


In our fast-paced digital world, the humble thumb drive remains a cornerstone of data portability. Whether you are a student carrying a thesis or a professional holding critical project files, the sudden failure of a storage device can feel like a minor catastrophe. When you need to repair USB drive errors, the stress usually comes from the fear of permanent data loss.
Fortunately, most USB issues are logical rather than physical. This means you can often fix the drive and get your files back using built-in Windows tools or specialized software. This comprehensive guide will walk you through everything from basic troubleshooting to advanced recovery techniques, ensuring you have the best chance of success.
Understanding Why Your USB Drive Failed
Before we dive into the “how-to,” we must understand the “why.” USB drives are essentially NAND flash memory chips soldered onto a circuit board. Unlike traditional hard drives, they have no moving parts, but they are susceptible to electronic wear, file system corruption, and physical damage.
Common symptoms that indicate you need to repair USB drive include:
- The PC recognizes the device but cannot open it.
- You receive a message saying, “You need to format the disk in drive X: before you can use it.”
- The drive shows up as “Unallocated” in Disk Management.
- Windows reports the “USB Device Not Recognized” error.
If you find that your computer isn’t detecting the device at all, it might be an issue with your hardware interface. You can check out this ultimate troubleshooting guide for USB ports to rule out your PC as the culprit.
Phase 1: Basic Troubleshooting and Quick Fixes
We always start with the simplest solutions. Many users jump straight to formatting, which wipes data, when a simple driver update or port swap could have solved the problem.
Step 1: Physical Inspection and Port Swapping
Check the USB connector for any debris, dust, or physical bends. A dirty contact can prevent a stable connection. Try plugging the drive into a rear USB port if you are using a desktop PC, as these are soldered directly to the motherboard and provide more consistent power.
Step 2: Use the Windows Hardware Troubleshooter
Windows has a built-in automated tool designed to find and fix common hardware issues.
- Open the Control Panel.
- Search for Troubleshooting in the top-right search bar.
- Click on Hardware and Sound and select Hardware and Devices.
- Follow the prompts to let Windows attempt an automatic repair.
Phase 2: Logical Fixes – How to Repair USB Drive via Software
When the hardware is fine but the data structure is scrambled, we move into logical repairs. This is the most common stage for users searching for how to repair USB drive solutions.
Using CHKDSK to Fix File System Errors
The “Check Disk” command is a powerful utility that can find and repair errors on the storage volume.
- Step 1: Press the Windows Key + S and type
cmd.
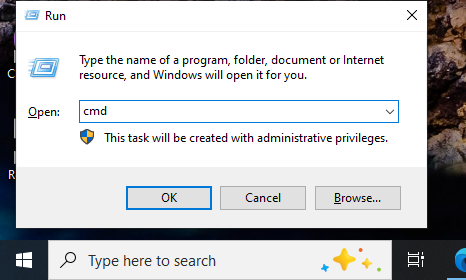
- Step 2: Right-click Command Prompt and select Run as Administrator.
- Step 3: Type the following command:
chkdsk X: /f(Replace X with the actual letter assigned to your USB drive). - Step 4: Press Enter. Windows will now scan the file system and attempt to fix bad sectors and directory errors.
Warning: While CHKDSK is effective, if your drive has physical bad sectors, running this command can sometimes lead to further data loss as it tries to move data away from damaged areas. Always try to back up what you can first.
Phase 3: USB Flash Memory Repair via Driver Reinstallation
Sometimes, the drive is perfectly healthy, but the “bridge” between the hardware and the OS (the driver) is corrupted. Performing a usb flash memory repair at the driver level often solves the “Device Not Recognized” error.
Step 1: Open Device Manager
Right-click the Start button and select Device Manager (or press devmgmt.msc in the Run dialog).
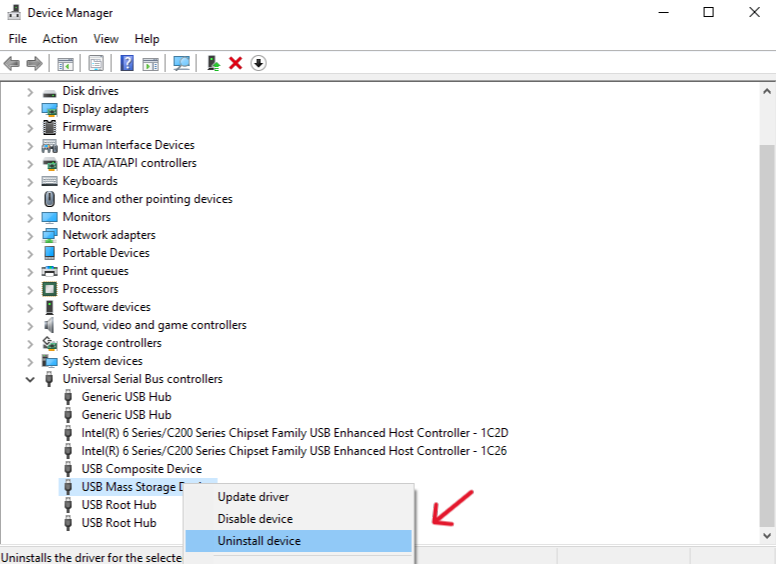
Step 2: Locate Universal Serial Bus controllers
Expand the section at the bottom of the list. Look for your USB drive. It might appear as “USB Mass Storage Device” or have a yellow exclamation mark next to it.
Step 3: Uninstall the Device
Right-click your USB device and select Uninstall device. Confirm the choice.
Step 4: Force a Reinstall
Unplug your USB drive and restart your computer. Once the desktop loads, plug the drive back in. Windows will automatically detect the hardware and install a fresh, clean driver.
Phase 4: Recovering Data with PandaOffice Drecov
If the steps above haven’t worked, or if the drive is asking you to format it, stop! Formatting will delete your files. Before you perform a destructive repair USB drive procedure, you must extract your data using a professional tool like PandaOffice Drecov.
Free Download Free Download⚠ Warning: Install it on a drive different from the one where your data was lost to prevent overwriting.
PandaOffice Drecov is a high-performance recovery engine designed to navigate corrupted partition tables and RAW file systems. Here is how to use it effectively:
Step 1: Select the Target Drive
Launch the software. On the main interface, you will see a list of available drives. Select your USB drive under the “External Devices” section.

Step 2: Deep Scan for Files
Click the Scan button. The software will perform two types of scans: a Quick Scan for recently deleted files and a Deep Scan, which looks for file signatures across the entire flash memory.
- Key Point: Let the scan reach 100% for the best results, especially if the drive is “RAW.”

Step 3: Preview and Filter
One of the best features of Drecov is the preview function. You can click on images, documents, or videos to see if they are intact before committing to a recovery. This saves time and ensures you are getting the right data.

Step 4: Secure Recovery
Select the files you wish to save and click Recover.
- Warning: Never save the recovered files back onto the same USB drive you are currently repairing. Choose a folder on your computer’s local hard drive or a different external disk.
For more detailed scenarios, such as accidentally hitting the delete key, see this guide on how to recover deleted files from USB drive.
Phase 5: Advanced Repair – Using DiskPart
If you have already recovered your data and the drive is still “Write Protected” or won’t format through the standard Windows UI, you need to use DiskPart. This is a “nuclear” option that wipes the partition structure to repair USB drive functionality from scratch.
Step 1: Enter the DiskPart Utility
Open Command Prompt as an administrator and type diskpart, then press Enter.
Step 2: Identify the Disk
Type list disk. Look for the disk number that matches your USB drive’s capacity (e.g., Disk 2 for a 32GB drive).
Step 3: Select and Clean
Type select disk N (Replace N with your disk number). Double-check this! Selecting the wrong disk will erase your computer’s hard drive. Once selected, type clean. This removes all partition information.
Step 4: Create a New Partition
Type the following commands in order:
create partition primaryformat fs=fat32 quick(orfs=ntfs quickfor drives larger than 32GB)assignexit
Your drive should now be visible and usable again in File Explorer.
Phase 6: Dealing with “RAW” File Systems
When a USB drive becomes “RAW,” it means the operating system no longer recognizes the file system (FAT32/exFAT/NTFS). This usually happens due to unsafe removal or a sudden power surge.
To learn more about fixing this specific state without losing your precious photos and documents, refer to this specialized article on how to repair corrupted USB flash drive without losing data.
Preventing Future USB Drive Failures
Now that you’ve learned how to repair USB drive issues, it’s vital to implement habits that prevent them from happening again.
- Always Eject Safely: Clicking “Safely Remove Hardware” ensures that all write operations are finished before power is cut.
- Avoid Public PCs: Malware is a leading cause of file system corruption.
- Check for Wear: Flash memory has a limited number of “write cycles.” If your drive is more than 5 years old and used daily, consider replacing it.
- Use High-Quality Brands: While cheap drives are tempting, brands like SanDisk, Samsung, and Kingston use higher-quality NAND chips that last longer.
Sometimes, a failing USB drive is a symptom of a larger OS issue. If your system is sluggish and failing to read devices correctly, you might consider a fresh start. You can learn how to reinstall Windows 10 from USB to optimize your PC’s performance and driver stability.
Summary Table: Which Repair Method Should You Use?
| Symptom | Recommended Tool | Complexity | Data Risk |
| Drive not showing up | Device Manager | Low | None |
| File system errors | CHKDSK | Medium | Low |
| Files are missing/RAW | PandaOffice Drecov | Medium | Safest |
| Write protected/Won’t format | DiskPart | High | Total Data Loss |
Frequently Asked Questions About USB Repair and Data Recovery
Navigating the complexities of flash storage can be tricky. To help you further master how to repair USB drive issues, we have compiled the five most common questions users ask when their portable storage fails.
1. Why does my computer say I need to format the disk before I can use it?
This is one of the most common signs of a corrupted file system. It typically occurs when the “Partition Table” or the “Boot Sector” of the drive is damaged due to unsafe removal or a sudden power spike.
- The Fix: Do not click “Format” if you have important files on the drive. Instead, use a tool like PandaOffice Drecov to extract your data first. Once your files are safe, you can proceed with the format to repair USB drive functionality.
2. Can I perform a usb flash memory repair if the drive is physically broken?
Physical damage—such as a bent USB connector or a cracked circuit board—cannot be fixed with software.
- The Fix: If the internal NAND flash chip is intact, a professional hardware recovery service can sometimes solder the chip onto a new board. However, for DIY users, software solutions only work if the computer can still “see” the device in Disk Management, even if it cannot open it.
3. Is it possible to repair USB drive errors without losing my data?
Yes, it is entirely possible. Many logical errors can be fixed using the chkdsk command or by updating drivers in the Device Manager. These methods target the communication between the OS and the device rather than the data itself. To be 100% safe, always run a scan with PandaOffice Drecov before attempting any “Write” operations (like fixing or formatting) on the drive.
4. What should I do if my USB drive shows “No Media” in Disk Management?
The “No Media” error is a bit more serious. It means the computer recognizes the USB controller, but it cannot communicate with the flash memory chip itself.
- Step 1: Try plugging the drive into a different computer to rule out port issues.
- Step 2: Check for driver updates.
- Step 3: If the error persists across multiple PCs, the flash chip may have reached the end of its life cycle, or a controller component has failed.
5. How do I fix a “Write Protected” USB drive?
When a drive becomes write-protected, you can read the files, but you cannot delete or add new ones. This is often a safety mechanism triggered by the drive when it detects a hardware failure.
- The Fix: You can attempt to clear this attribute using DiskPart.
- Open Command Prompt as Admin.
- Type
diskpart->list disk->select disk N. - Type
attributes disk clear readonly.
Conclusion
Learning how to repair USB drive errors is a vital skill in the digital age. By following the steps outlined—starting with simple driver updates, moving to professional recovery with PandaOffice Drecov, and finishing with deep-level formatting—you can save both your hardware and your data.
Remember, the moment you suspect a drive is failing, stop writing new data to it. Every new file saved reduces the chances of a successful recovery. Stay calm, follow the steps, and you’ll likely have your files back in no time.


