


Understanding Hardware Acceleration in Windows 11
Modern computers rely on both the central processing unit (CPU) and graphics processing unit (GPU) to handle tasks efficiently. Hardware acceleration is a technology that shifts specific workloads from the CPU to specialized hardware components, most commonly the GPU. In Windows 11, hardware acceleration is enabled by default in many applications, including web browsers, media players, productivity software, and communication tools.
The primary goal of hardware acceleration is to improve responsiveness and reduce CPU usage. By allowing the GPU to process graphics-intensive tasks, applications can deliver smoother animations, faster rendering, and improved multimedia performance.
However, hardware acceleration is not always beneficial. Some users encounter display glitches, browser crashes, screen flickering, high GPU utilization, or compatibility problems. In these situations, turning off hardware acceleration may improve stability.
Before changing any settings, it is important to understand how hardware acceleration functions and what consequences may result from disabling it. The answer often depends on your hardware configuration, driver quality, and workload requirements.
What Hardware Acceleration Does Behind the Scenes
When hardware acceleration is enabled, graphics-intensive operations are processed by the GPU instead of the CPU. These tasks can include:
- Video decoding
- Image rendering
- 3D graphics
- Browser animations
- Visual effects
- Presentation rendering
The GPU is specifically designed to process large numbers of visual calculations simultaneously, making it far more efficient than the CPU for these operations.
How Windows 11 Uses GPU Resources
Windows 11 incorporates GPU acceleration throughout the operating system. Common examples include:
- Desktop visual effects
- Window animations
- Hardware-accelerated GPU scheduling
- Browser rendering engines
- Office graphics rendering
As a result, users often experience smoother performance and lower processor utilization during demanding tasks.
Applications That Commonly Use Hardware Acceleration
Many popular applications use hardware acceleration by default:
- Google Chrome
- Microsoft Edge
- Microsoft Office
- Adobe Creative Cloud applications
- Discord
- Zoom
- Video editing software
Although these applications benefit from GPU acceleration, compatibility issues can occasionally occur.
What Does Turning Off Hardware Acceleration Do?
One of the most common questions users ask is what does turning off hardware acceleration do. The answer depends on the application and workload involved.
Disabling hardware acceleration forces software to rely primarily on the CPU rather than the GPU. As a result, graphics rendering and multimedia processing become software-based instead of hardware-assisted.
For some systems, this change improves stability. For others, performance may decrease.
Changes in CPU and GPU Workload Distribution
When hardware acceleration is enabled:
- GPU usage increases
- CPU usage decreases
- Visual rendering becomes more efficient
When disabled:
- CPU workload increases
- GPU workload decreases
- Software rendering becomes responsible for graphics processing
This shift can significantly alter system behavior.
How Disabling Hardware Acceleration Affects Performance
Performance effects vary based on hardware capability.
On newer systems:
- Video playback may remain smooth
- Browsing performance may show little difference
- Battery consumption may increase slightly
On older systems:
- Applications may become slower
- Video playback may stutter
- Interface responsiveness may decrease
This is why there is no universal answer regarding should hardware acceleration be on or off.
Impact on Video Playback, Gaming, and Productivity Apps
Different workloads respond differently to hardware acceleration changes.
For example:
- Web browsers may become more stable
- Video editing software may render slower
- Games typically perform worse
- Office applications may eliminate display glitches
Users troubleshooting visual problems often find that disabling hardware acceleration resolves symptoms without requiring major system changes.
Situations Where Turning Off Hardware Acceleration Helps
Disabling acceleration may help when experiencing:
- Screen flickering
- Browser crashes
- Black screens
- Video playback errors
- Driver-related instability
- Rendering artifacts
In these situations, reducing reliance on GPU acceleration can improve reliability.
⚠️ Warning: Disabling hardware acceleration may reduce performance in graphics-intensive applications.
Should Hardware Acceleration Be On or Off? Key Factors to Consider
Another frequently asked question is should hardware acceleration be on or off.
There is no single answer because hardware environments vary significantly.
Performance Benefits for Modern Hardware
Modern GPUs are optimized for accelerated rendering.
Benefits include:
- Reduced CPU workload
- Better multitasking
- Smoother visual effects
- Faster video processing
- Improved browser responsiveness
Users with updated graphics drivers and modern hardware generally benefit from leaving acceleration enabled.
Common Problems Caused by Hardware Acceleration
Despite its advantages, hardware acceleration can cause issues.
Examples include:
- Browser freezing
- Graphical corruption
- Laggy video playback
- Application crashes
- Screen tearing
These problems often occur when graphics drivers contain bugs or lack compatibility with specific software versions.
Compatibility Issues With Older GPUs
Older graphics cards may struggle with newer acceleration technologies.
Potential issues include:
- Incomplete driver support
- Rendering failures
- Excessive GPU utilization
- Visual distortions
In such situations, turning off hardware acceleration may produce better results.
Signs You Should Disable Hardware Acceleration
Consider disabling acceleration if you notice:
- Frequent browser crashes
- Random application freezes
- Display artifacts
- Video playback instability
- Persistent screen flickering
Testing with acceleration disabled can help determine whether the GPU is contributing to the issue.
Signs You Should Keep Hardware Acceleration Enabled
Leave acceleration enabled if:
- Applications run smoothly
- GPU drivers are updated
- Video playback is stable
- Performance meets expectations
Disabling acceleration without a specific reason may reduce efficiency unnecessarily.
Methods for Turning Off Hardware Acceleration in Windows 11
Method 1: Disable Hardware Acceleration Through Windows Graphics Settings
Test Environment
- Windows 11 23H2
- NVIDIA RTX 4060
- Intel UHD Graphics
- 16GB RAM
Windows 11 includes several graphics-related settings that influence GPU behavior.
Step-by-Step Instructions
- Open Settings.
- Select System.
- Click Display.
- Scroll to Graphics.
- Review available graphics preferences.
- Access advanced graphics settings.
- Modify hardware acceleration-related options if available on your system.
- Restart the computer.
How Graphics Settings Affect Hardware Acceleration
These settings control how Windows prioritizes graphics processing resources.
Adjusting them may:
- Improve compatibility
- Reduce GPU-related crashes
- Change rendering behavior
Verifying the Changes
After restarting:
- Monitor application stability.
- Test video playback.
- Observe browser responsiveness.
Successful configuration changes often eliminate visual glitches.
Method 2: Turn Off Hardware Acceleration in Microsoft Edge
Test Environment
- Windows 11 Home
- Microsoft Edge Stable Channel
Microsoft Edge uses GPU acceleration for rendering websites, videos, and animations.
Steps to Disable Hardware Acceleration
- Open Edge.
- Click the menu button.
- Open Settings.
- Navigate to System and Performance.
- Locate the hardware acceleration option.
- Disable it.
- Restart the browser.
When Browser Hardware Acceleration Causes Problems
Users frequently disable acceleration when encountering:
- Video playback errors
- Browser crashes
- Screen flickering
- Unexpected rendering behavior
Testing Browser Performance After Changes
After restarting Edge:
- Visit video streaming websites.
- Open multiple tabs.
- Monitor resource consumption.
If stability improves, the GPU acceleration feature may have been contributing to the problem.
Method 3: Disable Hardware Acceleration in Google Chrome
Test Environment
- Windows 11 Pro
- Chrome Stable Release
- NVIDIA and AMD graphics platforms
Chrome also relies heavily on GPU acceleration.
Chrome Settings Walkthrough
- Open Chrome.
- Select Settings.
- Navigate to System.
- Find the hardware acceleration option.
- Disable the setting.
- Relaunch Chrome.
Common Display and Video Issues Resolved
Users often report improvements in:
- YouTube playback
- Video conferencing performance
- Tab stability
- Screen rendering consistency
Restart Requirements and Verification
Chrome requires a restart before the changes take effect.
Verify success by:
- Opening chrome://gpu
- Testing multimedia content
- Monitoring browser responsiveness
⚠️ Warning: Some browser-based graphics features may perform slower after hardware acceleration is disabled.
Method 4: Turn Off Hardware Acceleration in Microsoft Office
Test Environment
- Windows 11 Pro 23H2
- Microsoft 365 Apps for Enterprise
- Intel Iris Xe Graphics
- 16GB RAM
Microsoft Office applications such as Word, Excel, and PowerPoint use graphics acceleration to improve rendering speed and visual performance. While this feature generally works well, some users encounter display glitches, screen flashing, blurry text, or application instability.
Steps for Word, Excel, and PowerPoint
- Open any Office application.
- Click File.
- Select Options.
- Open the Advanced tab.
- Scroll to the Display section.
- Enable Disable hardware graphics acceleration.
- Save the settings.
- Restart the Office application.
Why Office Rendering Problems Occur
Office applications frequently display:
- Flickering menus
- Black boxes
- Blurry fonts
- Crashes during presentations
These issues are often related to GPU driver compatibility rather than Office itself.
Performance Considerations
Most users notice little difference in document editing performance after disabling hardware acceleration. However, large PowerPoint presentations containing animations and multimedia may render slightly slower.
Method 5: Modify Registry Settings to Disable Hardware Acceleration
Test Environment
- Windows 11 Pro
- Administrator Account
- Latest Windows Updates Installed
Some applications do not provide a built-in option for disabling hardware acceleration. In such cases, advanced users may use the Windows Registry to modify specific graphics settings.
Registry Backup Before Changes
Before editing the registry:
- Press Windows + R.
- Type regedit.
- Open Registry Editor.
- Select File > Export.
- Save a backup copy.
This allows you to restore previous settings if necessary.
Registry Editing Procedure
Depending on the software involved, registry paths may vary. Consult official documentation before making changes.
General process:
- Open Registry Editor.
- Locate the relevant graphics-related key.
- Create or modify the required value.
- Save changes.
- Restart the system.
Confirming Successful Configuration
After rebooting:
- Test the affected application.
- Monitor stability.
- Verify whether visual artifacts have disappeared.
⚠️ Warning: Incorrect registry modifications can lead to software malfunctions. Always create a backup first.
Method 6: Update Graphics Drivers Before Disabling Hardware Acceleration
Test Environment
- Windows 11 Home and Pro
- NVIDIA, AMD, and Intel GPUs
Many users immediately begin turning off hardware acceleration when problems appear. However, outdated graphics drivers are often the actual cause.
Checking Driver Versions
To verify your current driver:
- Right-click Start.
- Open Device Manager.
- Expand Display Adapters.
- Open your graphics device properties.
- Review the Driver tab.
Installing Updated Graphics Drivers
You can obtain drivers from:
- Windows Update
- GPU manufacturer websites
- Official system manufacturer support pages
Always download drivers from trusted sources.
When Driver Updates Solve Acceleration Issues
Driver updates frequently resolve:
- Screen flickering
- Rendering errors
- Browser crashes
- Video playback problems
- GPU instability
Many users discover they no longer need to disable acceleration after installing updated drivers.
Method 7: Recover Files After Crashes Related to Hardware Acceleration Using PandaOffice Drecov
Test Environment
- Windows 11 23H2
- SSD and HDD storage devices
- Systems experiencing application crashes
In rare situations, GPU-related crashes can result in unsaved documents, corrupted files, or lost project data.
How Display Crashes Can Lead to Data Loss
Potential scenarios include:
- Application freezes during editing
- Unexpected system restarts
- Driver crashes while saving files
- Blue screen errors triggered by graphics drivers
When this occurs, file recovery may become necessary.
Steps to Recover Lost Files
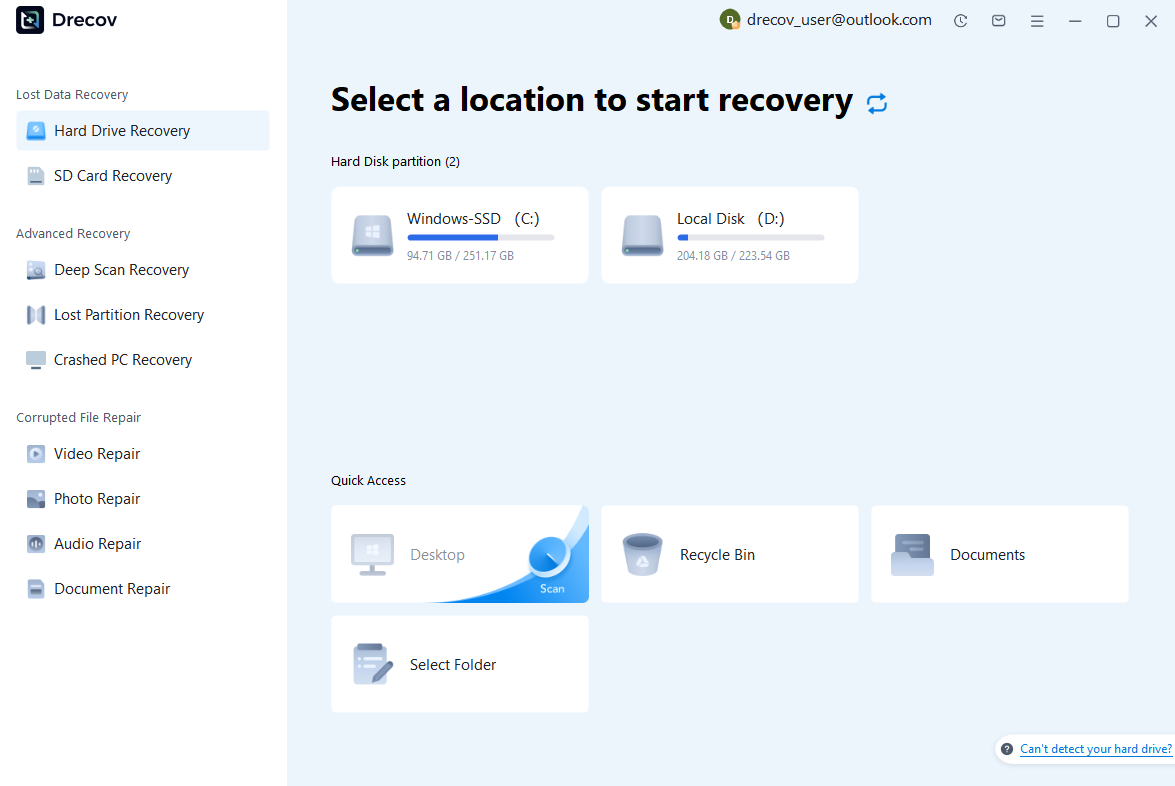
Step 1: Scan the Storage Device (SD Card / Hard Drive / USB)
Connect your device (SD card, HDD/SSD, or USB drive) to your computer and launch PandaOffice Drecov. Select the target device and start the scan. The software will perform a quick scan and deep scan to detect lost or deleted data.
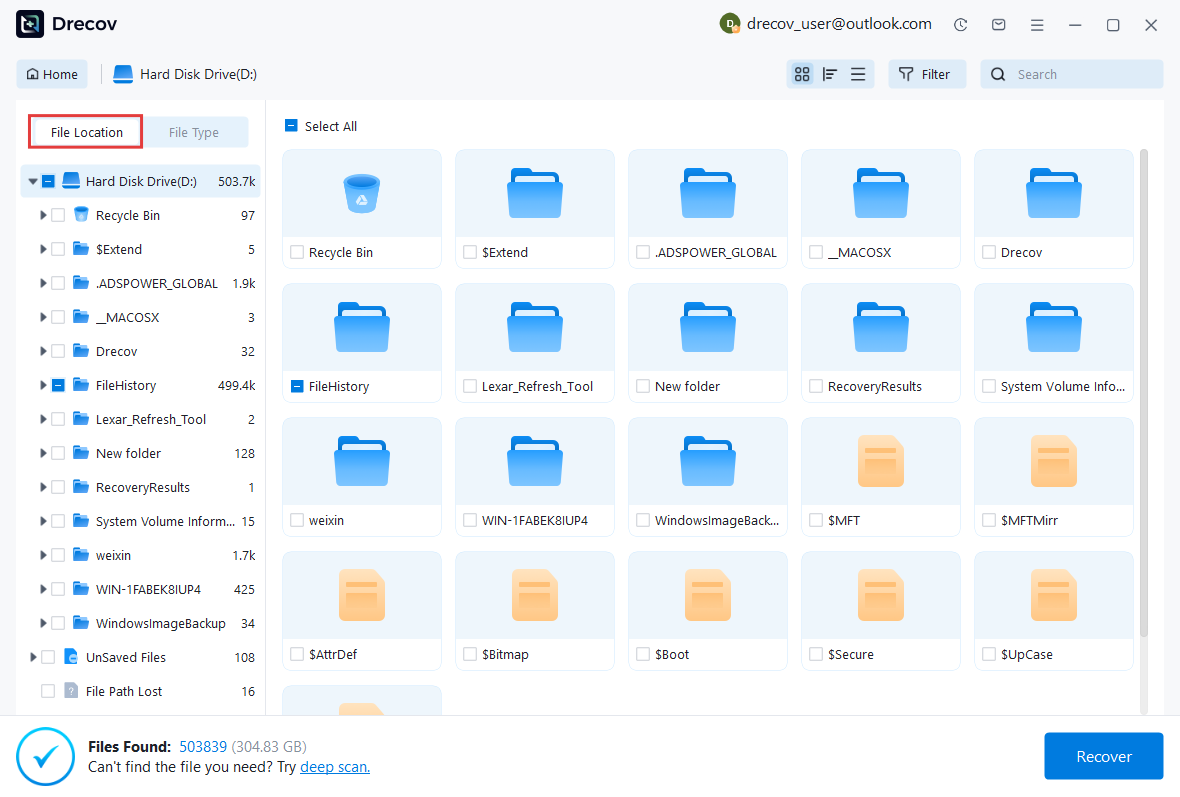
Step 2: Locate and Preview Lost Files
After scanning, browse the detected files and use the preview feature to check recoverable data. You can preview documents (Word, Excel, PDF), photos, and videos to ensure file integrity before recovery.
Step 3: Recover and Save to a New Location
Select the files you want to restore and click recover. Save all recovered data to a different drive or location (not the original device) to avoid overwriting lost data.

Why Choose PandaOffice Drecov Recovery Software?
PandaOffice Drecov offers a fast, secure, and user-friendly solution for recovering lost files across multiple scenarios. Whether you need email recovery, ZIP File Recovery, format data recovery, or help to recover deleted drafts Outlook, the software provides reliable recovery performance for both personal and business users.
PandaOffice Drecov supports recovery from formatted hard drives, SSDs, USB drives, SD cards, and external storage devices. Its advanced scanning engine can locate deleted archives, damaged ZIP files, lost Outlook drafts, and accidentally removed documents with high accuracy. For users searching for how to find deleted messages in Teams, PandaOffice Drecov can also help recover exported chat files, attachments, and related local cache data when available.
Key advantages include:
- Deep scan technology for complex data loss situations
- Support for emails, archives, videos, photos, and office documents
- Recovery from accidental deletion, formatting, corruption, and system crashes
- Easy preview before restoring files
- Compatible with Windows and multiple storage devices
Unlike complicated enterprise recovery tools, PandaOffice Drecov keeps the recovery process simple. Users can scan, preview, and restore files in just a few steps without technical expertise.
Whether you are dealing with lost Outlook drafts, corrupted ZIP archives, formatted drives, or missing communication data, PandaOffice Drecov provides an efficient and practical recovery experience designed to minimize downtime and protect important files.
Disk imaging ensures that even partially corrupted drives can be preserved. This is often the safest approach before attempting any aggressive repair operations for fix bad sectors on hard drive situations.
Best Practices During Recovery
For the highest recovery success rate:
- Stop writing new data to the drive.
- Recover files as soon as possible.
- Save restored files to another storage location.
⚠️ Warning: Continuing to use the affected drive heavily may overwrite recoverable data.
Advanced Troubleshooting for Hardware Acceleration Issues
When standard methods fail, advanced troubleshooting can help identify the root cause.
Check GPU Compatibility and Feature Support
Not all graphics hardware supports the latest acceleration technologies.
Factors to evaluate include:
- GPU generation
- DirectX support
- Driver availability
- Manufacturer compatibility updates
Older graphics hardware may struggle with newer Windows 11 rendering technologies.
Monitor GPU Usage With Task Manager
Task Manager provides valuable information regarding graphics utilization.
To monitor GPU activity:
- Open Task Manager.
- Select the Performance tab.
- Choose GPU.
- Observe utilization levels during problem scenarios.
Abnormally high usage may indicate software conflicts or driver issues.
Review Windows Event Viewer Logs
Event Viewer can reveal hidden error messages.
Useful log categories include:
- Application Errors
- System Events
- Display Driver Warnings
- Hardware Events
Repeated display-related errors often identify the source of instability.
Perform a Clean Graphics Driver Installation
Sometimes standard updates do not fully remove corrupted driver files.
A clean installation typically involves:
- Removing existing drivers.
- Restarting Windows.
- Installing the latest driver package.
- Rebooting the system.
This process can eliminate persistent graphics-related issues.
Identify Software Conflicts Causing Display Problems
Certain software categories are known to interfere with hardware acceleration:
- Screen recording tools
- Overlay applications
- GPU monitoring software
- Third-party visual customization tools
Temporarily disabling these applications can help isolate the problem.
Frequently Asked Questions About Turning Off Hardware Acceleration
What Does Turning Off Hardware Acceleration Do in Windows 11?
It shifts rendering tasks from the GPU to the CPU. This can improve stability in some applications but may reduce graphics performance in others.
Should Hardware Acceleration Be On or Off for Gaming?
Most gamers should leave hardware acceleration enabled. Modern games are designed to utilize GPU resources extensively. Disabling acceleration can significantly reduce performance.
Can Disabling Hardware Acceleration Improve Browser Stability?
Yes. Browser crashes, screen flickering, video playback issues, and rendering glitches are common reasons users disable hardware acceleration in Chrome or Edge.
Will Turning Off Hardware Acceleration Reduce GPU Usage?
Generally, yes. GPU workload decreases because more rendering operations are handled by the CPU instead.
Does Hardware Acceleration Affect Battery Life?
It can. Depending on the workload, disabling acceleration may increase CPU usage, which can sometimes reduce battery efficiency on laptops.
Can Hardware Acceleration Cause Screen Flickering?
Yes. Driver incompatibilities and GPU rendering conflicts can occasionally produce flickering screens, visual artifacts, or display corruption.
Should I Disable Hardware Acceleration on Older Computers?
If an older system experiences graphical issues, testing with acceleration disabled may be worthwhile. However, results vary depending on hardware specifications and driver support.
Why Does My Browser Crash When Hardware Acceleration Is Enabled?
Browser crashes often stem from GPU driver conflicts, unsupported rendering features, or corrupted browser profiles. Updating drivers should be attempted before disabling acceleration permanently.
Conclusion: Choosing the Right Hardware Acceleration Settings
Hardware acceleration is designed to improve performance by allowing specialized hardware to process graphics-intensive tasks more efficiently. For many users, it delivers smoother animations, better multimedia playback, and reduced CPU usage.
However, hardware acceleration is not universally beneficial. Graphics driver bugs, software conflicts, and compatibility limitations can create unexpected problems. This is why many users ask what does turning off hardware acceleration do and should hardware acceleration be on or off when troubleshooting system instability.
The best approach is to evaluate your specific situation. If applications perform normally, leaving hardware acceleration enabled is generally recommended. If you encounter crashes, flickering, rendering issues, or browser instability, testing with acceleration disabled can help identify whether the GPU is contributing to the problem.
Key Takeaways
- Hardware acceleration shifts workloads from the CPU to the GPU.
- Modern hardware usually benefits from acceleration.
- Browser crashes and display glitches may be resolved by disabling acceleration.
- Update graphics drivers before changing acceleration settings.
- Registry modifications should only be performed carefully.
- PandaOffice Drecov can assist with recovering files lost after system or application crashes.
- There is no universal answer to whether acceleration should be enabled or disabled; results depend on hardware and workload requirements.
By understanding how hardware acceleration works and applying the appropriate troubleshooting techniques, Windows 11 users can achieve a balance between performance, stability, and compatibility.


