


Introduction to Formatting a Hard Drive in Windows 7
What Does It Mean to Format a Drive?
Formatting a storage device removes existing data and prepares the drive for use with a file system such as NTFS or FAT32. Many users search for ways to format hard drive Windows 7 when reinstalling the operating system, fixing disk errors, or preparing a secondary drive for storage.
When you format disk drive Windows 7, the process rebuilds the file allocation structure so the operating system can read and write files properly. Depending on the formatting option selected, the process may perform a quick cleanup or a deeper overwrite operation.
A formatted drive can improve compatibility, eliminate corruption, and solve certain boot issues. However, formatting also deletes files, applications, and partitions if performed incorrectly.
⚠️Warning: Formatting permanently removes stored files unless they are recovered using specialized recovery software afterward.
Common Reasons People Format HDDs in Windows 7
There are several situations where users may need to format hard disk drive Windows 7 systems:
- Removing viruses or malware
- Preparing a used drive for reuse
- Fixing RAW or inaccessible partitions
- Installing Windows again
- Changing file systems
- Clearing personal data before selling a PC
Some users also need to format HDD for Windows 7 after upgrading hardware or replacing a damaged drive. External hard drives and USB storage devices may also require formatting for compatibility with older Windows environments.
Things to Know Before You Format a Hard Drive
Understand Quick Format vs Full Format
Before learning how to format hard drive Windows 7, it is important to understand the two primary formatting types.
A quick format removes the file table but does not fully erase stored data. This option is much faster and commonly used for healthy drives.
A full format scans the disk for bad sectors while rebuilding the file system. Although slower, it is more effective for damaged or corrupted drives.
Typical differences include:
| Feature | Quick Format | Full Format |
|---|---|---|
| Speed | Fast | Slow |
| Error Checking | No | Yes |
| Data Recovery Possibility | Higher | Lower |
| Recommended For | Healthy drives | Problematic drives |
If the drive contains errors or suspicious behavior, a full format is generally safer.
⚠️Warning: Avoid interrupting a full format process because sudden shutdowns may damage partitions further.
Backup Important Files Before Formatting
Anyone asking “how do I format a hard drive in Windows 7” should first create a complete backup.
Formatting deletes:
- Photos
- Documents
- Installed software
- Videos
- Saved games
- Emails
You can back up data using:
- External hard drives
- Cloud storage
- USB flash drives
- Network storage systems
For system drives, creating a Windows system image is highly recommended. This allows restoration if formatting or installation fails later.
Test Environment:
- Windows 7 Ultimate 64-bit
- Seagate 1TB HDD
- NTFS file system
- Dell Inspiron desktop
Methods to Format a Hard Drive in Windows 7
Method 1: Format a Drive Using Windows Explorer
One of the simplest ways to format disk drive Windows 7 is through Windows Explorer. This method works well for external drives and secondary partitions.
Steps to Format Through Explorer
- Click the Start menu
- Open “Computer”
- Right-click the target drive
- Select “Format”
- Choose NTFS or FAT32
- Enable or disable Quick Format
- Click “Start”
Windows will begin the formatting process immediately.
This approach is ideal for:
- USB drives
- External HDDs
- Non-system partitions
However, it cannot format the active system partition currently running Windows.
Test Environment:
- Windows 7 Professional
- WD Blue 500GB HDD
- USB external enclosure
- NTFS formatting
⚠️Warning: Double-check the selected drive letter before clicking Start.
Method 2: Use Disk Management to Format HDD
Disk Management offers more advanced control when users need to format hard drive Windows 7 systems.
Steps to Format Through Disk Management
- Press Windows + R
- Type
diskmgmt.msc - Press Enter
- Locate the target disk
- Right-click the partition
- Choose “Format”
- Select allocation settings
- Confirm formatting
Disk Management can also:
- Delete partitions
- Create new volumes
- Change drive letters
- Initialize new disks
This method is especially useful for newly installed hard drives that do not yet appear in File Explorer.
Test Environment:
- Windows 7 Home Premium
- Samsung 2TB HDD
- GPT partition style
- NTFS file system
Method 3: Format a Hard Drive Using Command Prompt
Advanced users often prefer Command Prompt because it offers greater flexibility.
Use Diskpart to Format the Drive
Follow these steps carefully:
- Open Command Prompt as administrator
- Type
diskpart - Enter
list disk - Select the target disk:
select disk X - Type
clean - Create partition:
create partition primary - Format the drive:
format fs=ntfs quick - Assign drive letter:
assign
This process is effective when graphical tools fail or when drives become inaccessible.
Users searching for how do I format a hard drive Windows 7 frequently rely on Diskpart for stubborn storage devices.
Test Environment:
- Windows 7 Enterprise
- Toshiba 750GB HDD
- SATA internal connection
- NTFS quick format
⚠️Warning: Using the wrong disk number inside Diskpart may erase the wrong drive completely.
Method 4: Format the System Drive During Windows 7 Installation
If you need to reinstall Windows entirely, formatting during setup is often the best solution.
How to Format During Installation
- Insert the Windows 7 installation DVD or bootable USB
- Restart the computer
- Boot from installation media
- Select language and keyboard settings
- Click “Install Now”
- Choose “Custom Installation”
- Select the target partition
- Click “Drive Options”
- Select “Format”
This method is ideal for:
- Removing corrupted operating systems
- Eliminating malware
- Starting with a clean installation
Formatting the system partition during installation ensures Windows files are replaced properly.
Test Environment:
- Windows 7 Ultimate ISO
- Kingston SSD
- Legacy BIOS mode
- NTFS formatting
How to Recover Files After Accidental Formatting
Recover Lost Data with PandaOffice Drecov Recovery
Sometimes users accidentally format HDD for Windows 7 without backing up important data first. In such situations, professional recovery software may help retrieve deleted files before they are overwritten.
One useful solution is PandaOffice Drecov. The software supports recovery from:
- Formatted hard drives
- Deleted partitions
- USB flash drives
- SD cards
- External storage devices
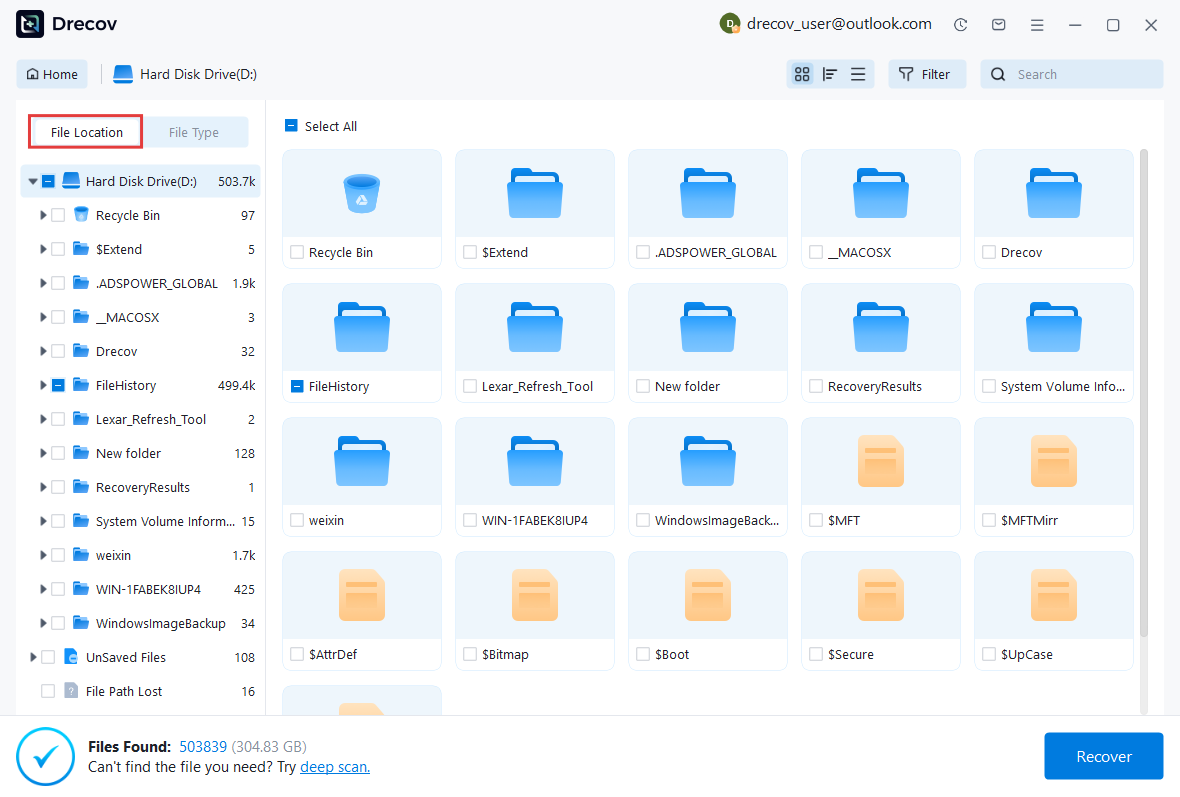
Steps to Recover Data
- Install the software on another drive
- Launch the recovery program
- Select the formatted partition
- Start scanning
- Preview recoverable files
- Restore files to a safe location
The software supports common formats including photos, videos, Office documents, and archives.
Test Environment:
- Windows 7 Professional
- Formatted WD external HDD
- NTFS partition
- Deep scan enabled


Why Choose PandaOffice Drecov Data Recovery Software?
When it comes to reliable data recovery, PandaOffice Drecov stands out as a powerful, all-in-one solution designed to handle a wide range of data loss scenarios. Whether you’re trying to perform TikTok deleted video recovery, restore files after formatting, or recover important documents, Drecov delivers fast and dependable results.
One of its biggest advantages is versatility. From format data recovery to lost partition recovery, the software can scan deeply and accurately locate files that other tools often miss. Even if your drive has been accidentally formatted or a partition has disappeared, Drecov uses advanced algorithms to reconstruct and retrieve your data with high success rates.
Drecov also supports specialized recovery needs. If you’ve lost important documents, its PDF recovery tool ensures that files retain their original structure and quality. For media users, the audio recovery feature helps restore music, recordings, and other sound files without corruption, making it ideal for both personal and professional use.
Ease of use is another key benefit. The intuitive interface allows beginners to recover files in just a few clicks, while still offering advanced options for more experienced users. Plus, it supports a wide range of storage devices, including HDDs, SSDs, USB drives, and memory cards.
In short, PandaOffice Drecov combines powerful recovery capabilities with user-friendly design, making it a trusted choice for anyone facing data loss.
⚠️Warning: Avoid saving recovered files back onto the formatted drive to prevent overwriting recoverable data.
Fix Common Formatting Problems in Windows 7
Drive Cannot Be Formatted
Sometimes Windows displays errors such as:
- Windows was unable to complete the format
- The drive is write-protected
- Disk format failed
Possible causes include:
- File system corruption
- Bad sectors
- Drive encryption
- Hardware failure
- Active processes using the drive
Solutions include:
- Running CHKDSK
- Using Diskpart
- Removing write protection
- Restarting Windows
- Updating storage drivers
If formatting repeatedly fails, the drive itself may be physically damaged.
Test Environment:
- Windows 7 64-bit
- Hitachi 1TB HDD
- SATA interface
- Corrupted NTFS partition
RAW Drive Issues Before Formatting
A RAW partition appears when Windows cannot recognize the existing file system. Many users decide to format hard disk drive Windows 7 systems after encountering RAW errors.
Symptoms include:
- “You need to format the disk before use”
- Missing file system
- Inaccessible drive
- Capacity showing incorrectly
Possible causes:
- Improper removal
- Sudden shutdowns
- Malware
- Partition corruption
In many cases, recovering files before formatting is safer.
⚠️Warning: Formatting a RAW drive immediately may reduce recovery success if important data still exists.
FAQ About Formatting Hard Drives in Windows 7
Can I Format Only One Partition Without Affecting Others?
Yes. Windows 7 allows individual partitions to be formatted separately. Formatting one volume will not erase data stored on another partition unless the wrong drive is selected accidentally.
Which File System Should I Choose?
NTFS is generally recommended for Windows 7 because it supports:
- Large files
- Better security
- Disk permissions
- Improved stability
FAT32 is mainly useful for compatibility with older devices.
How Long Does Formatting Take?
The duration depends on:
- Drive size
- HDD or SSD type
- Quick vs full format
- Disk condition
A quick format may finish in under a minute, while a full format on large drives may require several hours.
Can Formatting Remove Viruses?
Yes, formatting often removes malware stored on the partition. However, advanced infections may remain in boot sectors or connected backup devices.
Is Formatting the Same as Deleting Files?
No. Deleting files removes selected data, while formatting rebuilds the entire file system structure.
Conclusion
Learning how to format hard drive Windows 7 is useful for troubleshooting storage problems, reinstalling Windows, and preparing drives for reuse. Whether you use Windows Explorer, Disk Management, Command Prompt, or the Windows installation process, each method offers different advantages depending on the situation.
Users who need to format disk drive Windows 7 environments should always back up important files first and verify the correct drive before starting. Understanding the differences between quick and full formats can also help prevent future issues.
If important files are lost accidentally after you format HDD for Windows 7, recovery software such as PandaOffice D-Back Recovery may help retrieve data before it becomes permanently overwritten.
By following proper formatting procedures and safety precautions, you can manage storage devices in Windows 7 more effectively while minimizing the risk of unexpected data loss.


