


Reinstalling Windows 10 from a USB drive is one of the most empowering things you can do as a PC user. Whether your system is acting sluggish, suffering from persistent errors, or simply cluttered with apps and files you no longer want—starting fresh with a USB installation can feel like giving your computer a brand-new lease on life. This guide walks you through everything from preparing the media to post-installation tasks so you can achieve a smooth and successful Windows reinstall with confidence.
Why You Might Want to Reinstall Windows 10
There are plenty of reasons someone might want to reinstall Windows 10 from USB. Maybe your PC has become painfully slow because of junk files, conflicted drivers, or malware. Perhaps a critical update failed and now your system won’t boot properly. In other cases, you might just want a clean slate to start fresh without old remnants of software slowing you down.
Reinstalling helps in all of these scenarios because it either repairs or replaces corrupted system files with fresh copies from official installation media—giving you a clean environment that often performs better and more reliably than before. By choosing to reinstall Windows 10 from USB, you ensure that the source files are untainted by any local disk corruption.
What You Need Before You Begin
Before diving in, there are a few essentials you’ll need—and a couple of recommended preparation steps to ensure you don’t lose anything important.
USB Flash Drive Requirements
To reinstall Windows 10 from USB, you’ll need a USB flash drive with at least 8 GB of storage. This drive will become your Windows installation media—a tool that contains everything needed to install or reinstall the operating system. Anything currently on the USB drive will be erased during the creation process, so keep that in mind when choosing which drive to use.
Backing Up Your Data
Reinstalling Windows can remove all your personal files and apps unless you specifically choose an option to keep them. That’s why backing up your important data first is absolutely critical. Consider copying your documents, photos, music, and other files to another USB drive, external hard disk, or cloud service like OneDrive or Google Drive before continuing. Having a backup removes the fear of losing precious files and gives you peace of mind to proceed.
Checking Your Windows Activation Status
Windows 10 activation is often tied to your device’s hardware. If your digital license is linked to your Microsoft account, Windows will usually reactivate automatically once you go online after reinstalling. Checking and linking your license beforehand is wise, especially if you’ve changed major hardware like a motherboard. You can verify this in Settings > Update & Security > Activation.
Creating a Bootable Windows 10 USB Drive
Now let’s create the USB installation media—the heart of the process to reinstall Windows 10 from USB.
Using Microsoft’s Media Creation Tool
Microsoft offers an official utility called the Media Creation Tool that simplifies creating a bootable Windows 10 USB.
- Step 1: Visit the official Microsoft download page.
- Step 2: Click “Download tool now” and run the .exe file.
- Step 3: Accept the license terms and select “Create installation media (USB flash drive, DVD, or ISO file) for another PC”.
Choosing Edition, Language & Architecture
As part of creating the USB media, you’ll be asked to select your desired language, edition (Home, Pro, etc.), and architecture (64-bit or 32-bit). Most modern systems run 64-bit (x64). Using the recommended options for the current PC is usually the safest bet. Choosing the correct settings ensures your USB installer matches the version of Windows 10 you intend to reinstall, which also helps avoid activation problems later.
Formatting the USB Drive Appropriately
During the creation process, the tool will ask you to select your USB drive.
Warning: All existing data on the USB drive is wiped at this stage.
The tool automatically formats the USB with the necessary system files so your computer can read it during startup. Always make sure you’ve chosen the correct drive letter before confirming because this step is irreversible. Once the process finishes, you are ready to reinstall Windows 10 from USB.
How to Boot From Your USB Installer
Once your USB drive is ready, the next step is telling your computer to boot from it instead of your usual hard drive or SSD.
Using the One-Time Boot Menu
Many desktops and laptops feature a one-time boot menu.
- Step 1: Plug the USB into the PC you wish to reinstall.
- Step 2: Restart the PC and immediately tap the boot menu key. Common keys include F12, F11, F10, or ESC.
- Step 3: Select the USB flash drive (it might be listed as “UEFI: [USB Name]”) from the list and press Enter.
Adjusting BIOS/UEFI Boot Order
If your system doesn’t show a one-time boot menu, you’ll need to enter the BIOS settings.
- Step 1: Restart your PC and tap the BIOS key (usually F2, Del, or F1).
- Step 2: Navigate to the “Boot” tab using your arrow keys.
- Step 3: Change the boot priority so that the USB Storage Device is at the top of the list.
- Step 4: Save changes and exit (usually F10). Your system should restart and begin loading Windows setup from the USB.
Reinstalling Windows 10 — Step by Step
Now we’re at the heart of the matter: the actual procedure to reinstall Windows 10 from USB.
Clean Installation (Erase Everything)
A clean install removes all existing data, apps, and settings. This is ideal if you want maximum performance improvement.
- Step 1: Once the Windows Setup screen appears, select your language and keyboard layout, then click “Next” and “Install Now”.

- Step 2: If asked for a product key, click “I don’t have a product key” (it will reactivate later).
- Step 3: Choose “Custom: Install Windows only (advanced)”. This is the key path to a fresh start.
Reinstall Windows with USB without losing data
If you prefer to reinstall Windows with USB without losing data, there is a specific way to handle this during the setup phase.
- Step 1: Boot from the USB as described previously.
- Step 2: Instead of choosing “Custom,” you can attempt the “Upgrade” option if you are running the setup from a working Windows desktop.
- Step 3: If you are booting from the USB because Windows won’t start, select the partition where Windows is currently installed and click Next without formatting it.
- Step 4: Windows will provide a notification stating that your old files will be moved to a folder named Windows.old. This allows you to reinstall Windows 10 from USB while keeping your documents accessible in that specific directory.
During the Windows Setup Process
Choosing Custom vs Upgrade
During setup, you’ll be prompted to choose between installation types. Custom installation is best when you’re booting from USB for a fresh start, while Upgrade installation typically occurs if you’re running setup within Windows and want to repair or refresh without a full wipe. Each path has trade-offs: Custom gives the cleanest start but wipes data, while Upgrade is safer for data retention but may not clear deep system problems.
Partition Management Explained
In a clean install, you’ll see a list of your storage partitions.
- Step 1: Identify the partitions on your primary Drive (usually “Drive 0”).
- Step 2: Select each partition on that drive and click “Delete” until only “Drive 0 Unallocated Space” remains.
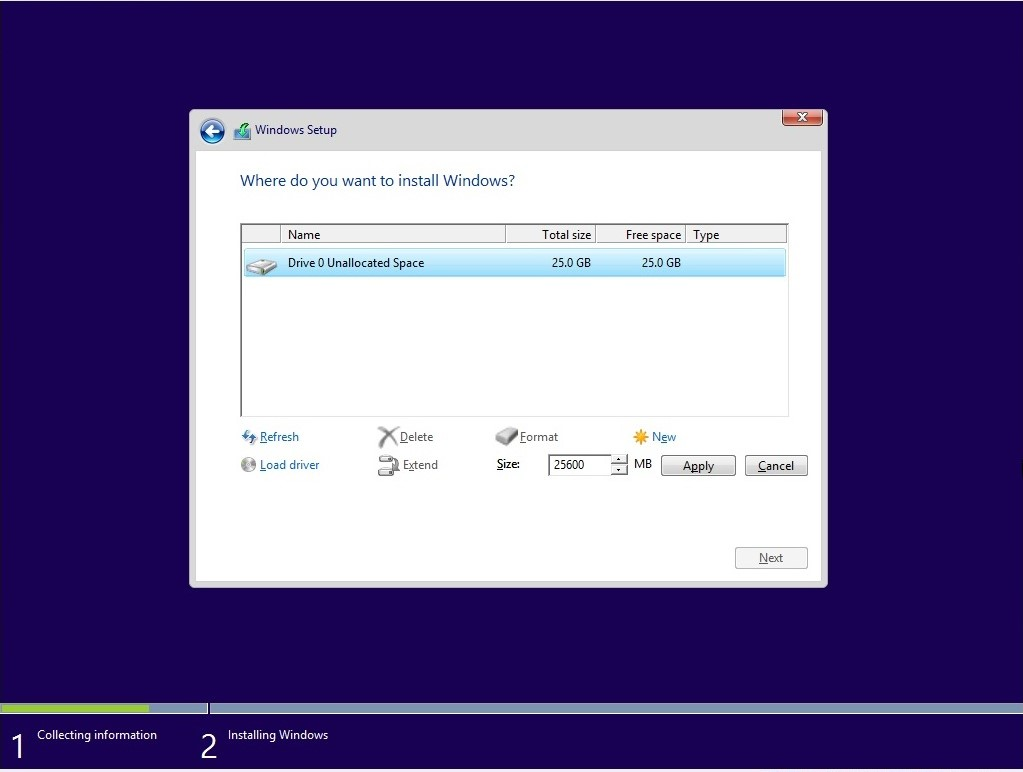
- Step 3: With the unallocated space selected, click Next. Windows will automatically create the necessary partitions (System, MSR, Primary) and begin the installation.
Troubleshooting Common USB Boot Issues
Sometimes things don’t go perfectly when you try to reinstall Windows 10 from USB. If your USB isn’t detected or setup gets stuck, here are a couple of common fixes:
“USB Not Detected” Problems
- Check the Port: Try a different USB port. On desktops, use the ports directly on the motherboard (at the back) rather than the front panel.
- UEFI vs Legacy: If your USB was created for UEFI, but your BIOS is set to “Legacy,” it won’t show up. Ensure your BIOS mode matches the media creation settings.
Setup Freezes or Won’t Start
- Re-create Media: The download might have been corrupted. Use the Media Creation Tool to format and write the USB again.
- Disable Secure Boot: In some cases, the “Secure Boot” setting in BIOS prevents the USB from initializing. Try disabling it temporarily.
Activating Windows After Reinstallation
After you reinstall Windows 10 from USB, the system will often reactivate automatically. Since Microsoft uses “Digital Entitlement,” your hardware ID is stored on their servers.
- Connect to the Internet.
- Go to Settings > Update & Security > Activation.
- If it isn’t active, click “Troubleshoot”. As long as you installed the same edition (e.g., Home or Pro) that you had before, it will activate without needing you to type a key.
After Installation — Must-Do Tasks
Once Windows 10 is successfully installed, you aren’t quite finished. To ensure the system runs perfectly after you reinstall Windows 10 from USB, follow these steps:
Installing Drivers & Updates
Windows Update is quite good at finding drivers, but it’s not perfect.
- Step 1: Go to Settings > Update & Security > Windows Update and click Check for updates.
- Step 2: Visit your PC manufacturer’s website (like Dell, HP, or ASUS) to download specific drivers for your chipset, graphics card, and audio if they aren’t performing correctly.
Reinstalling Your Favorite Apps
Reinstall the apps you use most often—your browser, productivity tools, and utilities. This is a great time to be selective. Only install what you actually use to keep your new installation fast and lean.
Configuring Settings
Finally, tweak your system settings. Personalize your desktop, adjust your privacy settings, and set up your backup routine so you don’t have to reinstall Windows 10 from USB again anytime soon due to a system crash.
Data Recovery: What if You Forgot to Backup?
Sometimes, the urge to reinstall Windows 10 from USB happens so fast that we forget to back up a specific folder, or perhaps a partition was deleted accidentally during the “Custom” install phase. If you find yourself in a situation where data was lost during the reinstallation process, you need a professional recovery solution.
Introducing PandaOffice Drecov
PandaOffice Drecov is a powerful data recovery tool designed to retrieve lost files from formatted drives, deleted partitions, and crashed systems. It is particularly effective after a Windows reinstallation where files might have been overwritten or lost during partition changes.
⚠ Warning: Install it on a drive different from the one where your data was lost to prevent overwriting.
How to Recover Data using PandaOffice Drecov:
- Step 1: Select the Location. Launch the software and select the drive or the “Unallocated Space” where your old Windows partitions used to be.

- Step 2: Scan for Files. Click the “Scan” button. The tool will perform a deep scan to find remnants of your old file system.

- Step 3: Preview and Recover. Once the scan is complete, browse the files found. You can preview images or documents to ensure they are intact.

- Step 4: Save to a Safe Place. Select the files you want to keep and click “Recover”.
Note: Always save recovered files to an external drive or a different partition than the one you are recovering from.
For more advanced tips on managing your Windows environment and ensuring your data stays safe, check out these helpful resources:
- How to disable Microsoft OneDrive permanently in Windows 11/10
- How to recover emptied Recycle Bin in 3 easy steps
Tips to Make Future Reinstalls Easier
To save time in the future, consider these proactive steps:
- Keep the USB Drive: Don’t format the USB drive after you’re done. Keep it in a drawer as an emergency recovery tool.
- Create a System Image: Once you have all your drivers and apps installed, create a “System Image” backup. This allows you to restore your PC to this perfect state without doing a full reinstall Windows 10 from USB from scratch.
- Use a Dedicated Data Partition: If you have a large hard drive, consider splitting it into two partitions: one for Windows (C:) and one for Data (D:). This way, you can reinstall Windows 10 from USB on the C: drive without ever touching your personal files on the D: drive.
Frequently Asked Questions
1. Do I need to buy a Windows 10 key after reinstalling?
No. If your Windows 10 was already activated, it should reactivate automatically after you reinstall Windows 10 from USB, provided you install the same edition (Home/Pro) that was previously on the device.
2. Can I reinstall without losing files?
Yes. You can choose to keep personal files by running the installer from within your current Windows session or by installing Windows over the existing partition without formatting (which creates a Windows.old folder).
3. How big should the USB drive be for the installer?
A USB drive with at least 8 GB of free space is required. Note that all data on the drive will be deleted during the creation process.
4. What if my PC doesn’t boot from USB?
Check your BIOS/UEFI settings. Ensure that the USB is set as the primary boot device and that “USB Boot” is enabled. You might also need to try a different USB port.
5. Is reinstalling better than resetting Windows?
Generally, yes. While a “Reset” is easier, a clean reinstall Windows 10 from USB is more effective at fixing deep registry errors, driver conflicts, and stubborn malware because it completely replaces the system files with fresh ones from an external source.
Conclusion
The process to reinstall Windows 10 from USB may seem intimidating at first, but with the right preparation and a clear step-by-step approach, it becomes a manageable and rewarding task. Whether you’re fixing deep system errors or simply want a clean slate, a USB reinstall can give your PC the fresh start it deserves. Remember to always prioritize your data—back up before you start, and use tools like PandaOffice Drecov if things go sideways. Take your time, follow the steps above, and your revitalized Windows system will be up and running in no time.


