


Lost partitions, RAW drives, and inaccessible files can cause panic, especially when important documents, photos, or business data are involved. Fortunately, TestDisk is one of the most trusted free recovery utilities available. This guide explains how TestDisk data recovery works, when it should be used, and how to safely recover files and restore partitions without making the situation worse.

⚠️ Warning
If your drive is making clicking, grinding, or beeping sounds, stop using it immediately. Software tools cannot repair physical hardware damage and continued use may permanently destroy recoverable data.
Understanding TestDisk and Its Recovery Capabilities
What Is TestDisk Software?
TestDisk software is a free, open-source utility designed to recover lost partitions, repair damaged boot sectors, and restore access to storage devices that have become inaccessible due to logical errors. Originally developed by Christophe Grenier, TestDisk has earned a strong reputation among system administrators, IT technicians, and advanced computer users.
Unlike many commercial recovery programs that focus primarily on file scanning, TestDisk works at a lower level. Instead of searching only for deleted files, it analyzes the structure of the disk itself. This makes it especially effective when partition tables become corrupted or when entire partitions disappear.
Key Features of TestDisk
Restore deleted partitions
Repair damaged partition tables
Rebuild NTFS boot sectors
Recover lost FAT32 partitions
Copy files from damaged partitions
Support Windows, Linux, and macOS
Completely free and open-source
Many people searching for testdisk data recovery tool, testdisk recovery, or testdisk software download are dealing with situations where Windows suddenly reports:
- Drive not accessible
- You need to format the disk
- RAW file system detected
- Partition missing
- Operating system won’t boot
In many of these situations, the data still exists on the drive. The operating system simply cannot locate it because the underlying partition information has been damaged.
Why IT Professionals Still Use TestDisk
Despite the availability of modern graphical recovery tools, TestDisk remains popular because it can solve problems that ordinary file recovery software sometimes cannot.
For example:
| Recovery Situation | TestDisk Effectiveness |
|---|---|
| Deleted partition | Excellent |
| Damaged partition table | Excellent |
| RAW drive | Very Good |
| Boot sector corruption | Very Good |
| Accidentally deleted files | Moderate |
| Physically damaged drive | Poor |
Because it works directly with disk structures, TestDisk often succeeds in recovering access to entire partitions rather than individual files.
How the TestDisk Data Recovery Tool Works
Understanding how the testdisk data recovery process works can help users avoid mistakes during recovery.
Every storage device contains metadata that tells the operating system where partitions begin, where files are located, and how data is organized. When this metadata becomes damaged, Windows may incorrectly assume that the drive is empty or corrupted.
The Recovery Process Simplified
📂 Existing Files
⬇
📑 Partition Table
⬇
💾 Storage Device
If the partition table becomes corrupted, the files often remain untouched.
TestDisk scans the drive for:
- Existing partition signatures
- Lost partition records
- Backup boot sectors
- File system structures
After identifying valid structures, the software allows users to:
- View discovered partitions.
- Verify files contained within them.
- Restore missing partition information.
- Copy files to a safe location.
This approach is one reason why many users successfully recover data with TestDisk even when Windows reports that the drive must be formatted.
Quick Search vs Deep Search
When analyzing a drive, TestDisk typically offers two scanning modes.
Quick Search
- Faster scanning
- Finds recently lost partitions
- Suitable for most situations
- Usually completes within minutes
Deeper Search
- Thorough sector-by-sector analysis
- Finds older partition structures
- Useful after formatting
- May require several hours
💡 Tip
Always start with Quick Search. Only use Deeper Search if the desired partition is not found.
Partition Recovery vs File Recovery
Many users confuse these two processes.
| Function | Purpose |
|---|---|
| Partition Recovery | Restore access to an entire partition |
| File Recovery | Recover individual files |
When a partition is successfully restored, thousands of files may become instantly accessible without needing individual recovery.
This is why testdisk restore partition functionality is often faster than conventional file recovery software.
Supported Systems, File Systems, and Recovery Scenarios
One of the biggest strengths of TestDisk is its extensive compatibility.
Supported Operating Systems
Windows 10/11
Windows Server
Linux
macOS
BSD Variants
Because the software is cross-platform, recovery procedures remain relatively similar regardless of the operating system.
Supported File Systems
TestDisk works with numerous file systems, including:
- NTFS
- FAT16
- FAT32
- exFAT
- ext2
- ext3
- ext4
- HFS+
- APFS-related structures
This flexibility makes the software useful for recovering data from:
- Internal hard drives
- SSDs
- USB flash drives
- SD cards
- External hard drives
- RAID arrays
Common Situations Where TestDisk Works Best
The software performs particularly well when users encounter:
Deleted partitions
Lost drive letters
RAW partitions
Corrupted partition tables
Damaged boot sectors
Failed operating system updates
Disk cloning failures
For example, imagine a user accidentally deletes a 500GB data partition during Windows installation. The files may still exist physically on the drive even though the partition disappears from File Explorer.
In many cases, TestDisk can locate the original partition and restore it without requiring file-by-file recovery.
⚠️ Warning
Do not create new partitions on a drive containing lost data. New partition information may overwrite structures required for successful recovery.
Why Data Loss Happens and How TestDisk Can Help
Accidental Deletion of Partitions
One of the most common reasons users search for testdisk recover data solutions is accidental partition deletion.
Modern disk management tools make it easy to resize, format, and reorganize storage devices. Unfortunately, mistakes happen.
Common scenarios include:
- Selecting the wrong partition
- Reinstalling Windows
- Disk cloning mistakes
- Misconfigured disk utilities
- Improper partition resizing
When a partition is deleted, many people assume the data is gone forever. In reality, the partition table entry is often removed while the underlying data remains untouched.
What Happens After a Partition Is Deleted?
Before deletion:
📂 Partition Entry
📄 Files
💾 Disk
After deletion:
❌ Partition Entry Removed
📄 Files Still Exist
💾 Disk
This distinction is why testdisk restore partition operations can be so effective.
Instead of searching for every file individually, TestDisk attempts to rebuild the missing partition information.
Why Immediate Action Matters
The longer a drive remains in use after partition deletion, the greater the risk of overwriting recoverable information.
Best practices include:
Stop using the drive immediately
Avoid formatting
Avoid creating new partitions
Begin recovery as soon as possible
These precautions significantly improve recovery success rates.
Corrupted Partition Tables and Boot Sectors
Another common cause of recovery situations involves damaged partition structures.
A partition table functions like a map that tells the operating system how the storage device is organized.
When this map becomes corrupted, symptoms may include:
- Missing partitions
- Unreadable drives
- Boot failures
- Incorrect drive sizes
- RAW file system errors
Common causes include:
- Power outages
- Malware attacks
- Firmware issues
- System crashes
- Disk management mistakes
TestDisk excels in these situations because it can compare existing structures with backup records and attempt to reconstruct missing information.
Many successful testdisk recovery cases involve damaged partition tables rather than deleted files.
💡 Tip
If TestDisk detects multiple versions of a partition structure, verify file contents before making any write operations.
RAW Drives, Formatting Errors, and System Crashes
Few error messages cause more concern than seeing a drive suddenly appear as RAW.
A RAW drive typically indicates that Windows can no longer recognize the file system.
Symptoms include:
- Drive requests formatting
- Files disappear
- Access denied messages
- Unknown file system errors
Common causes include:
- Corrupted NTFS metadata
- Boot sector damage
- Unexpected shutdowns
- USB disconnection during writes
- Operating system crashes
In these situations, many users mistakenly format the drive immediately.
⚠️ Warning
Formatting should never be your first response when important data is involved.
Instead, TestDisk can analyze the storage structure and determine whether the original partition remains recoverable.
In many cases, testdisk file recovery and partition restoration can restore access without performing a format at all.
Method 3: TestDisk Restore Partition Structures
Restoring a lost partition is one of the most powerful capabilities of TestDisk. When a partition disappears due to corruption, accidental deletion, or system failure, the actual data is often still present on the disk. Only the partition table entry is missing or damaged.
This is where testdisk restore partition functionality becomes extremely useful.
TestDisk scans the disk and attempts to rebuild the original partition layout based on detected file system signatures.
🖥️ Test Environment
- Windows 11 Pro 24H2
- 2TB HDD (GPT disk)
- Partition lost after failed Windows update
- TestDisk 7.x portable version
📋 Steps
- Launch TestDisk as Administrator
- Select the affected disk
- Choose partition table type (Intel / EFI GPT)
- Run Analyse
- Select Quick Search
- Press P to list files in found partitions
- Verify correct partition by browsing folders
- Choose Write to restore partition table
- Restart system
📊 Verification Checklist
| Check Item | Status |
|---|---|
| Partition detected | ✔ |
| File structure visible | ✔ |
| Correct size shown | ✔ |
| Folder names match | ✔ |
💡 Tip: Always verify with P before writing changes.
⚠️ Warning: Writing incorrect partition structures can overwrite valid disk metadata.
Method 4: TestDisk Recover Files from Existing Partitions
Sometimes partitions are still visible but files are inaccessible or corrupted. In this case, TestDisk can directly extract files without repairing the partition table.
This method is commonly used for testdisk recover files and testdisk file recovery scenarios.
🖥️ Test Environment
- Windows 10 Pro
- 1TB external USB HDD
- NTFS partition readable but folders missing
- USB 3.0 connection
📋 Steps
- Open TestDisk
- Select disk
- Run Analyse
- Choose detected partition
- Press P to browse files
- Navigate directory structure
- Select files using arrow keys
- Press C to copy files
- Choose safe destination drive
📦 Recovery Flow
📁 Scan Partition
➡️ Detect Files
➡️ Preview Data
➡️ Copy to Safe Drive
➡️ Verify Integrity
💡 Tip: Always recover to a different disk, never the source drive.
Method 5: Recover Important Data with PandaOffice Drecov Before Repairs
Before performing deep repair operations, it is highly recommended to extract critical data first. Partition repair operations may modify disk structures, making later recovery more difficult.
In many real-world testdisk data recovery cases, users lose partial data because they attempted repair before backup.
🖥️ Test Environment
- Windows 11 Pro
- 1TB SSD with RAW partition
- Important documents and media files
- PandaOffice Drecov latest version
📋 Recovery Steps
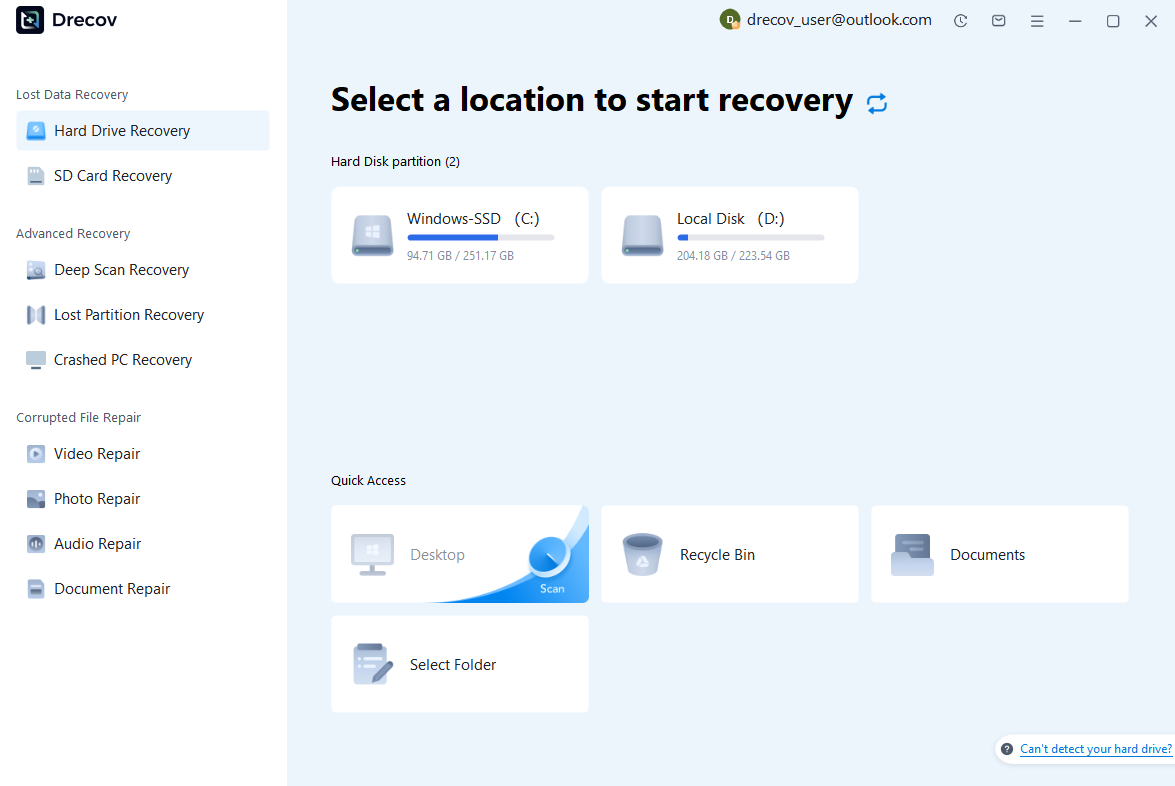
Step 1: Scan the Storage Device (SD Card / Hard Drive / USB)
Connect your device (SD card, HDD/SSD, or USB drive) to your computer and launch PandaOffice Drecov. Select the target device and start the scan. The software will perform a quick scan and deep scan to detect lost or deleted data.
Step 2: Locate and Preview Lost Files
After scanning, browse the detected files and use the preview feature to check recoverable data. You can preview documents (Word, Excel, PDF), photos, and videos to ensure file integrity before recovery.
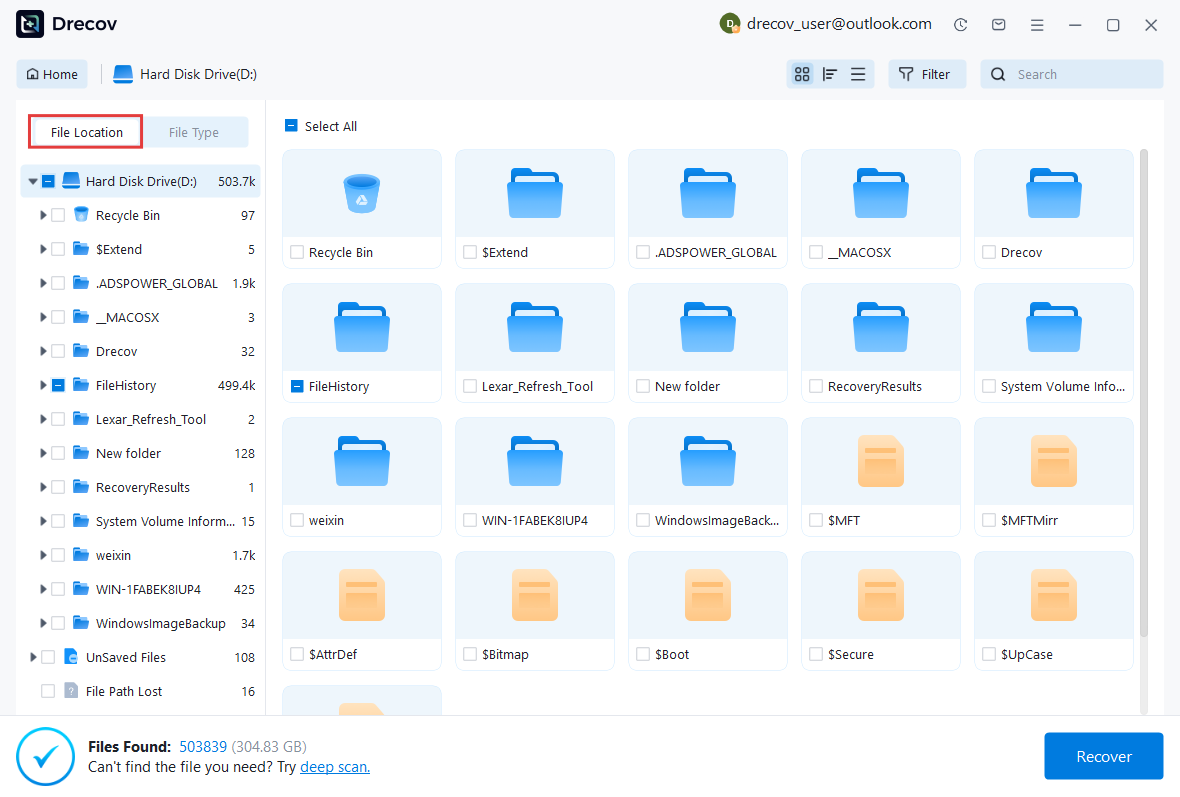
Step 3: Recover and Save to a New Location
Select the files you want to restore and click recover. Save all recovered data to a different drive or location (not the original device) to avoid overwriting lost data.

Why Choose PandaOffice Drecov Recovery Software?
PandaOffice Drecov offers a fast, secure, and user-friendly solution for recovering lost files across multiple scenarios. Whether you need email recovery, ZIP File Recovery, format data recovery, or help to recover deleted drafts Outlook, the software provides reliable recovery performance for both personal and business users.
PandaOffice Drecov supports recovery from formatted hard drives, SSDs, USB drives, SD cards, and external storage devices. Its advanced scanning engine can locate deleted archives, damaged ZIP files, lost Outlook drafts, and accidentally removed documents with high accuracy. For users searching for how to find deleted messages in Teams, PandaOffice Drecov can also help recover exported chat files, attachments, and related local cache data when available.
Key advantages include:
- Deep scan technology for complex data loss situations
- Support for emails, archives, videos, photos, and office documents
- Recovery from accidental deletion, formatting, corruption, and system crashes
- Easy preview before restoring files
- Compatible with Windows and multiple storage devices
Unlike complicated enterprise recovery tools, PandaOffice Drecov keeps the recovery process simple. Users can scan, preview, and restore files in just a few steps without technical expertise.
Whether you are dealing with lost Outlook drafts, corrupted ZIP archives, formatted drives, or missing communication data, PandaOffice Drecov provides an efficient and practical recovery experience designed to minimize downtime and protect important files.
Disk imaging ensures that even partially corrupted drives can be preserved. This is often the safest approach before attempting any aggressive repair operations for fix bad sectors on hard drive situations.
📊 Recovery Priority Model
| Priority Level | Data Type |
|---|---|
| High | Work documents |
| Medium | Photos / videos |
| Low | Cache / temporary files |
⚠️ Warning: Never install recovery software on the affected drive.
Best Practices for Successful TestDisk Recovery
Preparing Your Drive Before Recovery
Before starting recovery, preparation is critical. Many failures occur not because TestDisk is ineffective, but because users continue using a damaged drive.
Recommended steps:
- Stop writing new data immediately
- Disconnect unnecessary external devices
- Use stable power source (avoid battery-only laptops if possible)
- Ensure destination drive has enough space
💡 Tip: Treat the drive as read-only during recovery.
Common Mistakes to Avoid
Many users searching for testdisk recover data make preventable mistakes:
❌ Writing partition table too early
❌ Running multiple repair tools at once
❌ Formatting before recovery attempt
❌ Saving recovered files back to source drive
These actions significantly reduce success rate.
⚠️ Warning: Formatting should always be the last option.
Improving Recovery Success Rates
To maximize success when using testdisk data recovery tool, follow this strategy:
- Identify problem type first
- Start with Quick Search
- Verify partitions before writing
- Recover files before repair when unsure
- Avoid repeated scans on failing drives
Frequently Asked Questions About TestDisk Data Recovery
Is TestDisk Safe to Use?
Yes. TestDisk is safe when used correctly. It does not overwrite data unless you explicitly choose to write changes. The safest operations are scanning and file copying.
Can TestDisk Recover Formatted Drives?
Yes, in many cases. If the drive was quickly formatted, file structures may still exist and can be detected through deep scanning.
How to Use TestDisk to Recover Files on Windows?
The basic workflow:
- Run TestDisk as admin
- Select disk
- Choose Analyse
- Run Quick Search
- Press P to browse files
- Copy files to safe drive
This is the most common testdisk recover data method.
Where Can I Find a TestDisk Software Download?
The safest source is the official CGSecurity website. Avoid modified versions from third-party download sites.
Final Thoughts on TestDisk Recovery
When TestDisk Is the Right Choice
TestDisk is ideal for:
- Lost partitions
- RAW drives
- Corrupted partition tables
- Boot sector issues
- File system damage (logical only)
It is less effective for physical hardware failure.
Key Recovery Tips to Remember
✔ Always recover files before repair when unsure
✔ Verify partitions before writing changes
✔ Use separate drive for recovery output
✔ Avoid unnecessary formatting
✔ Stop using failing drives immediately


