


The Recycle Bin is one of the most recognizable and fundamental features within the Microsoft Windows operating system. For decades, it has served as a critical safety net, temporarily storing deleted files and folders so that users can effortlessly restore items before they are permanently erased from storage. While many individuals rely heavily on this functionality, a growing number of modern users prefer a completely clean, minimalist desktop environment free of extra shortcuts and clutter.
If you want to remove this iconic icon, Windows provides built-in options to customize your workspace. Whether you run Windows 10 or Windows 11, learning how to delete recycle bin from desktop is a straightforward process. This educational guide will explain how to delete Recycle Bin from desktop, hide it properly, customize your desktop layout, and troubleshoot common configuration issues. Furthermore, we will delve deeply into data safety, the technical distinctions between hiding and permanently disabling system folders, and how to recover your vital files if something goes wrong.
What Is the Recycle Bin in Windows?
The Recycle Bin is not just a simple shortcut; it is a highly specialized, hidden system directory within the Microsoft Windows ecosystem. When you select a file and press the delete key, Windows does not instantly wipe the binary data from your hard drive or solid-state drive (SSD). Instead, the operating system alters the file pointer and redirects the item to this temporary storage location.
When you delete a file normally, several distinct events occur under the hood:
- The file moves to a hidden system folder named
$Recycle.Binlocated at the root of each drive partition. - The system retains the original file path, creation dates, and deletion timestamps.
- The file data is not permanently erased immediately, meaning it continues to occupy physical disk storage space.
- You can open the interface and restore the files to their original locations with a single click.
Fundamentally, the Recycle Bin helps protect users from accidental data loss. Windows users can leverage this space to restore deleted files, permanently delete individual items, or empty the entire storage directory manually to free up space. Although highly useful, some users choose to remove the desktop icon to achieve a more streamlined aesthetic.
Why People Remove the Recycle Bin from Desktop
The choice to hide default system icons often comes down to optimizing one’s digital work environment. There are three primary motivations behind this customization trend.
Cleaner Desktop Appearance
Many modern users want a minimal desktop with fewer visual distractions. Overloading a screen with shortcuts, folders, and system icons can lead to cognitive clutter. Removing default, unbudging icons like the Recycle Bin yields better organization, cleaner aesthetics, and improved overall focus during complex workflows.
Personal Preference
Some power users simply rarely access the container manually. Instead of double-clicking an icon on the screen, they prefer navigating their file architecture via alternative methods, including:
- Windows File Explorer sidebar shortcuts
- Fast keyboard shortcuts
- Automated Windows Storage Sense utilities
Workspace Customization
Professionals, digital artists, and gamers often customize Windows desktops extensively to match customized wallpapers or widgets. Removing default system icons helps create sleek professional setups, minimalist themes, and highly streamlined workflows where every pixel serves a deliberate purpose.
How to Delete Recycle Bin from Desktop in Windows 11
The latest flagship operating system from Microsoft features a overhauled settings ecosystem, but it still retains a very simple mechanism for toggling desktop visibility. If you are operating on this version of Windows, follow this clear, sequential process to hide the icon.
Step-by-Step Instructions
Step 1: Open Settings
Click on the Start menu icon located on your taskbar and select the gear icon representing Settings. Alternatively, you can use the rapid global hotkey combination by pressing Windows + I simultaneously to open the configuration center.
Step 2: Go to Personalization
In the main navigation panel located on the left-hand side of the Settings window, locate and select the Personalization category. Once inside, scroll down the right pane until you see Themes, then click on it to open further visual configuration parameters.
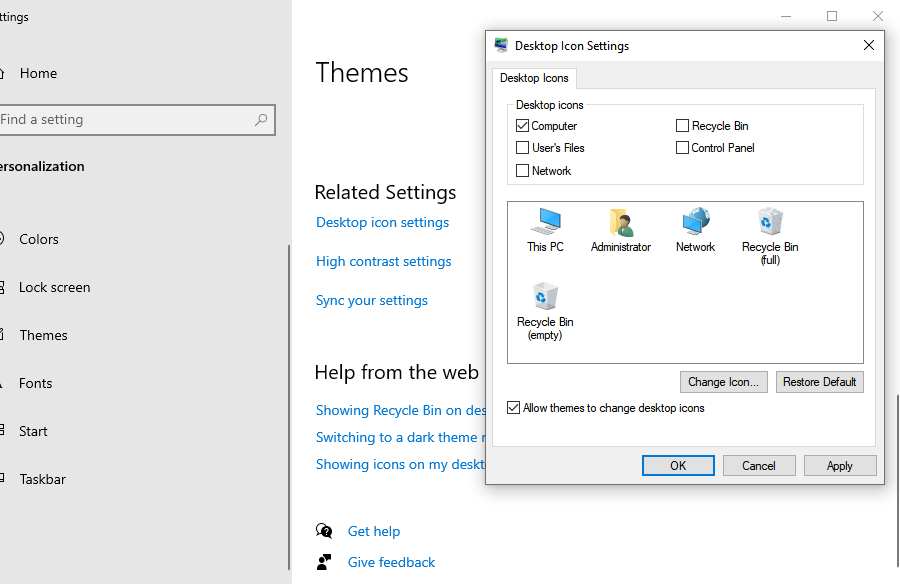
Step 3: Open Desktop Icon Settings
Scroll down toward the bottom of the Themes configuration window. Under the related links section, look for and click on Desktop icon settings. A legacy control panel dialogue box will pop up on your screen showing all standard system icons.
Step 4: Uncheck Recycle Bin
The new dialogue window will present you with a list of default system shortcuts, including:
- Computer
- User’s Files
- Network
- Control Panel
- Recycle Bin
Simply clear the checkmark from the box directly next to Recycle Bin.
Step 5: Apply Changes
To commit your modifications to the system, click the Apply button at the bottom right of the window, followed immediately by clicking OK to close the dialogue box. The icon will instantly vanish from your active workspace.
How to Delete Recycle Bin from Desktop in Windows 10
Windows 10 remains incredibly popular worldwide. While its settings menu looks a bit different than its successor, the underlying steps to alter desktop visibility follow a highly logical and comparable trajectory.
Instructions for Windows 10
Step 1: Open Settings
Press the Windows + I shortcut on your keyboard to immediately call up the main Settings hub. Click on the option labeled Personalization.
Step 2: Select Themes
Inside the Personalization interface, look at the sidebar menu on the left side of your screen. Locate and select the Themes tab.
Step 3: Open Desktop Icon Settings
Direct your attention to the right side of the window. Depending on your current window sizing, you will find a link titled Desktop icon settings either under the main options list or pinned to the far right menu bar. Click it.
Step 4: Remove Recycle Bin
Uncheck the box next to Recycle Bin in the pop-up dialogue box. Click Apply, and then click OK to save your preferences. Your desktop will immediately reflect the update.
How to Restore the Recycle Bin Icon Later
If you ever change your mind or realize that your workflow suffers without the immediate visual cue of the folder on your desktop, reversing the entire configuration takes less than a minute.
Steps to Restore
- Open the Desktop icon settings panel again by navigating through Settings > Personalization > Themes.
- In the list of options, locate the unchecked entry for Recycle Bin.
- Place a checkmark back inside the box.
- Click Apply and click OK. The icon will return to its original placement on your desktop grid instantly, retaining all of its previous operational features.
How to Access Recycle Bin After Removing It
When you execute the steps to delete recycle bin from desktop, you might occasionally need to open the directory to restore a mistakenly deleted item or to check its contents. Because the system folder remains active, you can leverage several quick shortcuts to access it without needing to toggle the desktop icon back on.
Use Windows Search
The fastest dynamic method is through the system search engine. Click on your Start menu or press Windows + S, type Recycle Bin into the search bar, and hit Enter. The system app will show up at the top of the search results, allowing you to open it instantly.
Use File Explorer
You can browse directly to the hidden folder using your standard navigation windows. Open any File Explorer window (or press Windows + E). Click on the first segment of the folder address bar, type Recycle Bin, and press Enter. The window will immediately shift to display the contents of your temporary deletion vault.
Create an Alternative Shortcut
If you want to keep your desktop pristine but desire quick accessibility elsewhere, you can pin the Recycle Bin directly to your Start Menu or drag it into a specific utility folder inside File Explorer. Simply search for it via the Start menu, right-click its application icon, and choose Pin to Start.
Powerful Data Recovery with PandaOffice Drecov Data Recovery Software
When users attempt to delete recycle bin from desktop, adjust system properties, or execute advanced clean-up methods, accidents happen. If you have permanently emptied your trash folder, disabled the safety net entirely, or performed a Shift + Delete command on an indispensable folder, the native Windows options will no longer suffice. This is exactly where professional-grade data extraction utilities become necessary.
⚠ Warning: Install it on a drive different from the one where your data was lost to prevent overwriting.
Introducing PandaOffice Drecov Data Recovery Software
To address data loss scenarios, utilizing an advanced tool like PandaOffice Drecov data recovery software provides an efficient solution. This high-performance utility is explicitly engineered to scan the deepest physical architecture of your storage drives, locating and reconstructing missing, formatted, or permanently deleted file fragments. It supports an array of file systems, including NTFS, FAT32, exFAT, and ext4, making it highly reliable regardless of how your computer’s storage media is structured.
Crucial Warning: The exact moment you realize important files have been permanently lost, immediately stop saving new data to that computer. Continued browsing, downloading files, or installing new software can overwrite the storage sectors where your old files still reside, making recovery impossible.
Step-by-Step Recovery Guide Using PandaOffice Drecov
Step 1: Launch the Application and Select the Scan Location
Open the application on your computer. The main user interface will present a clear overview of all connected hardware drives, external storage devices, and common system folders. To target files bypassed or emptied from your trash folder, select the system drive (usually C:) or choose the dedicated Recycle Bin logical shortcut on the main dashboard screen.

Step 2: Initiate the Automated Deep Storage Scan
Click on the Scan button. The software will instantly commence an initial quick sweep to identify surface-level files, followed immediately by an advanced deep scan. The tool’s scanning algorithm will carefully piece together raw data headers to identify missing photos, documents, and creative assets. You can actively monitor the progress bar at the top of the interface.

Step 3: Filter and Preview Discovered Files
You do not have to wait for the complete drive scan to finish if you spot your files early. Use the organized sidebar to filter results by file types (such as .docx, .png, .mp4). Click on any discovered item to launch an instant, high-fidelity visual preview. This lets you confirm the file is intact and fully functional before executing the final recovery phase.

Step 4: Select a Secure Recovery Path
Place checkmarks next to all specific files and folders you wish to restore. Click the prominent Recover button located in the bottom-right corner. A window will prompt you to choose an output destination.
Important Warning: Never save the recovered files back onto the exact same drive where they were originally lost. Choose an external hard drive, a USB flash drive, or a completely different partition to prevent any chance of file corruption during the extraction process.
Helpful Internal Guides for Better Data Management
Once you have completed your data recovery operations, it can be highly beneficial to expand your knowledge regarding file locations and recovery techniques within the Windows platform. Consider exploring these practical resources to optimize your digital workspace:
- If you ever find yourself struggling to navigate your desktop environment on alternative devices, review this comprehensive guide outlining where is Recycle Bin in Windows 10 for rapid access.
- For those focusing on web development or online research, understanding browser structures is essential. Learn how to locate your browser data by analyzing the detailed Firefox bookmarks location guide.
- If you have accidentally misplaced or deleted temporary multimedia files, you can discover an expedited restoration method by checking out this 5-minute photo fix tutorial.
Common Problems When Removing Recycle Bin from Desktop
While customizing your Windows interface is usually standard practice, users occasionally run into technical hurdles. Here are the most frequent anomalies and how to fix them.
Recycle Bin Icon Keeps Returning
Some users report that after they successfully hide the shortcut, it mysteriously reappears on their desktop after a reboot or system update. This typically happens for two reasons:
- Third-party desktop personalization software or sync utilities override standard icon visibility parameters.
- The active Windows Theme settings are configured to automatically allow themes to change desktop icons.
To resolve the second issue, go to your Desktop icon settings dialogue box and uncheck the option at the bottom labeled Allow themes to change desktop icons.
Desktop Icon Settings Missing
If you cannot find the links to configure your system layouts, your operating system files might be out of date, or you might be using an unactivated copy of Windows. Microsoft disables deep personalization settings if the system lacks a valid digital activation license key. Ensure your copy of Windows is properly activated via the Update & Security settings panel.
Group Policy Restrictions
If your computer was issued by an employer, school, or organization, the IT department likely manages it through administrative configurations called Group Policies. These policies frequently lock down user-facing personalization menus. If your desktop icon configuration links appear greyed out, you must contact your local system administrator to request modification permissions.
How to Customize Desktop Icons Further
If you want to fine-tune your desktop beyond learning how to delete recycle bin from desktop, Windows offers additional built-in adjustments to maximize workspace efficiency.
Change Icon Size
If you find desktop icons intrusive but still want to keep them accessible, you can change their physical scaling. Right-click any open space on your desktop, hover your mouse cursor over View, and select either Medium icons or Small icons from the context menu.
Hide All Desktop Icons Completely
For the absolute ultimate minimalist workspace, you can hide every single file, folder, and system icon with a single command. Right-click your desktop, select View, and click to uncheck Show desktop icons. All items will instantly vanish, leaving only your wallpaper visible. You can bring them back at any time by re-checking the same option.
Change Recycle Bin Icon Appearance
Instead of completely removing the folder representation, you can personalize its design to match your desktop aesthetic.
- Open the Desktop icon settings control window.
- Click on the Recycle Bin (Full) or Recycle Bin (Empty) icon from the visual list.
- Click the button labeled Change Icon….
- Browse through the native Windows icon library or choose a custom
.icofile you downloaded from the internet. Click OK to apply.
Is It Safe to Remove Recycle Bin from Desktop?
The short answer is: Yes, hiding the icon is completely safe. It is a native customization workflow provided directly by Microsoft’s design engineers. You are only adjusting user interface visibility, not deleting critical operating system code.
However, you must remain aware of the operational changes if you transition from hiding the icon to permanently disabling the system functions:
| Operational Mode | Core Safety Level | Data Recovery Ease | Impact on Storage Media |
| Standard Enabled (Icon Visible) | Extremely High Safety | Super Fast (Native Built-in Restore) | Files continue to hold space until emptied manually. |
| Hidden Icon (Function Enabled) | High Safety | Fast (Via File Explorer or Search) | Files continue to hold space safely in background. |
| Permanently Disabled Function | Low Safety Risk | Complex (Requires Specialist Recovery Software) | Space is freed instantly; files are easily overwritten. |
For the vast majority of personal and professional workflows, simply hiding the icon while leaving the background framework intact provides the perfect balance of visual cleanliness and data protection.
Frequently Asked Questions
Can I recover Recycle Bin after deleting it from desktop?
Yes. If you have hidden the icon using the Desktop Icon Settings interface, you can easily restore it by returning to that exact menu and re-checking the box next to Recycle Bin. This will return the icon to your screen without modifying any underlying data.
Does removing the Recycle Bin delete my files?
No. Hiding the desktop shortcut has absolutely no impact on the files stored inside the underlying system directory. The items will continue to reside safely in the background storage cache until you manually choose to empty it or configure the system otherwise.
Can I hide all desktop icons at once?
Yes. Windows provides a global toggle switch for this layout format. Right-click any open space on your desktop background, hover your mouse over the View sub-menu, and click to uncheck the entry titled Show desktop icons.
Is keeping the Recycle Bin active absolutely necessary?
While not mandatory for booting or running the operating system, keeping its core data retention functionality active is highly recommended. It serves as your primary line of defense against human error and accidental file losses.
Conclusion
Learning how to delete recycle bin from desktop is an excellent, simple technique to master when creating a personalized, organized, and modern Windows environment. Whether you are running Windows 10 or Windows 11, adjusting your layout settings only takes a few steps through the built-in Personalization hub.
For the vast majority of users, simply hiding the icon remains the safest option because your deleted files remain protected and recoverable in the background. If you eventually decide to disable the Recycle Bin entirely to bypass temporary storage, make sure to proceed with absolute caution. Always maintain consistent system backups and utilize a dependable program like PandaOffice Drecov data recovery software to ensure your essential work documents and personal memories remain safe from unexpected deletion disasters. Consistent desk organization paired with advanced file safety protocols will provide a smooth, reliable computer experience for years to come.


