


Losing precious memories due to an accidental click or a system crash is a heart-wrenching experience. Whether it is a snapshot of a child’s first steps or critical project documentation, knowing how to retrieve deleted photos is a digital survival skill everyone should possess. In this comprehensive guide, we will explore the technical nuances of data storage and provide actionable steps to get back deleted photos across various devices.
Understanding Photo Deletion
What Happens When Photos Are Deleted
Let’s be real—deleting photos can feel like losing a piece of your life. Whether it’s a vacation memory, a family moment, or an important screenshot, hitting that delete button often comes with instant regret. However, the surprising truth is that when you delete a photo, it usually isn’t gone right away. Instead, your device simply marks that storage space as “available,” meaning the actual image data is still sitting there quietly in the background.
Think of it like erasing the label on a box rather than throwing the box away. The contents are still inside—you just don’t know where to find them anymore. This is exactly why photo recovery is possible in many cases. Your operating system—whether it’s Windows, macOS, Android, or iOS—doesn’t immediately wipe the file. It waits until new data needs that space. This delay creates a valuable window of opportunity. If you act quickly and avoid using the device too much, you significantly increase your chances of how to find deleted photos. The moment you realize photos are missing, stopping further activity becomes your first and most important step.
Temporary vs Permanent Deletion
Not all deletions are created equal. There’s a big difference between temporary deletion and permanent deletion, and understanding that difference can save you a lot of stress.
Temporary deletion happens when photos move to folders like the Recycle Bin (Windows), Trash (Mac), or Recently Deleted (iPhone/Android). These folders act like a safety net, giving you time to undo mistakes. For example, most smartphones keep deleted photos for up to 30 days before permanently removing them.
Permanent deletion, on the other hand, occurs when you empty these folders or delete files using shortcuts like Shift + Delete. At this point, your system removes the file reference, making recovery more challenging—but not impossible. The data still lingers until overwritten. Here’s the key idea: temporary deletion is easy to reverse, while permanent deletion requires specialized tools or backups.
Can Deleted Photos Really Be Recovered?
Factors That Affect Recovery
Yes, deleted photos can often be recovered—but success depends on several critical factors. Timing is the biggest one. The longer you wait, the higher the risk that new data overwrites your deleted files. Another factor is how the photos were deleted. If they’re still in a temporary folder, recovery is almost guaranteed. If they were permanently deleted, recovery depends on whether the storage sectors have been reused.
Device usage also matters. If you continue taking photos, installing apps, or downloading files after deletion, you increase the chance of overwriting your lost data. It’s like writing over an erased whiteboard—the original content becomes harder to recover. Furthermore, file size and format can influence recovery success. Smaller files are often easier to recover intact, while large files like high-resolution images or RAW photos may become fragmented.
Storage Types and Their Impact
Different storage types behave differently when it comes to data recovery. Traditional Hard Disk Drives (HDDs) are generally more forgiving because they don’t immediately erase deleted data. This gives recovery tools a better chance to reconstruct files.
Solid-State Drives (SSDs), however, use a feature called TRIM. This function actively clears deleted data to improve performance, which can make recovery significantly harder—or even impossible in some cases. Smartphones also vary. Android devices often allow deeper access for recovery tools, especially if rooted. iPhones, on the other hand, are more restrictive, making backups the most reliable recovery method.
Methods to Retrieve Deleted Photos
How to Find Deleted Photos in the Recycle Bin or Trash
The easiest and fastest method is checking your device’s trash folder. This should always be your first stop when wondering how to find deleted photos.
- Windows: Open the Recycle Bin icon on your desktop.
- Mac: Click the Trash icon in your Dock.
- Smartphones: Look for the “Recently Deleted” album in your Photos app.
If your photos are there, restoring them is as simple as clicking a button. No software, no complications—just instant recovery. It’s like finding something you thought you lost in your own pocket.
Restore from Backup Services
If the photos aren’t in the trash, backups become your best friend. Services like Google Photos, iCloud, or external backups can store copies of your images automatically. For example, Google Photos keeps deleted items in its trash for 30 days, while iCloud may store them for up to 40 days depending on settings. If you’ve enabled automatic backups, recovery becomes incredibly simple.
Using Specialized Software: PandaOffice Drecov
When built-in tools fail, you need a professional-grade solution. PandaOffice Drecov is a premier data recovery product designed to retrieve permanently deleted photos after emptying recycle bin. It utilizes advanced deep-scan algorithms to identify file signatures even when the file system index is lost.
⚠ Warning: Do not install the software on the same drive where the photos were lost, as this may overwrite the data you are trying to save.
Step-by-Step Recovery with PandaOffice Drecov
- Step 1: Select the Location. Launch the program. On the main interface, you will see a list of drives and partitions. Select the specific drive (e.g., C: Drive, D: Drive, or an external SD card) where your deleted photos were originally stored.

- Step 2: Initiate the Scan. Click the “Scan” button. PandaOffice Drecov will first perform a Quick Scan to get back deleted photos that were recently removed. If they aren’t found, it automatically transitions into a Deep Scan to search the storage sectors bit-by-bit.

- Step 3: Filter and Preview. Once the scan is complete, use the sidebar to filter results by “Graphics” or “Photos.” You can double-click any file to preview it. This ensures the file is intact and not corrupted before you proceed with recovery.

- Step 4: Recover and Save. Check the boxes next to the photos you want. Click the “Recover” button.
Key Prompt: Always save the recovered photos to a different storage device, such as a USB flash drive or a different partition, to prevent data overlap.
If your photo loss occurred on a portable storage device, you might find these specific guides helpful:
- How do I recover pictures from a corrupted SD card? – A guide for logical errors.
- Step-by-step SD card photo recovery – General recovery tips.
- Alternative methods for SD card restoration – Comprehensive strategies.
Step-by-Step Recovery on Windows
Using Built-in Tools (File History)
Windows 10 and 11 include a feature called File History. If you have an external drive set up for backups, this is a powerful way to retrieve deleted photos.
- Step 1: Type “Restore your files with File History” in the Windows taskbar search box.

- Step 2: Look for the folder where your photos were stored.
- Step 3: Use the arrows to browse through different versions of that folder.
- Step 4: Select the photos you want and click the green Restore button.
Retrieve Permanently Deleted Photos After Emptying Recycle Bin via Registry
While not a direct recovery tool, sometimes checking the registry can help if a system error “hid” the files.
- Step 1: Press Win + R, type
regedit, and hit Enter. - Path:
HKEY_LOCAL_MACHINE\SOFTWARE\Microsoft\Windows\CurrentVersion\Explorer\Desktop\NameSpace - Step 2: Ensure the key
{645FF040-5081-101B-9F08-00AA002F954E}exists; this represents the Recycle Bin. If it’s missing, the bin might not be functioning correctly, leading to perceived data loss.
Step-by-Step Recovery on Mac
Using Time Machine Backup
Time Machine allows you to go back in time—literally. It is the most robust way to get back deleted photos on macOS.
- Step 1: Connect your Time Machine backup drive to your Mac.
- Step 2: Open the folder where the photos used to live.
- Step 3: Click the Time Machine icon in the Menu Bar and select “Enter Time Machine.”
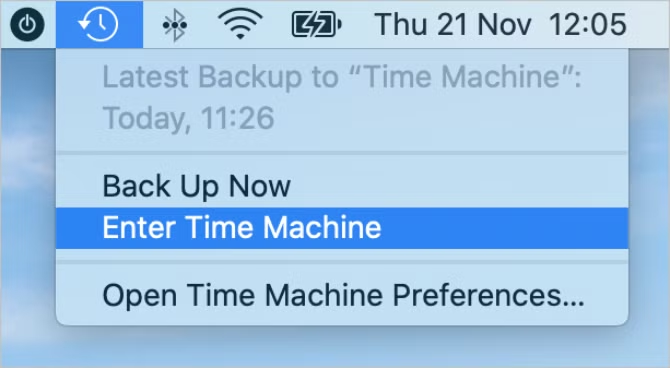
- Step 4: Use the timeline on the right to find a date before the deletion. Select the photos and click Restore.
Recovering Photos on Smartphones
Android Photo Recovery
Android users have several layers of protection. First, check the Gallery > Settings > Trash/Recently Deleted. If you need to go deeper:
- Step 1: Check Google Photos. Many Android phones sync here by default.
- Step 2: If photos were on an SD card, remove the card and use PandaOffice Drecov on a PC for a more thorough scan.
iPhone Photo Recovery
Apple’s ecosystem is very structured.
- Step 1: Open the Photos app, go to Albums, and scroll down to “Recently Deleted.”
- Step 2: If the 30-day window has passed, log into iCloud.com on a computer.
- Step 3: Go to Account Settings and look for “Restore Files” at the bottom of the page.
Cloud Storage Recovery Options
Google Photos Recovery
Google Photos provides a trash folder where deleted photos stay for 30 days (or 60 days if backed up). After that, recovery becomes difficult unless backed up elsewhere. To recover:
- Open the Google Photos app.
- Tap Library > Trash.
- Touch and hold the photo you want to restore.
- Tap Restore.
iCloud Photo Recovery
iCloud allows recovery within a limited time frame. Log in, navigate to Photos, and restore from the Recently Deleted section. If the photos were part of a device backup, you might need to restore the entire phone to an earlier state, which is a more drastic but effective measure.
Best Data Recovery Tools in 2026
Free vs Paid Tools Comparison
| Feature | Free Tools (e.g., Recuva) | Paid Tools (e.g., PandaOffice Drecov) |
| Recovery Depth | Basic (Deleted file pointers) | Advanced (Deep sector-by-sector) |
| File Types | Limited | Extensive (RAW, HEIC, PSD, etc.) |
| Support | Community-based | Professional 24/7 Support |
| Success Rate | Moderate | High (Handles corruption) |
Top Recommended Software
While free tools like Recuva are great for simple tasks, professional scenarios—such as when you need to retrieve permanently deleted photos after emptying recycle bin—require robust software like PandaOffice Drecov or Disk Drill. These programs are updated to handle the latest file systems like APFS and ReFS.
Tips to Maximize Recovery Success
Immediate Actions After Deletion
Stop using the device immediately! This cannot be stressed enough. Every second the device is on, it generates temporary files or system logs that could land exactly where your deleted photo was stored. Turn off Wi-Fi and Bluetooth to prevent background updates.
Avoiding Overwrites
Always recover files to a different drive. If you are recovering from your “C:” drive, save the results to a “D:” drive or a USB stick. This simple step can significantly improve your chances of success and prevents “data suicide,” where the recovery process itself destroys the remaining data.
How to Retrieve Deleted Photos FAQs
1. Can permanently deleted photos be recovered?
Yes, but only if the data hasn’t been overwritten. Using specialized recovery software is your best bet for files that have bypassed the Recycle Bin.
2. How long do deleted photos stay recoverable?
There is no set time. They remain recoverable as long as no new data is written to the physical sectors where the photo was stored. On a busy system drive, this could be minutes; on an idle SD card, it could be months.
3. Are free recovery tools effective?
Yes, for basic recovery of recently deleted files on non-SSD drives. For SSDs or complex file corruption, professional tools are usually required.
4. Can I recover photos without software?
Yes, provided you have enabled cloud sync (Google Photos/iCloud) or system backups (File History/Time Machine).
5. What is the best way to prevent photo loss?
The “3-2-1 rule” is best: 3 copies of your data, on 2 different media types, with 1 copy stored off-site (cloud).
Conclusion
Retrieving deleted photos isn’t as impossible as it might seem at first. Whether your images were recently deleted or permanently removed, there’s almost always a method worth trying. The key is acting quickly, choosing the right recovery method, and avoiding actions that could overwrite your data.
From simple solutions like checking the trash folder to advanced tools like PandaOffice Drecov that dig deep into your storage, you have multiple paths to recovery. Each method has its strengths, and combining them often yields the best results. Think of data recovery as a race against time. The sooner you act, the better your chances. And once you’ve recovered your photos, setting up a reliable backup system ensures you never have to go through the same stress again.


