


I am looking for assistance with moving the Windows recovery partition to the end of hard drive. Currently, the recovery partition is positioned in the middle of the disk, and I need to relocate it to free up space for additional applications and data. I am unsure of the safest method to accomplish this without risking data loss or corrupting my system.—from Microsoft Store
A healthy recovery partition is a dedicated part of your hard drive that stores system recovery files, allowing Windows to restore itself in case of boot issues or system failures. Understanding what is a healthy recovery partition is crucial for anyone managing system partitions.
Many users want to move healthy recovery partitions to free up disk space, reorganize drives, or prepare for OS upgrades. Doing so safely ensures that recovery options remain intact while allowing for optimized disk usage.
⚠️Warning: Modifying system partitions carries risk. Always back up important files before attempting to move a recovery partition.
This guide explains multiple ways to move a healthy recovery partition, including built-in tools, command-line approaches, and professional software like Pandaoffice Drecov. Each method includes a test environment and step-by-step instructions to ensure safety and success.
Understanding Healthy Recovery Partitions
Purpose and Benefits
A healthy recovery partition stores critical recovery tools and system files. Its main advantages include:
- Quick access to Windows recovery options without external media
- Protection against accidental data loss
- Ability to reset or troubleshoot Windows efficiently
Knowing what is the healthy recovery partition helps users manage it effectively, whether the goal is moving, resizing, or removing it.
Common Scenarios for Moving Recovery Partitions
Users may need to move a healthy recovery partition in situations such as:
- Adding new partitions or reorganizing disk layout
- Upgrading from HDD to SSD or expanding system storage
- Preparing a disk for dual-boot or multi-OS setups
- Resolving partition layout conflicts
Moving the partition can help maintain system organization while preserving recovery functionality.
⚠️Warning: Ensure sufficient unallocated space exists before moving the recovery partition.
Preparation Before Moving a Recovery Partition
Steps to Minimize Risks
Before attempting to move a healthy recovery partition, follow these precautions:
- Back up your system and important files.
- Check available disk space for the new partition location.
- Identify the recovery partition and its size using Disk Management or DiskPart.
- Close all active applications to avoid conflicts during partition modification.
Proper preparation reduces risk and ensures the recovery partition remains functional after relocation.
Methods to Move a Healthy Recovery Partition
Method 1: Using Disk Management
Test Environment:
Windows 10 Pro, 1TB SSD, GPT disk layout, desktop workstation.
Steps:
- Open Disk Management (Win + X → Disk Management).
- Identify the healthy recovery partition.
- Shrink or move adjacent partitions to create unallocated space.
- Use the Move Partition option (if available in your tool) to relocate the recovery partition.
- Confirm and apply changes.
This method uses native Windows tools for users who prefer GUI-based solutions.
⚠️Warning: Some versions of Windows Disk Management may not allow moving recovery partitions directly.
Method 2: Using Command-Line Tools (DiskPart)
Test Environment:
Windows 10 Enterprise, 500GB NVMe SSD, GPT disk, administrator account.
Steps:
- Open Command Prompt as Administrator.
- Launch DiskPart:
diskpart
- List all partitions:
list partition
- Select the healthy recovery partition:
select partition 3
- Delete or mark it for moving if using third-party support scripts.
⚠️Warning: DiskPart commands are irreversible; verify partition numbers carefully.
Method 3: Using Professional Software (Pandaoffice Drecov)
Download DrecovTest Environment:
Windows 11 Pro, 2TB SSD, GPT disk, desktop setup.
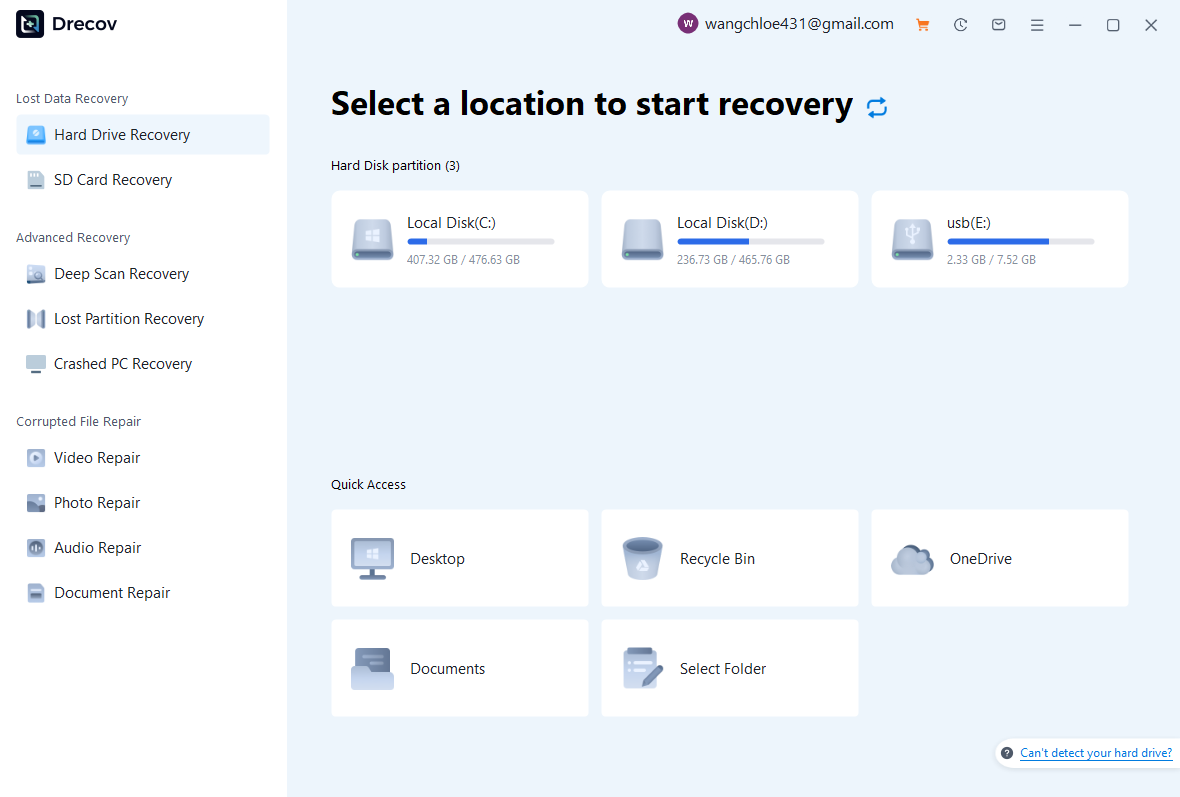
Pandaoffice Drecov offers a safe, guided way to move a healthy recovery partition:
- Install and launch Pandaoffice Drecov.
- Scan the target disk to locate all partitions.
- Select the recovery partition and choose Move/Resize.
- Select the new location for the partition.
- Apply changes and confirm the operation.

Why Choose Pandaoffice Drecov?
Data loss can occur unexpectedly due to accidental deletion, system crashes, formatting errors, or software failures. Whether you need to restore Windows previous date, perform recover Excel files,or handle deleted PowerPoint recovery, Pandaoffice Drecov provides a reliable and efficient solution designed to restore important documents quickly and safely.
Pandaoffice Drecov is a professional PowerPoint Recovery Software that supports recovery for multiple document types, including Excel spreadsheets, Word documents, and PowerPoint presentations. With advanced scanning technology, the software can detect and recover files even after deletion, formatting, or unexpected system shutdowns. This makes it an ideal tool for users who urgently need Document Recovery from hard drives, SSDs, USB drives, memory cards, and other storage devices.
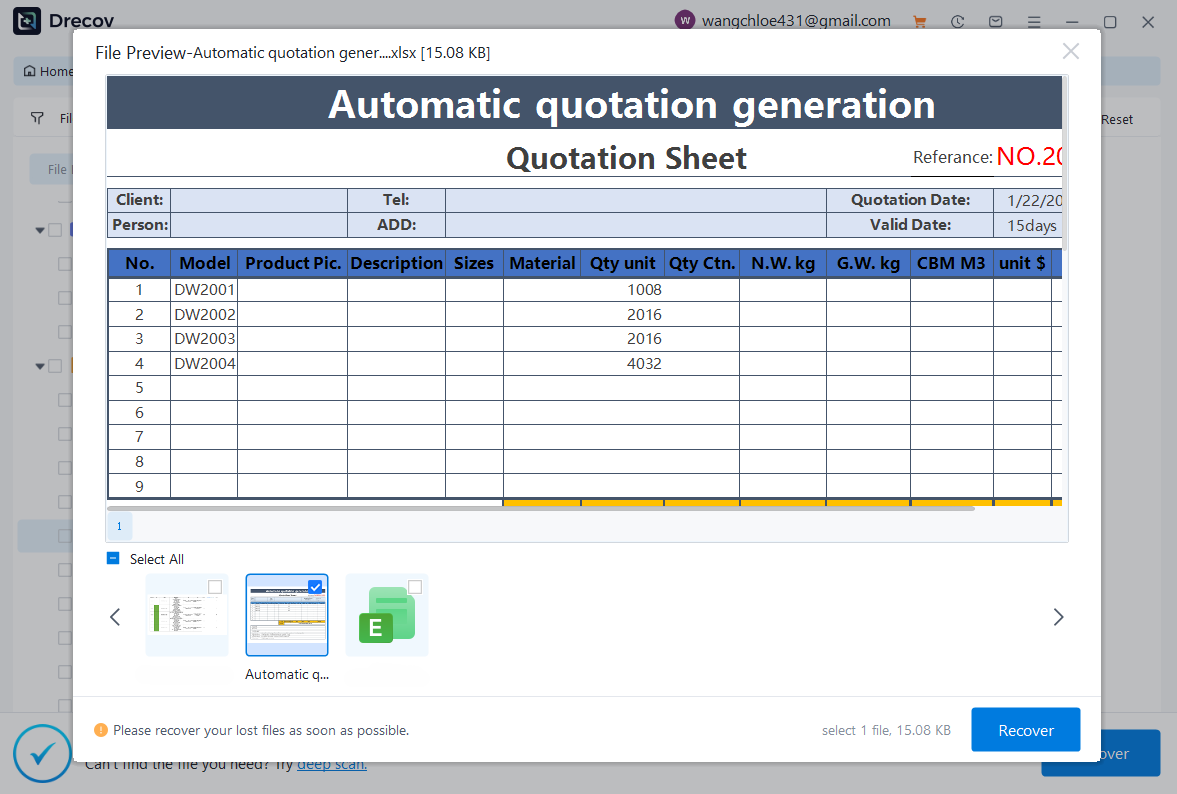
One of the key advantages of Pandaoffice Drecov is its intelligent deep-scan engine. It carefully analyzes storage sectors to locate lost or hidden files that standard recovery tools often miss. Whether you accidentally deleted a presentation and require deleted PowerPoint recovery, or you lost critical spreadsheets and need to recover Excel files, the software provides fast scanning and high recovery success rates.
The software also features a user-friendly interface that allows beginners and professionals alike to complete recovery tasks in just a few steps. Users can preview recoverable files before restoring them, ensuring that only the needed data is recovered. In situations where files were lost due to system errors, the software can also help recover documents after attempts to restore Windows previous date.
This method is recommended for users unfamiliar with command-line operations or those managing critical systems.
⚠️Warning: Ensure the selected location does not overlap with existing system partitions.
Method 4: Moving Recovery Partition After Disk Upgrade
Test Environment:
Windows 10 Home, 1TB HDD upgraded to SSD, GPT disk.
When upgrading or replacing a disk:
- Clone the old disk to the new SSD.
- Open Disk Management to identify the recovery partition.
- Shrink or adjust adjacent partitions to free space.
- Move the recovery partition to the preferred location using third-party tools or DiskPart scripts.
- Verify that recovery options remain accessible in Windows.
Method 5: Moving Recovery Partition in Dual-Boot Systems
Test Environment:
Windows 11 Pro + Linux dual-boot, 2TB SSD, GPT layout.
Dual-boot setups often require recovery partitions to be relocated:
- Open Disk Management and identify the recovery partition.
- Shrink adjacent partitions to create unallocated space.
- Use DiskPart or a professional partition tool to move the partition without affecting bootloaders.
- Test that Windows recovery options are still functional.
⚠️Warning: Incorrect relocation may prevent Windows from booting; always back up the bootloader first.
Method 6: Using PowerShell to Move a Recovery Partition
Test Environment:
Windows 11 Pro, 2TB NVMe SSD, GPT disk layout, administrator access.
PowerShell allows advanced users to script recovery partition relocation:
- Open Windows PowerShell (Admin).
- List disks and partitions:
Get-Disk
Get-Partition -DiskNumber 0
- Identify the healthy recovery partition.
- Use PowerShell scripts or third-party module integration to move the partition to unallocated space.
- Verify the partition appears correctly and is recognized by Windows recovery tools.
This method is suitable for IT professionals or users managing multiple machines.
⚠️Warning: PowerShell commands execute immediately. Mistakes can overwrite important data.
Method 7: Using a Backup and Restore Approach
Test Environment:
Windows 10 Pro, 1TB SSD, GPT disk layout.
Moving a recovery partition can also be done via backup:
- Create a full image of the healthy recovery partition.
- Allocate new space on the target disk.
- Restore the backup image to the new location.
- Hide the partition to prevent accidental use.
- Test that recovery tools are still functional.
This method ensures a safe relocation while maintaining an exact copy of the original recovery environment.
⚠️Warning: Do not overwrite active system partitions during restore.
Method 8: Moving Recovery Partition During OS Upgrade
Test Environment:
Windows 11 Home, 500GB SSD, GPT disk.
When upgrading the OS, the recovery partition may need to be relocated:
- Back up system data.
- Shrink or move adjacent partitions to create unallocated space.
- Use Disk Management or professional partition software to move the recovery partition.
- Verify that Windows recovery options remain intact.
This ensures that upgraded systems retain full recovery functionality without relying on external media.
Method 9: Relocating Recovery Partition in Multi-OS Environments
Test Environment:
Windows 11 + Linux dual-boot, 2TB SSD, GPT disk.
In multi-OS setups, the recovery partition may interfere with other boot partitions:
- Identify the healthy recovery partition and adjacent partitions.
- Shrink or adjust other partitions to create space.
- Move the recovery partition to a new location using DiskPart or professional software.
- Confirm that both Windows and Linux boot processes function properly.
⚠️Warning: Misplacement can cause bootloader errors; backup boot configuration before moving.
Frequently Asked Questions About Healthy Recovery Partitions
What is a healthy recovery partition?
A healthy recovery partition is a dedicated section of your hard drive containing system recovery files and tools that help restore Windows in case of errors, corruption, or boot issues.
Can I remove a healthy recovery partition?
Yes, but removing it may prevent system recovery without external media. Backup important files and consider alternative recovery options.
How do I move a healthy recovery partition in Windows 11?
You can move it using Disk Management, DiskPart, PowerShell, or professional tools like Pandaoffice Drecov, ensuring the partition is placed in unallocated space without overlapping other partitions.
Do I need special software to move the recovery partition?
While built-in tools may suffice for simple moves, professional software like Pandaoffice Drecov is recommended for safe, guided relocation, especially in complex setups or dual-boot environments.
What size should a recovery partition be?
Most healthy recovery partitions are 500MB–1GB, enough for Windows recovery tools. Larger partitions may be needed if storing full system images.
Conclusion / Key Takeaways
Relocating a healthy recovery partition is important for:
- Optimizing disk space
- Managing complex or dual-boot systems
- Maintaining system recovery options
Methods include:
- Disk Management for GUI-based moves
- DiskPart or PowerShell for advanced control
- Pandaoffice Drecov for safe, professional relocation
- Using backups or OS upgrades to reposition recovery partitions
⚠️Warning: Always back up important data and verify partition locations before moving.
By following these methods, users can efficiently move a healthy recovery partition in Windows 10 or 11, ensuring recovery options remain functional and system organization is improved.


