


I’m taking apart a computer that stopped working roughly a year ago and before I throw it out, I have to deal with the hard drive. What does that look like and how do I take it out safely? — From Reddit
Introduction to Removing a Hard Drive from a Laptop
Understanding why you may need to remove a laptop hard drive
Learning how to remove hard drive from laptop devices is an essential skill for both everyday users and IT professionals. Whether you are upgrading storage, replacing a damaged drive, or attempting data recovery, knowing how to remove a hard drive from a laptop safely can prevent further issues and protect your valuable data.
Laptop hard drives are typically located in compact, enclosed spaces, making removing hard drive from laptop systems more delicate than working with desktop computers. Modern laptops may use HDDs or SSDs, each requiring slightly different handling techniques.
Another important reason to understand how to remove hard drive from a laptop is troubleshooting. If your system fails to boot or shows disk errors, physically removing the drive allows for external diagnostics or recovery attempts.
⚠️Warning: Improper handling during remove hard drive from laptop processes can cause permanent hardware damage or data loss.
Common Reasons for Removing Hard Drive from Laptop
Typical scenarios requiring hard drive removal
There are several practical situations where knowing how to remove hard drive from laptop becomes necessary. One of the most common reasons is upgrading storage capacity. Users often replace older HDDs with faster SSDs to improve performance.
Another frequent case is hardware failure. If your laptop experiences unusual noises, slow performance, or system crashes, removing hard drive from laptop devices allows you to test or replace faulty components.
Data recovery is another critical scenario. When a system fails to boot, users often need to learn how to remove a hard drive from a laptop to access files using another computer or recovery tool.
Additionally, removing the drive is useful when selling or recycling a laptop. It ensures your personal data is securely wiped or retained.
⚠️Warning: Always power off and unplug your laptop before attempting how to remove hard drive from a laptop procedures.
Preparation Before You Remove Hard Drive from Laptop
Tools and environment setup for safe removal
Before starting the process of how to remove hard drive from laptop, proper preparation is crucial. You’ll need a clean, static-free workspace and basic tools such as a small Phillips screwdriver.
Ensure the laptop is completely powered down, disconnected from any power source, and the battery is removed if possible. This minimizes the risk of electrical damage during removing hard drive from laptop operations.
It is also recommended to use an anti-static wrist strap to prevent electrostatic discharge, which can damage sensitive components.
Backing up your data is another essential step. Even if your goal is data recovery, any attempt at how to remove hard drive from a laptop carries some risk.
Test Environment:
- Device: Windows laptop (Dell/HP typical structure)
- Tools: Precision screwdriver set
- Conditions: Powered off, unplugged, anti-static surface
⚠️Warning: Never attempt remove hard drive from laptop while the device is powered on.
How to Remove Hard Drive from Laptop (Step-by-Step Methods)
Method 1: Removing the Back Panel to Access the Hard Drive
This is the most common method for how to remove hard drive from laptop, especially in traditional designs with accessible panels.
Start by flipping the laptop over and locating the back panel screws. Remove all visible screws carefully and keep them organized. Once unscrewed, gently pry open the panel using a plastic tool.
Inside, locate the hard drive, which is typically secured in a bracket. Disconnect the connector cable slowly and remove any mounting screws.
Finally, slide the drive out of its slot and lift it carefully. This completes the basic process of how to remove a hard drive from a laptop using the back panel method.
Test Environment:
- Laptop Type: Standard consumer laptop with removable panel
- Difficulty Level: Easy to moderate
- Time Required: 10–20 minutes
⚠️Warning: Avoid using metal tools when prying open panels to prevent scratches or short circuits.
Method 2: Removing the Entire Bottom Case for Thin Laptops
For ultrabooks or modern slim laptops, removing hard drive from laptop requires accessing the full bottom case instead of a dedicated panel.
Begin by removing all screws from the bottom casing. Some screws may be hidden under rubber feet or stickers. Carefully detach the entire bottom cover using a plastic pry tool.
Once opened, locate the internal hard drive or SSD. Disconnect the cable or remove the securing bracket. Gently lift the drive out of its position.
This method is slightly more complex but necessary for newer devices where how to remove hard drive from a laptop involves full internal access.
Test Environment:
- Laptop Type: Ultrabook (e.g., MacBook-style or slim Windows laptop)
- Difficulty Level: Moderate
- Time Required: 20–30 minutes
⚠️Warning: Be cautious of fragile internal cables when opening the case.
Method 3: Using Pandaoffice Drecov After Removing the Drive
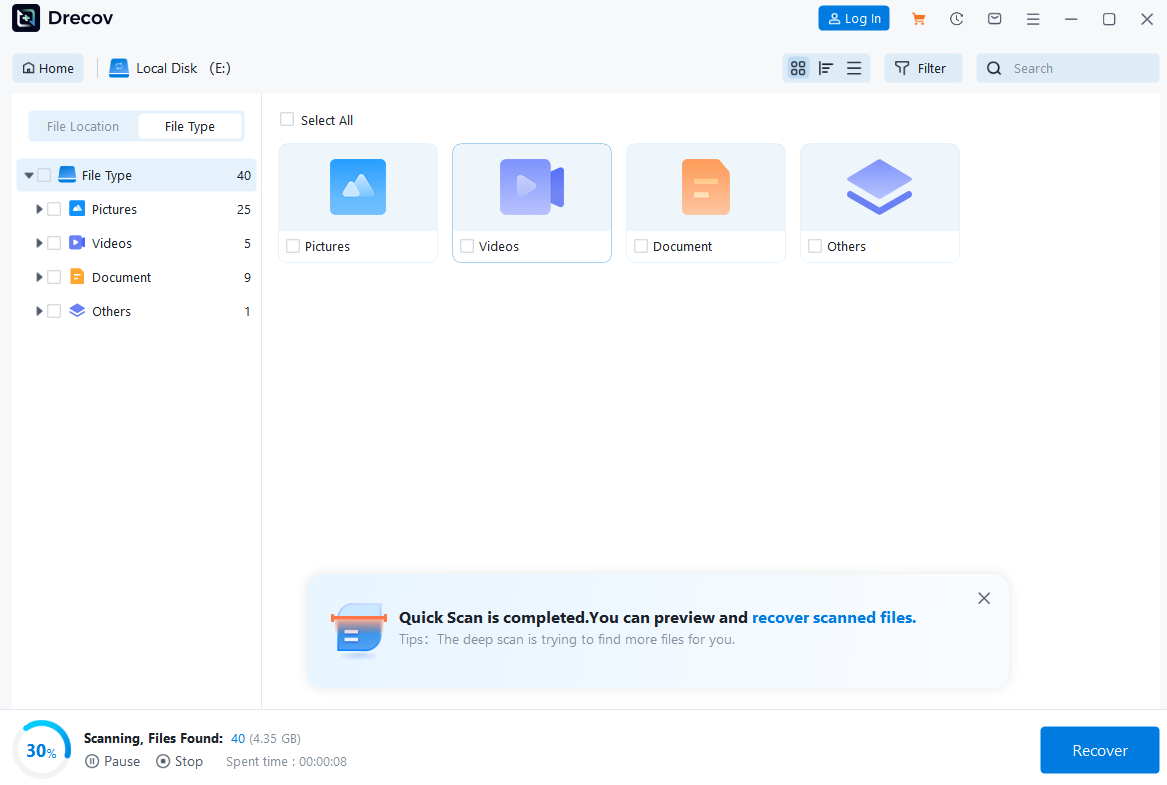
Download DrecovAfter completing how to remove hard drive from laptop, recovering data safely becomes the next priority. This is where Pandaoffice Drecov plays a critical role.
Once the drive is removed, connect it to another computer using a SATA-to-USB adapter. Launch Pandaoffice Drecov and select the connected drive for scanning.
The software provides both quick and deep scan options, allowing users to recover deleted, formatted, or inaccessible files efficiently. You can preview files before recovery and select only the needed data.
Unlike manual recovery attempts, Pandaoffice Drecov simplifies the process after removing hard drive from laptop, making it suitable even for beginners.
Test Environment:
- Device: External connection via USB adapter
- System: Windows 10/11
- Recovery Scenario: Deleted files and formatted partition


Why Choose Pandaoffice Drecov?
Pandaoffice Drecov stands out as a powerful and user-friendly solution for handling various data loss scenarios. Whether you need to reset PC to earlier date, perform a recover deleted Blink video, or figure out how do I recover an overwritten Excel file, Drecov provides reliable and efficient recovery tools in one place. It also excels at recovering photos from SD cards, making it ideal for photographers and everyday users alike. Even complex situations like Illustrator unsaved file recovery are handled with advanced scanning algorithms that maximize file retrieval success. With its intuitive interface, deep scan technology, and high recovery rate, Pandaoffice Drecov ensures your lost data can be restored quickly and safely without requiring technical expertise.
Method 4: Removing Hard Drive from Older Laptops with Side Slots
Some older laptop models are designed with dedicated side slots, making how to remove hard drive from laptop much easier compared to modern sealed devices. In these systems, the hard drive is usually secured behind a small side panel.
To begin, power off the laptop completely and disconnect all cables. Locate the side compartment, which is often marked with a disk icon. Remove the screws securing the panel and slide it open.
Inside, you will find the hard drive mounted in a caddy. Gently pull the tab or slide the drive outward. Once removed, detach the caddy if needed.
This approach simplifies how to remove a hard drive from a laptop without opening the entire device, making it ideal for beginners.
Test Environment:
- Laptop Type: Older models (pre-2015)
- Difficulty Level: Easy
- Time Required: 5–10 minutes
⚠️Warning: Do not force the drive out if it feels stuck—check for hidden screws.
Method 5: Removing an SSD from Modern Laptops
In newer laptops, storage often comes in the form of SSDs rather than traditional hard drives. While the process of removing hard drive from laptop devices still applies, SSDs require extra care due to their compact design.
After opening the laptop’s bottom case, locate the SSD, usually a slim chip connected to the motherboard. Remove the single screw holding it in place. The SSD will pop up at an angle.
Carefully pull the SSD out of its slot without bending it. This completes the process of how to remove hard drive from a laptop when dealing with SSD storage.
Because SSDs are more sensitive, handle them only by the edges and avoid touching connectors.
Test Environment:
- Laptop Type: Modern SSD-based laptop
- Difficulty Level: Moderate
- Time Required: 10–15 minutes
⚠️Warning: Static electricity can damage SSDs—always ground yourself before handling.
Common Mistakes When Removing Hard Drive from Laptop
Errors to avoid during the removal process
Even when you understand how to remove hard drive from laptop, mistakes can still happen. One common error is failing to disconnect the battery or power source, which can lead to short circuits.
Another mistake is using excessive force. Laptop components are delicate, and forcing parts during removing hard drive from laptop procedures can break connectors or cables.
Misplacing screws is also a frequent issue. Different screws have different sizes, and incorrect placement can damage the casing.
Additionally, skipping proper grounding can result in electrostatic discharge, which may permanently damage your drive.
Finally, not labeling components during disassembly can make reassembly difficult.
Test Environment:
- Scenario: Beginner-level disassembly attempt
- Outcome: Increased risk of hardware damage
- Recommendation: Follow step-by-step guidance carefully
How to Install or Replace a Hard Drive After Removal
Steps to reinstall or upgrade your laptop storage
After learning how to remove a hard drive from a laptop, the next step is installing a new or repaired drive. The process is essentially the reverse of removal but requires equal attention to detail.
Insert the new drive into the slot, ensuring proper alignment with connectors. Secure it using screws or brackets. Reconnect any cables that were detached earlier.
Close the laptop casing and tighten all screws evenly. Once reassembled, power on the device and check if the system recognizes the new drive.
You may need to initialize or format the drive using your operating system. This step is crucial for making the storage usable.
Understanding both removal and installation ensures you fully master how to remove hard drive from laptop and replace it effectively.
Test Environment:
- Device: Windows laptop with replacement SSD
- Setup: Clean OS installation required
- Time Required: 20–40 minutes
FAQ About Removing Hard Drive from Laptop
Is it safe to remove a hard drive from a laptop by yourself?
Yes, it is generally safe if you follow proper steps for how to remove hard drive from laptop. Using the right tools and precautions significantly reduces risks.
Will removing the hard drive delete my data?
No, removing hard drive from laptop does not erase data. However, improper handling may damage the drive, making data recovery difficult.
Can I remove a hard drive from any laptop model?
Most laptops allow it, but some ultra-thin models make how to remove a hard drive from a laptop more complex due to sealed designs.
Do I need professional help for hard drive removal?
If you are unsure or dealing with expensive devices, seeking professional help is recommended. However, many users successfully perform remove hard drive from laptop tasks at home.
Test Environment:
- User Level: Beginner to intermediate
- Scenario: General user concerns
- Result: Safe removal with proper guidance
Conclusion: Mastering How to Remove Hard Drive from Laptop
Key takeaways and best practices
Understanding how to remove hard drive from laptop is a valuable skill that helps with upgrades, repairs, and data recovery. By following structured methods and preparing properly, you can safely complete the process without damaging your device.
From accessing back panels to handling SSDs, each method of how to remove a hard drive from a laptop requires attention to detail and patience. Choosing the right method depends on your laptop’s design and condition.
Always remember to power off your device, use proper tools, and work in a static-free environment. These precautions make removing hard drive from laptop much safer and more efficient.
In addition, using reliable recovery tools like Pandaoffice Drecov after removal ensures your data remains protected and accessible.
By applying these techniques and avoiding common mistakes, you can confidently perform how to remove hard drive from a laptop tasks and handle your device like a professional.


