


The Windows desktop serves as our digital workspace, and for many users, a minimalist aesthetic is key to productivity. While most icons are easy to delete or move, the Recycle Bin is a “system icon” that behaves differently. Many users find themselves searching for how to remove recycle bin on desktop because the standard “right-click and delete” method simply doesn’t exist for this specific icon.
In this extensive guide, we will explore the technical reasons behind the Recycle Bin’s persistence and provide detailed, step-by-step instructions on how to declutter your screen. More importantly, we will discuss the critical safety implications of hiding your trash bin and how to use professional tools like PandaOffice Drecov to rescue data if you accidentally lose files while your bin is hidden.
Understanding the Desktop Environment: Why is the Recycle Bin Different?
Before we master how to remove recycle bin on desktop, we must understand its role. Unlike a shortcut to a program like Chrome or Word, the Recycle Bin is a shell namespace extension. It is deeply integrated into the Windows Explorer (explorer.exe) process. It acts as a safety net, holding deleted files in a temporary state before they are purged from the drive’s indexing system.
Because it is a system-level component, Windows protects it from accidental deletion. Consequently, users must navigate through specialized settings menus or the system registry to toggle its visibility. Whether you are a fan of “The Minimalist Desktop” or you simply prefer using the “Shift + Delete” shortcut to bypass the bin entirely, knowing how to remove the recycle bin gives you total control over your UI.
Method 1: How to Remove the Recycle Bin
For 99% of users, the easiest way to handle this is through the Windows Personalization menu. This method is safe, reversible, and doesn’t involve touching the system’s “brains” (the Registry).
- Step 1: Right-click on any empty space on your desktop and select Personalize from the context menu.
- Step 2: In the window that opens, navigate to the Themes tab on the left-hand sidebar.
- Step 3: Scroll down on the right side until you see the “Related Settings” section. Click on the link labeled Desktop icon settings.
- Step 4: A small pop-up window will appear titled “Desktop Icon Settings.” You will see a list of system icons: Computer, User’s Files, Network, Recycle Bin, and Control Panel.
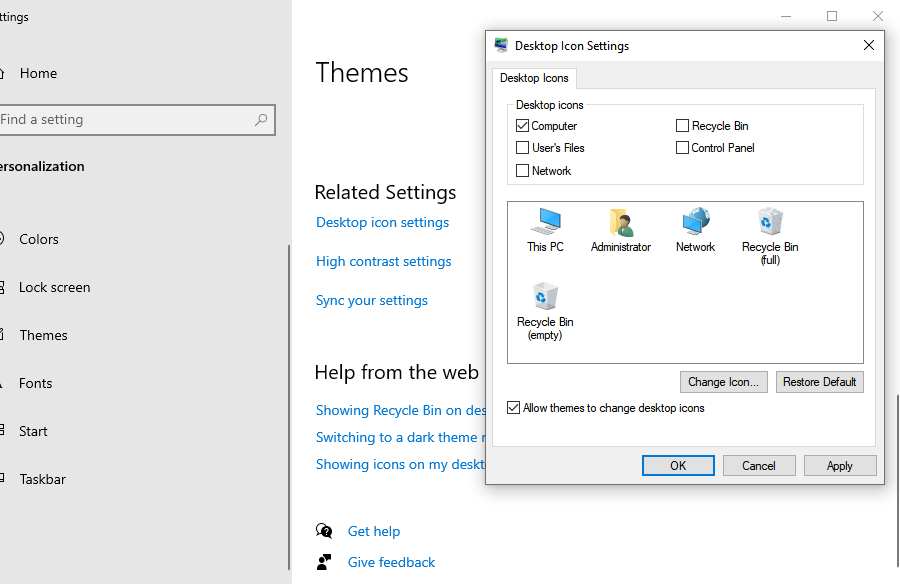
- Step 5: Uncheck the box next to Recycle Bin.
- Step 6: Click Apply and then OK. The icon should immediately disappear from your desktop.
Method 2: How to Remove Recycle Bin from Desktop
If you are a system administrator or using a Pro/Enterprise version of Windows, you might want to remove recycle bin from desktop at a deeper level. This prevents other users on the same computer from accidentally re-enabling the icon.
- Step 1: Press Windows Key + R to open the Run dialog box.
- Step 2: Type
gpedit.mscand press Enter to launch the Local Group Policy Editor. - Step 3: On the left pane, navigate through the following path:
User Configuration > Administrative Templates > Desktop.- Step 4: In the right-hand pane, look for the entry titled Remove Recycle Bin icon from desktop.
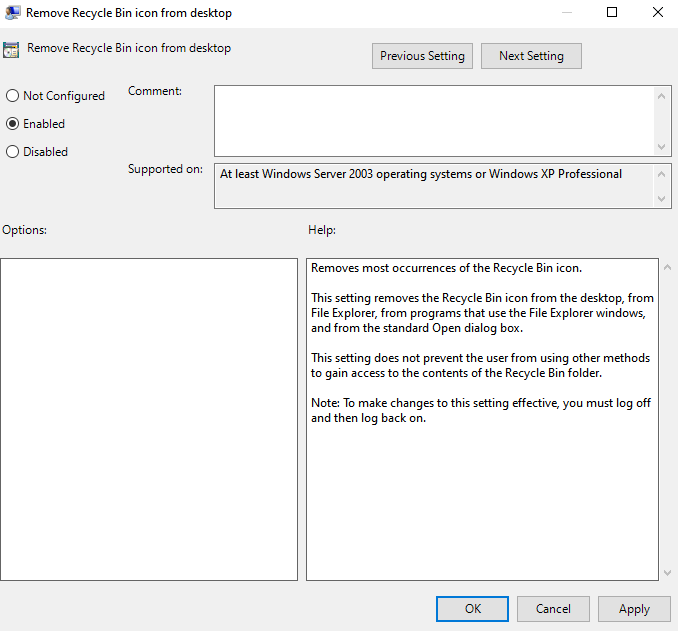
- Step 5: Double-click this entry. In the settings window, select the Enabled radio button.
- Step 6: Click Apply and restart your computer (or restart
explorer.exevia Task Manager) to see the changes.
The Risk Factor: Hidden Does Not Mean Disabled
When you follow a tutorial on how to remove recycle bin on desktop, it is vital to remember one thing: Hiding the icon does not stop the Recycle Bin from working. If you press “Delete” on a file, it still goes to the hidden bin, consuming disk space.
Many users who remove recycle bin from desktop eventually forget it’s there. They continue deleting files until their hard drive is mysteriously full. Even worse, if you accidentally delete a vital project and the bin is hidden, you might experience a moment of panic. How do you recover files from a bin you can’t see?
Emergency Recovery: Using PandaOffice Drecov
If you have hidden your Recycle Bin and accidentally deleted a file—or if you emptied the bin before realizing you needed something inside—you need a professional recovery solution. PandaOffice Drecov is specifically engineered to handle “invisible” data loss scenarios. It bypasses the Windows interface to talk directly to your storage hardware.
⚠ Warning: To prevent overwriting the very data you lost, try to install it on a different drive partition than where the deleted file was located (e.g., install on D: if the file was on C:)
The Step-by-Step Data Recovery Process
Step 1: Select the Scan Location
Open the application. You will see a list of available drives. Since the desktop and Recycle Bin are part of the system drive, select the C: Drive.
- Key Point: You can also select the “Recycle Bin” shortcut icon within the software interface to target that specific database.

Step 2: Perform a Deep Scan
Click Scan. The software will first perform a “Quick Scan” to find recently indexed deletions. It will then transition into a Deep Scan, which searches for “orphaned” files that no longer have a path because the Recycle Bin was hidden or cleared.

Step 3: Filter and Preview
Once the scan reaches 100%, use the sidebar to filter by file type. For example, if you lost a budget spreadsheet, filter for .xlsx.
- Key Point: Use the Preview button to see the content of the file. If you can see the text or image in the preview, the file is 100% recoverable.

Step 4: Execute Recovery
Check the boxes for the files you wish to save. Click the Recover button.
Warning Prompt: Always choose a destination folder on an external drive or a different partition. Saving the recovered file back to the original desktop location while the scan is active can cause permanent data corruption!
Advanced Customization: Using the Windows Registry
If the standard settings aren’t working, or if you are using Windows Home edition (which lacks the Group Policy Editor), you can learn how to remove the recycle bin by editing the Registry.
Note: Registry editing is for advanced users. Making a mistake here can cause system instability. Always export a backup of your registry keys before proceeding.
- Step 1: Press Windows Key + R, type
regedit, and press Enter. - Step 2: Navigate to the following path:
HKEY_LOCAL_MACHINE\SOFTWARE\Microsoft\Windows\CurrentVersion\Explorer\Desktop\NameSpace- Step 3: Look for a folder (key) named
{645FF040-5081-101B-9F08-00AA002F954E}. This is the unique ID for the Recycle Bin.
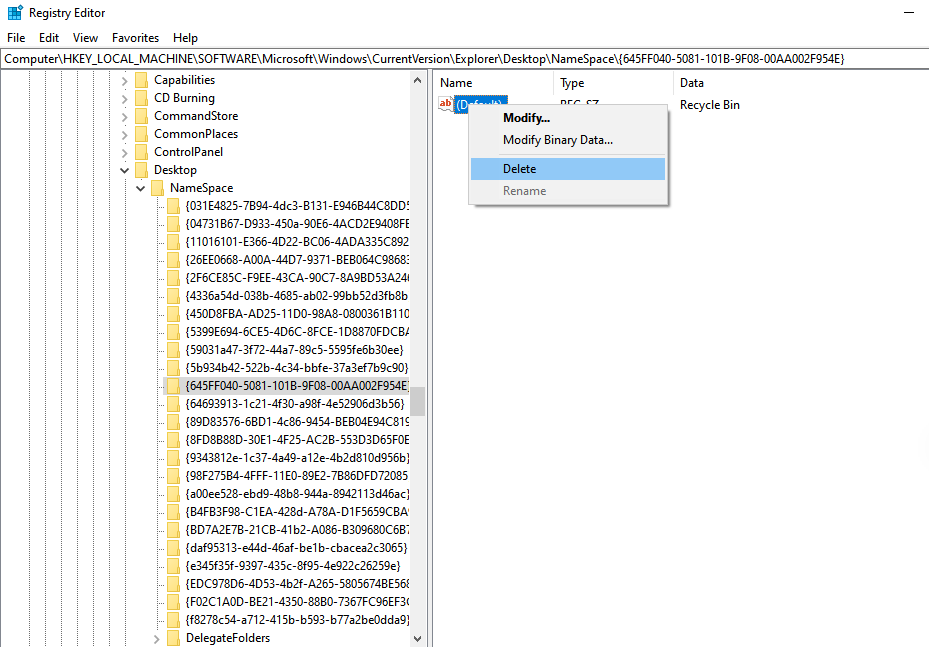
- Step 4: To remove recycle bin from desktop, right-click this key and select Delete.
- Step 5: Close the Registry Editor and refresh your desktop.
For further technical documentation on shell objects, you can refer to the Microsoft Developer Network (MSDN) Shell Documentation.
Helpful Internal Resources
If you find that you’ve hidden the bin and now can’t remember where the system stores those files, we have several troubleshooting guides to assist you:
- Can’t find your files? Learn where is the recycle bin in Windows 10.
- Follow our detailed Windows 10/11 recycle bin removal guide for a visual walkthrough.
- If you are struggling with the interface, find out where do I find recycle bin in Windows 10 quickly.
Mastering Desktop Icon Customization and Data Safety FAQs
1. If I remove the Recycle Bin from my desktop, are my deleted files automatically gone forever?
No. When you remove recycle bin from desktop, you are only hiding the visual shortcut. The underlying system folder ($Recycle.Bin) continues to store your deleted data. To permanently delete files, you must either empty the bin before hiding it or use the “Shift + Delete” keyboard shortcut, which bypasses the bin entirely. If you realize you’ve deleted something important after the bin is hidden, professional tools like PandaOffice Drecov can still find and restore that data.
The standard method for how to remove the recycle bin usually only affects the desktop. To remove it from the File Explorer navigation pane (sidebar), you must modify the Registry. You would navigate to HKEY_CLASSES_ROOT\CLSID\{645FF040-5081-101B-9F08-00AA002F954E} and change the “System.IsPinnedToNameSpaceTree” value to 0.
3. Why did the Recycle Bin icon reappear on my desktop after a Windows update?
Windows updates sometimes reset system personalization settings to their defaults. If you previously mastered how to remove recycle bin on desktop only to find it back after a restart, simply revisit the Desktop Icon Settings menu and uncheck the box again. This is a common occurrence during major feature updates (like moving from Windows 10 to Windows 11).
4. Is it possible to pin the Recycle Bin to the Taskbar instead of having it on the desktop?
Yes! Many users choose to remove recycle bin from desktop and pin it to the taskbar for a cleaner look.
- First, ensure the icon is visible on the desktop.
- Right-click it and select “Pin to Start.”
- Go to your Start Menu, right-click the Recycle Bin tile, select “More,” and then “Pin to taskbar.”
- Once it is on your taskbar, you can safely use the Desktop Icon Settings to hide the desktop version.
5. Does hiding the Recycle Bin improve my computer’s performance?
Hiding the icon itself does not improve CPU or RAM performance. However, if you remove recycle bin from desktop and forget to empty it, the accumulated “ghost” data can slow down your storage drive as it nears full capacity. For SSD users, keeping at least 15-20% of the drive free is crucial for maintaining high write speeds. If your drive feels sluggish after hiding the bin, run a scan with PandaOffice Drecov to see how much “invisible” deleted data is still occupying your sectors.
Summary of Best Practices
Mastering how to remove recycle bin on desktop is a great way to clean up your workspace, but it requires a disciplined approach to file management.
- Empty the Bin First: Before hiding the icon, empty it. This ensures you aren’t hiding gigabytes of wasted space.
- Enable Confirmation Dialogs: Since you won’t see the bin, go to the Recycle Bin properties (before hiding it) and check “Display delete confirmation dialog.” This adds a layer of safety.
- Regular Backups: Use a tool like PandaOffice Drecov as your “plan B.” Knowing you have a professional recovery tool on standby makes desktop customization much less stressful.
By following the methods outlined above—from the simple Personalization menu to the technical Registry edit—you now have the expertise to remove recycle bin from desktop while maintaining a safe and recoverable digital environment.


