


That sudden, heart-stopping moment when you scroll through your camera roll or desktop folder only to find that crucial video missing—it’s a feeling of instant dread. Maybe you accidentally hit “Delete All” instead of “Preview,” or perhaps your memory card decided to corrupt itself after a long day of filming. Have you already run through a thousand ways in your head to search for “how to recover video files”?
Before you resign yourself to the loss, take a deep breath. Here’s the truly reassuring news: in the digital world, deleted is not the same as destroyed. For most people facing this crisis, learning how to recover video files is not just possible; it’s an accessible process. This comprehensive guide will transform that feeling of panic into a clear action plan, showing you exactly how to retrieve those precious moments.
The Digital Ghost of Deleted Files:
To truly grasp how to recover video files, it helps to know what happens when you hit “Delete.”
👻 The Underlying Principle
When you delete a video, a photo, or a document on your computer, phone, or camera’s memory card, the Operating System doesn’t instantly erase the data from the physical storage device (HDD, SSD, SD card).
Instead, the OS simply does two things:
- It marks the space occupied by the video file as “available” or “free”.
- It removes the file’s entry from the file system table (like the index of a book).
Crucially, the actual data—the magnetic charges on an HDD or the electronic charges in flash memory that make up your video—remains intact until the OS decides to write new data over that specific physical location. This principle is why learning how to recover video is possible: the deleted file is essentially a digital “ghost” waiting to be brought back.
The Challenge of Fragmentation
Video files are often large, making them susceptible to data fragmentation. This means the file’s data is split into many separate blocks scattered across the drive. If new data overwrites just one of these blocks, the entire video file may become corrupted and unplayable, even if the file name is recovered. This is why specialized software and deep scanning are essential when trying to recover video files.
🔍 The Golden Window: As long as no new data has been written to the same sectors, your video is fully recoverable. Once new data overwrites those sectors, recovery becomes impossible.
Your Recovery Toolkit: Methods and Steps
Before attempting any recovery, there is one crucial core principle to follow:
⚠️ Core Precaution: Stop!
The single most important action is to STOP USING THE DEVICE (hard drive, SD card, etc.) immediately after realizing the video is deleted. Any action, like downloading new files, installing software, or even saving a temporary file, risks overwriting the very video data you are trying to save.
Method 1: The Quick Check The Recycle Bin
Always start with the simplest solution. This applies to videos deleted from a computer’s main storage.
Step 1: Locate and open your system’s Recycle Bin.

Step 2: Search for the deleted video file by its name, type, or deletion date. The file name might be prefixed with how to recover video to help in the search if you are using specialized file managers.
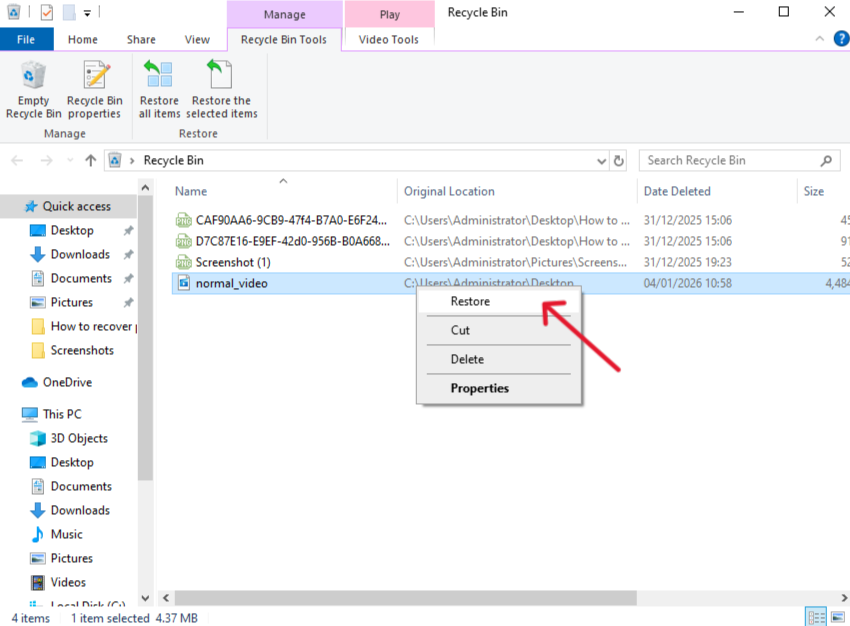
Step 3: Right-click on the file and select Restore . The video will instantly return to its original folder.
Method 2: Professional Recovery Software
When a video is deleted permanently (e.g., emptied from the Recycle Bin or deleted from an external drive), specialized software is necessary. Tools like PandaOffice Drecov are designed to scan the “free” space on your drive for those digital “ghosts.”
Step 1: Download and Install PandaOffice Drecov. Download the software on a different drive or partition than the one containing the lost video to avoid overwriting.
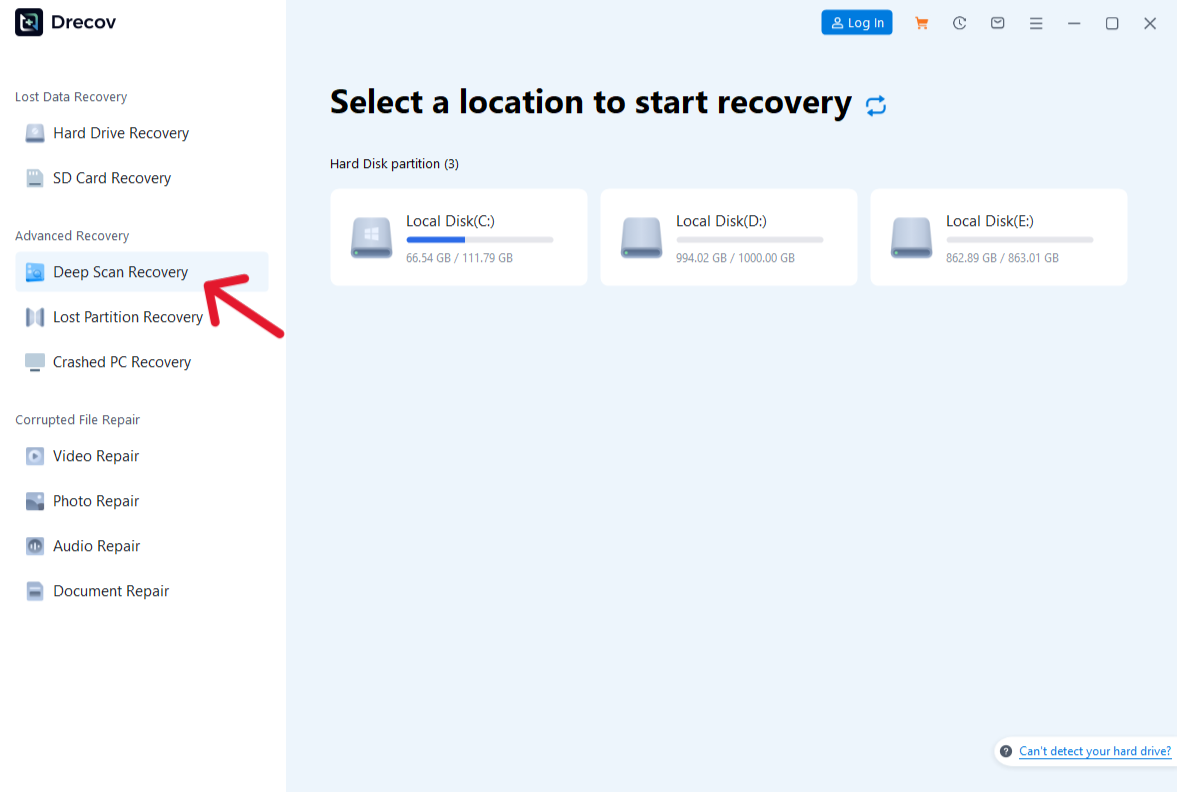
Step 2: Scan the Drive. Open PandaOffice Drecov. Select the specific location (e.g., ‘Drive D:’, ‘SD Card’) where your video was lost. Click “Scan” to begin the process. Since video files are large and often fragmented, ensure you select a “Deep Scan” option for the best chance of successful retrieval.

Step 3: Preview and Filter. Once the scan is complete, use the Filter option to select file types, specifically Video (or common video formats like MP4, MOV, AVI).Select the desired video files and click the Recover button.
🔍 CRITICAL: Save the recovered videos to a DIFFERENT drive than the one you are recovering from. This protects the original data until a successful recovery is confirmed.
Method 3: File History or Previous Versions
Operating systems often have built-in backup and recovery features that can help you learn how to recover video files without third-party tools.
Step 1: Navigate to the folder where the video was originally saved. Right-click the folder and select Properties.
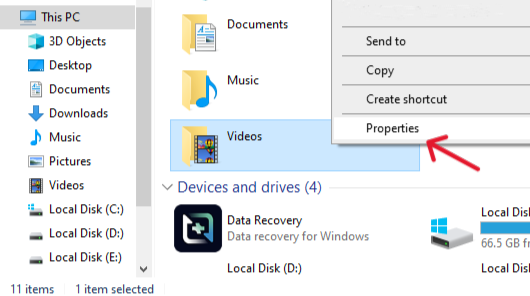
Step 2: Click the Previous Versions tab. This will display a list of older, automatically saved versions of the folder.
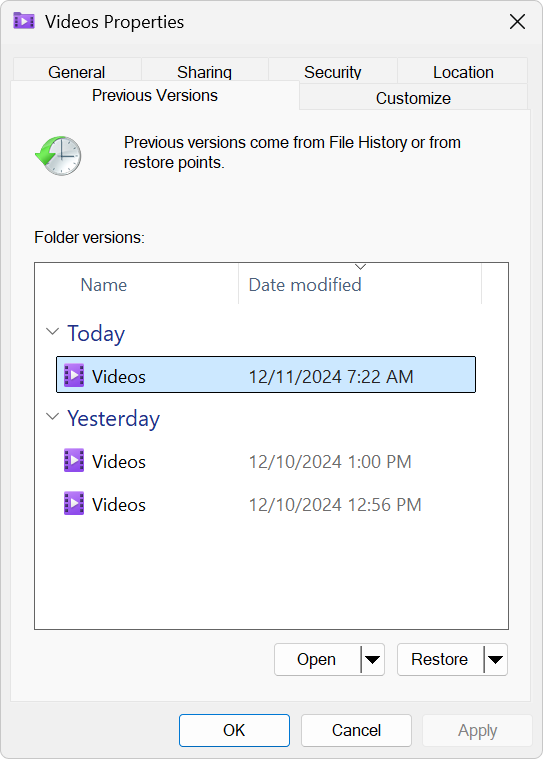
Step 3: Select a version that predates the deletion, and click Restore or Open to retrieve the video file.
Method 4: Command Line Tools for Advanced Users
If you are comfortable with the Command Prompt, Microsoft offers a free utility called Windows File Recovery. It’s an advanced option for users who want complete control over how to recover video files on Windows 10/11.
Step 1: Install the Utility. Download and install Windows File Recovery from the Microsoft Store.
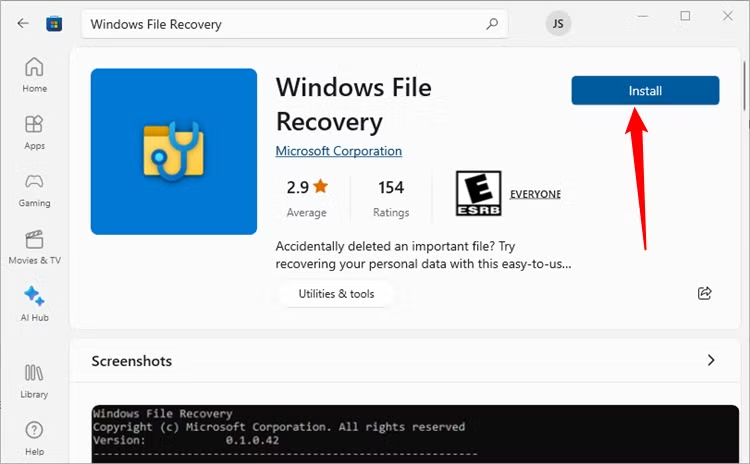
Step 2: Determine the Recovery Mode. Check your drive’s file system (NTFS, FAT, exFAT). For recovering specific video formats like from FAT or exFAT drives (common on SD cards), use the Signature Mode (). For NTFS drives, Segment Mode () is often better..mp4/x/r

Step 3: Execute the Command. Use the command structure: winfr [Source Drive]: [Destination Drive]: [Mode] /n [File Path/Type] .
🔍 Warning: The destination drive cannot be the same as the source drive.
Example for SD Card (exFAT/FAT, recovering MP4): winfr D: E: /x /y:MP4. This attempts to recover all MP4 files from D: drive to E: drive using Signature Mode.
Step 4: Check the Destination. The recovered files will appear in the destination folder (e.g., E:\Recovery_date_time).
Method 5: Using System Restore Points
While not a direct file recovery method, a System Restore can occasionally bring back files if they were deleted due to a system error or an application failure that happened recently. This is an indirect approach to learn how to recover video if other methods fail.
Step 1: Access System Restore. Search for and open “Create a restore point” in the Windows search bar, then click the System Restore button.

Step 2: Select a Restore Point. Choose a restore point created before the video was lost.
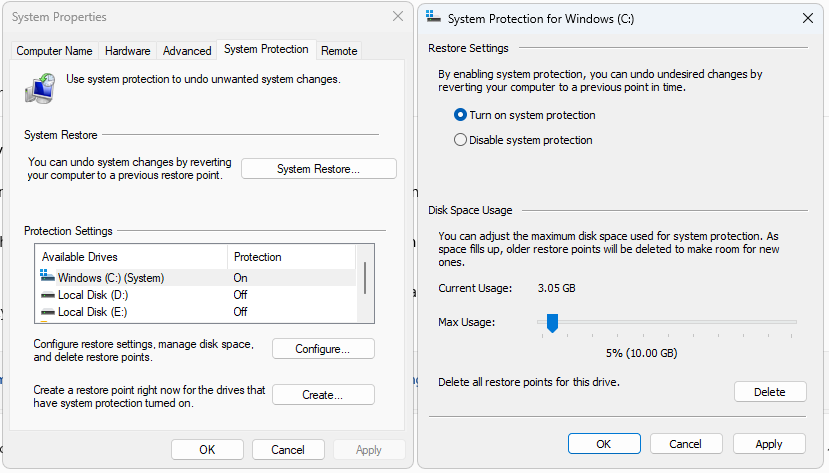
Step 3: Confirm and Execute. Follow the prompts. Your computer will restart and revert system files and registry settings to the state of the chosen point.
🔍 Warning: This process deletes programs installed after the restore point, but it usually keeps personal data intact.
Method 6: Cloud or App-Specific Recovery
If the video was deleted from a modern smartphone, chances are a cloud backup service has placed it in a temporary trash bin.
Step 1: Check the Cloud Trash/Bin. Open your primary photo/video app (e.g., Google Photos, iCloud Photos, or OneDrive).

Step 2: Locate the Trash Folder. Navigate to the Trash or Recently Deleted folder (usually found under Library or Settings).
Step 3: Restore the Video. Select the deleted video(s) and choose the Restore option. Most cloud services keep deleted videos for 30 to 60 days before permanent removal.
Proactive Steps: Preventing Future Video Loss
Successfully learning how to recover video is excellent, but avoiding the loss in the first place is far better. Implement these habits to protect your valuable footage:
- Establish a 3-2-1 Backup Strategy: Keep 3 copies of your important videos (the original, plus two backups), on 2 different types of media (e.g., external hard drive and cloud storage), with 1 copy stored offsite (e.g., the cloud).
- Format Cards In-Camera: Always format memory cards inside the camera, not on your computer. This ensures the card’s file system is optimized for the device you are using to capture the video, reducing the chances of corruption.
- Avoid Overusing Storage: If a drive or card is consistently near full capacity, it increases the risk of file corruption and fragmentation, which makes subsequent efforts to figure out how to recover video much harder.
- Eject Safely: Always use the “Safely Remove Hardware” function before physically unplugging external drives or memory cards. Pulling them out mid-operation can severely corrupt the file system.
Common Questions on How to Recover Video
Q1: Can I recover video files from a formatted drive?
- A: Yes, often you can. Formatting (especially a quick format) only clears the file system’s index, similar to a basic delete. The actual data remains until overwritten. However, a deep scan with professional software like PandaOffice Drecov is usually required.
Q2: How do I know if the file has been overwritten?
- A: You won’t know for sure until you try to scan. If the recovery software finds the file but it is corrupted or won’t play correctly, there’s a high chance that parts of the video data have been partially overwritten, making it difficult or impossible to fully piece together how to recover video to a playable state.
Q3: What about recovering videos from a broken or physically damaged phone/camera?
- A: Software methods are useless here. If the memory chip (e.g., the SD card) is intact, you might attempt to read it via an external reader. If the internal memory chip of a device is damaged, the only option is professional data recovery service, which is very expensive and labor-intensive.
Q4: Can I use these recovery methods for videos lost on my iPhone or Android?
- A: For most videos lost on mobile devices, you should first try Method 6: Cloud Recovery. If the video was never backed up and was stored locally, using the software methods (like DRecov) requires specialized software that connects to the phone’s storage, or sometimes rooting/jailbreaking the device, which is far more complex and risky than computer recovery.
Q5: Is it safe to use free recovery software?
- A: Be cautious. While some free tools are legitimate, many have limitations or could be unreliable. Always choose reputable software to ensure the safety of your drive and the best chance of successful recovery.
Conclusion
Losing a cherished video is frustrating, but remember the most critical rule: speed is everything. By immediately stopping the use of the affected storage device and employing the focused, step-by-step methods outlined here—from checking the cloud trash to using powerful tools like PandaOffice Drecov—you dramatically increase your chances of successful retrieval. Now you know not only how to recover video files, but also how to protect them in the future.


