


Have you ever experienced that sinking feeling in your chest when you plug in your thumb drive, only to find your folders empty? Or perhaps you accidentally hit “Delete” on a thesis paper or a batch of irreplaceable wedding photos? If you are searching for a solution regarding a recuva usb flash drive recovery process, you are in the right place. Data loss is a stressful ordeal, but in the digital age, “deleted” rarely means “gone forever.”
In this comprehensive guide, we will explore how to use Recuva to reclaim your digital life. Furthermore, we will introduce professional-grade alternatives like PandaOffice Drecov to ensure you have a fallback plan regardless of how severe your data loss situation might be.
Understanding USB Data Loss
Common Causes of Data Loss on USB Drives
Let’s be honest—USB flash drives feel like magic little sticks, don’t they? You plug one in, drag your files, and boom—your data is portable. But that convenience comes with a catch. Data loss on USB drives happens more often than most people expect, and usually at the worst possible moment.
One of the biggest culprits is accidental deletion, where files disappear with a single click. Another common issue is file system corruption, often caused by unsafe removal or malware infections. Even physical damage—like dropping the USB or exposing it to water—can make data inaccessible. And let’s not forget viruses, which can hide or delete files silently.
When you use a recuva usb flash drive strategy, you are essentially betting on the fact that the operating system hasn’t cleared the physical storage cells yet. When files are deleted, the system just marks that space as “available.” If you stop writing new data immediately, your chances of a successful recovery remain incredibly high.
Why USB Flash Drives Are Vulnerable
USB drives are incredibly convenient, but they’re also fragile in ways many people overlook. Unlike traditional hard drives (HDDs), USB flash drives rely on NAND flash memory, which has a limited number of write and erase cycles. Over time, this wear and tear can lead to data corruption or complete hardware failure.
Furthermore, because we carry them in pockets and bags, they are exposed to static electricity, moisture, and physical pressure. Since most budget USB drives lack advanced error-correction code (ECC) found in SSDs, a single bit-flip can sometimes render an entire directory unreadable. This inherent instability makes knowing how to perform a recuva usb flash drive recovery a vital skill for anyone who carries data on the go.
What Is Recuva?
Key Features of Recuva
Recuva is one of those tools that feels almost like a lifesaver when you’re staring at missing files. Developed by Piriform (the makers of CCleaner), it’s a lightweight yet robust data recovery software.
- User-Friendly Wizard: It guides you through the process by asking what you lost (pictures, music, documents) and where you lost it.
- Deep Scan: This feature performs a byte-by-byte analysis of your drive to find traces of files that the standard file table has forgotten.
- Secure Overwrite: Interestingly, Recuva can also do the opposite—it can permanently delete files so they can never be recovered, which is great for privacy.
- Portable Version: You can run Recuva from another USB stick, ensuring you don’t have to install anything on the host computer’s hard drive.
Free vs. Professional Version
When looking into recuva usb flash drive solutions, you’ll notice a choice between the Free and Professional versions. For most individual “oops” moments, the Free version is more than enough. However, the Professional version ($24.95) offers:
- Virtual Hard Drive (VHD) Support: If you work with virtual machines, this is essential.
- Automatic Updates: Ensures you always have the latest recovery algorithms.
- Premium Support: Direct access to the Piriform technical team.
How Recuva Works for USB Recovery
File Recovery Process Explained
To master the recuva usb flash drive recovery method, you must understand the underlying tech. Your USB drive has a “Master File Table” (MFT) or a “File Allocation Table” (FAT). Think of this as the table of contents in a book.
When you delete a file, Windows simply crosses out the entry in the table of contents. The actual “chapters” (your data) stay on the pages until someone writes a new story over them. Recuva ignores the table of contents and scans the actual “pages” of the flash drive to see what is still written there.
Supported File Types and Formats
Recuva is impressively versatile. It supports:
- File Systems: FAT12, FAT16, FAT32, exFAT, NTFS, ext2, ext3, and ext4.
- Media: It can recover data from SD cards, CF cards, USB sticks, and external hard drives.
- Documents: $PDF$, $DOCX$, $XLSX$, and $PPTX$.
- Photos: Standard JPEGs and even RAW camera formats like .CR2 or .NEF.
Step-by-Step Guide to Recover Files from USB Using Recuva
Performing a recuva usb flash drive recovery is a linear process. Follow these steps carefully to ensure the best results.
Step 1: Downloading and Installing Recuva
Visit the official Piriform website to download the installer.
CRITICAL WARNING: Never install the software directly onto the drive you are trying to recover. If your lost files are on the C: drive, install Recuva on a USB. If your lost files are on a USB, install Recuva on your C: drive. This prevents the installation process from overwriting your deleted data.
Step 2: Launching the Wizard
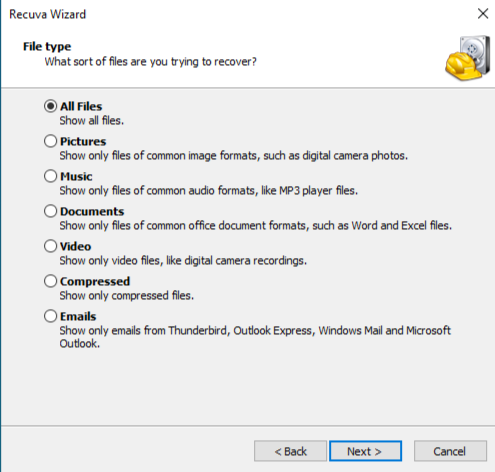
When you open Recuva, the “Recuva Wizard” will appear.
- Click Next.
- Select the File Type (e.g., “All Files” or “Pictures”).
- On the File Location screen, select “In a specific location” and browse to your USB Flash Drive.
Step 3: Scanning the USB Drive
Click Start. Recuva will conduct a “Quick Scan” first. This usually takes less than a minute. If the files you are looking for don’t show up, the program will ask if you want to perform a Deep Scan.
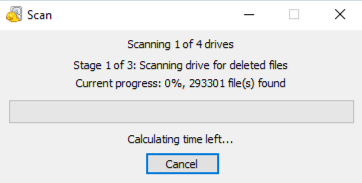
Note: A Deep Scan on a 64GB recuva usb flash drive can take 30 to 60 minutes. Be patient.
Step 4: Reviewing and Recovering Deleted Files
Once the scan finishes, you will see a list of files with colored dots:
- Green: Excellent condition; recovery is highly likely.
- Orange: Poor condition; some data may be lost.
- Red: Unrecoverable; the data has been overwritten.
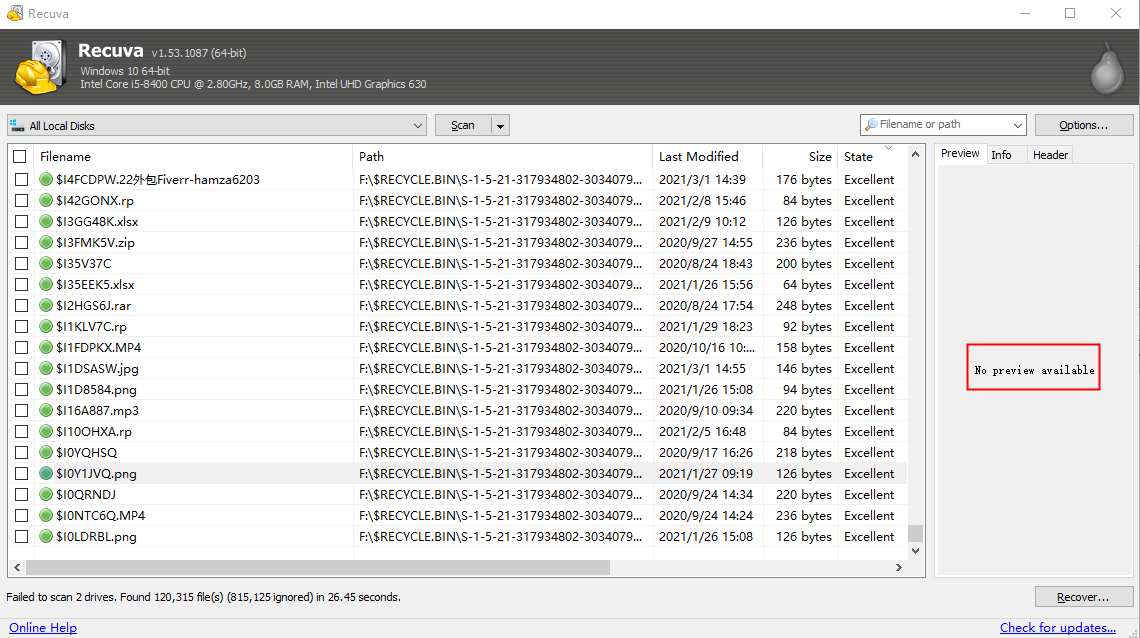
Check the boxes next to your files and click Recover. Select a folder on your computer’s hard drive (not the USB) to save the restored files.
Pro-Level Alternative: Using PandaOffice Drecov
While Recuva is excellent for basic deletions, sometimes the file system is so badly damaged that you need a more powerful engine. PandaOffice Drecov is a professional-grade tool designed for complex data loss scenarios. If your recuva usb flash drive attempt didn’t yield the results you wanted, follow these steps to use Drecov.
While basic tools often struggle with fragmented data or damaged directory trees, Drecov utilizes a proprietary high-speed scanning engine that reconstructs file signatures with surgical precision.
It is particularly effective for users who need to restore Windows to an earlier date without losing their most recent personal files. This level of versatility is why experts often recommend a complete guide to Drecov for those dealing with complex partition loss.
Furthermore, Drecov excels in niche recovery scenarios that standard software often overlooks. For instance, if you are a power user trying to locate Firefox bookmarks or need to know exactly where Firefox bookmarks are stored after a browser crash, this tool can pinpoint those specific SQLite database files instantly.
It even addresses modern sync issues, such as when you need to disable OneDrive folders and recover files that were accidentally wiped during a cloud sync conflict. Beyond just recovery, the PandaOffice suite provides comprehensive digital support, even offering insights on how to download Firefox videos safely in 2026. This makes it a holistic “digital insurance policy” for your flash drive and beyond.
⚠ Warning: Install it on a drive different from the one where your data was lost to prevent overwriting.
Step 1: Connect Your Device
Plug your USB flash drive into your computer. Launch PandaOffice Drecov. The main interface will display all connected drives.

Step 2: Select the USB Target
Locate your USB drive under the “External Drives” section. Ensure the drive letter matches what you see in “This PC.” Click on the drive to highlight it, then click the Start Scan button in the bottom right corner.

Step 3: Real-Time Filtering
Unlike simpler tools, Drecov allows you to filter results while the scan is running. If you are looking for a specific $PDF$ file, you can type “.pdf” into the search bar or select “Documents” from the left-hand sidebar. This saves you from waiting for a full 2TB scan if you only need one small file.

Step 4: Previewing Files
Before committing to a recovery, click on a file to see a Preview. For images and documents, this confirms the file is intact and not just a corrupted shell.
Step 5: Execute Recovery
Once you have identified your lost data, click the Recover button.
Warning: A prompt will appear asking for a destination path. Do not save the files back to the source USB. Choose a location on your desktop or a cloud-synced folder to ensure data integrity.
Tips to Maximize Recovery Success
Dos and Don’ts After Data Loss
- DO unplug the drive immediately if you aren’t ready to run a scan.
- DON’T format the drive, even if Windows pops up a window saying “You need to format the disk in drive X: before you can use it.” Formatting creates a new file system and can destroy old data.
- DO use a different computer to download recovery tools if possible.
- DON’T run “Chkdsk” on the drive. While Chkdsk is great for fixing errors, it often does so by “cleaning up” (deleting) corrupted fragments that might actually contain your data.
Deep Scan vs. Quick Scan
Always start with a Quick Scan. It’s faster and maintains the original folder structure better. However, if your recuva usb flash drive search comes up empty, the Deep Scan is your best friend. It searches for “headers”—unique signatures at the start of files (like the FF D8 hex code at the start of every JPEG). This method is slower but can find files even if the entire partition table is gone.
Common Issues and Troubleshooting
USB Not Detected
If your computer doesn’t recognize the drive, Recuva can’t scan it.
- Open Disk Management (Right-click Start > Disk Management).
- See if the drive appears there. If it says “No Media” or doesn’t show up at all, the hardware controller might be dead.
- Try a different USB port, preferably one directly on the motherboard (at the back of a PC) rather than a front-panel port or a hub.
Files Not Recoverable
If you see a file in Recuva but it has a red icon, it means a new file has claimed those storage blocks. This often happens if you continued to save work to the drive after the initial deletion. In these cases, even a recuva usb flash drive professional scan may only recover fragments of the original file.
Preventing Future USB Data Loss
Backup Strategies: The 3-2-1 Rule
To avoid needing a recuva usb flash drive guide ever again, follow the 3-2-1 backup rule:
- 3 copies of your data (Original + 2 backups).
- 2 different types of media (e.g., USB drive and Internal HDD).
- 1 copy off-site (e.g., Google Drive, Dropbox, or OneDrive).
Safe Usage Practices
- Always Eject: Right-click the drive icon and select “Eject” before pulling it out. This ensures all “write-cache” operations are finished.
- Use Caps: Physical damage to the USB connector is a leading cause of failure. Keep the cap on or use a retractable model.
- Replace Regularly: USB sticks aren’t meant to last forever. If you’ve been using the same drive for 5 years, it’s time to migrate your data to a new one.
Recuva USB drive data recovery FAQs
1. Can Recuva recover files from a formatted USB drive?
Yes. As long as you performed a “Quick Format” and not a “Full Format” (which wipes the data to zeros), Recuva can find the files using a Deep Scan.
2. Is Recuva safe to use?
Absolutely. Recuva is “read-only” during the scanning process, meaning it won’t damage your existing data. Just ensure you download it from the official Piriform site to avoid bundled third-party software.
3. Why are my recovered files corrupted?
This usually happens because the data was partially overwritten before you attempted the recovery. This is why immediate action is critical.
4. How long does a deep scan take?
For a standard 32GB USB 3.0 drive, a deep scan usually takes about 15–20 minutes. Older USB 2.0 drives will take significantly longer.
5. Does Recuva work on Mac?
No, Recuva is a Windows-only application. For Mac recovery, you might look into Disk Drill or PhotoRec.
Conclusion
Losing data from a flash drive is a rite of passage in the digital world, but it doesn’t have to be a permanent tragedy. By using the recuva usb flash drive recovery method, you can often restore your files in minutes for free. If the situation is more dire, professional tools like PandaOffice Drecov provide the deep-level scanning power needed to handle corrupted partitions and complex file structures.
The most important takeaway? Stop using the drive the second you realize something is missing. Every second of use after a deletion increases the risk of permanent overwriting.


