


In the modern digital era, the need to format usb to fat32 remains a frequent requirement for tech enthusiasts and casual users alike. Whether you are looking to use a flash drive on a gaming console like the PS4, an older car stereo, or a specific industrial machine, the FAT32 file system is often the only compatible format. However, when you try to format usb drive to fat32 on a high-capacity device (such as 64GB, 128GB, or 256GB), Windows often restricts you to NTFS or exFAT.
In this comprehensive tutorial, we will explore various professional and built-in methods to achieve a successful fat32 usb drive conversion. We will also introduce PandaOffice Drecov as your primary safeguard for data security during this process.
Why Do You Need to Format USB Drive to FAT32?
Before we dive into the “how-to,” it is essential to understand why formatting usb to fat32 is still so prevalent despite the existence of more modern file systems.
- Universal Compatibility: Almost every operating system, including Linux, macOS, and Windows, can read and write to a fat32 usb drive.
- Hardware Support: Many gaming consoles (Xbox 360, PS3/PS4), smart TVs, and car head units specifically require you to format usb to fat32 to recognize the media files.
- Bootable Drives: For certain BIOS-based system updates or UEFI firmware installations, a fat32 usb drive is mandatory.
Pre-Formatting Essential: Data Safety with PandaOffice Drecov
A critical warning before you begin: formatting usb to fat32 will erase every single file on your device. If you accidentally format the wrong drive or realize you didn’t back up your photos, videos, or documents, do not panic. This is where PandaOffice Drecov comes into play.
PandaOffice Drecov is a professional-grade data recovery solution designed to retrieve lost partitions and formatted files with high efficiency.
How to Recover Data if You Accidentally Format USB to FAT32
If you encounter data loss during the process of formatting usb to fat32, follow these steps using PandaOffice Drecov:
- Step 1: Connect your USB drive to your computer and launch PandaOffice Drecov.

- Step 2: Select the USB drive from the list of available storage devices and click “Scan.”

- Step 3: The software will perform a deep analysis of the drive’s sectors. You can preview the found files in real-time.

- Step 4: Mark the files you wish to save and click “Recover” to store them on a different local drive.
Versatile Solutions for Other USB Crisis Scenarios
Beyond accidental formatting, PandaOffice Drecov serves as a Swiss Army knife for various flash drive failures. If you find yourself asking, “Can you really recover data from formatted USB drives?” the answer is a resounding yes, provided you use the right algorithmic tools.
The software is also engineered to tackle complex logical issues. For instance, many users experience a frustrating bug where USB files are missing but space is still used; Drecov can force these “phantom” files to reappear. It is equally effective when a drive’s file system collapses into a “RAW” state, offering easy ways to recover data from RAW USB without further damaging the hardware.
For those dealing with security breaches, you can use the tool to defeat a USB virus and reclaim your files that were hidden or encrypted by malware. Even in hardware-adjacent issues, such as when the USB light is on but the drive won’t show up in Windows, Drecov can often still communicate with the controller to pull data. Finally, for those “oops” moments, it provides a reliable method for how to recover files deleted with Shift+Delete from your USB, bypassing the fact that USB deletions don’t go to the Recycle Bin.
Method 1: Utilizing FAT32 Format (GUI Tool) for Large Drives
Since Windows File Explorer limits you to NTFS or exFAT for drives over 32GB, the most efficient way to format usb to fat32 is using the specialized tool utility. This lightweight, free tool bypasses the 32GB limit effortlessly.
Detailed Steps for Using GUI Format
- Step 1: Download the FAT32 Format executable from the official source.
- Step 2: Plug in your device and ensure no other programs are accessing the fat32 usb drive to avoid “drive in use” errors.
- Step 3: Select the correct Drive Letter.
Warning: Double-check this to avoid wiping your secondary hard drives.
- Step 4: Set the Allocation Unit Size to “Default” and check “Quick Format.”
- Step 5: Click “Start.” Within seconds, the tool will successfully format usb drive to fat32 even on 128GB or 256GB hardware.
Method 2: How to Format USB Drive to FAT32 via Disk Management
If your USB drive is 32GB or smaller, you can use the Windows Disk Management tool. This is a built-in utility that doesn’t require third-party downloads.
Step-by-Step Guide for Disk Management
- Step 1: Right-click on the “Start” button and select “Disk Management.”
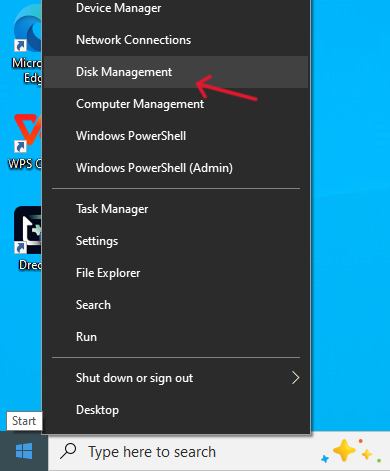
- Step 2: Locate your USB flash drive in the list of drives.
- Step 3: Right-click the partition on the USB and select “Format.”
- Step 4: Set the file system to FAT32 and ensure the “Perform a quick format” box is checked. Click “OK.”
⚠️ Note: If the drive is 64GB or larger, the FAT32 option will be missing from the list. You must use Method 1 or Method 3 in that case.
Method 3: Using Command Prompt (CMD) for Advanced Users
For those who prefer a command-line interface, Windows provides a way to format usb to fat32 via the Command Prompt. This method is effective but can be very slow for large drives.For more advanced partition mapping, you can also refer to the Official Microsoft DiskPart Documentation.
Instructions for CMD Formatting
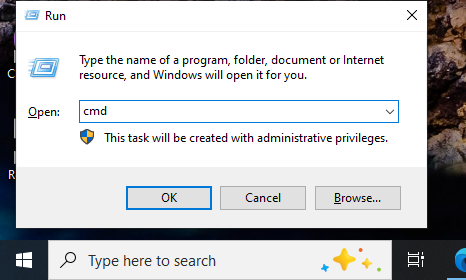
- Step 1: Type
cmdin the Windows search bar, right-click the result, and “Run as Administrator.”
- Step 2: Type the command:
format /FS:FAT32 X:(Replace “X” with your actual USB drive letter). - Step 3: Press Enter. The system will begin the process of formatting usb to fat32.
Wait for the progress to reach 100%. Note that for a 128GB drive, this might take several hours.
Method 4: How to Format USB to FAT32 using PowerShell
PowerShell is a more powerful version of CMD and can sometimes handle fat32 usb drive tasks more efficiently.
- Step 1: Right-click the Start icon and select “Windows PowerShell (Admin).”
- Step 2: Enter the command:
format /FS:FAT32 E:(Substitute “E” with your drive letter). - Step 3: Confirm the action by pressing Enter.
- Step 4: Once finished, your drive is ready for use as a fat32 usb drive.
Troubleshooting: Why Can’t I Format My USB to FAT32?
Sometimes, you might encounter errors while trying to format usb drive to fat32. Here are the most common reasons:
- The Drive is Write-Protected: If your USB has a physical switch or a software lock, you cannot format usb to fat32 until the protection is removed.
- Drive Size is Over 32GB: As mentioned, Windows native tools (File Explorer/Disk Management) will not show FAT32 for large drives. Use Method 1.
- Physical Damage: If PandaOffice Drecov cannot see the drive, it might have hardware failure.
Comparison Table: Which Method is Best for You?
| Method | Best For | Success Rate | Speed |
| Partition Master | All drive sizes (up to 2TB) | Very High | Fast |
| Disk Management | Drives under 32GB | High | Medium |
| Command Prompt | Tech-savvy users | Medium | Very Slow |
| PowerShell | Quick command line fix | Medium | Slow |
Format USB flash drive to fat32 FAQs
Q: Will formatting a USB drive to FAT32 make it slower?
A: Not necessarily. While FAT32 is older, for simple file transfers on a fat32 usb drive, you won’t notice a significant speed difference compared to NTFS. However, FAT32 cannot store individual files larger than 4GB.
Q: Can I format a 256GB USB to FAT32?
A: Yes, but you cannot do it through Windows File Explorer. You must use a third-party partition tool or the Command Prompt (though CMD will be extremely slow).
Q: Is it better to use exFAT or FAT32?
A: It depends on your device. If your device supports exFAT (like modern PCs and Macs), use it. If you are using older hardware, you must format usb to fat32.
Q: What if PandaOffice Drecov cannot find my files after a format?
A: Ensure you have selected the “Deep Scan” mode. If the data was overwritten by new files after the format usb to fat32 process, recovery becomes significantly harder. Always stop using the drive immediately after a data loss event.
Conclusion
Learning how to format usb to fat32 is a vital skill for anyone dealing with cross-platform hardware. While Windows imposes a 32GB limit on its native formatting tools, professional software like EaseUS Partition Master allows you to easily create a fat32 usb drive even on high-capacity 128GB or 256GB sticks.
Always remember that the process of formatting usb to fat32 is destructive to data. Ensure you have backups, and if something goes wrong, trust PandaOffice Drecov to recover your precious files. By following the “step 1, step 2” guides provided above, you can safely and effectively format usb drive to fat32 without any technical headaches.


