


Losing important files can feel like dropping your phone into the ocean—sudden panic, a quick surge of regret, and the desperate hope that things can be reversed. Thankfully, modern operating systems include a safety net designed for exactly these moments. If you have recently misplaced a critical document or photo, the first thing you should learn is how to restore deleted files from recycle bin. This built-in feature acts as a temporary holding area, keeping your data intact and easily accessible before it is permanently erased from the hard drive.
Instead of instantly wiping information, Windows simply moves deleted items to this digital “trash can,” allowing you a grace period to change your mind. By understanding how this process works, you can recover your work in seconds and avoid the stress of permanent data loss. Whether you are dealing with a single accidentally deleted image or a folder full of project files, mastering this simple recovery technique is the most effective way to protect your digital life.
Understanding the Recycle Bin and How File Deletion Works
To master data recovery, you first need to understand the mechanics of the Windows file system. The Recycle Bin is not just a folder; it is a specialized system directory that tracks the original metadata of your files. When you send a file there, Windows changes its “pointer,” making it invisible to your standard File Explorer folders but keeping the raw data intact on your disk.
What Happens When You Delete a File in Windows
Deleting a file on a Windows computer is a bit like tossing a letter into a temporary mailbox rather than shredding it instantly. The system moves the file from its original folder into the Recycle Bin, where it stays until you decide to restore it or permanently remove it. This safety feature prevents accidental data loss, especially when users mistakenly delete documents, photos, or project files.
Technically speaking, when a file is deleted, the operating system removes its reference from the file system index. The actual data remains on the disk until new data overwrites it. That means your deleted file is often still physically present on the storage device, just hidden from normal view. Because of this design, many recovery tools can scan the drive and rebuild the missing file structure.
This is why experts always recommend stopping computer activity immediately after accidental deletion. Every time you save a new file, install a program, or download content, the system might overwrite the space where your deleted file exists. Once that happens, recovery becomes extremely difficult or even impossible. Acting quickly dramatically improves your recovery chances.
How Long Files Stay in the Recycle Bin
By default, Windows keeps deleted files in the Recycle Bin until one of three things happens: you manually empty it, the bin reaches its storage limit, or you delete the file permanently using Shift + Delete. In many setups, files can remain there for weeks or even months depending on available storage.
Some cloud services, like OneDrive, keep deleted files for about 30 days before permanent removal, providing another layer of protection. This grace period gives users plenty of time to recover accidentally deleted documents. However, once files are removed from the Recycle Bin, the recovery process becomes more complicated.
The key takeaway here is simple: if you accidentally delete a file, check the Recycle Bin immediately. In most cases, restoring it takes just a few clicks. If the bin has already been emptied, don’t panic—there are still several recovery methods available, which we’ll explore next.
Common Reasons Files Get Deleted from Recycle Bin
Sometimes files disappear from the Recycle Bin faster than you expect. This can happen for several reasons, and understanding them can help you avoid similar situations in the future. Accidental deletions are surprisingly common, especially when cleaning up folders or managing large batches of files.
Accidental Emptying of Recycle Bin
Imagine cleaning out your closet and accidentally throwing away something valuable along with the trash. That’s exactly what happens when users empty the Recycle Bin without checking its contents carefully. It’s one of the most common causes of unexpected data loss.
The good news is that even after emptying the bin, the files may still exist on the disk. Recovery software can scan the drive for file signatures and attempt to rebuild the deleted data. Studies show recovery tools can restore 60–95% of recently deleted files under optimal conditions, depending on disk activity and file type. Still, time is critical. The longer you continue using the computer after deletion, the higher the chance that the system will overwrite the deleted data.
Using Shift + Delete and Permanent Deletion
The Shift + Delete keyboard shortcut permanently deletes files without sending them to the Recycle Bin. While it’s useful for quickly removing unwanted data, it can be dangerous if used accidentally. Many users press this shortcut while organizing files, thinking they are simply moving items to the Recycle Bin. Instead, the files disappear instantly. Since there is no intermediate storage location, recovery usually requires specialized tools or backups.
Method 1 – Restore Deleted Files Directly from Recycle Bin
How do you restore deleted files from recycle bin?
This is the most fundamental question for any Windows user. If you haven’t performed a permanent deletion command, your files are likely sitting in the bin waiting for your command. Recovering files directly from the Recycle Bin is by far the easiest and fastest method. In most cases, it takes less than a minute and requires no technical skills. If you’ve ever dragged something into the trash by accident, this method is essentially the digital equivalent of reaching into the bin and pulling it back out.
To begin, open the Recycle Bin from your desktop. Once inside, you’ll see a list of deleted files. You can sort items by name, date deleted, or file size to quickly locate what you’re looking for. Windows also provides a search box that helps you filter results if the bin contains hundreds of items.
Step-by-Step Guide to Recover Files
- Step 1: Locate the Recycle Bin icon on your desktop and double-click it to open.

- Step 2: Use the search bar in the top-right corner or scroll through the list to find your deleted file.
- Step 3: Right-click the specific file or folder you wish to retrieve.
- Step 4: Select Restore from the context menu.
- Step 5: The file will disappear from the bin and return to its original location.
Pro Tip: If you aren’t sure where the file was originally stored, you can right-click the file in the Recycle Bin and select Properties to see the “Original Location” path.
Method 2 – Restore Files Using File History Backup
How to restore things deleted from recycle bin via backup?
If the Recycle Bin no longer contains your deleted files, the next place to look is File History. This built-in Windows backup feature automatically saves copies of files from folders like Documents, Desktop, Pictures, and Videos. When enabled, it acts like a time machine, allowing you to roll back to earlier versions of files or entire folders.
The beauty of File History is that it keeps multiple versions of files over time. If you accidentally delete or overwrite a document, you can simply browse the backup timeline and restore the version you need. It’s similar to having multiple snapshots of your data saved at different points in time.
Checking Previous Versions of Files
The Previous Versions feature works hand-in-hand with File History and system restore points. When enabled, Windows periodically creates snapshots of files and folders. These snapshots can be used to recover lost data even if the original file is gone.
- Step 1: Open File Explorer and navigate to the folder that previously contained the deleted file.
- Step 2: Right-click the folder and select Restore previous versions.
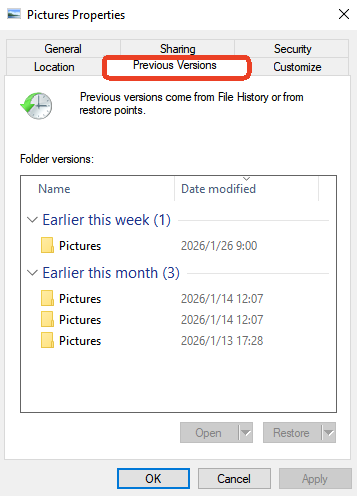
- Step 3: A list of available versions will appear based on dates. Choose a version from a time before the file was deleted.
- Step 4: Click Open to verify the contents or click Restore to bring the folder back to that state.
Method 3 – Recover Files After Emptying Recycle Bin
Once the Recycle Bin has been emptied, the situation becomes more complicated—but not hopeless. At this stage, Windows no longer stores an easy reference to the file, but the data may still exist on the disk. Specialized recovery tools can scan the storage device and search for remnants of deleted files.
Using Windows File Recovery Tool
One of the most effective built-in tools is Windows File Recovery, a command-line utility available from the Microsoft Store. While it may look intimidating because it lacks a graphical interface, it is a powerful tool for those wondering how to restore deleted files from recycle bin after emptying it.
- Step 1: Download and install Windows File Recovery from the Microsoft Store.
- Step 2: Open the app (this will open a Command Prompt window).
- Step 3: Enter the command:
winfr source-drive: destination-drive: [/mode] [/switches]. For example:winfr C: D: /regular /n \Users\<username>\Documents\. - Step 4: Press Y to start the recovery process. The tool will scan for fragments and attempt to rebuild the file.
Method 4 – Recover Deleted Files Using Data Recovery Software
When built-in tools aren’t enough, professional data recovery software becomes the next logical step. These programs are designed specifically to scan storage devices for deleted data and reconstruct lost files.
Introducing PandaOffice Drecov
For a more user-friendly experience than command-line tools, PandaOffice Drecov is a premier data recovery product. It is designed to handle complex data loss scenarios, including formatted drives, emptied Recycle Bins, and partition loss. Its intuitive interface makes it accessible for beginners while providing deep scanning capabilities for advanced users.
⚠ Warning: Install it on a drive different from the one where your data was lost to prevent overwriting.
How to use PandaOffice Drecov to recover files:
- Step 1: Select Location. Choose the drive or specific folder (like the Recycle Bin) where your files were last seen. Click the Scan button.

- Step 2: Preview Results. As the scan progresses, you can browse files by type (photos, documents, etc.). PandaOffice Drecov allows you to preview files before recovery to ensure they aren’t corrupted.

- Step 3: Execute Recovery. Select the files you want to retrieve and click Recover.
Warning: Always save recovered files to an external drive or a different partition to ensure the original data isn’t overwritten during the process.
How Recovery Software Works
Recovery programs scan the storage device sector by sector. They search for file signatures—unique patterns that identify file types such as JPG, DOCX, or MP4. Once these patterns are found, the software reconstructs the file structure and attempts to restore it. This process can recover thousands of file formats and often works even when the Recycle Bin has been emptied.
Method 5 – Restore Files Using System Backup
Where do files restored from recycle bin go when using a System Image?
If you are using a full System Image Backup, the files return to exactly where they were when the image was created. This is an “all or nothing” approach compared to File History, but it is incredibly reliable for major data loss events.
- Step 1: Connect your backup media (external hard drive).
- Step 2: Go to Settings > Update & Security > Recovery.
- Step 3: Under Advanced startup, click Restart now.
- Step 4: Select Troubleshoot > Advanced options > System Image Recovery.
- Step 5: Follow the prompts to select your backup and restore your system state.
Factors That Affect File Recovery Success
Not every deleted file can be recovered. Several variables determine whether your efforts will be fruitful.
Storage Type (HDD vs SSD)
Traditional Hard Disk Drives (HDDs) tend to have higher recovery success rates because deleted data remains on the physical disk until another file occupies that space. Solid-state drives (SSDs), however, often use a feature called TRIM. When TRIM is active, the SSD controller proactively clears deleted data to maintain high write speeds. This means recovery on an SSD must happen almost immediately after deletion, or the data may be gone forever.
Overwritten Data and Time Factor
The biggest enemy of file recovery is time. Every action on your computer—saving files, installing software, browsing the internet—writes new data to the disk. If new data overwrites the sectors containing your deleted file, recovery becomes impossible. That’s why experts always recommend stopping computer usage immediately after accidental deletion.
Tips to Prevent Losing Important Files
Prevention is always easier than recovery. Developing strong data management habits will save you from future headaches:
- Enable Automatic Backups: Use Windows File History or cloud services like Google Drive or Dropbox.
- Avoid Shift + Delete: Train yourself to use the standard delete key so you have a safety net.
- Check Before You Empty: Make it a habit to glance through the Recycle Bin once a week before clicking “Empty.”
- Use an Uninterruptible Power Supply (UPS): Sudden power cuts can corrupt file indexes, leading to data loss that bypasses the Recycle Bin entirely.
More Data Recovery and Internal Links
To further enhance your knowledge of managing the Windows environment and protecting your data, explore these helpful guides:
- Where is Recycle Bin in Windows 10? 3 Quick Ways to Find It
- Where Do I Find Recycle Bin in Windows 10?
- Windows 10/11: How to Remove the Recycle Bin from Desktop
How to Restore Deleted Files From Recycle Bin FAQs
1. Can I restore files after emptying the Recycle Bin?
Yes, it is possible using recovery software like PandaOffice Drecov or Windows File Recovery. Success depends on whether the deleted data has been overwritten by new files.
2. How long do files stay in the Recycle Bin?
Files remain in the Recycle Bin indefinitely until you empty it, or until the bin reaches its assigned storage limit, at which point Windows deletes the oldest files first.
3. Is file recovery guaranteed?
No. Recovery success depends on the storage type (HDD vs. SSD), the amount of disk activity since deletion, and whether the physical sectors have been overwritten.
4. Where do files restored from recycle bin go?
When you click “Restore,” the files go back to the exact folder or directory where they were located before they were deleted.
5. Can SSD files be recovered after deletion?
Recovery is significantly harder on SSDs due to the TRIM command. If you need to recover data from an SSD, turn off the computer immediately and use a recovery tool from a bootable drive.
Conclusion
Accidentally deleting important files can feel disastrous, but in many cases, the situation is reversible. The Recycle Bin acts as a robust first line of defense, allowing users to restore files instantly if they haven’t been permanently removed. Even when the bin has been emptied, recovery remains possible through backups, built-in Windows tools like File History, and professional solutions like PandaOffice Drecov to improve your chances of how to restore deleted files from recycle bin.
The most important factor in successful recovery is speed. The sooner you act after deleting a file, the greater your chances of retrieving it intact. Understanding how file deletion works—and knowing the available recovery methods—turns what seems like a digital disaster into a manageable problem. Always remember to back up your data regularly to ensure that “permanently deleted” never truly means “gone forever.”


