


Accidentally hitting “Empty Recycle Bin” is a heart-sinking moment that almost every computer user has experienced. Whether it was a collection of irreplaceable family photos or a crucial work presentation, the immediate realization of loss is stressful. However, in the modern digital landscape of 2026, data recovery is more accessible than ever. One of the most prominent names in this field remains CCleaner’s Recuva. This article serves as an extensive educational resource on recuva recycle bin recovery, exploring how the technology works, its limitations, and the best alternatives available today.
Understanding Recycle Bin Data Loss
What Happens When You Delete Files
Let’s clear up a common myth: when you delete a file on Windows, it isn’t immediately gone forever. Instead, the system simply removes the “pointer” or reference to that file, marking the space it occupies as “available” for new data. Think of it like removing a book from a library’s digital catalog—the physical book still sits on the shelf, but the librarian no longer knows where to look for it.
When files reside in the Recycle Bin, they occupy a hidden system folder. Even after you empty the bin, the binary data remains on the disk sectors. This is exactly why specialized software can perform a recuva recycle bin recovery to retrieve what seems lost. The operating system treats these sectors as empty space, meaning the data stays intact until a new file is written over those specific coordinates.
Can Files Be Recovered After Emptying Recycle Bin?
Yes, and that’s where the magic of data recovery shines. Even after the final “Empty Recycle Bin” confirmation, recovery is highly possible because the underlying bits and bytes often remain untouched for a period. However, success depends on several variables: disk activity, file size, and the type of storage media.
For example, traditional Hard Disk Drives (HDDs) are generally more forgiving. They don’t actively wipe data until they need the space. In contrast, Solid State Drives (SSDs) often utilize TRIM technology. When a file is deleted on an SSD, the TRIM command tells the drive to proactively clear those cells to maintain write speeds. Therefore, if you are performing a recuva recycle bin recovery on an SSD, your window of opportunity is significantly smaller than on an HDD.
What is Recuva and How It Works
Key Features of Recuva
Recuva is a veteran data recovery tool designed for the Windows ecosystem. It gained popularity by being lightweight, efficient, and—most importantly—offering a robust free version. In 2026, it remains a staple for users who need a quick fix without a steep learning curve.
- User-Friendly Wizard: Guides beginners through the selection of file types and locations.
- Deep Scan Mode: An advanced search that combs through drive sectors for traces of deleted files.
- Portable Version: Allows you to run the software from a USB drive, preventing the installation process from overwriting the very data you want to save.
- Secure Overwrite: Ironically, it also includes a feature to permanently delete files using military-grade standards.
File Recovery Technology Explained
Recuva utilizes a combination of file system analysis and signature scanning. It primarily examines the Master File Table (MFT), which is the database Windows uses to track every file on an NTFS partition. When a file is deleted, Recuva looks for entries marked as “deleted” but whose clusters are not yet occupied by new data.
For more difficult cases, it uses “Carving.” This involves looking for specific file headers (like the start of a JPEG or a PDF) directly on the drive platters. By identifying these signatures, the tool can reconstruct the file even if the MFT entry is completely gone.
Why Use Recuva for Recycle Bin Recovery
Advantages Over Other Tools
The primary reason users flock to recuva recycle bin recovery is the price-to-performance ratio. While many “freemium” tools allow you to scan for free but charge you to actually save the files, Recuva’s free version allows for unlimited recovery.
Furthermore, its integration with the Windows shell is seamless. You can often right-click a folder and scan for deleted files directly. It is a low-resource application, meaning it won’t crash older systems or consume massive amounts of RAM during the scanning process.
Limitations You Should Know
Despite its strengths, Recuva is not a silver bullet. It excels at simple accidental deletions but struggles with:
- Formatted Drives: While it can find some files, the success rate drops significantly compared to professional-grade tools.
- Damaged Partitions: If a partition table is corrupted (RAW drive), Recuva often fails to see the drive at all.
- File Naming: During deep scans, it often recovers files but loses their original names, renaming them something like
[000001].jpg.
How to use Recuva to restore recycle bin
If you have just realized you emptied the bin by mistake, follow these steps immediately. The goal is to minimize disk writes, so avoid downloading large files or streaming videos while you perform these steps.
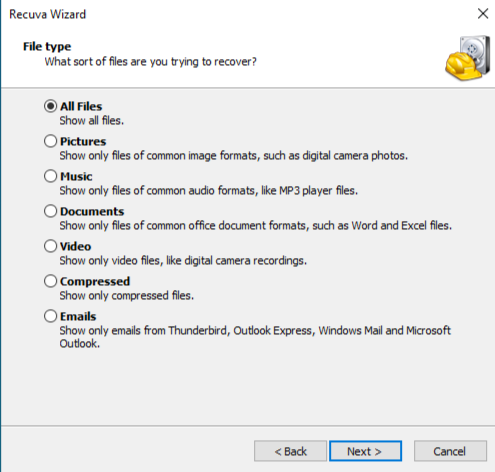
Step 1: Launch the Recuva Wizard
When you open the program, the Recuva Wizard will appear. Click Next. Select the file type you are looking for (Pictures, Music, Documents, etc.). If you want to see everything, select All Files.
Step 2: Target the Recycle Bin
On the “File Location” screen, choose the option “In the Recycle Bin”. This narrows the search scope specifically to the system’s deletion repository, making the recuva recycle bin recovery process much faster.
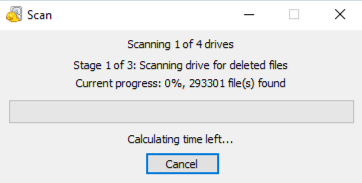
Step 3: Execute the Scan
Click Start. A “Quick Scan” will run first. It usually takes less than a minute. If your files appear in the list, you are in luck. If the list is empty, you may need to restart the process and check the “Enable Deep Scan” box, though this will take much longer.
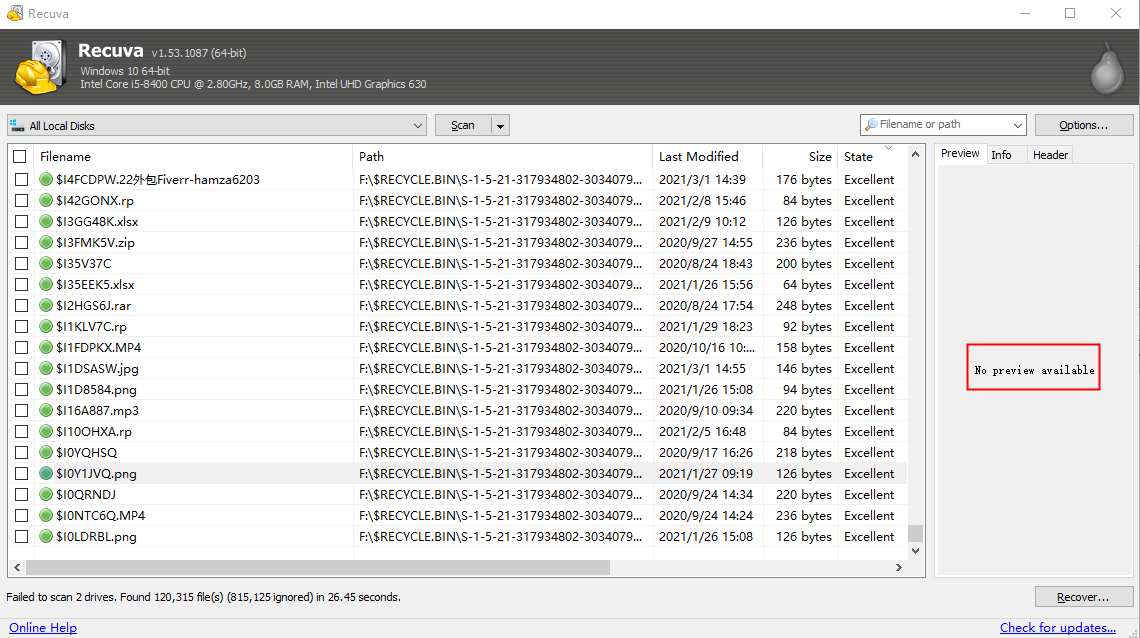
Step 4: Analyze and Recover
Review the results. Recuva uses a traffic light system:
- Green Circle: The file is in excellent condition and highly likely to be recovered perfectly.
- Red Circle: The file is overwritten and likely unrecoverable.Select your files and click Recover. Choose a destination folder on a different drive (e.g., an external hard drive or a different partition) to save the files.
Recuva recycle bin recovery not working
Sometimes, users follow the steps perfectly but still find themselves staring at an empty results screen. If you find that Recuva recycle bin recovery not working, it is usually due to one of the following technical reasons:
1. The File Was Overwritten
If you continued to use your computer for several days after the deletion, Windows likely used those “empty” sectors to store temporary browser files, Windows updates, or system logs. Once a single byte of the original file is overwritten, the file becomes “corrupted” or disappears from the scan results.
2. SSD TRIM Command
As mentioned earlier, if your OS is installed on an SSD, the TRIM command may have already wiped the data. You can check if TRIM is enabled by opening the Command Prompt as Administrator and typing:
fsutil behavior query DisableDeleteNotify
If the result is 0, TRIM is active, and the chances of a successful recuva recycle bin recovery are lower.
3. File Size and Fragmentation
Large files (like 4K videos) are often stored in non-contiguous fragments across the disk. If Recuva can’t find all the “pieces” of the puzzle, it might not display the file at all, or it might recover a file that won’t open.
4. System Permissions
Recuva needs administrative privileges to access the low-level file system. Ensure you are running the application as an Administrator by right-clicking the desktop icon and selecting “Run as administrator.”
Recuva vs Drecov for recycle bin recovery
When Recuva hits its technical ceiling, many users turn to more advanced, modern solutions. A prominent comparison in the 2026 market is Recuva vs Drecov for recycle bin recovery. While Recuva is the king of “quick and free,” PandaOffice Drecov is built on a more sophisticated engine designed for high-stakes data recovery.
| Feature | Recuva | PandaOffice Drecov |
| Scan Speed | Fast (Quick Scan) | Optimized Multi-thread Scanning |
| Deep Scan Success | Moderate (70-75%) | High (95%+) |
| File Preview | Basic Images/Text | Advanced (Video/Office Docs) |
| UI Design | Classic/Dated | Modern/Intuitive |
| SSD Recovery | Basic | Advanced Algorithms for SSD/NVMe |
If Recuva fails to find your files, or if the files it finds are corrupted, Drecov is often the next logical step. It uses a “Raw Recovery” method that ignores the file system entirely and reconstructs data based on raw hex patterns, which is far more effective for emptied Recycle Bins.
Professional Alternative: Using PandaOffice Drecov
For those who need a more powerful solution, PandaOffice Drecov offers a professional-grade recovery experience that remains accessible to non-technical users. It is particularly effective for cases where the file system has been partially damaged.
⚠ Warning: Install it on a drive different from the one where your data was lost to prevent overwriting.
Step 1: Select the Recovery Source
Launch Drecov. You will be presented with a clean interface showing all available drives and common locations. Select the Recycle Bin icon or the specific drive (usually C:) where the files were originally located.

Step 2: Scanning and Real-time Preview
Click Scan. Drecov will perform a two-stage scan. One of its best features is the Real-time Preview. You don’t have to wait for the scan to finish; as files are found, you can click on them to see a thumbnail or a full preview to verify they aren’t corrupted.

Step 3: Filter and Search
Use the filter sidebar to sort by file type (e.g., .docx, .jpg, .mp4) or by the date modified. This saves time if you are looking for a specific file among thousands of deleted items.

Step 4: Secure Recovery
Mark the checkboxes for your desired files and click Recover.
Warning Prompt: Drecov will warn you if you try to save files back to the same drive. Always heed this warning and select an external USB drive or a secondary hard disk to prevent permanent data loss via overwriting.
Deep Scan vs Quick Scan
When to Use Quick Scan
The Quick Scan is your first line of defense. It is essentially a “search” of the Master File Table. If you deleted a file five minutes ago and realized the mistake immediately, a Quick Scan will find it in seconds. It preserves the original file name and folder structure, making it the most convenient option.
When Deep Scan is Necessary
You should resort to a Deep Scan if:
- The files were deleted a long time ago.
- The drive has been formatted.
- The Quick Scan returned no results.Be prepared for a wait. On a 1TB drive, a Deep Scan can take several hours as the software reads every single sector of the disk.
Recovery Success Rates and Real Performance
Real Test Results and Statistics
In controlled environments, recuva recycle bin recovery boasts an impressive 100% success rate for files deleted and recovered within the same hour on an HDD. However, in “wild” scenarios—where the user continues to browse the web or download files—the success rate for the free version of Recuva sits around 60-70%.
Tools like Drecov typically achieve higher success rates (often exceeding 90%) because they employ better “de-fragmentation” logic, allowing them to piece together files that Recuva might see as “unrecoverable.”
Factors Affecting Recovery Success
- Disk Fragmentation: Highly fragmented drives make it harder for software to find all parts of a file.
- File Type: Small text files are easier to recover than 10GB video files.
- User Action: The most critical factor is how much the user interacted with the PC after the deletion.
Common Issues and Troubleshooting
Files Not Recovering Properly
If you recover a file but it shows an error like “Format not supported” when you try to open it, the file is likely partially overwritten. In these cases, you might try a different recovery tool or check for “Previous Versions” of the folder in Windows.
Corrupted or Missing Files
Sometimes, Recuva finds the file name but the data inside is gone. This is common when system logs occupy the space previously held by your document. Unfortunately, once data is overwritten at the physical level, it is gone forever. No software—not even Recuva or Drecov—can recover data that has been physically replaced by new bits.
Best Practices for Successful Recovery
Do’s and Don’ts After File Deletion
- DO shut down unnecessary applications immediately.
- DO use a portable version of recovery software if possible.
- DON’T restart your computer repeatedly, as boot sequences write many temporary files.
- DON’T save the recovered files to the same drive they were lost from.
Preventing Future Data Loss
The best recovery strategy is never needing one.
- Cloud Backup: Use OneDrive, Google Drive, or Dropbox for critical folders.
- External Backups: Keep a weekly “Image” of your drive.
- Increase Recycle Bin Size: Right-click the Recycle Bin > Properties and increase the “Maximum size” to ensure large files aren’t immediately bypassed and deleted.
After you have mastered the basics of recycle bin recovery, you might find these specialized guides helpful for other devices:
- Learn how to use Recuva to recover deleted files from SD card for your camera or phone.
- Read our master guide to Recuva for Windows and beyond for advanced power-user tips.
- Need to fix a thumb drive? Check out how to recover deleted data with Recuva for USB drive.
Recuva Recycle Bin Recovery FAQs
1. Can Recuva recover files after a “Shift + Delete”?
Yes. “Shift + Delete” simply bypasses the Recycle Bin, but the data remains on the disk just like an emptied bin. Use the “I’m not sure” location setting in Recuva to find these.
2. Is there a Recuva for Mac?
No, Recuva is strictly for Windows. Mac users should look into tools like Disk Drill or Drecov’s Mac version.
3. Why does Recuva say “Unable to determine file system type”?
This usually happens when a drive’s partition table is corrupted. You may need a more advanced tool like Drecov to perform a “Raw” scan.
4. How long does a Deep Scan take?
It depends on the drive size and speed. On a standard 1TB HDD, it can take 2 to 5 hours. On a modern NVMe SSD, it might take 30 minutes.
5. Is Recuva safe to use?
Yes, as long as you download it from the official CCleaner website. It is a legitimate tool used by millions worldwide.
Conclusion
While the digital world moves fast, the core principles of recuva recycle bin recovery remain a vital skill for any computer user. Recuva offers a fantastic, no-cost entry point for recovering those “oops” moments. However, understanding its limits is key. If your data is of immense personal or professional value, moving to a modern tool like PandaOffice Drecov can provide the extra layer of depth needed to rescue files from the brink of permanent erasure. Stay calm, stop using the drive, and follow the steps—your data is likely still there, waiting to be found.


