


Losing a precious memory captured in a photo can feel like a punch to the stomach. Whether you accidentally swiped the wrong way on your smartphone or formatted a camera card too soon, the panic is real. However, as a data recovery specialist, I can tell you that “deleted” rarely means “gone forever”—at least not immediately.
In this comprehensive guide, we will explore every viable method to get recently deleted photos back. We will move from the easiest “built-in” features to advanced professional software solutions like PandaOffice Drecov. By the end of this article, you will have a masterclass-level understanding of how data storage works and the exact steps to rescue your files.
Understanding the “Digital Ghost”: Why Photos Stay Recoverable
Before we dive into the “how,” we need to understand the “why.” When you delete a photo from a hard drive, SD card, or smartphone, the device doesn’t actually erase the binary data of that image immediately. Instead, the operating system marks the space that the file occupied as “available.”
Think of your storage like a library. Deleting a photo is like removing the entry from the card catalog, but the book is still sitting on the shelf. As long as a new “book” (new data) isn’t written over that exact spot, we can recover recently deleted photos with high success rates. This is why the #1 rule of data recovery is: Stop using the device immediately.
Level 1: The Basics of How to Get Recently Deleted Photos Back on Smartphones
Most modern mobile operating systems understand that human error is common. Consequently, they have built-in safety nets that act as a middle ground between “deleted” and “permanently erased.”
Method 1: Checking the “Recently Deleted” Album on iPhone (iOS)
If you are an iPhone user, Apple provides a 30-day grace period. This is the first place you should look to get recently deleted photos back.
- Step 1: Open the Photos app on your iPhone.
- Step 2: Tap on the Albums tab at the bottom of the screen.
- Step 3: Scroll all the way to the bottom to find the “Utilities” section.
- Step 4: Tap on Recently Deleted. (Note: In iOS 16 and later, you will need to authenticate with FaceID, TouchID, or your passcode).
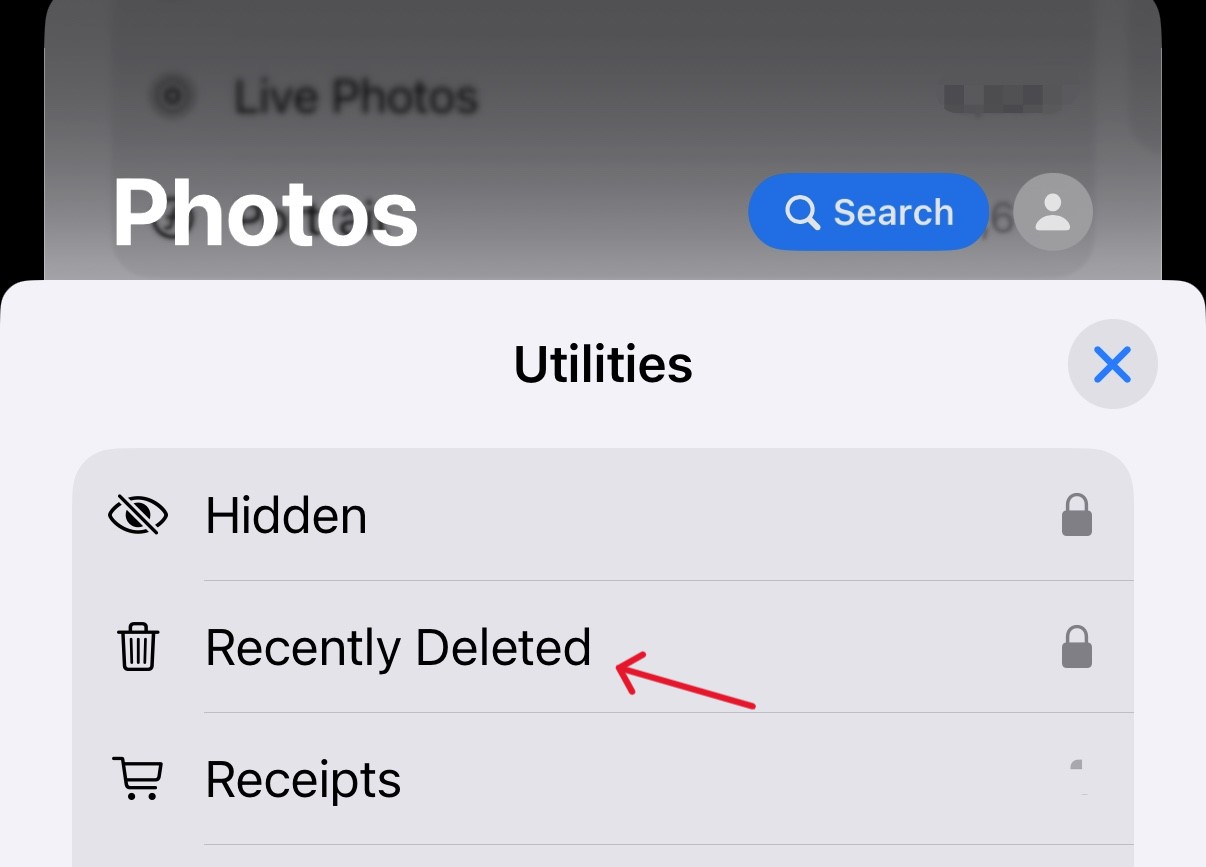
- Step 5: Tap Select in the top right corner, choose the photos you want, and hit Recover.
Method 2: Using the Google Photos Trash (Android and iOS)
Google Photos is the default gallery for many Android users and a popular backup choice for iPhone users. It offers a robust “Trash” system.
- Step 1: Launch the Google Photos app.
- Step 2: Tap on the Library tab located in the bottom right.
- Step 3: Select the Trash icon at the top.
- Step 4: Long-press the photos you wish to restore.
- Step 5: Tap Restore at the bottom. The photos will return to your main gallery and any albums they were previously in.
Critical Note: Google Photos keeps deleted items for 60 days if backed up, or 30 days if they weren’t backed up but deleted from the device.
Level 2: How to Recover Recently Deleted Photos on Windows and macOS
When working on a laptop or desktop, the logic remains similar, but the tools change. Whether you are dealing with a local hard drive or an external USB, here is how to recover recently deleted photos effectively.
Method 3: The Windows Recycle Bin
It sounds simple, but many users overlook the most obvious solution.
- Step 1: Locate the Recycle Bin icon on your desktop.
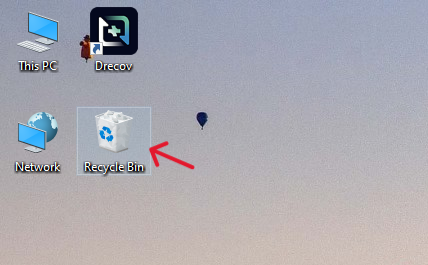
- Step 2: Double-click to open it and use the search bar in the top right to type file extensions like
.jpgor.png. - Step 3: Right-click the desired file and select Restore. This moves the file back to its original directory.
Method 4: Windows File History and Previous Versions
If you have cleared the Recycle Bin, don’t lose hope. Windows has a feature called File History.
- Step 1: Navigate to the folder where the photos were originally stored.
- Step 2: Right-click the folder and select Restore previous versions.
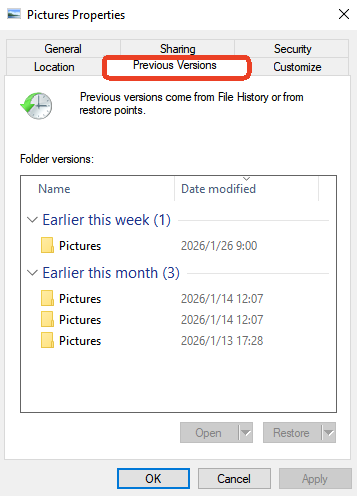
- Step 3: A list of available backups will appear. Choose a version dated before the deletion and click Open to verify the contents.
- Step 4: Click Restore to bring the entire folder state back.
Level 3: Professional Recovery Using PandaOffice Drecov
When the built-in “Trash” or “Recycle Bin” options fail—usually because the files were permanently deleted (Shift+Delete) or the drive was formatted—you need a professional-grade tool. This is where PandaOffice Drecov becomes essential.
PandaOffice Drecov is a high-performance data recovery suite designed to deep-scan storage sectors to reconstruct fragmented image files. It supports over 1,000 file formats and is particularly effective for photographers dealing with RAW files.
⚠ Warning: Install it on a drive different from the one where your data was lost to prevent overwriting.
Step-by-Step Guide: Using PandaOffice Drecov to Get Recently Deleted Photos Back
Follow these steps carefully to maximize your recovery chances.
- Step 1: Select the Location. Open the application. You will see a clean dashboard listing all connected drives (Internal HDD, SSD, External USB, or SD Cards). Select the specific drive where you lost your photos and click Start.

- Step 2: The Scanning Process. Drecov will initiate a Quick Scan followed by a Deep Scan. The Quick Scan handles recently deleted files, while the Deep Scan looks for remnants of files from formatted or corrupted partitions.

- Step 3: Filter and Preview. While the scan is running, you can use the File Type filter on the left sidebar. Select “Graphics” or “Photos.” You can even filter by specific extensions like
.JPG,.ARW, or.CR2.- Key Point: Double-click any image to see a Preview. If you can see the preview, the file is 100% recoverable.

- Step 4: Recovery. Tick the checkboxes for the photos you want. Click the Recover button.
- Step 5: Choose a Safe Destination. A window will pop up asking where to save the files. Always save them to a different physical drive (e.g., save photos from your SD card onto your Computer’s Desktop).
Level 4: Advanced Scenarios – SD Cards and Digital Cameras
Photographers often face the nightmare of an “SD Card Error” or accidental “Format All” button presses. Because SD cards use NAND flash memory, they are highly susceptible to file system corruption.
If you are wondering how to recover recently deleted photos from a camera card, the process is slightly more delicate. You should use a high-quality card reader rather than connecting the camera via USB cable, as the computer sometimes treats cameras as “media devices” rather than “mass storage,” which limits the recovery software’s access.
For more specific guides on this hardware, check out these resources:
- How to recover deleted photos from an SD card
- Steps to recover deleted photos from an SD card
- Universal guide to recover deleted photos from SD card
Pro Tips for Maximizing Recovery Success
To successfully get recently deleted photos back, you must adhere to several “Golden Rules” of the data recovery industry:
- Avoid New Writes: Every time you save a new file, browse the web (which saves temporary cache files), or even boot up your OS, you risk overwriting the deleted photo.
- Check Cloud Syncs: Often, photos deleted from a phone are still sitting in the desktop sync folder of Dropbox, OneDrive, or iCloud.
- Check Messaging Apps: If you sent the photo to a friend via WhatsApp, Telegram, or Messenger, a compressed version of that photo is stored on their servers and in your “Sent Media” folder.
- The Registry Trick (Windows Only): Sometimes, the “Recycle Bin” icon disappears or the path is corrupted. You can check the registry path
HKEY_LOCAL_MACHINE\SOFTWARE\Microsoft\Windows\CurrentVersion\Explorer\Desktop\NameSpaceto ensure the Recycle Bin is functioning correctly.
Summary of Methods
| Method | Complexity | Best For | Success Rate |
| Recently Deleted Album | Very Low | iPhones/Androids (within 30 days) | 100% |
| Recycle Bin/Trash | Very Low | PC/Mac (Temporary deletion) | 100% |
| Cloud Backups | Low | Google Photos/iCloud/OneDrive | High |
| PandaOffice Drecov | Easy | Formatted drives, emptied bins, corrupted SD cards | Very High |
| Professional Lab | Very High | Physically broken or burnt drives | High (but expensive) |
Get recently deleted photos back FAQs
Can I get recently deleted photos back after 30 days?
Yes. While the “Recently Deleted” folder in your gallery might empty itself after 30 days, the data usually remains on the internal storage until it is overwritten. You will need a tool like PandaOffice Drecov to perform a deep sector scan to find these “invisible” files.
Is it possible to recover photos after a factory reset?
This is significantly harder. On modern iPhones and Androids (using File-Based Encryption), a factory reset often wipes the encryption keys. However, for older devices or external SD cards that were inside the device, recovery is still highly possible.
Does PandaOffice Drecov work on SSDs?
Yes, but with a caveat. If the TRIM command has been executed by the OS, the SSD may have proactively cleared the data blocks. It is vital to run the recovery software as soon as possible after the deletion occurs on an SSD.
Conclusion
Learning how to get recently deleted photos back is a skill that saves not just data, but memories. Whether it’s a quick trip to the Recycle Bin or a deep-dive scan with PandaOffice Drecov, the most important factor is speed. The sooner you stop using the device and start the recovery process, the higher your chances of a successful restoration.
Always remember to maintain a “3-2-1” backup strategy in the future: 3 copies of your data, on 2 different media types, with 1 copy stored off-site (cloud). This ensures you’ll never have to worry about how to recover recently deleted photos ever again.


