


Windows 11 has brought a sleek, centered aesthetic to our digital workspaces, but for many enthusiasts, the default desktop remains a bit too cluttered. If you are aiming for that ultra-minimalist look, one of the first things you likely want to do is hide recycle bin windows 11. While this system icon has been a staple of the Windows experience since the 90s, modern users often prefer accessing their deleted files through File Explorer rather than having a permanent “trash can” staring at them from a beautiful wallpaper.
In this comprehensive guide, we will explore every possible method to achieve a cleaner desktop. More importantly, because hiding the bin can sometimes lead to accidental permanent deletions, we will also dive deep into professional data recovery strategies using tools like PandaOffice Drecov to ensure your files are always safe.
What Is the Recycle Bin in Windows 11?
Purpose of the Recycle Bin
If you’ve used a Windows PC for even a short time, you’ve probably noticed the Recycle Bin sitting quietly on your desktop. It’s one of those features that feels so basic you barely think about it—until you want it gone. But what exactly does it do?
The Recycle Bin in Windows 11 acts like a safety net for deleted files. Instead of permanently removing files right away, it temporarily stores them so you can restore them if needed. Think of it like a “second chance” folder. Because users often hit the “Delete” key accidentally, this staging area prevents immediate data loss. If you realize you made a mistake, you can simply open the bin, right-click your file, and select “Restore.”
Why It Appears on the Desktop
Microsoft places the Recycle Bin on the desktop by default because it’s considered a core system feature. It’s meant to be easily accessible at all times, ensuring users can quickly manage deleted files without digging through system menus.
However, as we move toward 2026, the trend in user interface design is shifting toward “less is more.” Just because it’s important doesn’t mean it has to stay visible. Many users prefer a minimalist desktop, free of unnecessary icons. Others simply want better control over what appears on their screen, leading many to search for how to hide recycle bin windows 11.
Why You Might Want to Hide the Recycle Bin
Cleaner Desktop Aesthetics
Let’s be honest—nobody likes a messy desktop. A cluttered screen can feel overwhelming, especially if you’re someone who values simplicity and focus. Removing the Recycle Bin is a small change, but it can make a big difference in how your workspace looks and feels.
Imagine your desktop as your physical desk. Would you keep a trash bin right in the middle of your workspace? Probably not. You’d move it somewhere less visible but still accessible. When you hide recycle bin windows 11, you are treating your digital environment with the same respect.
Privacy and Security Reasons
There’s also a practical side to hiding the Recycle Bin. If multiple people use your computer, you might not want them to see what you’ve deleted recently. While the Recycle Bin doesn’t expose everything directly, the icon changes appearance when it contains files, which can give hints about your recent activity. Hiding it adds a subtle layer of privacy. It doesn’t replace proper security measures, but it helps reduce casual snooping from passersby.
Method 1: Hide Recycle Bin via Settings
The most straightforward way to handle a windows 11 hide recycle bin request is through the native Personalization menu. This is the safest method for the average user.
Accessing Desktop Icon Settings
- Step 1: Right-click on any empty space on your desktop and select Personalize from the context menu.
- Step 2: In the Settings window that opens, scroll down and click on Themes.
- Step 3: Scroll down to the “Related settings” section and click on Desktop icon settings.
How to Hide Recycle Bin Windows 11 via Toggle
- Step 1: A small pop-up window titled “Desktop Icon Settings” will appear.
- Step 2: Look for the Recycle Bin checkbox under the “Desktop icons” section.
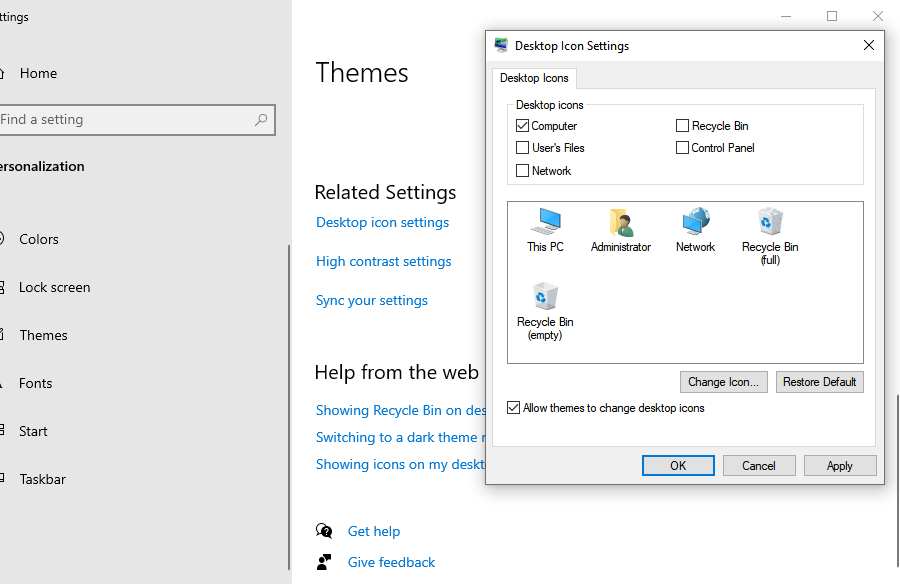
- Step 3: Uncheck the box next to Recycle Bin.
- Step 4: Click Apply and then OK.
The icon will disappear immediately. If you ever need it back, simply return to this menu and re-check the box.
Method 2: Hide Recycle Bin Using Registry Editor
For power users who find that the standard settings don’t work—perhaps due to a system glitch or a specific corporate image—the Registry Editor is the next logical step.
Safety Precautions Before Editing Registry
Before you proceed, understand that the Registry is the “DNA” of your operating system. Mistakes here can cause system instability. Always export a backup of the key you are editing before making changes.
Opening Registry Editor
- Step 1: Press Win + R on your keyboard to open the Run dialog box.
- Step 2: Type
regeditand press Enter. Click “Yes” when the User Account Control (UAC) prompt appears.
Windows 11 Hide Recycle Bin via Registry Keys
- Step 1: Navigate to the following path in the left sidebar:
HKEY_LOCAL_MACHINE\SOFTWARE\Microsoft\Windows\CurrentVersion\Explorer\Desktop\NameSpace - Step 2: Look for a subkey named
{645FF040-5081-101B-9F08-00AA002F954E}. This is the unique identifier for the Recycle Bin.
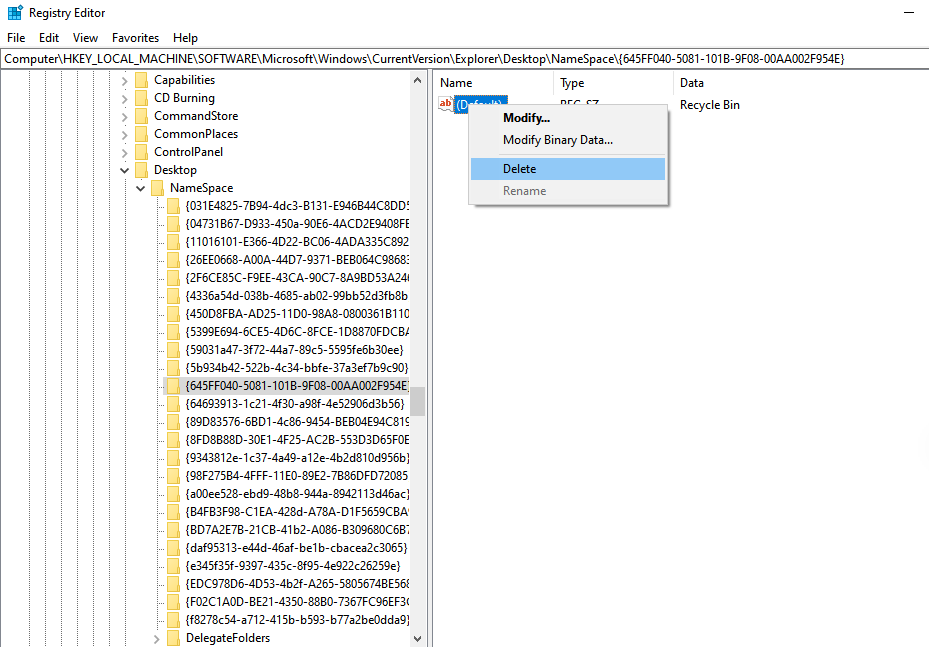
- Step 3: To hide it, you can right-click this key and select Delete. (Note: Ensure you have backed up the key first by right-clicking and selecting “Export”).
- Step 4: Restart your computer or restart Windows Explorer via Task Manager to see the changes.
Method 3: Hide Recycle Bin via Group Policy
If you are using Windows 11 Pro, Enterprise, or Education, the Local Group Policy Editor is a powerful way to hide recycle bin windows 11 for all users on the machine.
Accessing Group Policy Editor
- Step 1: Press Win + R, type
gpedit.msc, and hit Enter. - Step 2: Navigate through the folder tree on the left.
Enabling “Remove Recycle Bin Icon” Policy
- Step 1: Go to User Configuration > Administrative Templates > Desktop.
- Step 2: On the right-hand pane, find the setting named Remove Recycle Bin icon from desktop.
- Step 3: Double-click it, select the Enabled radio button.
- Step 4: Click Apply and OK.
- Step 5: You may need to refresh your desktop (F5) or log out and back in for the policy to take effect.
The Risk of Hiding the Bin: Data Loss Scenarios
When you hide recycle bin windows 11, you lose that visual reminder to check your “trash” before it gets too full or before you lose something permanently. Many users who hide the bin also start using the Shift + Delete shortcut, which bypasses the bin entirely.
What happens if you hide the bin and then realize you deleted a critical work project or a decade of family photos? This is where professional data recovery tools become essential.
Professional Recovery with PandaOffice Drecov
PandaOffice Drecov is a premier data recovery solution designed to handle scenarios where files have been emptied from the bin, deleted via Shift + Delete, or lost due to drive formatting. Because it works at a block-level on your hard drive, it can find data that the Windows OS can no longer see.
⚠ Warning: Install it on a drive different from the one where your data was lost to prevent overwriting.
How to Recover Deleted Data with PandaOffice Drecov
- Step 1: Select Location. Launch the program. You will see a list of drives and specific locations. If you know the file was on your desktop or in the Recycle Bin, select the C: drive or the specific “Recycle Bin” shortcut if available.

- Step 2: Scan. Click the Scan button. The software will perform a “Quick Scan” followed by a “Deep Scan.” The Deep Scan is highly effective at finding fragmented files that have been “lost” for a longer period.

- Step 3: Filter and Preview. Once the scan is complete, use the sidebar to filter by file type (e.g., .jpg, .docx, .pdf). PandaOffice Drecov allows you to Preview files before recovery to ensure they are not corrupted.

- Step 4: Recover. Select the files you want back and click Recover.
Crucial Point: Always save the recovered files to an external drive or a different partition to maintain data integrity.
Managing Your Windows 11 Environment
After you have successfully managed your desktop icons and ensured your data is recoverable, you might want to further optimize your system. Managing a clean desktop is just the beginning of Windows 11 mastery.
- If you find that system changes didn’t go as planned, you might need to learn how to restore computer to an earlier date on Windows.
- For those focusing on privacy, after you hide recycle bin windows 11, you may also want to know how to remove OneDrive from Windows 11 to stop unwanted cloud syncing.
- If you share your PC and want to prevent others from changing your desktop settings, it’s vital to know how to change administrator on Windows 11 to secure your profile.
Alternative Methods to Manage Recycle Bin
Moving Recycle Bin to File Explorer or Taskbar
If you hide recycle bin windows 11 for the sake of aesthetics but still want quick access, you can “Pin to Quick Access” in File Explorer.
- Step 1: Open File Explorer.
- Step 2: Right-click “Quick Access” in the left pane and select “Show all folders.”
- Step 3: Drag the Recycle Bin icon from the desktop (before you hide it) into the Quick Access sidebar.
Creating a Shortcut Instead of Desktop Icon
You can create a custom shortcut that uses a transparent icon or resides inside a specific “System Tools” folder. This keeps the desktop 100% clean while keeping the functionality one click away.
Common Issues and Fixes
Recycle Bin Keeps Reappearing
This is often caused by third-party “Desktop Management” software or certain Windows Themes that force specific icon layouts. To fix this, ensure you are using a “Static” theme and have disabled any third-party dock applications that might be refreshing the desktop state.
Settings Not Saving
If you uncheck the box in “Desktop Icon Settings” but it remains checked after a reboot, your user profile might have corrupted permissions. Try creating a new local administrator account to see if the issue persists.
For more information on Windows 11 system requirements and official updates, you can visit the Official Microsoft Windows Support page.
Comparison Table: All Methods Explained
| Method | Difficulty | Safety | Best For |
| Settings App | Very Easy | High | General users & beginners |
| Registry Editor | Advanced | Medium | Power users / Automation scripts |
| Group Policy | Medium | High | IT Admins / Pro Edition users |
| PandaOffice Drecov | Easy | High | Users who accidentally deleted files |
Hide Recycle Bin Windows 11 FAQs
1. Can I restore the Recycle Bin after hiding it?
Absolutely. Simply revisit the Desktop Icon Settings and re-check the box. The icon will reappear exactly where it was.
2. Does hiding the Recycle Bin delete my files?
No. It only removes the visual shortcut. The underlying folder system continues to store deleted files until they are manually or automatically emptied.
3. Is it safe to use the Registry Editor?
It is safe if you follow a guide precisely. However, always export your keys before deleting anything to ensure you can revert changes if something goes wrong.
4. Why does the Recycle Bin come back after a Windows Update?
Major feature updates sometimes reset registry keys or personalization settings to their defaults. You may need to toggle the setting again after a large update.
5. How do I access the Bin if it’s hidden?
The fastest way is to open File Explorer and type Recycle Bin into the address bar at the top, then press Enter.
Conclusion
Mastering how to hide recycle bin windows 11 is a rite of passage for any user looking to truly own their digital workspace. Whether you choose the simplicity of the Settings menu or the precision of the Registry Editor, the result is a cleaner, more focused environment. However, always remember that a clean desktop should not come at the cost of data safety. By keeping tools like PandaOffice Drecov in your utility belt, you can customize your OS with the confidence that even if a file is hidden or “permanently” deleted, it is never truly gone.


