







If “USB device not recognized” keeps popping up, Windows is probably seeing a USB connection disappear and return, or repeatedly failing to identify one attached device. The fastest safe test is to note when the alert appears and disconnect external USB items one at a time. If the troublesome item is a flash drive with important files, stop copying to it. A recurring warning is not a reason to format the drive or start a long recovery scan.
Watch the timing before changing anything
A warning that appears only after you insert one device is different from an alert that returns while every port appears empty. Leave the notification visible long enough to write down its exact wording. Note the time, the connected accessory, and whether Windows plays the connection sound twice. Watch File Explorer too: does a drive letter appear briefly, vanish, and reappear? That pattern matters more than the number of popups.
Do not assume the last item you touched is the cause. A mouse receiver, printer, webcam, phone cable, or powered hub can generate the same type of alert. If the message starts only when you move a cable or touch a port, a physical connection is plausible. If it appears after the PC wakes from sleep, power management may be involved. These observations give you a useful first branch without installing a driver or changing the storage device.
For a flash drive, stop any active transfer before testing. Preserve the original files on the computer and do not repeatedly copy the same large folder onto an unreliable USB stick. A failed transfer may leave an incomplete destination copy that looks convincing by name. Open files on the original device and on a separate backup, if one exists, before you decide which copy is safe.
Find out whether one accessory or the computer triggers the loop
When the warning follows one USB item
Shut down the affected program, eject the device if Windows still offers that option, and disconnect it. Test one known-good port directly on the PC rather than through a hub. If the same accessory causes the warning on that port while another ordinary USB item works there, the accessory or its cable becomes more suspect. A removable cable can be checked with one known-good replacement. Avoid bending a loose connector to make temporary contact; that can turn a recoverable problem into physical damage.
Leave that port unused. Try a known-good item in a different port and note whether the warning stops. A single damaged socket, debris, or an overloaded hub can make every attached device look faulty. Do not insert metal tools into a powered port. If you see bent contacts or smell overheating, shut down and seek hardware service instead of continuing tests.
When the alert appears with no external device attached
Restart once after disconnecting removable accessories. If the message returns, an internal USB-connected component or controller may be involved. Laptops can have internally connected cameras, card readers, or Bluetooth modules. You do not need to open the case to make that diagnosis; record the Device Manager entry and ask the computer maker for model-specific support. Randomly removing multiple drivers is unlikely to show which component first caused the alert.
Protect files if the troublesome USB item is storage
A repeated connection cycle is especially important when the device holds the only copy of a file. If it mounts long enough to read, copy the irreplaceable folders to another healthy drive before running repair utilities. Open a few copied documents, photos, and videos at the destination. A transfer that reports success can still leave a file truncated or unreadable. Keep the suspect USB idle once you have a usable copy.
If the drive drops out during a simple read, makes unusual sounds, becomes unusually hot, reports severe read errors, or shows the wrong capacity, stop direct scans and repeated reconnection tests. Software cannot repair a damaged connector or failing storage controller. A professional service or controlled image may be safer than exhausting the device with repeated attempts. The USB recovery overview applies to stable, recognizable storage loss, not a device that cannot maintain a connection.
Do not initialize, format, or run CHKDSK on the source merely because the popup is annoying. Those actions can write metadata or change the file system. They do not identify which USB port, cable, or accessory is failing. If you no longer need any contents on the device, deal with the connection problem first; a format performed through an unstable connection is not a reliable cure.
Use Device Manager to confirm what Windows knows
Right-click Start and open Device Manager. Expand Universal Serial Bus controllers, then watch for an entry that appears or changes when the warning recurs. Open that entry’s Properties and read the message under Device status. Microsoft explains that Device Manager shows device status and driver information in its official Device Manager guidance. Copy the exact error code if there is one; it narrows the next step.
A yellow warning symbol says Windows has identified a problem, but it does not by itself prove the USB device is physically dead. Conversely, the absence of a symbol does not guarantee a drive that keeps disconnecting is safe for important files. Compare the entry before and after one controlled reconnect. If the item disappears with the accessory and returns when it is attached, you have better evidence of which branch to investigate.
Record the device name and error before making changes. If a driver update is genuinely indicated, obtain it through Windows Update or the computer or device maker’s official support channel. Avoid generic driver-fixer downloads that promise to repair every USB warning. Do not uninstall a storage controller blindly while a transfer or recovery attempt is in progress.
Try reversible checks in the order the evidence suggests
If one port is implicated, leave it alone and use a known-good port. If a hub is involved, connect a low-power USB device directly to the PC for one test. An externally powered device should use its correct power adapter; a cable that fits is not evidence that its power rating is right. These checks do not write to the USB storage. Keep each test limited and record whether the alert stops, moves to another port, or returns after sleep.
If the symptom follows wake-from-sleep rather than ordinary transfers, review the Windows power setting for USB selective suspend. Change only that setting for a short controlled test, note the previous value, and restore it if it makes no difference. Do not disable power management permanently just because a forum post says to do so. The separate USB disconnect checks explain that branch in more detail.
When a particular accessory fails on multiple known-good ports and another PC, stop blaming Windows settings. Check the maker’s support instructions or seek repair. If many unrelated devices fail across several ports, the PC’s controller or power supply deserves attention. In neither case does a data-recovery program remove an electrical fault. The broader USB recognition guide covers a single failed recognition event; the repeated alert here makes stability the first decision.
Recover a missing file only after the storage connection is stable
If the USB drive is now consistently recognized at its expected capacity but a file has disappeared, Drecov can examine that stable Windows source without treating the scan as a hardware fix. Its read-only recovery workflow provides Quick Scan, Deep Scan when needed, result filtering, preview, and recovery to another healthy location. Lost Partition Recovery is available for a lost partition, but it does not repair a loose connector or guarantee that an overwritten file can be restored.
First look for the file in the original PC’s folders and any verified backup. Stop writing to the USB, prepare a separate healthy drive for recovered output, and never install recovery software on the affected volume. If the notification loop returns, stop here and consider an image or specialist help instead of launching another scan.
⚠ Warning: Install it on a drive different from the one where your data was lost to prevent overwriting.
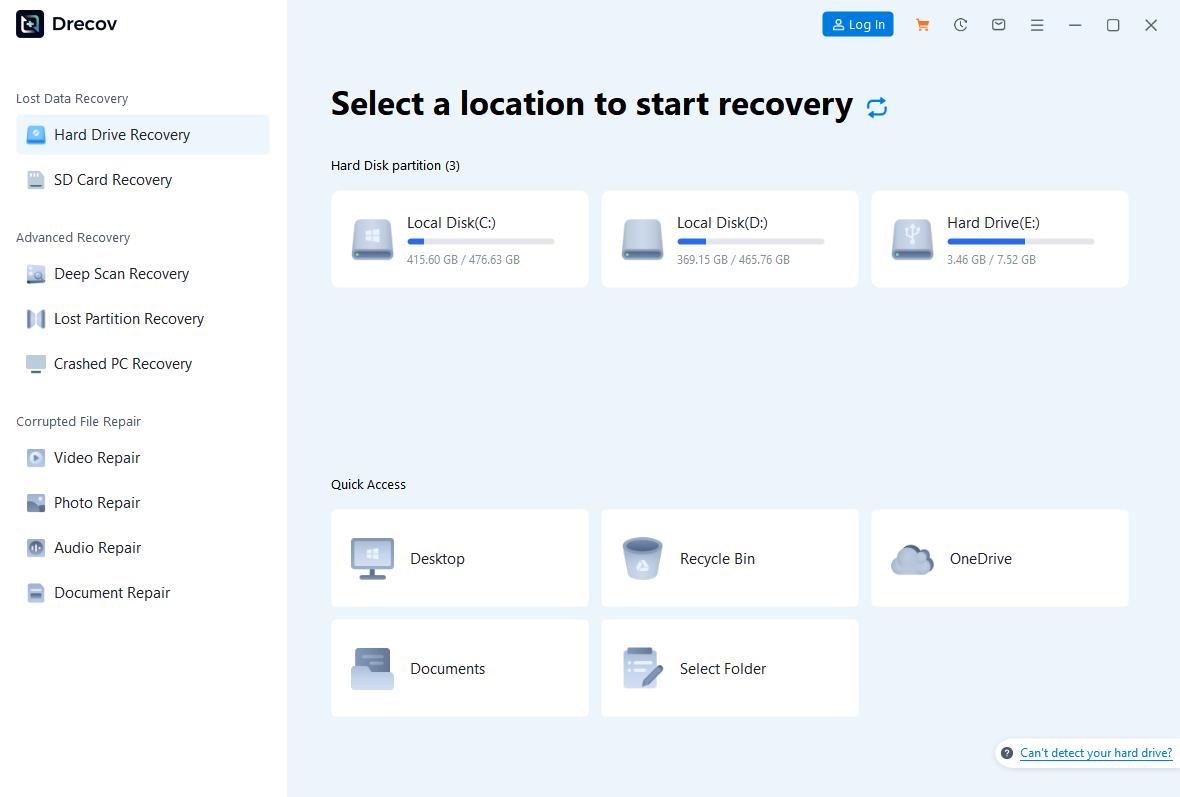
Step 1: Choose the original USB location
Open Drecov and select the recognizable USB volume where the file was last stored. Check its capacity and name rather than relying only on a changing drive letter. If the old partition is missing but the device stays stable, assess Lost Partition Recovery instead of inventing a new volume in Disk Management.
Step 2: Run Quick Scan first
Start Quick Scan and inspect likely folders or known filenames. If the needed item appears, pause to examine it. A scan count is not the same as a verified usable file, so do not select everything merely because the list is long.
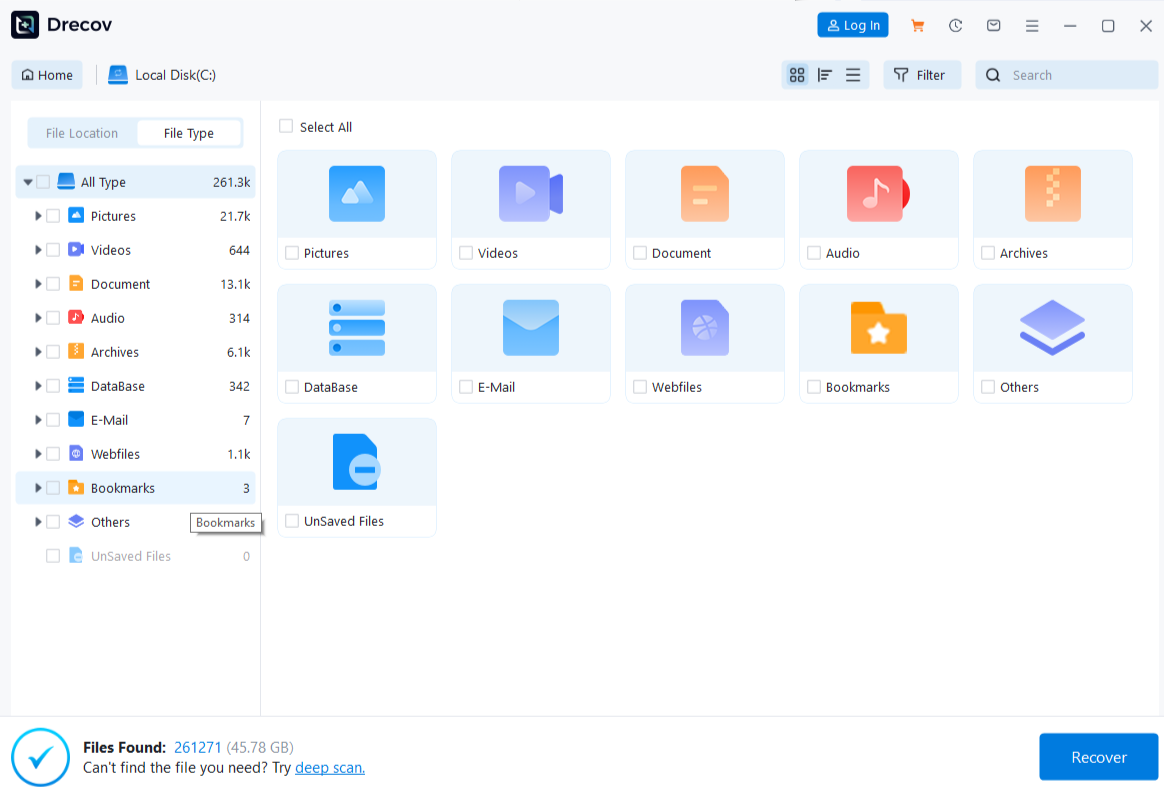
Step 3: Consider Deep Scan only on steady storage
Use Deep Scan if Quick Scan does not find the target and the USB remains connected without serious read errors. Stop immediately if the drive drops offline again. Repeated deep scans cannot stabilize hardware and may reduce the time available for a controlled recovery attempt.
Step 4: Filter and preview representative files
Narrow results by type, path, or name when available. Preview several representative documents, photos, or videos from the missing folder. A readable preview supports your selection, but it does not certify every page or frame of every candidate.
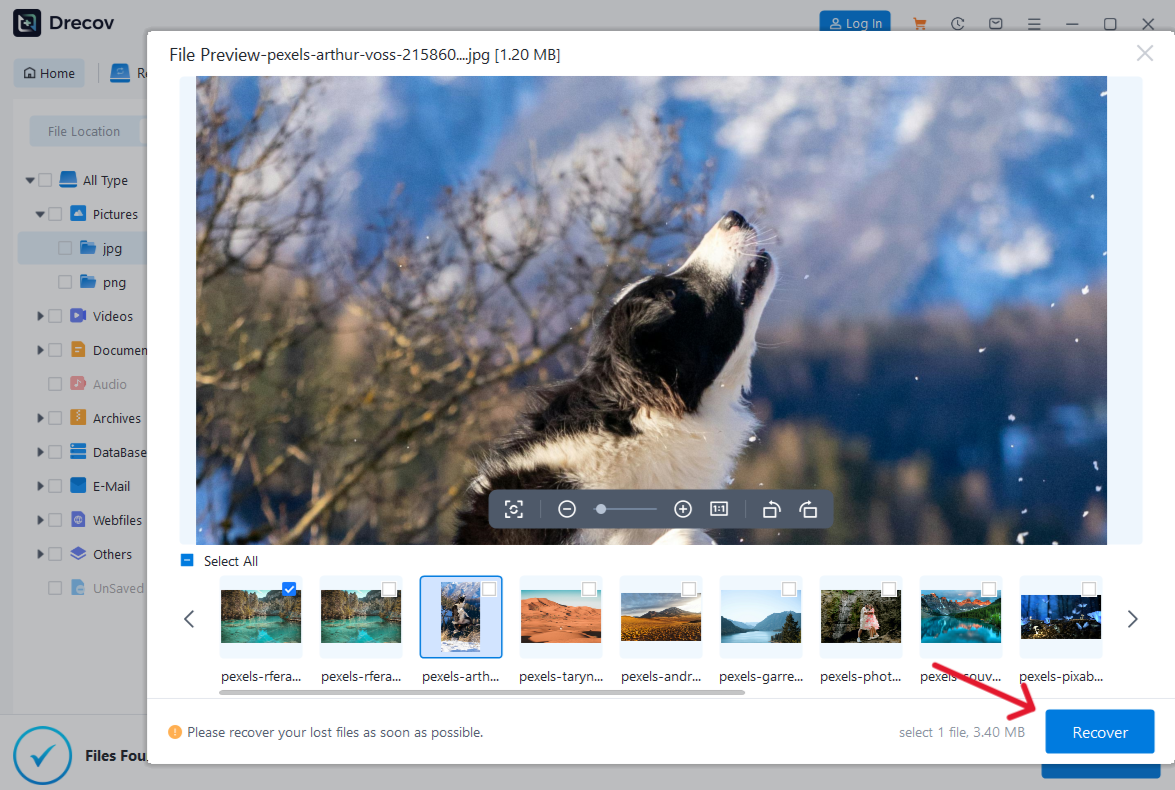
Step 5: Recover to another healthy drive
Choose the separate destination you prepared. Do not save recovered files back to the source USB. If the output is not in the folder you expected, look for the Drecov Folder or Recovery Folder before rescanning the device.
Step 6: Open the recovered copies
Open several important results from the destination and compare them with the expected names, sizes, and content. Only after the files are safe should you consider any repair or format operation on the original device. If it starts disconnecting again, retire it from important storage rather than trusting one successful copy.
⚠ Warning: Install it on a drive different from the one where your data was lost to prevent overwriting.
Frequently asked questions
Why does the warning appear even when I am not using a USB drive?
A mouse receiver, phone cable, printer, hub, or an internal USB-connected component may trigger it. Disconnect external items one at a time and watch Device Manager. Do not assume every USB warning is a storage problem.
Will hiding USB notifications fix the issue?
No. Hiding the alert changes what you see, not the connection. If files are being copied, an unnoticed disconnect can leave an incomplete destination. Find the trigger before suppressing the warning.
Should I update every USB driver?
Not automatically. Record the device and its status code first. Update through Windows or the maker’s official channel only when the evidence points to a driver. Changing several controllers at once makes the result harder to interpret.
Can I keep using a flash drive that reconnects?
Do not use it as the only copy of important files. Back up readable content to a healthy device. If the repeated disconnect follows that drive across good ports and another PC, stop trusting it for storage.
Can recovery software stop the popup?
No. Recovery software searches for missing files on suitable storage. It does not repair a USB port, power problem, cable, or controller. Use it only after the storage device is stable and the file-loss question is real.
Conclusion
When “USB device not recognized” keeps popping up, the useful question is which connection fails and when. Trace one accessory and one port at a time, read Device Manager’s status, and protect files before changing drivers or storage structures. Stop DIY tests if a storage device cannot stay connected. Once a USB drive is stable but files are missing, Drecov can search the original location and save selected results elsewhere; verify those copies before making further changes. A recurring electrical or hardware fault needs a different remedy.
⚠ Warning: Install it on a drive different from the one where your data was lost to prevent overwriting.





