
Recover the Affinity Photo document at the right editing stage
To recover Affinity Photo documents, preserve the surviving native file and inspect existing snapshots or saved history before rebuilding layers. A snapshot, ordinary undo history, and crash recovery have different roles. Therefore, identify whether you need an earlier design state, a missing unsaved change, or simply a layer that remains present but hidden.
This guide focuses on the documented Affinity Photo 2 workflow. Menu placement and licensing can differ in other releases, so inspect your actual version. Built-in features can avoid buying an additional recovery utility when you already have appropriate access. They do not establish that every installation has a traditional interval-based archive of all previous document versions.
Define the content you need to recover
Record the native document path and a distinctive missing change, such as a retouching layer, mask, crop, or color adjustment. Then preserve the current document and related source assets. An AFPhoto file and a flattened export can look alike while preserving very different editing information. Choose the recovery target according to the next task rather than appearance alone.
If useful work remains open, save a separate native copy before restarting or experimenting with history. Also note any recovery offer and the actual application version. A stable current copy gives you a way to retain valid later work while comparing an older snapshot. It also prevents a successful historical restoration from accidentally discarding a useful recent layer.
Native route 1: create a new document from an existing snapshot
- Preserve the current native document before restoring any historical state.
- Open the Snapshots panel and inspect the snapshots that already exist.
- Select the relevant candidate and use New Document from Snapshot where available.
- Compare the missing content and save the new native document separately.
A snapshot must have existed before the unwanted change to help now. Creating one after the loss preserves only the current state. Also inspect the actual snapshot content rather than relying on its name. A named milestone can precede a later correction, while another candidate may preserve the particular layer or mask you need.
Compare the snapshot with the current document
Inspect layer structure, masks, adjustments, dimensions, and the distinctive recent change. Then compare the rendered appearance at a useful zoom. A snapshot can preserve an earlier composition while lacking valid later detail. Keep both documents until you decide whether to adopt the historical baseline or transfer verified content into a new combined recovery.
If you transfer a layer or group, inspect blending and mask relationships afterward. The same pixels can look different in another document context. Save the combined result as a new version and record which snapshot supplied the content. This makes deliberate reconstruction clear instead of presenting the merged document as an untouched historical state.
Native route 2: inspect history saved with the document
- Preserve the current AFPhoto and open a working copy.
- Inspect the History panel for the specific earlier action or useful state.
- If history survives, compare a controlled earlier point without discarding the preserved current version.
- Save the accepted result as a separate native document.
History across sessions depends on having saved it with the document. Enabling Save History with Document after the loss cannot recreate an earlier session’s missing actions. Also distinguish that saved history from the live undo stack. A document can open with intact layers while lacking the historical operations you hoped to revisit.
Avoid a long uncontrolled rollback
Identify the relevant action and preserve useful current work before moving through history. Repeatedly undoing without a target can remove valid later edits and make comparison harder. If the desired state no longer exists, retain the current candidate and move to snapshots or another source rather than assuming a restart will recreate the history.
When an earlier state supplies useful content, inspect its canvas and layer structure before accepting it. A rollback may restore a retouch while removing a later crop or text correction. Reconcile those differences in a new recovery version. The goal is the intended editable composition, not merely reaching an earlier timestamp in the panel.
Native route 3: preserve an available crash recovery
- Preserve existing native files and available recovery data before cleanup.
- Reopen the relevant document in the appropriate application version and inspect any recovery offer.
- Accept a useful candidate and compare the missing unsaved content.
- Save it deliberately under a new native name in a known recovery location.
Crash recovery is conditional on usable data from the interrupted session. It is not a guarantee that every last stroke or adjustment survives. Also do not equate it with an ordinary historical file archive. Inspect the actual candidate, retain the last manual save, and keep the recovered source separate from any subsequent repair experiments.
Check the recovered layer rather than its thumbnail
Select the expected retouching or adjustment layer and inspect its content at full size. Then toggle the relevant masks and groups in a working copy. A thumbnail can look familiar while hiding a missing region or flattened result. Confirm that the recovered content remains editable in the way your next revision requires.
Save, close, and reopen the accepted native copy. Then compare a fresh export with the intended appearance. This checks both stored editability and output behavior. If only part of the document survives, retain that useful result and list the remaining gap rather than treating a successful opening as proof of complete restoration.
Native route 4: use an existing layered source or export
- Locate a verified earlier native document or layered interchange file from the relevant milestone.
- Open a copy in a separate recovery workspace.
- Inspect the actual layers, masks, text, and adjustments that survived.
- Save a new native recovery and document any flattened or reconstructed elements.
A layered source can preserve useful editing information while differing in application-specific behavior. A flattened PNG or JPEG preserves appearance with much less structure. Keep those outcomes separate. Do not describe importing a rendered image as recovery of the original layer stack, even when it looks close enough to support an immediate review.
Inspect the intended output quality
Compare dimensions, transparency, fine detail, and color behavior at the size needed for delivery. A small preview may help identify the design while being unsuitable as a production source. Also establish the export’s revision. A file called final may predate the last mask correction or omit a layer that appeared only in the native document.
If you rebuild missing layers over a composite, keep the original salvage and the new work separate. Record which elements you recreated from the reference. A useful reconstruction can save time without preserving the original editing operations, and that distinction matters when another editor needs to revise the same area later.
Diagnose a native document that looks incomplete
Inspect layer visibility, group visibility, opacity, clipping, masks, and the active document before assuming content vanished. A valid layer can be hidden by another relationship. Work on a copy while testing. If the expected object is absent from the layer list, compare historical candidates rather than changing unrelated display settings repeatedly.
Check masks and clipping in their context
Toggle the relevant mask or group in the working copy and compare the result. A missing-looking region may contain intact pixels that a mask hides. Conversely, an empty layer cannot supply the original retouch simply by changing opacity. These checks distinguish a display relationship from actual data loss and help target the next recovery route.
Also inspect whether an adjustment is live or already baked into a pixel layer. A visually similar document can provide different future controls. Keep that editability inventory with the accepted candidate. It prevents a flattened or simplified salvage from silently replacing the native master when your next task requires changing a specific adjustment.
Use snapshots for selective reconstruction carefully
A historical snapshot can supply useful pixels or composition while the current document supplies valid later work. Preserve both sources before combining them. Then compare the target region and surrounding layers. The recovered appearance may depend on blending, masks, and document settings rather than on one isolated layer alone.
Distinguish a snapshot layer from a full historical document
A snapshot-derived flattened layer can preserve a visual state without retaining every original component as separate editable layers. Use it according to that role. If you need the historical layer structure, inspect the new-document-from-snapshot route instead. These outputs can be useful for different tasks and should not be described as equivalent recoveries.
After selective reconstruction, export a review image and inspect the affected edge, texture, and transparency. Then reopen the native recovery and verify the controls needed for continued editing. This paired check shows whether the result preserves both the desired appearance and sufficient structure for the next revision.
A worked recovery after an unwanted retouch
Suppose you flatten or overwrite a retouching stage, then notice that an important detail looks wrong. Preserve the current document and inspect existing snapshots and saved history. Identify the candidate containing the correct detail. An older snapshot may preserve the subject while the current document contains useful later text or layout changes.
Combine the verified stages in a new version
Create a separate recovery document and transfer only the useful content after comparing its context. Inspect masks, blend modes, and alignment at full resolution. Then compare a fresh export with the reference. Record which historical state supplied the restored detail and which adjustments you recreated manually.
If no native source contains the missing layers, preserve the best composite as a reference and state the limitation. You may still rebuild a useful editable result, but that is new image work based on surviving evidence. Keeping the distinction clear protects the recovered master from becoming an unexplained mixture of history and approximation.
Decide whether you need pixels, layers, or historical operations
An Affinity Photo recovery can preserve several different levels of information. A composite preserves visible pixels, a native layer stack preserves editing relationships, and saved history can preserve earlier operations. Identify which level the next task requires. A flattened salvage may support an immediate review while being unsuitable for changing a mask or revisiting a retouch. This acceptance target helps you choose a useful candidate without pretending that every visually complete image is an editable master.
Compare one meaningful detail across candidates
Choose a distinctive region, such as a repaired edge, local highlight, or removed object. Inspect it at full resolution in each candidate and identify which layer or adjustment produces it. Then toggle the relevant group in a working copy. A similar composite can come from different structures, and those differences matter for future revisions. Preserve the source that supplies the strongest editable information even if another candidate has a more recent overall appearance.
Also inspect canvas dimensions and crop boundaries. A snapshot can preserve a good retouch while predating a later crop, or the current document can preserve useful layout while lacking the correct image detail. Keep both states and reconcile the verified pieces in a new document. Record the combination rather than describing the result as one untouched historical state. This makes later comparison easier if another source reveals a better version of the missing detail.
Use the snapshot route that matches the editing need
A new document from an existing snapshot and a flattened snapshot-derived layer can serve different purposes. The former can provide a historical document to inspect, while the latter can preserve a visual state for compositing or reference. Check the actual structure of the result before choosing it. Do not assume that anything produced from a snapshot retains every original layer and adjustment in the same form.
Preserve current work before testing a historical state
Save a separate current native copy, then inspect the useful snapshot independently where possible. Compare the affected region and a few valid later changes. This protects newer work while you decide what to restore. A direct rollback can be appropriate, but it should follow a comparison of what it returns and what it removes. The purpose is an intended composition, not merely reaching an earlier point in the document’s timeline.
If you use a snapshot as a source for selective reconstruction, inspect blending, masks, alignment, and color behavior in the destination. A useful isolated layer can look different within another stack. Compare the full composition and a fresh export after the transfer. Retain the original snapshot candidate so you can revisit a relationship that later proves important rather than rebuilding it from memory.
Treat saved history as conditional evidence
History can help only when the relevant actions survive in the document or live session. Inspect its actual range before planning a rollback. A setting enabled now cannot recreate an earlier unsaved session. Keep that limit clear, especially when the native document opens normally and the temptation is to assume that all prior operations must still exist somewhere in the interface.
Target the unwanted action narrowly
Identify the operation that caused the problem and compare the state before it. Then inspect valid later changes that a rollback would remove. Preserve both before choosing how to continue. This avoids a long undo sequence that sacrifices useful work while searching for one missing layer. If the action is absent from surviving history, retain the current candidate and move to a snapshot or another source instead of repeatedly testing the same unavailable state.
A successful rollback still needs a content check. Inspect the layer structure, affected pixels, masks, and dimensions. Then save the accepted result separately and reopen it. This establishes a stable recovered milestone rather than a temporary view of historical content. Keep a short note of the history point and any later work you reconstructed, so another editor can understand the resulting document’s scope.
Inspect masks and adjustment relationships before repainting
An apparently missing retouch can be hidden by a mask, group state, or clipping relationship. Inspect those controls in a working copy before adding new paint. If the pixels survive, correcting the relationship may restore the intended appearance without reconstruction. If the layer itself is absent, changing display controls cannot recreate it, and a historical candidate becomes the relevant source.
Compare edges and transitions rather than only the subject
Inspect the boundary where an adjustment meets unmodified content. A recovered mask can look plausible at a small scale while revealing a halo or misplaced edge at full size. Then compare the intended output dimensions. This focused check tests the part of the edit most likely to reveal a partial recovery and provides stronger evidence than a recognizable central subject in the thumbnail.
If you must rebuild a mask from a composite reference, keep the new mask and its source identifiable. The reference can show the desired edge without preserving hidden pixels or the original soft transition. A careful reconstruction can be useful, but it should remain distinguishable from the recovered native layer data. This leaves room for a later historical candidate to replace the approximation without losing the current usable result.
Evaluate an imported or flattened source by its actual flexibility
A layered interchange candidate may preserve some structure while changing application-specific behavior. Inspect text, masks, blend modes, and adjustments rather than assuming equivalent editability. A flattened export can preserve appearance while supporting a much narrower set of revisions. Choose it according to the task and retain the native candidates separately, even if the export initially looks more complete.
Test one representative edit on a disposable copy
Choose a layer or text element that the next revision will need and make a small test change in another copy. Then inspect whether the control behaves as expected and discard the test. This reveals the practical limits of the candidate without changing the accepted recovery. A document that only looks correct may still be inadequate when the next task requires independent control of an adjustment or object.
Also compare transparency, color behavior, and fine detail in a fresh output. A reduced or compressed export can be useful as reference while being unsuitable as the replacement production source. Record those quality limits alongside the editability inventory. This prevents a convenient emergency image from silently replacing a richer native master and avoids unnecessary rebuilding when a useful editable source still survives elsewhere.
Keep the recovery boundary clear before new image work
Once the accepted document passes its checks, save a native milestone and a reference export from the same revision. Then begin new creative changes in another version. This boundary helps you compare later discoveries with the actual recovered state rather than with a document that has already accumulated new retouching. Preserve original candidates, snapshots, and rejected sources separately with concise notes about their useful content.
Test protection across a session boundary
Use a disposable document to verify that the snapshot or history information you expect remains available after saving, closing, and reopening. Then inspect the actual native backup copy independently. This practical test distinguishes live-session convenience from persistent recovery material. Finish by listing any remaining missing layers or reconstructed regions so the next editor can continue from a reliable baseline with realistic expectations.
Inspect the editable controls needed for the next revision
Choose one mask, layer, or adjustment that the next task will require. Inspect it in the recovered native document and, if useful, test a small change on a disposable copy. This reveals practical editability that a composite preview cannot establish. Keep the accepted source untouched while testing so the check does not become an unexplained new creative revision.
Keep output-specific edits in separate versions
A web image or print output may need sizing and sharpening different from the recovered master. Save those variants separately and identify the native milestone that produced them. This makes later appearance comparisons clearer and prevents a delivery adjustment from silently replacing the historical recovery baseline.
If a region remains reconstructed from a flattened reference, list it with the source used. A visually complete result can still have a local editability limit. Clear scope lets another editor continue useful work while preserving the option to replace that approximation if a stronger native candidate later appears.
When storage recovery can help Affinity Photo files
PandaOffice Drecov may help retrieve deleted saved AFPhoto files, existing native copies, or original image assets on readable storage. It cannot regenerate unsaved layer work that never reached disk or infer the original structure from a JPEG. Use snapshots, saved history, and existing sources first, and reduce writes to the affected location while investigating.
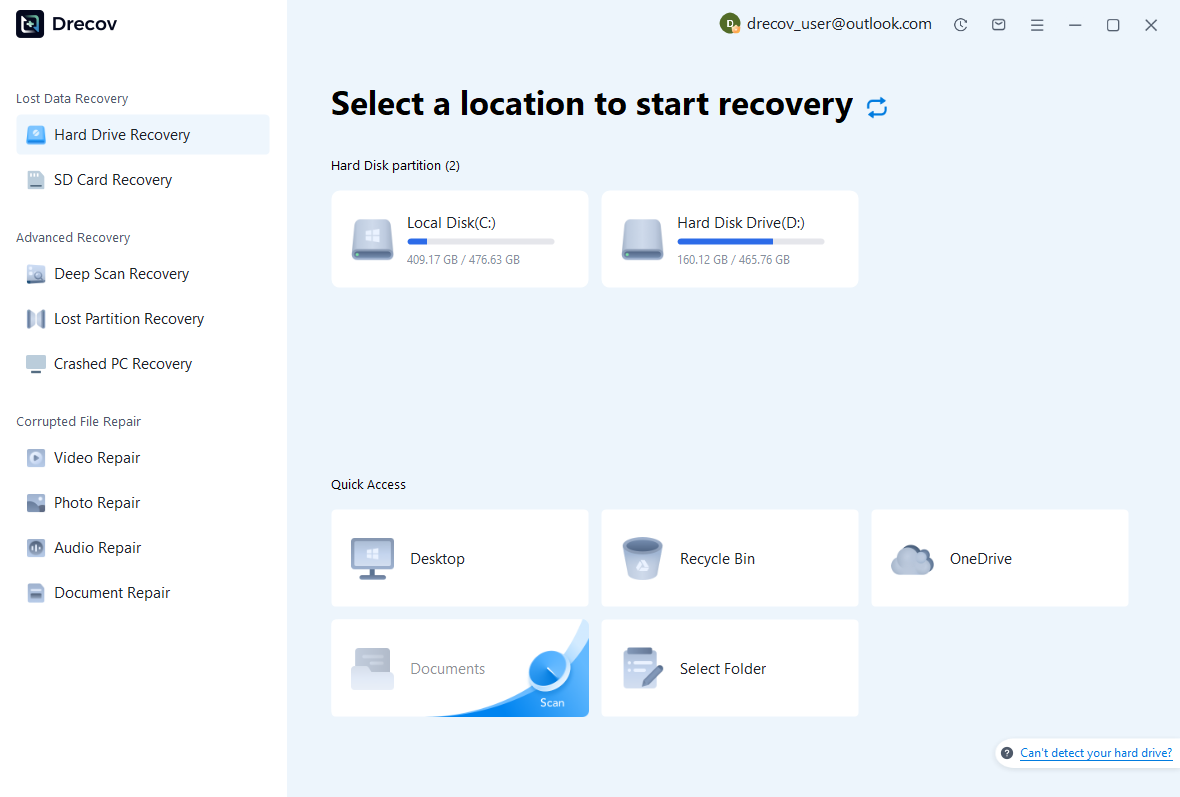
Step 1: identify the native document’s storage
Select the drive or partition that held the AFPhoto or relevant source assets. Record whether a separate existing copy lived elsewhere. Keep recovery output on other healthy storage. If the source repeatedly disconnects or reports hardware read failures, assess that condition before treating it as an ordinary deleted-file scan.
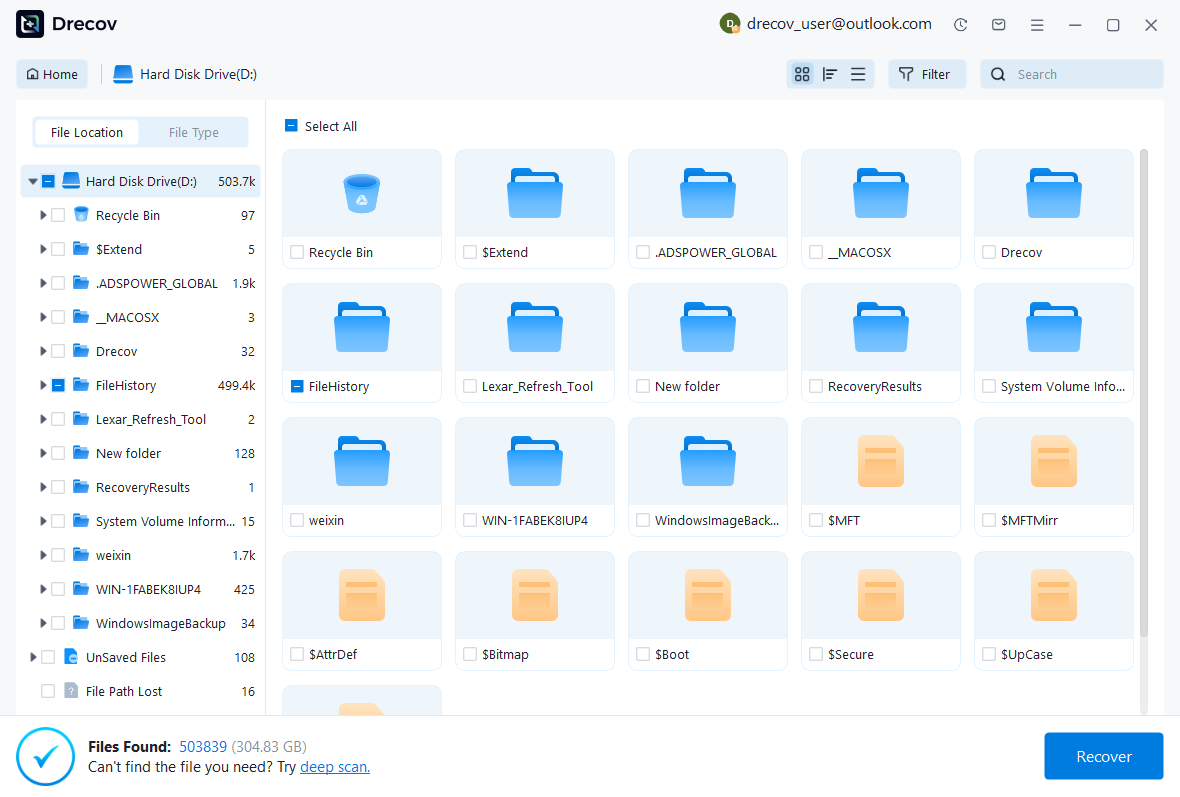
Step 2: compare native and visual candidates
Review available paths, names, sizes, dates, and supported previews. Preserve plausible native revisions alongside useful layered or flattened sources. A recognizable preview does not establish that the complete layer stack survived. Keep several useful candidates and inspect their actual structure in the application after recovery.
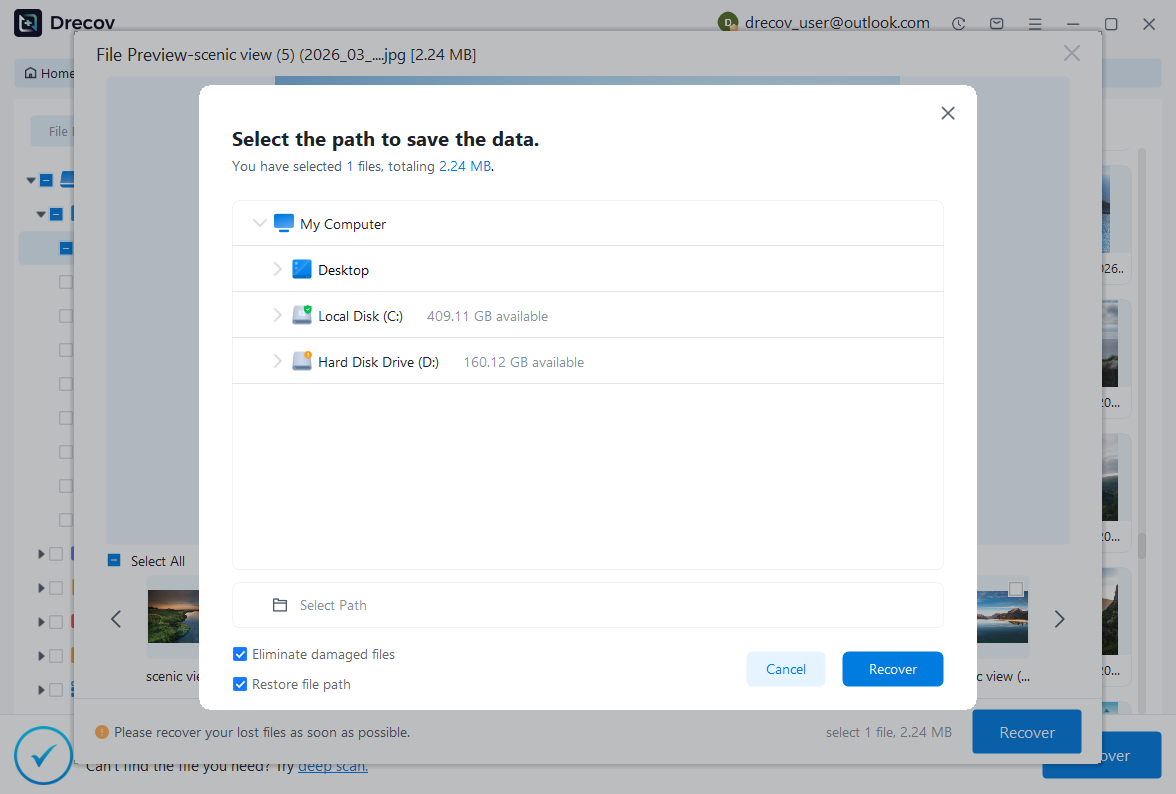
Step 3: restore elsewhere and verify editability
Recover selected files to a separate destination and preserve an untouched set. Open working copies, inspect layers, masks, history, snapshots, dimensions, and a fresh export. Save the accepted native milestone separately. Keep uncertain candidates away from the document you have already verified so that they cannot overwrite useful recovered work.
Preserve the accepted editing state
Record the source candidate, snapshot or history route, reconstructed elements, and remaining limitations. Then reopen the accepted native document and compare the distinctive detail again. Keep a reference export from that exact revision. This gives the next editor a reliable connection between the visible result and the editable source that produced it.
Test the saved-history workflow deliberately
Use a disposable document to inspect how snapshots and saved history behave in your actual version. Save, close, reopen, and verify the expected historical state. Also test your ordinary native-file backup. These practical checks show which protections survive a session boundary and prevent a conditional feature from being mistaken for an unlimited archive.
Related recovery resources
Explore the relevant recovery options: Hard drive recovery, External hard drive recovery.
For another recovery case and its practical checks, read the related recovery guide.
Check the vendor guidance for the installed version: official recovery documentation 1, official recovery documentation 2, official recovery documentation 3.