







How do you edit a video in Windows Media Player? The practical answer is to open the original in a video editor rather than hunt for a full editing timeline in the player. Microsoft recommends Clipchamp for Windows editing. Keep your original, make the cuts in an editing project, and export a new video with a different name.
Playback controls can look similar to editing controls. Moving the playhead changes where you watch; it does not remove the opening seconds from the saved file. A successful edit produces a separate result that you can reopen and check outside the editor.
Confirm which application you are using
Media Player is not the same as an editor
Check the application’s name rather than relying on its appearance. Windows Media Player Legacy, the newer Media Player, Photos, and Clipchamp are different applications. Instructions for one may not match the buttons in another. A missing scissors icon does not necessarily mean your installation is broken.
Microsoft’s Windows video-editor guidance points readers to Clipchamp. Search Start for Clipchamp or use the supported version available to your account. Work and school access may depend on organizational settings. Do not install an unfamiliar “Media Player editor” plug-in merely because its advertisement promises the missing button.
Decide which change you need
Trimming changes the start or end of a clip. Removing an interruption from the middle requires separating that section from the parts you want. Cropping changes the visible frame, not the running time. Naming your intended change prevents a perfectly functioning tool from appearing unsuitable.
For example, removing a camera setup at the beginning needs a trim. Cutting a private conversation halfway through needs a middle section removed and the remaining clips joined. Both jobs require checking the exported result, not just observing a shorter-looking timeline.
Make the edit while keeping the source available
Locate and preserve the original
Find the actual video in Explorer and confirm its location. A recent-item entry is not another copy. Keep a backup on a separate healthy location before a significant edit. If the file is only online, make sure the editor can access the complete media before beginning.
Use a working copy when practical and leave the source folder organized. An editing project may still need its source media later. Moving or deleting that media can produce a missing-file prompt even though the project itself continues to appear in the editor’s list.
Start a project and place the clip on the timeline
Open Clipchamp and create a new video project. Import the intended media through the editor’s import control, then add it to the timeline. Play a short portion to confirm that it is the correct take and that both picture and sound are available.
Give the project a meaningful name so you can distinguish it from the exported video. Importing a file does not necessarily mean you created an independent permanent backup. Retain the original until the finished export and any future project needs are settled.
Trim the beginning or end
Select the clip on the timeline. Drag its beginning or ending handle inward to shorten that side, then play across the new boundary. Zoom into the timeline when you need finer placement. Check the first audible word as well as the first useful frame.
If you cut too much while the original media remains available, adjust the handle back before exporting. A rough visual estimate can remove part of a sentence. Listen to the transition instead of assuming that a neatly aligned edge sounds natural.
Remove a section from the middle
Place the playhead at the start of the unwanted section and use Split. Move to its end and split again. Select the isolated middle segment, delete that segment from the timeline, and remove the resulting gap using the editor’s gap controls or by moving the remaining clip.
Play through the join. Check that you removed the intended interval and did not leave a blank pause. Deleting a timeline segment is not the same as deleting the original file in Explorer; keep those operations separate while you work.
Export a new file, then verify the delivered video
Do not stop at a saved project
A saved editing project preserves your arrangement of media; it is not necessarily the finished video another person can play. Use Export to produce the result. Choose an available resolution appropriate to the source and destination rather than assuming the highest option improves every recording.
Save or locate the exported file and use a name different from the original. Personal and work accounts can have different save locations, so inspect the editor’s completion screen or your browser’s downloads. Wait until the export finishes before treating a partially created file as usable.
Open the result outside the editor
Play the exported copy in your normal player. Check the new beginning, every middle cut, and the final seconds. Listen for missing words or sudden silence, and compare the total duration with your edit. Watch for a frozen picture while sound continues. This tests the output, not merely the project preview.
If you removed confidential material, inspect the actual file you will share. Some organizational web-player trim features hide intervals during playback rather than physically removing them from the downloadable source. Those features are not Windows Media Player, and their behavior should not be confused with an exported edited copy.
Keep the originals until the result reaches its destination
Upload or transfer the new video through the intended route and check the received version when possible. A messaging or publishing service may process it again. Preserve the source and project while you confirm that the shared copy contains the right scenes and understandable audio.
Renaming the new export clearly also reduces accidental sharing of the untouched original. A shorter project title does not change the source filename. Verify the exact attachment or upload selection instead of assuming the newest-looking thumbnail is correct.
If the editor cannot find media, distinguish moving from deletion
A missing-media prompt often concerns a path, not a failed edit. Search the original folder, check whether a removable device is connected, and confirm the correct cloud account. If the source moved, use the editor’s relink prompt to identify the actual file rather than renaming an unrelated clip to match.
Use copies and backups before scanning
Check the Recycle Bin, independent backups, and the original recording device. A phone may still hold the clip that you imported earlier. For a cloud-only source with no former local copy, use the service’s own recovery features.
Do not overwrite a surviving original while trying to solve a project-link problem. An old export may preserve useful footage without reproducing the editable source arrangement. Compare what each copy contains before deciding which one to use.
Recover deleted local clips before trying to rebuild the edit
Drecov searches for lost local files on stable readable Windows storage. Read-only recovery mode, Quick Scan, Deep Scan, filters, and supported previews help locate deleted footage. Lost Partition Recovery is relevant when the source partition disappeared. The software does not edit clips, reconstruct an unsaved timeline, or repair physical damage.
Use this branch only for actual missing local media, not a player without editing buttons. The video recovery page covers the broader footage-loss task. Preserve surviving exports while you investigate, because recovered source clips may still require manual relinking or editing.
Prepare before Step 1
Stop new writes to the location that held the source. Prepare another healthy device and do not install Drecov on the affected partition. Repeated disconnects or severe read errors require imaging advice or professional help. Overwriting and SSD TRIM can limit what remains recoverable.
⚠ Warning: Install it on a drive different from the one where your data was lost to prevent overwriting.
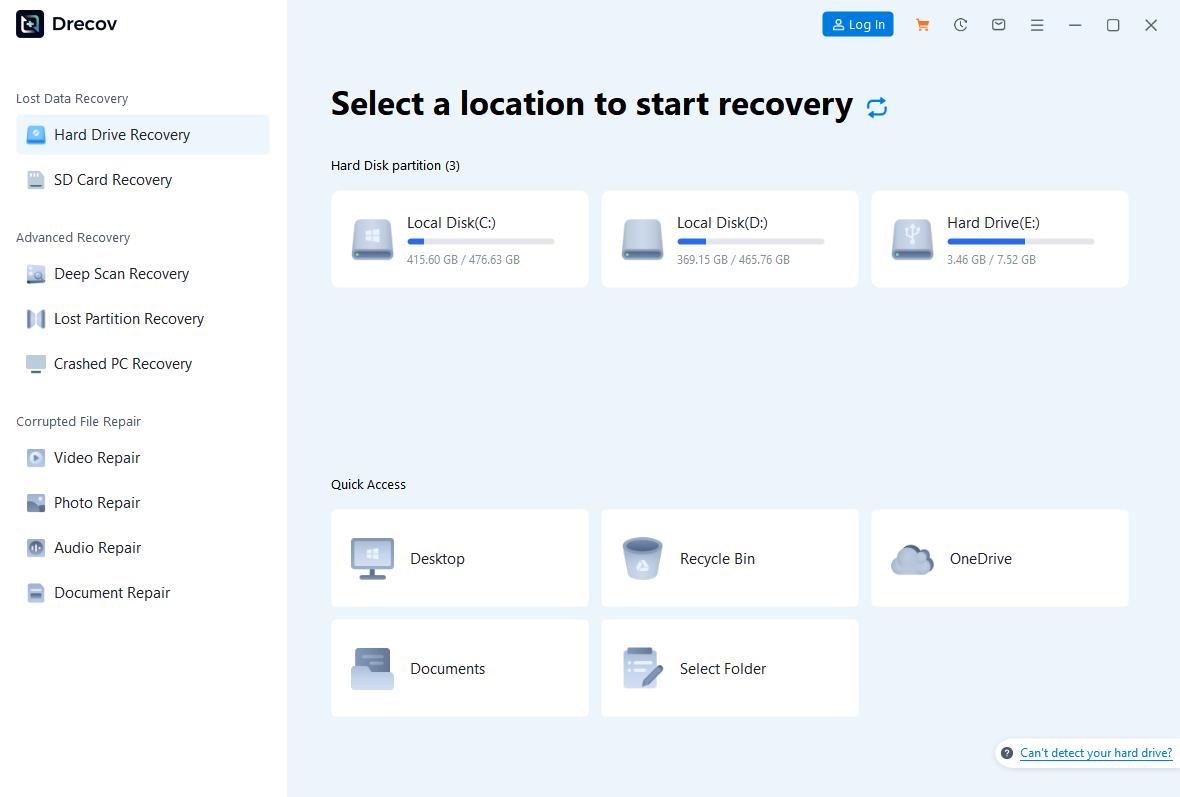
Step 1: Open Drecov and select the original clip location
Choose the stable Windows volume or former source-media folder. Do not search only for the editing project’s title when the missing items are camera clips with different names. Identify the actual location used before the deletion or move.
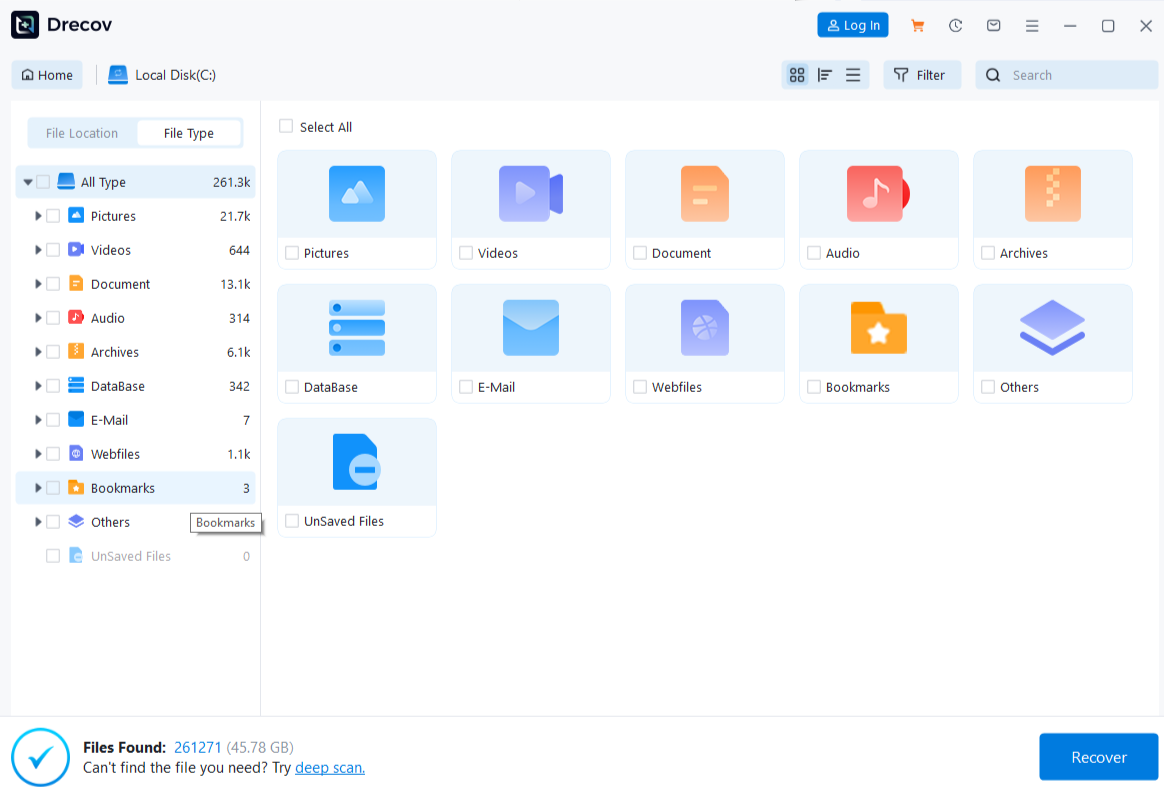
Step 2: Run Quick Scan and recognize the required assets
Look for the expected video types, recording dates, and names. Include separately recorded audio and still images if the project used them. A full set of relevant assets is more useful than a single compressed export when you need to resume editing.
Step 3: Use Deep Scan only when necessary
Continue if Quick Scan does not find the needed clips and the source remains stable. Stop if reading becomes unreliable. A deeper search cannot guarantee a complete recording. The file recovery page explains other local-file loss conditions.
Step 4: Find candidates and preview supported media
Narrow results using available type, path, date, and filename information. Preview representative supported clips where possible. A recognizable first frame does not certify the full recording; keep plausible candidates until you can test their duration and important scenes.
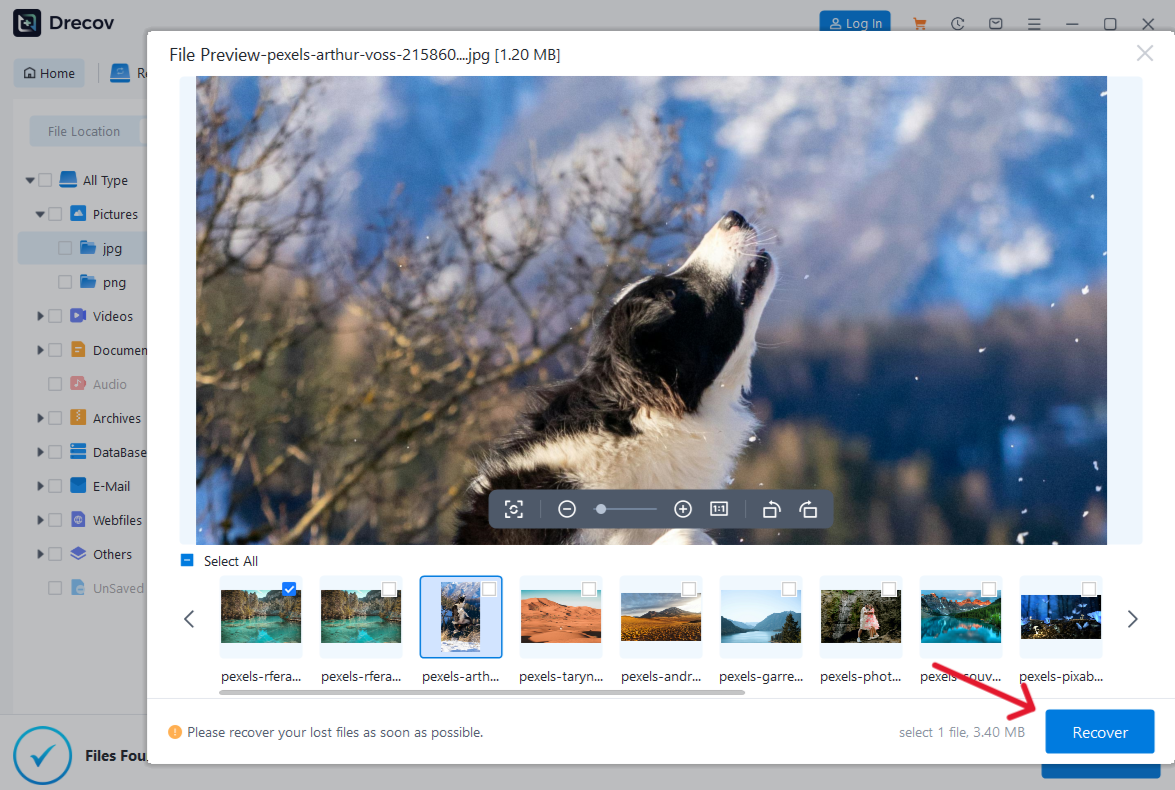
Step 5: Recover elsewhere and test before relinking
Save selected files to the healthy destination, never the source. Check Drecov Folder or Recovery Folder if the output is unexpected. Open the recovered clips in a player and test several positions. Relink a working project copy to verified media, then make and inspect a fresh export before deleting or cleaning anything else.
⚠ Warning: Install it on a drive different from the one where your data was lost to prevent overwriting.
FAQs about editing a Windows video
Why can I not find a timeline in Media Player?
You may be following instructions for a different application. Use a supported editor such as Clipchamp rather than treating playback controls as editing tools.
Does moving the playback slider trim the file?
No. It changes the point you are watching. Create an edit and export the result if you need a new file with a different duration.
Can I remove a section from the middle?
In an editor, split at both boundaries, remove the isolated segment, close the gap, and preview the join before exporting.
Is the saved project enough to send to someone?
A project can depend on its source media. Export a playable video for ordinary sharing and verify the exact file you send.
Will Drecov restore my unsaved edits?
It retrieves suitable lost local files, not an unsaved arrangement inside an editing application. Check project recovery or history separately.
Conclusion
Move from Media Player to an actual editor, preserve the original, and verify a separately exported video. That completes an editing task rather than just changing playback. If local source clips genuinely disappeared, Drecov can help search a stable source, but recover them elsewhere and inspect them before rebuilding the project.
⚠ Warning: Install it on a drive different from the one where your data was lost to prevent overwriting.





