
Recuva photo recovery software can help locate deleted pictures on a Windows drive, but its results need interpretation. A visible thumbnail does not prove that the full original opens, and a missing preview does not by itself prove that no useful file exists. Start with the correct source device, avoid new writes to it, inspect candidate details and restore a small sample to another healthy disk. This is an analysis of documented features, not a claim based on independent recovery-rate testing. If the original source is unstable, stop direct scans rather than comparing more software.
Know which photo you are trying to recover
Identify the last location of the full image, not merely a thumbnail shown in a gallery. The original might have been on the PC, a USB stick, a camera card or an external drive. A thumbnail can remain cached after the source file has been deleted. Write down the former folder, approximate date, filename and expected image dimensions. These clues help distinguish a print-ready original from a tiny preview that only looks convincing in a small results pane.
Check the Recycle Bin and backups before a scan. If the file remains in the bin, restore it normally and open it. When a synced service or camera still has the original, copy it to a healthy destination and check that copy. The Recycle Bin recovery page explains why ordinary restoration is different from deleted-file scanning. Do not install a new recovery program or save fresh photographs on the device that contained the missing image.
Watch for physical trouble. A source that clicks, disconnects repeatedly or shows the wrong capacity may not tolerate several scanning passes. Preserve any readable files and consider imaging or specialist advice. Neither Recuva nor Drecov can repair failing electronics or reconstruct pixels that have been overwritten. A software comparison only makes sense when the original storage is stable enough to read.
What Recuva’s documented photo views tell you
Recuva’s official Advanced Mode documentation describes choosing a drive and file types, viewing results and inspecting an image preview where possible. The interface can show filenames, paths, size and other details. Its documentation also describes a Deep Scan option when a normal scan fails to find the target. These are useful capabilities, but the presence of a candidate in a results list is not a guarantee that its complete content remains intact.
Use the former path and filename to narrow a familiar set first. If those clues are missing, compare the subject and approximate size of multiple candidates. A thumbnail may have been generated separately from the full picture, so do not count it as a recovered original. Preview can fail for an image that requires a different viewer, and it can succeed for only a small part of the photo. Recover a sample to another disk and open it at the intended size before committing to a larger batch.
Interpret the result indicators cautiously
Recuva may display condition indicators and preview information. Treat them as software estimates or observations, not an audited success probability for your files. A green-looking result can still be the wrong photo; a recovered file may also be truncated or unreadable in your usual editor. Verify with an external viewer, check dimensions and inspect fine details. For camera RAW, decide whether the result is the original RAW or only an embedded JPEG preview. Preserve the recovered candidates separately while you investigate.
When a deeper scan changes the choice
If Recuva’s first scan does not show the original, confirm the drive you selected. Scanning the destination of a copy will not necessarily find a file deleted from the source. Then consider the documented Deep Scan only if the device is stable. A broader search may return files without useful original names or folder structure. More results create a sorting task, not automatic recovery. Filter by image type and examine several candidate photos from the relevant event.
Do not keep rescanning an unstable drive because one program found nothing. Stop if it disappears or read errors grow. Also account for writes since deletion and for SSD TRIM, which can sharply reduce prospects for old deleted data. Neither factor predicts the result of a specific file with certainty. If images were lost from cloud-only storage, the provider’s trash or version history is the correct route; local Recuva scans cannot search the cloud server.
For a collection, document what success would mean: perhaps 30 original JPEGs from a trip, not hundreds of thumbnails or unrelated web images. Compare the recovered count and content with a list of expected scenes. The tool that presents more results is not necessarily the tool that recovered more of your actual project. A fair comparison therefore focuses on verified outputs, not a screenshot of a large results list.
How Drecov offers a separate Windows path
Drecov is Windows data-recovery software for stable recognized PCs, USB drives, memory cards and other supported local sources. Its Quick Scan and Deep Scan, filters and preview help locate candidate photos; selected files should be recovered to another healthy storage location. Lost Partition Recovery applies when a partition’s files are missing, not when a single image fails to open. Drecov does not repair damaged pixels, fix hardware or promise to recover overwritten data. Its practical role here is to give you another way to inspect the original source and test recovered photos, not an evidence-free claim of superiority over Recuva.
Choose the path that answers your problem. If Recuva has already produced full originals that open correctly, stop scanning and back them up. Small thumbnails or incomplete files call for checking backups and source identity before another search of the stable original device. The photo recovery page explains the Drecov route for missing pictures. Do not run both tools simultaneously against a faltering source or save either tool’s results back onto it.
A cautious Drecov comparison on the same source
⚠ Warning: Install it on a drive different from the one where your data was lost to prevent overwriting.
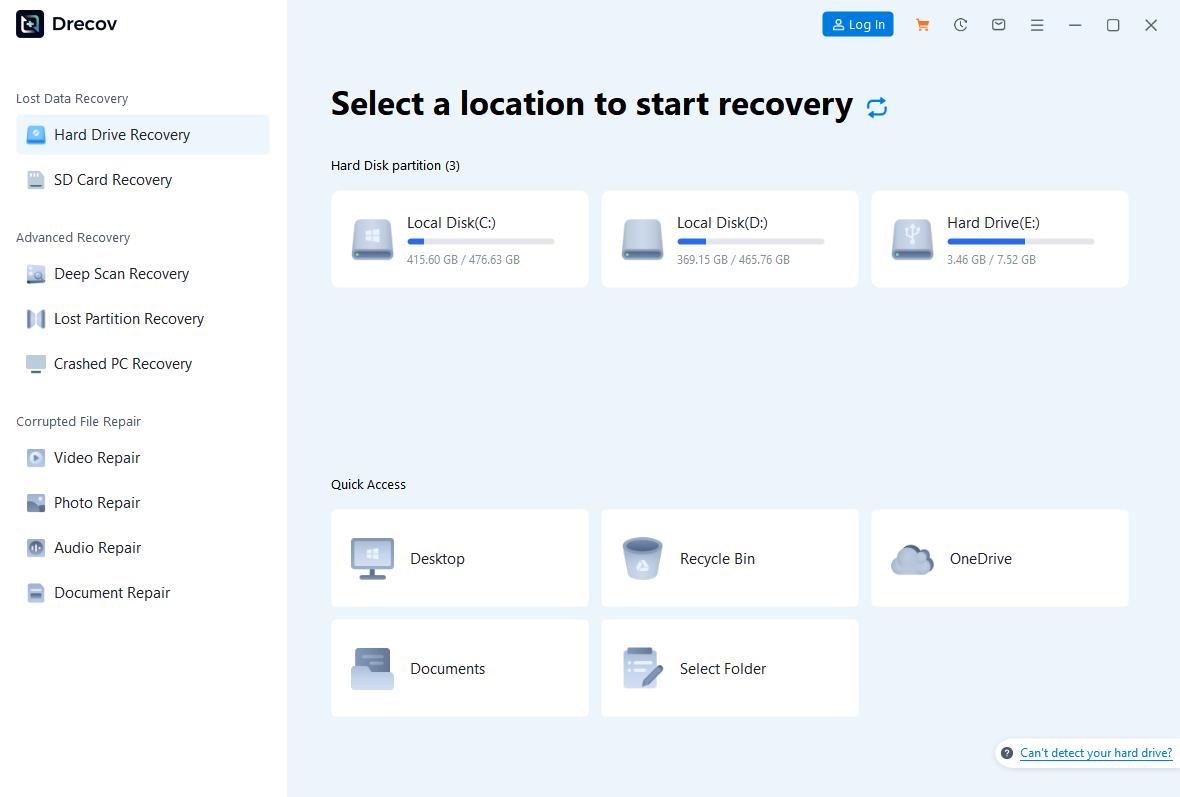
Step 1: open Drecov and select the original loss location.
Confirm the device and capacity before scanning; keep installations off that partition.
Step 2: run Quick Scan.
Seek the former folder and relevant image formats.
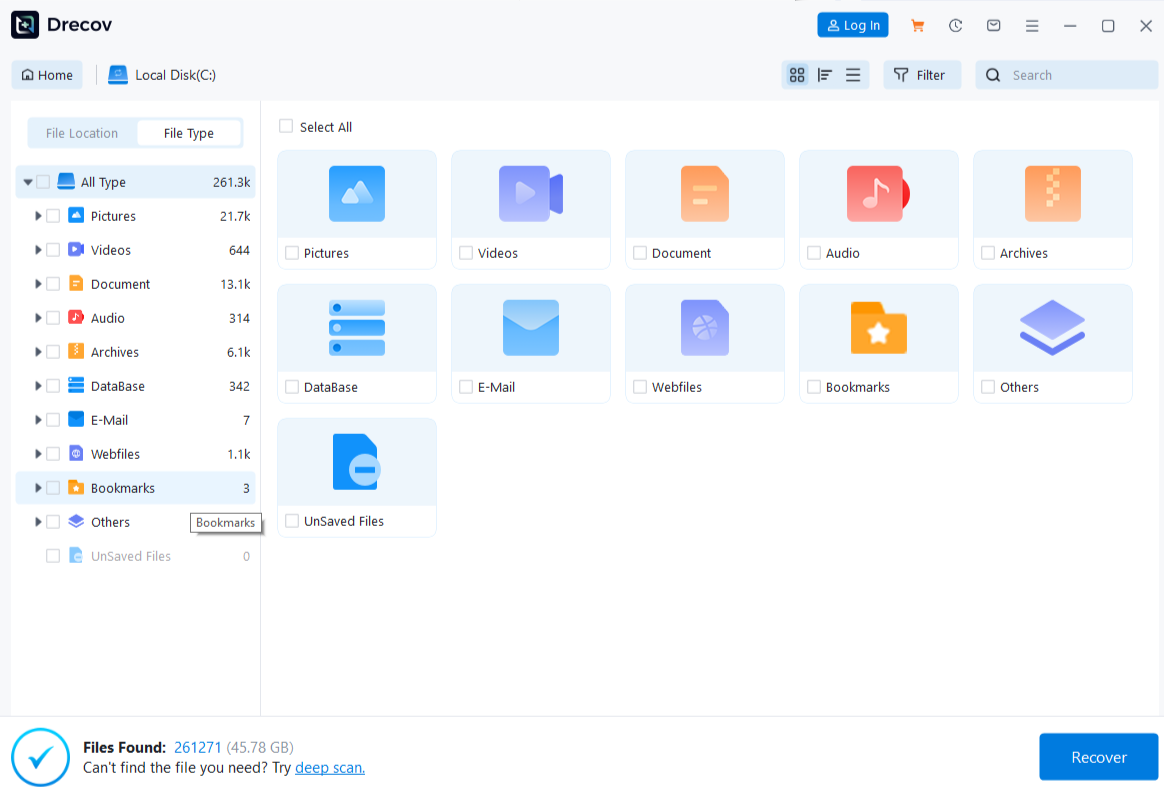
Step 3: use Deep Scan only if needed and stable.
Stop direct reading if the device becomes unreliable.
Step 4: filter and preview candidates.
Compare subject, path, type and dimensions where available.
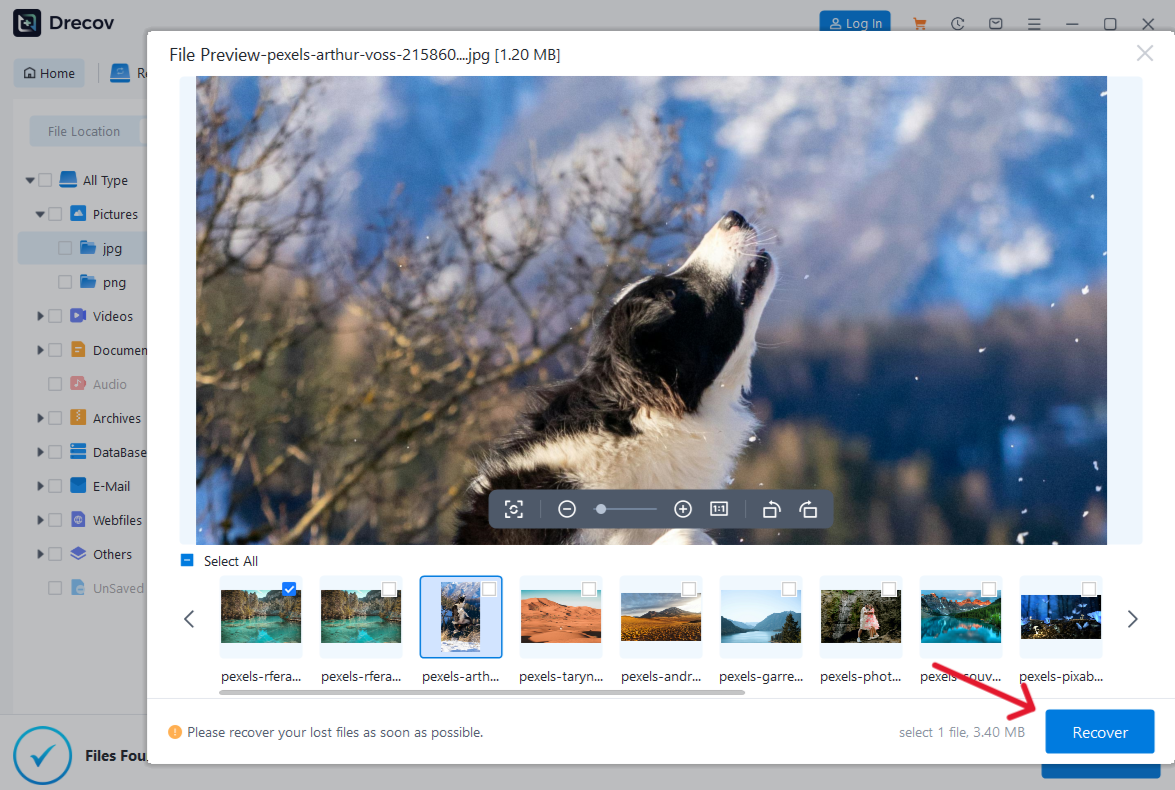
Step 5: recover selected pictures to another healthy disk.
Do not write to the source.
Step 6: open the saved originals outside Drecov.
If the output is missing from the chosen folder, check Drecov Folder or Recovery Folder there.
Compare the actual files recovered by each route, not their marketing descriptions. The file recovery overview helps when the same source also held documents or video. Keep every candidate labeled by tool and date so you do not mistake a thumbnail for the final original.
⚠ Warning: Install it on a drive different from the one where your data was lost to prevent overwriting.
A fair decision after you inspect real files
Recuva may be a reasonable first choice for a user familiar with its Windows interface and a simple deletion from stable storage. Its documented Advanced Mode can narrow drives and file types, and its preview helps inspect pictures. Drecov offers a graphical source-selection and scan path with preview and an appropriate lost-partition mode. Those are documented workflow differences, not evidence that one wins every recovery. Neither program can make an overwritten file reappear by changing a setting.
A backup is preferable when it contains the complete original. If you have both a backup and a recovered copy, compare their dimensions and visible details. Without either copy, focus on preserving the source. A device showing physical symptoms should go to imaging or professional assessment rather than a new trial of multiple programs. Do not spend additional time or money on a second product merely because the first scan did not show the filename; confirm you scanned the right place.
Keep the test small and reversible. Restore a few likely candidates to another disk, open them in a normal viewer and note which are complete. Use the same criteria for both tools: correct photo, expected resolution, readable image and safe destination. This method does not require invented benchmark times, ratings or recovery percentages to help a reader decide what to do next.
Verify pictures rather than counting thumbnails
Open each important recovered photo outside the recovery interface. Zoom in to check facial detail, text or another feature that matters. Inspect edges and a few images from the middle of the set. A preview that looks fine at small size may hide blocks of missing pixels when enlarged. For RAW files, use an application that can read the original format, not just the JPEG preview stored inside it.
After checking, copy complete originals to a second healthy location. Keep an untouched version of any damaged candidate for later comparison; do not overwrite it with a converted image. If the set is incomplete, leave the source alone while you look for other backups, camera exports or copies shared with someone else. Formatting the device or cleaning temporary files before you finish that search can reduce options.
The final decision is whether you have the photographs you actually needed. A software name, an optimistic status dot and a large list of results are all less important than opening the correct full-size files from a safe destination. If the important images are verified, stop scanning and make a backup.
FAQs
Does a Recuva preview prove the original photo is intact?
No. Recover a sample to another drive and open it at full size. The preview may be small or incomplete.
What if Recuva finds only thumbnails?
Check whether you selected the original device and look for backups. A thumbnail cannot recreate missing full-resolution detail.
Should I try Deep Scan immediately?
First confirm the source and ordinary scan results. Use a deeper scan only when needed and the device remains stable.
Can Drecov repair a damaged JPEG?
It can search for another copy on local storage. Recovering a file is different from repairing missing or corrupted image data inside it.
Which program is guaranteed to recover my photos?
Neither. Availability depends on the source, later writes and the state of the file. Judge the saved images, not an unsupported success claim.
Conclusion
Recuva photo recovery software gives useful ways to search for and preview deleted pictures, but a result only becomes valuable when the full original opens. Identify the source, save to another disk and verify real images at their expected size. Drecov provides another Windows search path when the stable original storage may still contain missing files; it is not a photo repair tool or a guarantee. If a Recuva result already meets your need, back it up rather than scanning endlessly.
⚠ Warning: Install it on a drive different from the one where your data was lost to prevent overwriting.