







A Recycle Bin recovery program is useful when you cannot restore a genuinely deleted local file through Windows or an existing backup. Before installing one, open the bin under the account that deleted the item and check its original location. An empty bin in a different account does not settle what happened. If the file really is gone, stop writing to its original drive while you choose a recovery method.
The bin is a way to manage certain deleted items, not a second independent backup of everything on the computer. A document on the desktop, a file on another local volume and a cloud-only item can require different recovery paths. Identifying the original location prevents a long scan of storage that never held your document.
Choose between Restore, a backup and a recovery program
Use ordinary restoration when the item remains in the bin
Open Recycle Bin and search for part of the filename. Check Original Location and Date Deleted before selecting Restore. Windows returns the item to its original folder; open it there and make an independent copy once you confirm the contents. A similarly named draft is not necessarily the version you deleted yesterday.
Prefer a usable existing backup to a new scan
Check the device or service where you already kept backups. If File History protected the folder before deletion, browse its saved versions and restore a suitable one elsewhere. The folder’s Previous Versions tab may also show earlier protected versions. Empty lists do not mean you should enable backup and expect yesterday’s files to appear.
Consider software when neither route has the file
After the bin has emptied or deletion bypassed it, software can search the original local storage for surviving file information or content. Later writes and SSD TRIM can limit what remains. A recovery program cannot promise a complete file simply because it displays the old name. For an overview of these distinctions, consult Recycle Bin recovery.
What to expect from a Recycle Bin recovery program
Drecov provides Windows file recovery for stable accessible storage. Its read-only recovery mode examines the source, with Quick Scan and Deep Scan available for finding lost content. Filters, location information and supported previews help distinguish the files you need from old drafts or unrelated results. You recover selected files to another healthy device for verification.
The source should be the volume that held the original content, not just whichever drive contains the recovery application. Lost Partition Recovery can help when the original partition disappeared. This is not hardware repair, account-password recovery or permission bypass. An encrypted source still requires legitimate access, and recovering a file does not automatically provide its decryption key.
Compare methods by what you can actually use
A graphical workflow such as Drecov can suit someone who wants to inspect results before selecting them. Windows File Recovery offers a command-line alternative for local deleted-file recovery. Choose it only if you can follow its source, destination, mode and filter instructions. Existing backups need neither type of scan when they already contain a verified copy.
For any tool, confirm that it recognizes your source and can save to another device. Read current recovery conditions before making a purchase decision. A preview, a scan and saving results can have different requirements. Do not substitute an unexplained recovery percentage for testing your own recovered document.
⚠ Warning: Install it on a drive different from the one where your data was lost to prevent overwriting.
Recover the file from its original storage with Drecov
Prepare a healthy output device before opening the search
Stop downloads, installations and unnecessary changes on the source partition. Install Drecov elsewhere and arrange another healthy physical device with enough free space. When the volume holding the deleted document keeps disconnecting, stop scanning it. Ask a recovery specialist whether imaging is safer than another direct read. Check independent backups before proceeding.
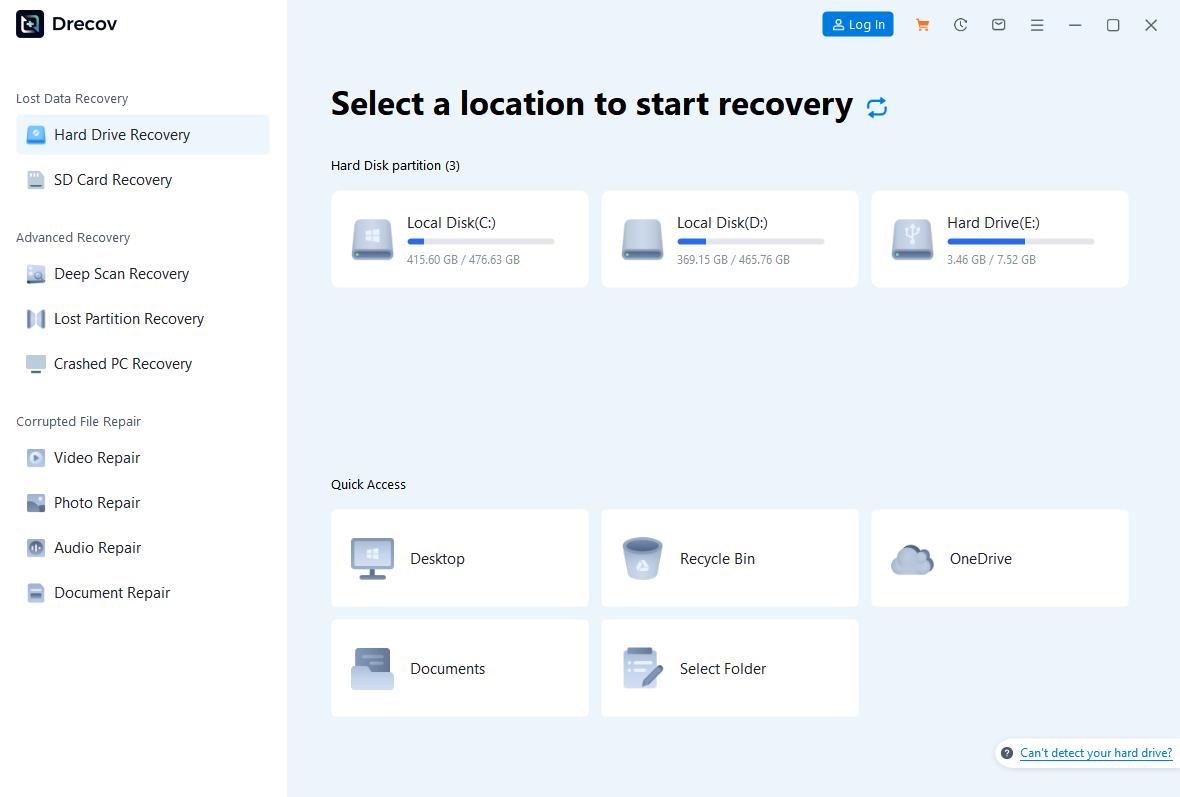
Step 1: Open Drecov and select the original loss location
Choose the volume or folder location where the file lived before deletion. A file deleted from another local volume should not lead you automatically to scan C:. For a missing partition, use the applicable Lost Partition Recovery mode. Match the actual source identity rather than relying on a drive letter from a different computer.
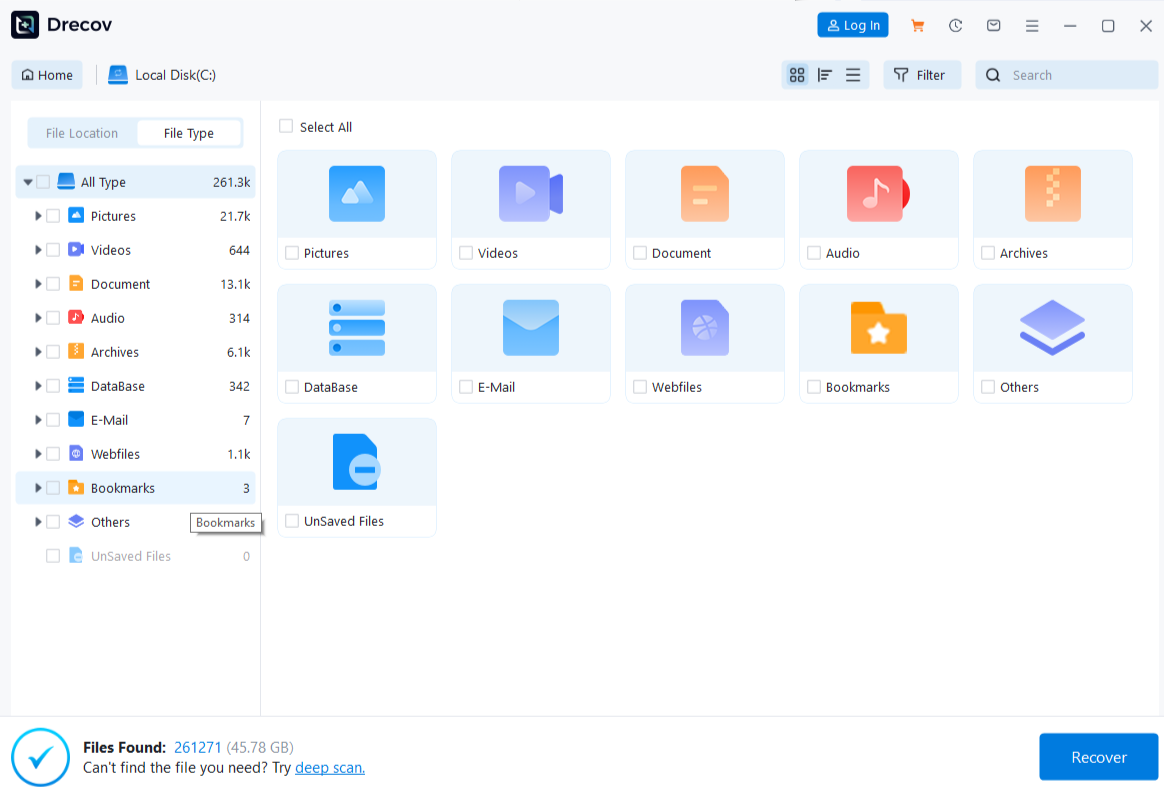
Step 2: Run Quick Scan and identify the needed version
Look for the original folder and recognizable names. Compare available dates and file types with the work you lost. A report may have several drafts and a separate final PDF. Select representative candidates for examination instead of treating the largest collection of results as the best outcome.
Step 3: Continue with Deep Scan only if needed and stable
Use Deep Scan when Quick Scan does not locate the file and source access remains reliable. Stop if errors worsen or the device disappears. More searching does not reverse complete overwriting. Do not initialize, format or repair the file system merely because a first scan did not find a familiar folder name.
Step 4: Filter and preview the results
Narrow the list with available name, type, path and date information. Preview supported examples and inspect the content you recognize. One visible page does not establish the condition of a long document. Keep plausible older versions too, especially when the newest candidate contains missing sections or incorrect figures.
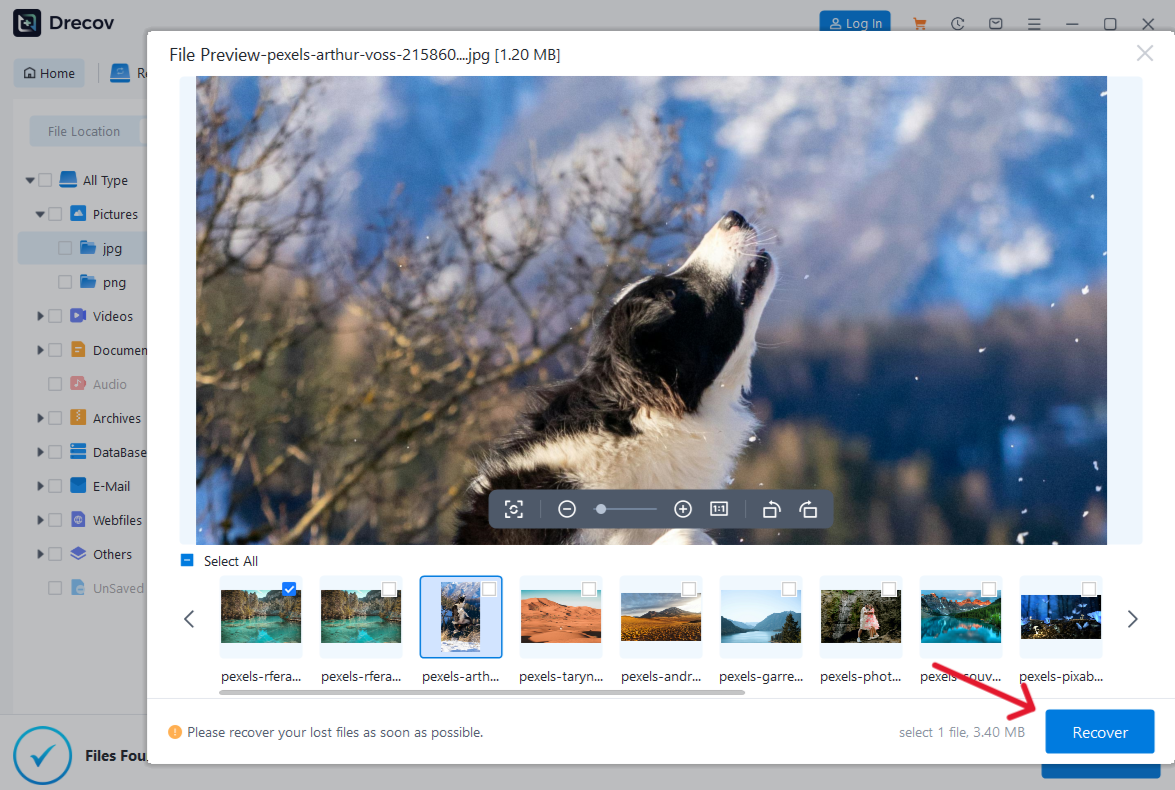
Step 5: Recover to another device and check the contents
Save to the healthy destination, never the original source. Look for Drecov Folder or Recovery Folder if the output is not where you expected. Open the files in their normal applications and compare important text, figures or media. Complete verification before CHKDSK, resetting, formatting or reinstallation. Broader file recovery follows the same distinction between extracting content and modifying its source.
⚠ Warning: Install it on a drive different from the one where your data was lost to prevent overwriting.
When files seem missing after changing Windows accounts
On a shared computer, confirm which Windows account you used when the item disappeared. Sign in to that account through the normal authorized route and check its Recycle Bin. Do not reset another person’s password or change protected folder permissions just to investigate their deleted items. A work or school computer may require its administrator’s help.
Compare the file’s original location with the expected user’s folders. Two people can each have a document with the same name on their own desktop. Matching names alone do not establish ownership or content. Ask the relevant person to verify the version before restoring or distributing it.
Do not confuse the PC bin with an online service’s deleted items
A file visible through a synchronized folder may also have a recovery path on the service’s website. Check the correct account and service when the item originated there. Microsoft’s restoration guidance distinguishes online recovery from restoring local Windows bin items. Local software cannot scan a remote account that never stored the file on the PC.
Check which device held the original
A USB file can bypass the local bin, while an independently copied PC version may still appear there. If the missing original lived on removable storage, follow the USB recovery route rather than assuming the desktop bin owns it. Keep the device out of regular use until you determine whether recovery is necessary.
Judge success by the saved file, not by the program’s list
Restore a small set and make a clear comparison
Start with the documents or media that matter most. Open a recovered file from the destination, not from a recent-items shortcut pointing to an old location. Compare a meaningful section: the final totals, the required image or the ending of an audio recording. File size and a familiar icon are useful clues, but they cannot replace this check.
Keep uncertain versions separate
Name verified working copies clearly and preserve the untouched recovery output. Avoid merging folders automatically when different versions share a name. Do not let an incomplete recent draft overwrite an intact earlier document. Once the important files pass inspection, make a second independent backup before repairing or reusing the source.
FAQs
Do I need a Recycle Bin recovery program before emptying the bin?
Usually not if the correct item remains there. Choose Restore, open the original folder and verify the file. Software becomes relevant when ordinary restoration and existing backups cannot supply it.
Does an empty bin mean recovery is impossible?
No, but it also does not prove recoverability. Original storage, later writes and device behavior matter. Check backups before scanning a stable source.
Which drive should I scan?
The volume that held the file before deletion. Neither the recovery application’s installation drive nor the desktop bin icon determines that source.
Can a program recover another user’s encrypted file?
Finding file content does not provide the owner’s encryption key. Obtain authorized access and involve the administrator rather than trying to bypass account or encryption protections.
Should I keep scanning if the device disconnects?
No. Repeated instability needs a source-protection plan, potentially imaging or professional recovery. Continuing scans can consume the access you still have without producing usable output.
Conclusion
Choose a Recycle Bin recovery program only after checking ordinary restoration, existing backups and the correct account. Drecov can search stable Windows-accessible storage for genuinely missing files, but the original volume still matters. Recover to another device and open the contents before repairing or reusing the source. On a shared PC, resolving whose file and which location you need can save an unnecessary scan.
⚠ Warning: Install it on a drive different from the one where your data was lost to prevent overwriting.






