







An “audio codec not supported” message after recovering a recording does not prove you need a codec pack. The player may lack a decoder, but the file may also be incomplete or mislabeled. Preserve the recovered copy, compare its size with any older version, and try a trustworthy player that supports the actual format. If the original recording is missing from a stable local drive, search that original location before editing or converting the only copy. Recovery software can retrieve files; it cannot supply a missing decoder or rebuild audio that was never recovered.
Check what changed before installing anything
A recording that played yesterday but fails today may have moved to another PC, opened in another app, or been recovered from deleted storage. Those are different changes. Note the exact message and which player displays it. Does the same file play on the device that created it? Try another recording with the same extension on this PC as well. An answer to either test can narrow the fault without modifying your only copy.
Open File Explorer, right-click the suspect file, and inspect Properties. Record the extension, size, and modification date. A zero-byte file has no audio payload for a codec to decode. Even a nonempty two-minute recording deserves inspection if it is dramatically smaller than an older copy; compression differences mean size alone is not proof. If the filename ends in .mp3 but came from an app that normally saves .m4a, do not assume renaming the suffix changed its actual encoding.
Make a working copy for tests
Copy the file to a healthy location and run every playback or conversion experiment on that duplicate. Leave the source unchanged, especially if it was recently recovered from a device that still contains other missing recordings. A conversion tool may overwrite its input or produce a new file that looks successful but contains silence. Keeping the original gives you a way to compare results and try a better source copy later.
Separate a codec problem from a damaged recording
A codec is the method used to encode or decode audio. The container or file extension describes how streams are packaged, but it does not always reveal every codec inside. Microsoft explains in its Windows Media Player troubleshooting guidance that some playback errors arise when a required codec is missing or unsupported. That is a real possibility, not a universal diagnosis for every recovered file that refuses to play.
Use a small comparison rather than a codec bundle
Try another reputable player that explicitly supports the source format. Use its current official download, not an unknown “all codecs” installer advertised beside an error message. If one player works and another fails, keep the working file and investigate the first player’s supported formats. By contrast, a file that stops at the same timestamp or produces only silence across players may be incomplete. A different codec pack cannot restore audio bytes that are absent.
Compare the failing recording with a known-good file created by the same app or recorder. The same extension is helpful but not conclusive. A good sample that plays on the same PC suggests the system can decode at least that format. The recovered file may still differ in codec, sample rate, or completeness. When the file came from a phone or voice recorder, preserve the device’s original export method and filename if available; a forced extension rename can hide the real issue.
For a Windows local recording that was transferred through email or cloud storage, download a fresh copy from the original service if it still exists. Compare sizes and play the new download before touching the recovered one. A failed transfer is often easier to solve by fetching the intact source again than by converting a truncated file. If there is no source copy, keep all candidate versions for the next stage.
Know when conversion can help
Conversion is useful only when a tool can read the existing audio stream. If a trustworthy app opens the recording and plays it through, exporting a new copy in a format supported by the target device may solve a compatibility problem. Work from a duplicate and keep the unconverted original. After export, listen near the beginning, middle, and end. Neither a new extension nor a completed progress bar proves that the full recording survived.
If the converting app also rejects the input, do not repeat exports with random settings. The source may be incomplete, encrypted, proprietary, or simply unsupported by that tool. Look for the original app’s export option or another documented player. An audio project file may contain references to separate media instead of a self-contained recording. In that case, the project and its linked assets must remain together; a codec download will not recreate missing dependencies.
Some recovered files have generic names or extensions because directory metadata was lost. Do not rename every result to .mp3. Preview candidates where possible and compare their content. A small file that is actually a thumbnail, cache record, or shortcut will not become audio through renaming. For an M4A-specific corruption question, the existing M4A copy check offers a narrower follow-up.
Look for an intact original before deeper repair
Check the application that created the recording, its export folder, any connected device, and an older backup. A synced folder may have version history or a deleted-items area. If the recording was sent to someone else, ask for their copy. These routes can give you the complete file without scanning a local disk or trying to rebuild damaged audio. Compare actual playback, not just filenames.
When the only known copy came from a recently deleted file on a Windows PC, stop creating new files on that source volume. The computer may reuse free space that once held the original. Do not install recovery software onto that partition if you can use another healthy destination. SSDs may further limit what remains after deletion and TRIM. No software can promise the missing bytes are still available.
If the source is an external drive or USB that disconnects, clicks, or returns severe read errors, stop direct attempts. A professional image or recovery assessment is safer than repeated consumer scans. Stable, recognized media may be searched for another intact recording. That is a file-recovery task, not a codec fix. Keep the questionable recovered copy for comparison, but do not overwrite it with a new scan result of the same name.
Where Drecov helps—and where it does not
Drecov is Windows data-recovery software. Here it can search a stable original PC drive, USB stick, or external drive for a missing recording or a more complete file candidate. Its read-only recovery mode, Quick Scan, Deep Scan, filtering, and preview can help locate audio before you attempt conversion or repair on copies. Lost Partition Recovery applies if the volume itself has vanished, not to a simple playback message. Drecov cannot install an audio codec, transcode a file, repair a damaged sound stream, or guarantee that overwritten recording data can be restored. The audio recovery page covers lost audio, and the file recovery overview explains the source-location approach.
Prepare another healthy storage device for output. Do not install Drecov or save recovered recordings on the source volume. Only proceed with a direct scan when the original device is consistently detected and physically stable. If its condition worsens, stop and use the specialist path described above.
⚠ Warning: Install it on a drive different from the one where your data was lost to prevent overwriting.
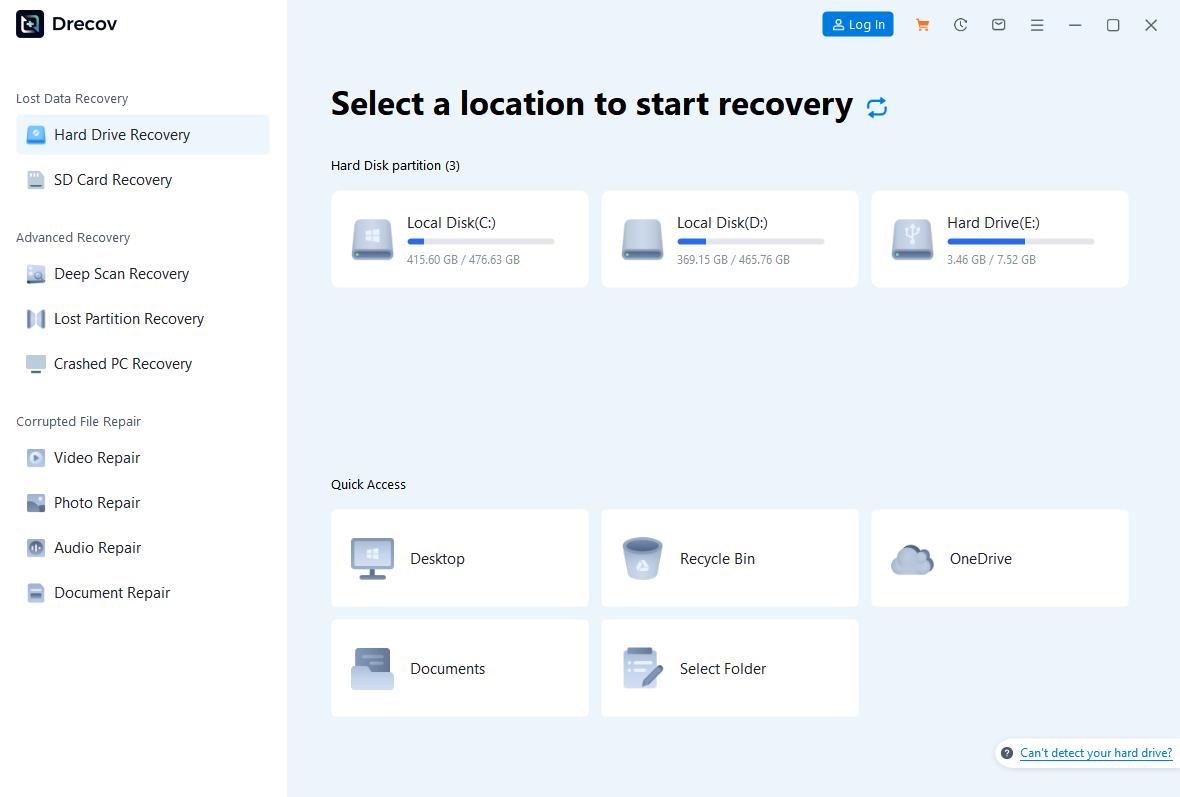
Step 1: Open Drecov and choose the original recording location
Launch Drecov from a healthy installation. Select the drive or volume where the original recording lived before deletion or loss. Use its capacity and former path to confirm the source; drive letters may change. Do not scan the folder containing a merely incompatible copy if the original was stored somewhere else.
Step 2: Run Quick Scan for the missing audio
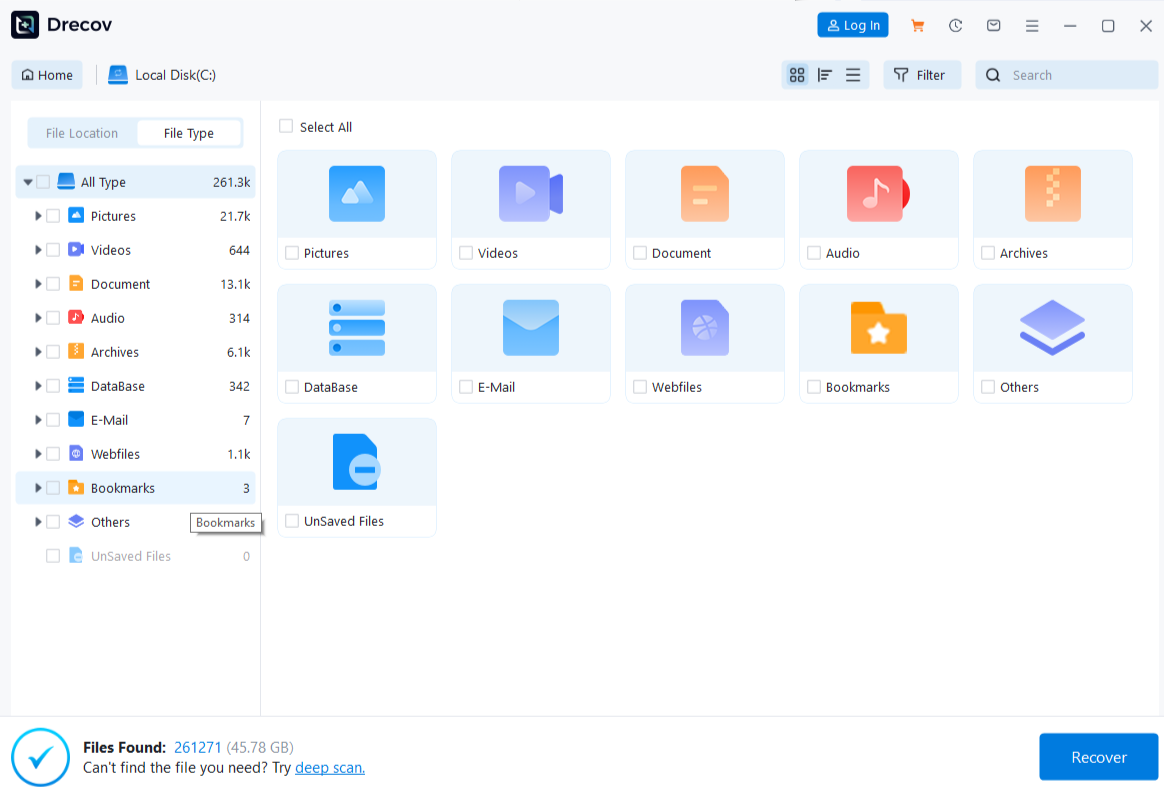
Start Quick Scan and look for the recording’s name, former folder, or audio file type. Older versions or duplicates may appear among the candidates. Note their apparent sizes and paths, but treat them as clues rather than guarantees of playable content.
Step 3: Try Deep Scan if the source stays stable
If Quick Scan misses the recording and the device remains connected without severe errors, run Deep Scan. This may reveal files whose names or folders were lost. Stop if the storage device begins disconnecting. A deeper search cannot fix an unsupported codec or reconstruct fully overwritten samples.
Step 4: Preview, recover elsewhere, and listen
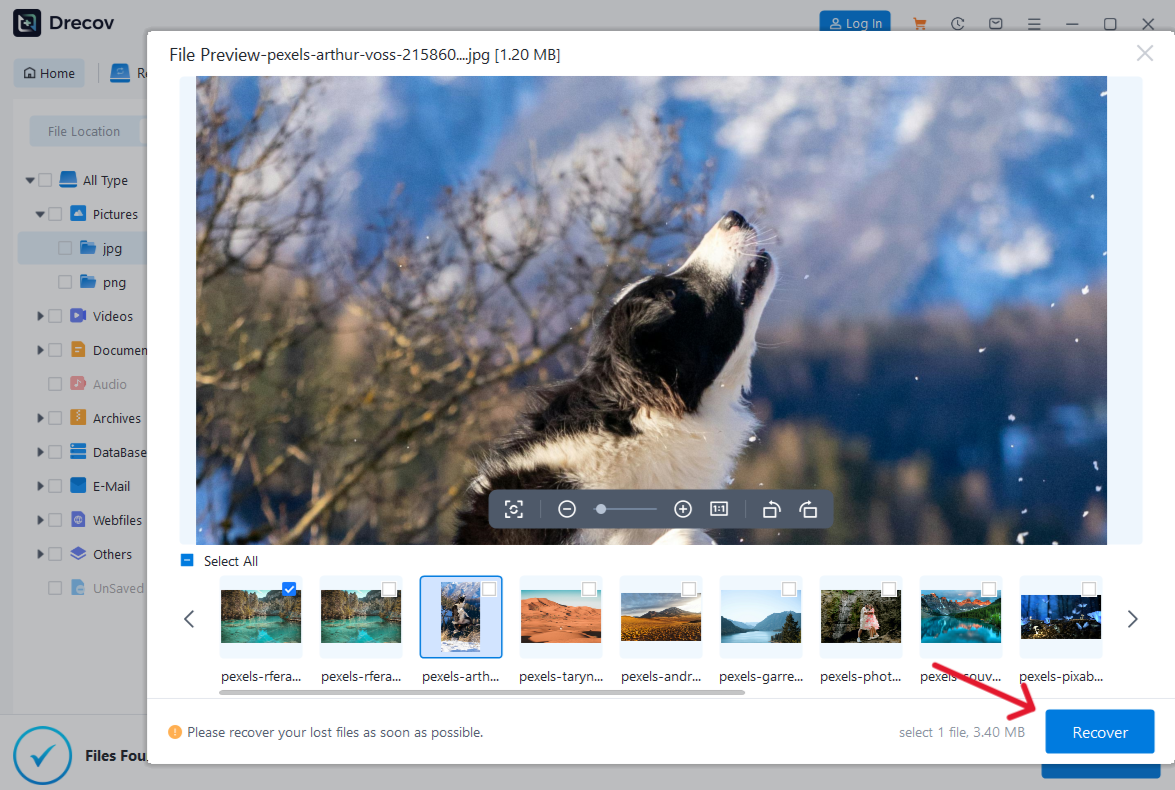
Filter or browse likely audio candidates, then preview supported files where possible. Preview may not work for every format or damaged file, so it is not an absolute verdict. Recover promising candidates to the prepared healthy device. If they are not in the expected place, check the Drecov Folder or Recovery Folder there. Play a recovered recording at several points, compare its duration with the expected session, and keep the most complete version before conversion.
⚠ Warning: Install it on a drive different from the one where your data was lost to prevent overwriting.
Verify the result in the app that matters
A recording is not “fixed” merely because one player opens the first second. Listen through the beginning, middle, and end, paying attention to gaps or sudden truncation. Check that the duration, speakers, and content match what you needed. If it belongs in an editing project, import a copy into that application and confirm that linked media and timing are intact. Save a separate working copy before editing.
When one player works but another still says the codec is unsupported, the file may be fine for one workflow and incompatible with another. Use the creator app’s documented export function or a reputable converter on a duplicate. Choose the target format based on the receiving app’s specifications. Retain the original and the verified export, since a lossy conversion can reduce quality or omit metadata even when playback succeeds.
If no recovered candidate plays fully, return to backups, the recording device, or a recipient’s copy. Do not hide the failure by declaring the file recovered because it has a familiar name. The honest outcome may be that the remaining source data is incomplete. Preserve what exists and decide whether specialist work is justified by the recording’s importance.
FAQs
Does “audio codec not supported” always mean the file is broken?
No. A player may simply lack a decoder. Test a trustworthy player with documented support for the format and compare with another known-good file from the same source.
Can changing .m4a to .mp3 make the recording play?
Renaming the suffix does not change the encoded audio. It may confuse applications further. Preserve the original name and use a documented export or conversion path only if an app can read the source.
Why is a recovered audio file smaller than expected?
It may be a shorter version, a partial recovery, or a different compression format. Compare content and duration with a known-good copy; size alone cannot identify the cause.
Can Drecov add the missing codec?
No. Drecov searches for lost local files. Codec support comes from the player, operating system, or an official extension. Use recovery only when the original recording itself is missing.
Should I install a random codec pack from an error popup?
No. Identify the actual file format and consult a trusted player or the codec provider’s official source. Keep the original recording unchanged while testing.
Conclusion
When a recovered recording reports “audio codec not supported,” compare the file, the player, and another known-good copy before installing anything. A missing decoder calls for a supported playback or export path; a truncated or absent original calls for a different response. If the original local recording was deleted and its storage device is stable, Drecov can search that source, preview candidates, and save them to another healthy drive. Listen to the recovered file throughout before calling the problem solved.
⚠ Warning: Install it on a drive different from the one where your data was lost to prevent overwriting.





