

Recover Capture One edits and originals as separate components
To recover Capture One edits, identify whether you used a Catalog or a Session before restoring files. Their storage models and backup requirements differ. A catalog database can preserve adjustments and organization while referenced RAW files live elsewhere. A Session can depend on its folder structure and adjustment sidecars. Recovering one database file does not automatically recover every original photograph.
Record the document type, Capture One version, original image location, and a photograph with a distinctive adjustment. Also identify whether originals were managed inside the catalog structure or referenced from another folder. These details determine what a complete recovery needs. A visible preview alone does not establish that the full-resolution source is available for export.
Preserve the current catalog or session
Close Capture One and preserve the complete surviving document folder before troubleshooting. Keep original images and relevant adjustment folders with their existing relationships. Work on a copied candidate rather than mixing backup components into the only live set. A newer database and an unrelated older adjustment folder can create a confusing combination that never existed as a valid milestone.
The native recovery routes below require an existing legitimate Capture One installation and suitable access to its features. They do not require purchasing a separate recovery utility, but Capture One itself is commercial software. Use the installed version’s documentation and avoid treating a database upgrade as an ordinary file copy that you can always reverse.
Native route 1: restore an existing catalog backup
- Locate a catalog backup created before the loss.
- Preserve the current catalog and the original backup separately.
- Restore the backed-up database with its associated adjustments as documented for that version.
- Open the copied catalog and compare a known edited photograph.
Capture One catalog backups can preserve the database and relevant adjustment information, but original image backup is a separate responsibility. Check the actual backup contents rather than assuming a dated folder includes every RAW file. If originals were referenced from another drive, restoring the database may leave the photographs offline until you reconnect or recover those sources.
Validate the specific editing milestone
Choose an image with a recognizable crop, color treatment, rating, or variant. Compare the restored values and the intended export result. A catalog that opens successfully may be older than the final editing session. Preserve useful alternatives and record which late adjustments are absent before promoting one candidate to the accepted working catalog.
Also compare albums and organizational information important to the job. Restoring the adjustment for one photograph does not establish that a complete client selection returned. Inspect representative images from different parts of the shoot and confirm the intended collection membership. Keep the original backup untouched while you evaluate the working copy.
Native route 2: restore a complete existing Session folder
- Locate a previously preserved Session folder or full backup.
- Copy the complete candidate to a separate healthy working location.
- Open its .cosessiondb file through Capture One.
- Check original images, adjustments, selected output, and folder relationships.
A Session backup should preserve the session structure and the files it depends on. Copying only the session database can omit original images and adjustment information. Inspect the actual folders and resources from that Session. If it referenced images outside the copied directory, include those external sources in the recovery investigation rather than assuming the session copy contains everything.
Preserve adjustment sidecars with their image folders
Session adjustments can live alongside source images in CaptureOne subfolders. Preserve those supporting folders instead of discarding them as expendable previews. Different file types inside the structure serve different roles. Rebuilding thumbnails is not equivalent to restoring edit settings, so avoid broad cleanup while the recovery source is still uncertain.
Compare the same photograph before and after opening the restored Session. Inspect crop, exposure, color adjustments, masks where relevant, and output settings. A recognizable image with default settings is evidence that the original survived, not proof that your edits returned. Record image recovery and adjustment recovery as separate outcomes.
Native route 3: reconnect surviving original image paths
- Identify an offline photograph or folder in the restored document.
- Locate the actual original image in the preserved source collection.
- Use Capture One’s supported locate workflow to reconnect the correct file or folder.
- Test full-resolution editing and export before applying the approach broadly.
A moved image can appear offline while both its original bytes and editing instructions survive. Reconnecting the correct source can restore useful access without re-importing everything. Match camera filename, capture details, and image content where possible. Another photograph with the same basename may belong to a different shoot and is not an acceptable substitute.
Reconnect at a meaningful folder boundary
If a whole shoot moved together, compare the old and new folder structures before correcting each image individually. A supported folder-level locate operation can preserve relationships more consistently. Test a small representative set afterward, including nested folders and a known adjusted variant. Do not accept the change solely because the offline indicator disappears.
If the source file truly is absent, keep the catalog or Session information that references it. That editing context may become useful when you recover the original later. Removing missing entries prematurely can discard the connection between a photograph and its surviving adjustments, making a later image recovery harder to use.
Native route 4: inspect a surviving pre-upgrade copy
- Preserve the current document before opening older candidates.
- Locate any existing backup made during a prior version upgrade.
- Test a copied candidate with a compatible Capture One version.
- Compare edits and organization before deciding whether it is useful.
An existing pre-upgrade database copy may preserve a helpful milestone, but its date and contents matter. It is not necessarily the newest valid editing state. Do not rename random files until the application accepts them or assume a newer database can open in an older version. Keep version conversion and content recovery as separate controlled steps.
Record version compatibility
Note which application version successfully opens each candidate. If opening a copy triggers an upgrade, retain the original before proceeding. A converted copy can help continued work, while the untouched earlier database preserves another recovery option. Compare the same edited sample after conversion to check that the intended appearance and organization remain.
If a candidate reports corruption, preserve the exact message and use the supported verification or repair guidance for that version on a copy. A repair can improve database readability without recreating every missing record. Inspect content afterward and retain the unmodified source, rather than treating a completed repair process as proof of complete restoration.
Distinguish previews from recoverable originals
A catalog can display a useful preview while the RAW file remains offline. This can help identify photographs and assess what is missing, but it does not guarantee full-resolution export or RAW editing. Check the original’s availability explicitly. A visible thumbnail should never be the sole acceptance test for a recovered photography job.
Test the output you actually need
Choose a representative image and export it at the intended dimensions and quality. Inspect detail, crop, color, and any important local adjustment. If the export fails or uses a limited source, record that limitation. A preview may still support selection or reference work, but it is a different deliverable from a restored original with editable adjustments.
If only a preview or old rendered export survives, preserve it with an honest description. It may provide a useful visual record or emergency delivery candidate. However, do not label it as a recovered RAW original or infer that the full adjustment history can be reconstructed automatically from the rendered pixels.
Review variants, masks, and organizational changes
An edited photograph can have several variants with different purposes. Compare the intended variant rather than accepting the first visible one. Check distinctive crops, processing choices, ratings, and collection membership. A recovered catalog may include the original image but omit a specific client-approved version that existed only in a later milestone.
Use a reference export for comparison
An earlier approved JPEG can help identify the intended appearance. Compare it with a fresh export from the restored candidate, accounting for output settings. If you manually adjust the image to resemble the reference, record that as reconstruction. Similar appearance does not prove the original adjustment values or local mask structure returned.
Also inspect any metadata that supports the workflow, such as keywords and ratings. Those details can matter when another person resumes the job. A recovery that preserves image appearance but loses selection decisions may still require additional work. Keep that gap visible rather than describing the entire project as complete because one export looks correct.
Protect tethered captures and external source folders
For a tethered shoot, identify the actual capture destination used during the session. The session name alone may not reveal where the newest RAW files were written. Inspect the configured folder and compare a distinctive capture time or filename. Preserve the newest source images before reorganizing the Session or changing capture destinations.
Compare source and output folders independently
An output folder may contain processed JPEGs while the capture folder holds the originals. Recovering the output can meet an immediate reference need without restoring the editable source. Keep both when available and record their roles. Do not copy processed output into the capture folder merely to make missing-image indicators disappear.
If source folders live outside the session structure, include them in the accepted backup plan. A complete-looking Session directory can still depend on external photographs. Test the copied recovery with the old location unavailable in a controlled setting, so you can identify hidden path dependencies before the project returns to ordinary production work.
Avoid cloud synchronization conflicts during inspection
A synchronized folder can change while the application is reading or writing a catalog or Session. Follow Capture One’s current storage guidance and pause synchronization where required before working with a copied recovery candidate. Preserve stable local copies first. This keeps a provider update from replacing files while you compare database and adjustment states.
Use provider history only when a useful version exists
If a storage provider retained an earlier file version, preserve that candidate separately and inspect its associated components. Restoring one database from history does not automatically restore matching adjustment folders or original images. Compare the collection as a set and record any mixed-version component before testing it in Capture One.
Do not treat synchronization status as a complete backup verification. A green indicator can mean the current files transferred successfully, including unwanted changes. Your acceptance check still needs a copied restore, a representative edited photograph, and the required original source. Those checks establish whether the stored milestone is actually useful for recovery.
Work through an offline catalog after a drive move
Suppose a catalog opens with previews but cannot export the final client selection after a folder relocation. Preserve the catalog and record the old source paths. Locate the original shoot folder and reconnect a representative photograph or supported folder boundary. Then export the approved variant at full resolution and compare it with the reference.
Decide whether edits or originals remain missing
If the source reconnects but the crop and color treatment are absent, inspect the catalog backup milestone rather than repeatedly moving the RAW file. If edits remain but the original cannot be found, preserve the catalog context and investigate source recovery. Separating these outcomes prevents an image-path repair from being mistaken for restoration of the complete job.
After the accepted candidate works, inspect other folders and variants from the same shoot. A single successful image does not prove every source path was corrected. Keep the original document and backups until a representative selection from the whole job passes the same full-resolution export check.
Create a Capture One recovery inventory by storage model
For each candidate, record whether it is a Catalog or Session, which application version opens it, where originals live, and which adjustment information survives. This avoids treating every database-looking file as interchangeable. A complete Session folder and a catalog database backup can both be useful, but they preserve different relationships and require different completeness checks.
Identify a diagnostic photograph
Choose a photograph with a distinctive crop, rating, variant, and local adjustment if the job uses them. Record the expected source filename and capture context. This one sample can test several recovery claims at once. A generic unedited image may confirm that originals exist while revealing little about the survival of the editing work you actually lost.
Add a second sample from another folder or capture period. If only one part of the shoot reconnects, you may have a folder-boundary or backup-scope problem. Keeping the sample diverse helps prevent one successful image from becoming an unsupported claim that the whole photographic job returned intact.
Compare managed and referenced originals explicitly
A catalog can organize images that are stored within its managed structure or referenced elsewhere. Inspect the actual arrangement for your candidate. A database backup does not automatically include every managed or referenced original. Preserve the complete original source set separately and test availability through the restored catalog before assuming the backup is self-contained.
Use full-resolution export as evidence
Choose a sample and export the intended full-resolution output to a separate test folder. Open it independently and inspect detail and appearance. If only a preview is available, record what the application can actually produce. This result is more useful than a visible thumbnail because it tests the source and processing chain needed for the real deliverable.
Compare source identity before reconnecting a folder with repeated camera filenames. Two shoots can both contain an image named DSC0001. Check capture details and visible content rather than relying on the basename. An incorrect original can appear connected while the catalog applies another photograph’s adjustments to it, creating a misleading but technically loadable result.
Protect Session adjustment information during cleanup
A Session can place useful adjustment data in supporting folders near the images. Preserve those folders with the originals before deleting anything described casually as cache. Some generated previews can be recreated, while saved edit information has a different role. Identify file types through the relevant version’s guidance rather than treating the whole supporting directory as disposable.
Test an edited image in a copied Session
Open the copied Session and compare an image with an obvious crop and color treatment. Then inspect its variant and any important local adjustments. If the original image appears with default processing, investigate the adjustment source rather than repeatedly reconnecting the RAW path. The source image and the edit state are separate recovery targets.
If you find several adjustment candidates, preserve each with its original folder context. Do not merge them by choosing the newest individual file in every directory. That can create a combination that never existed as a coherent Session. Test complete plausible milestones first, then transfer only understood changes into a working recovery candidate.
Review the scope of a catalog repair
A supported verification or repair process can improve database usability, but the outcome still needs content inspection. Compare the diagnostic photograph, collections, and representative metadata after repair. Keep the unrepaired source untouched. If a record or adjustment remains missing, preserve that finding rather than assuming the repair report guarantees complete historical recovery.
Record what changed after repair
Note whether the catalog now opens, whether offline paths remain, and whether the distinctive edits returned. These are separate observations. A repair that solves opening may still leave missing originals or an older adjustment milestone. Keeping the outcomes separate helps you choose the next step without rerunning the same repair unnecessarily.
When an older backup produces better content than the repaired current catalog, preserve both. The current candidate may still contain recent selections or keywords absent from the backup. Compare the useful differences before deciding on a full rollback. Any manual combination should remain a documented recovery decision in a separate accepted catalog.
Compare variants against a client-approved reference
A photograph may have several variants that share the same original source. Identify the one that matches the intended client selection or editing milestone. Compare crop, processing, and output appearance. An intact source file and one visible variant do not establish that every alternate version or local mask returned.
Separate output settings from adjustment differences
If a fresh export differs from an older approved JPEG, inspect both processing and output context. Dimensions, sharpening, color handling, and other output choices can affect the comparison. Preserve the native candidate before making broad changes to match a reference. Otherwise, you may alter correctly recovered adjustments to compensate for a different export setup.
If exact native settings cannot be recovered, a manual visual reconstruction may still support the immediate delivery. Label it clearly and preserve the original approved output. A close appearance can be useful without proving that the original mask geometry, parameter values, and variant relationships survived the incident.
Recover a tethered shoot from its actual capture path
Inspect the capture destination used during the session rather than assuming that all originals are inside the folder named after the job. Compare capture times and a distinctive frame. If the session state is older than the latest recording period, the newest RAW files may still survive in the actual capture directory and require separate preservation.
Keep ingestion and editing milestones separate
A folder of new RAW files can restore the shoot’s original captures while the database backup restores an earlier edit selection. Record those milestones independently. Importing the new originals does not automatically recreate ratings, variants, or adjustments that were never preserved. This distinction helps a photographer plan remaining work without overstating what the backup supplied.
For a large shoot, compare image counts with capture context and inspect representative files from the beginning and end. Counts alone can hide duplicates or missing bursts. Preserve the original folder structure until you understand gaps, and avoid reorganizing filenames while you are still matching images to surviving edit information.
Test the accepted job without temporary paths
Open a copied catalog or Session from its planned storage location and verify the diagnostic photographs again. Confirm that full-resolution exports work and that no source relies on a temporary recovery directory. This practical test exposes hidden dependencies that a successful open on the original machine can conceal.
Keep a photography-specific recovery record
Record database milestone, original source locations, adjustment source, application version, and the samples you exported. List missing images, masks, or reconstructed edits explicitly. The result gives another editor a clear starting point and prevents an older backup from being discarded while it still contains the only surviving version of an important adjustment.
Retain a complete accepted backup and test a copied restore periodically through your own workflow. The useful question is whether the preserved set can reproduce the intended edited photographs, not merely whether a backup folder contains a database file. That keeps original image protection and editing-state protection connected without confusing their separate roles.
When storage recovery can help Capture One files
PandaOffice Drecov may help retrieve deleted local catalog backups, Session files, adjustment folders, or original photographs from readable storage. It cannot infer all edit settings from a thumbnail or recreate a missing RAW original from a preview. Prefer coherent surviving backups and path repair first, and minimize writes where deleted project files may remain.
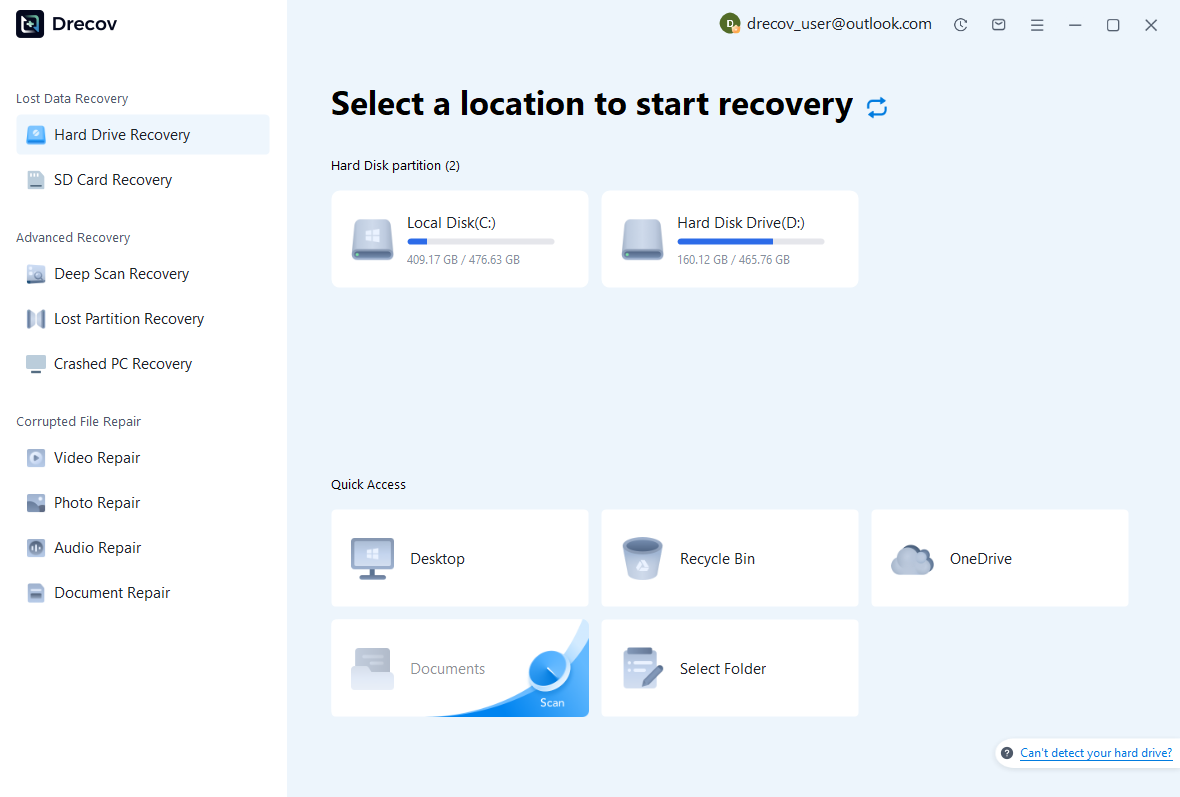
Step 1: identify the database and original storage
Choose the drive or partition that held the catalog, Session folder, adjustment sidecars, or original shoot. Record which component each search targets. Keep recovery output on other healthy storage. Assess repeated disconnections or hardware read errors before proceeding with routine software scanning, because source stability affects what a scan can read.
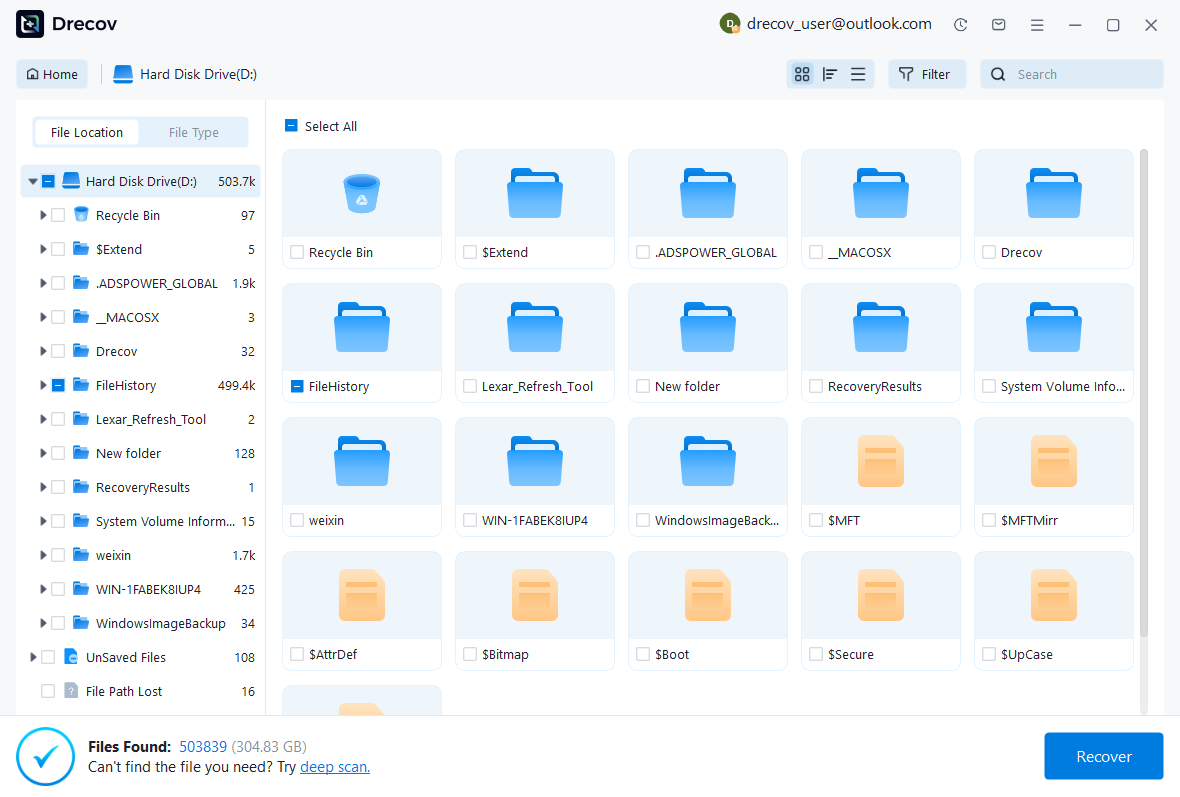
Step 2: compare coherent candidate sets
Review available paths, dates, sizes, and supported previews. Preserve plausible database and adjustment sets without mixing unrelated milestones. Inspect original photographs separately from previews and processed output. A recognizable image does not prove that its edits survived, while a database filename does not establish that the full-resolution source still exists.
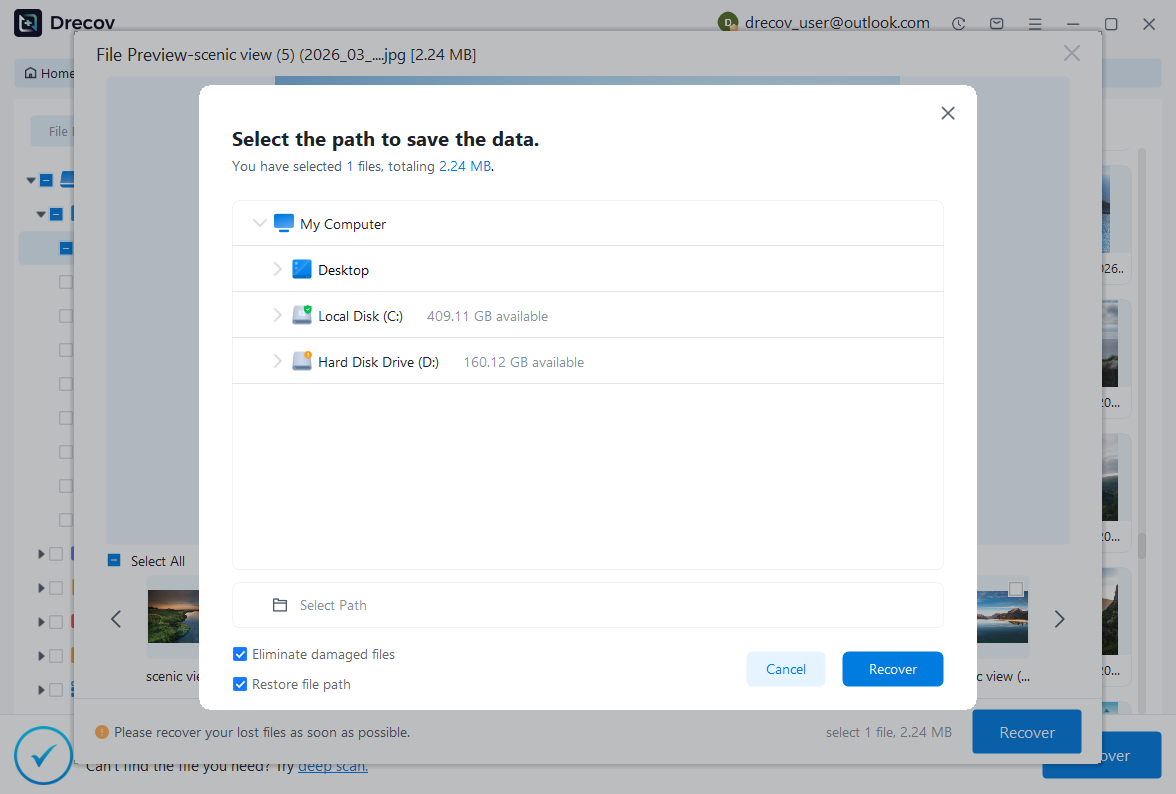
Step 3: restore elsewhere and test with Capture One
Recover selected files to a separate destination and keep an untouched set. Open a working catalog or Session through a compatible application version, reconnect verified originals, and inspect representative variants. Export the required deliverable and compare it with a trusted reference. Record missing masks, metadata, images, or reconstructed edits before accepting the recovered job.
Preserve a tested photographic milestone
Retain the accepted database or complete Session, its required adjustment information, and the actual original photographs. Add a short record of application version, source locations, and export checks. A copied restore that produces the expected full-resolution result is a more useful recovery source than a backup folder whose contents have never been tested.
Related recovery resources
Explore the relevant recovery options: Hard drive recovery, External hard drive recovery.
For another recovery case and its practical checks, read the related recovery guide.
Check the vendor guidance for the installed version: official recovery documentation 1, official recovery documentation 2, official recovery documentation 3.