







To test a USB drive that contains important files, start with checks that do not write to it. Confirm the device’s capacity, watch whether it stays connected, and open a few existing files. Copy anything you need to another healthy location before trying a write test. A speed score alone cannot tell you whether your photos or documents will still open tomorrow. If the drive disconnects or reports severe read errors, stop testing rather than trying a format.
Decide what you need the test to tell you
“Test” can mean several different things. You may want to know whether Windows sees the correct capacity, whether a file can be read, whether the USB connection stays stable, or how fast it transfers data. These are related but not interchangeable. A benchmark can show throughput during one session while missing an intermittent connector fault. A successful folder listing proves that directory entries are visible, not that every file is intact.
Write down the reason you are worried. Did a copy fail halfway through, or did the drive vanish and return? Perhaps a photo opens as a thumbnail but fails at full size. Another computer might even show a different capacity. Your observations determine the safest first check. An ordinary drive you are preparing for reuse can tolerate a small new test file after backup. A stick holding your only copy should be read and copied first, not stressed for a score.
If your question is purely performance, the existing USB speed-test article covers that separate measurement. Here the goal is practical trust: can Windows identify the same device consistently, can you open the files you care about, and can a nonessential new file survive an eject and reconnect?
Begin with identity and connection checks that do not write
Insert the USB stick directly into a known-good port. Open File Explorer, select This PC, and compare the displayed size and name with the device in your hand. Drive letters are not permanent identifiers; they can change when you connect another disk. If multiple removable devices are attached, disconnect those you do not need so you cannot mistake one for another. Open the intended USB and look at its folder structure without moving or renaming anything.
Watch for disconnections while you browse. A drive that disappears when lightly touched may have a worn connector or a bad port. Test one other known-good port, preferably without a hub, and record whether the symptom follows the device. Do not repeat the test over and over on a device that is heating up or repeatedly dropping offline. Physical instability makes long software scans a poor next step.
If Windows shows a warning symbol, right-click Start and open Device Manager. Find the device, open Properties, and read its status message. Microsoft’s Device Manager guidance explains that this view reports device status and driver information. Record the exact code before changing a driver. A clean status does not certify the storage cells, but an error gives you a concrete lead for the hardware or driver branch.
Read a sample of existing files before copying more onto the stick
Choose a few files that matter to you, ideally from different folders and file types. Open a document past its first page, enlarge a photo, or play a video beyond the opening seconds. This is not a complete integrity test, but it catches problems that a visible filename misses. Note any file that opens slowly, produces an error, or has an unexpected size. Do not edit these files on the USB during the test; open them for inspection and keep the source unchanged.
If the drive holds data you cannot replace, copy the important folders to another healthy device now. Keep the source in place while copying. Afterward, open representative copies from the destination rather than assuming the transfer succeeded because a progress bar vanished. Compare folder counts and the files you care about most. A partial copy after a disconnection can look complete at a glance while leaving the last large video or archive unusable.
Stop if even a simple read causes disconnects or serious errors. Do not run CHKDSK as a first test for important data; it changes file-system structures. Do not initialize or format a stick that still holds uncopied files. For a device that cannot maintain a stable connection, consider a specialist or controlled image instead of repeated direct access. The USB data recovery overview applies to stable logical loss, not broken electronics.
Try a small write-and-read test only after the files are safe
Once the drive is empty or its important contents have been copied and verified, create a small nonessential text file on your computer. Copy that test file to the USB. Open it from the USB and check that the text matches. Eject the device normally, disconnect it, reconnect it once, and open the same file again. This is an everyday-use check: write, read, disconnect cleanly, and read again. It does not claim to test every storage block.
If the copied file disappears after reconnecting, opens with different contents, or produces an error, do not use that stick for important data. A format may rebuild the file system but cannot replace failing memory or a damaged controller. If the test passes, keep another backup anyway. A single successful cycle says the drive worked for that small file at that moment, not that it is permanently reliable.
A tool that claims to test the entire capacity may write across much of the device. That can be useful for a genuinely empty stick, but it is inappropriate before data protection. Read the tool’s instructions carefully and confirm the selected device before starting. If the drive has unusual capacity claims or loses connection, do not use a long destructive test to settle the question. Choose a different stick or seek device-specific advice.
Interpret the pattern instead of chasing one green result
Correct capacity, stable connection, readable copies
This is reassuring for current use, especially if the test file survives reconnecting. It is still not a substitute for backup. Use the stick as one transport or storage copy, not as the only home for important work. Recheck any file that was already reported damaged before treating the device as healthy.
Correct capacity but missing or unreadable files
Do not immediately label the USB hardware defective. The file may have been deleted, saved under another name, or affected by logical file-system damage. Check the original computer, cloud storage, and backups first. Stop new writes to the USB while you decide whether recovery is needed.
Wrong capacity, severe read errors, or repeated dropouts
These are stronger warnings. A different port may rule out a simple connection problem, but a device that stays unstable is not a good candidate for repeated scans or format attempts. Record what you observed, keep it unplugged when not being examined, and consider professional recovery if the files are valuable.
If files are missing from a stable drive, recover before repair
Drecov is Windows recovery software for data that has been deleted or become inaccessible on supported storage. On a stable, recognized USB drive, its read-only workflow can search the original location, beginning with Quick Scan and using Deep Scan if needed. Filtering and preview help you choose files before saving them to another healthy device. It also supports Lost Partition Recovery when partition information is missing, but it cannot certify hardware health or repair a bad connector.
Check backups before scanning. Stop using the USB and prepare a separate destination with enough free space. Install Drecov on a healthy computer location, not on the source USB. If the stick disconnects during a basic read, stop here; repeated direct scans can make the situation worse. The file recovery options explain how finding a missing file differs from testing the device itself.
⚠ Warning: Install it on a drive different from the one where your data was lost to prevent overwriting.
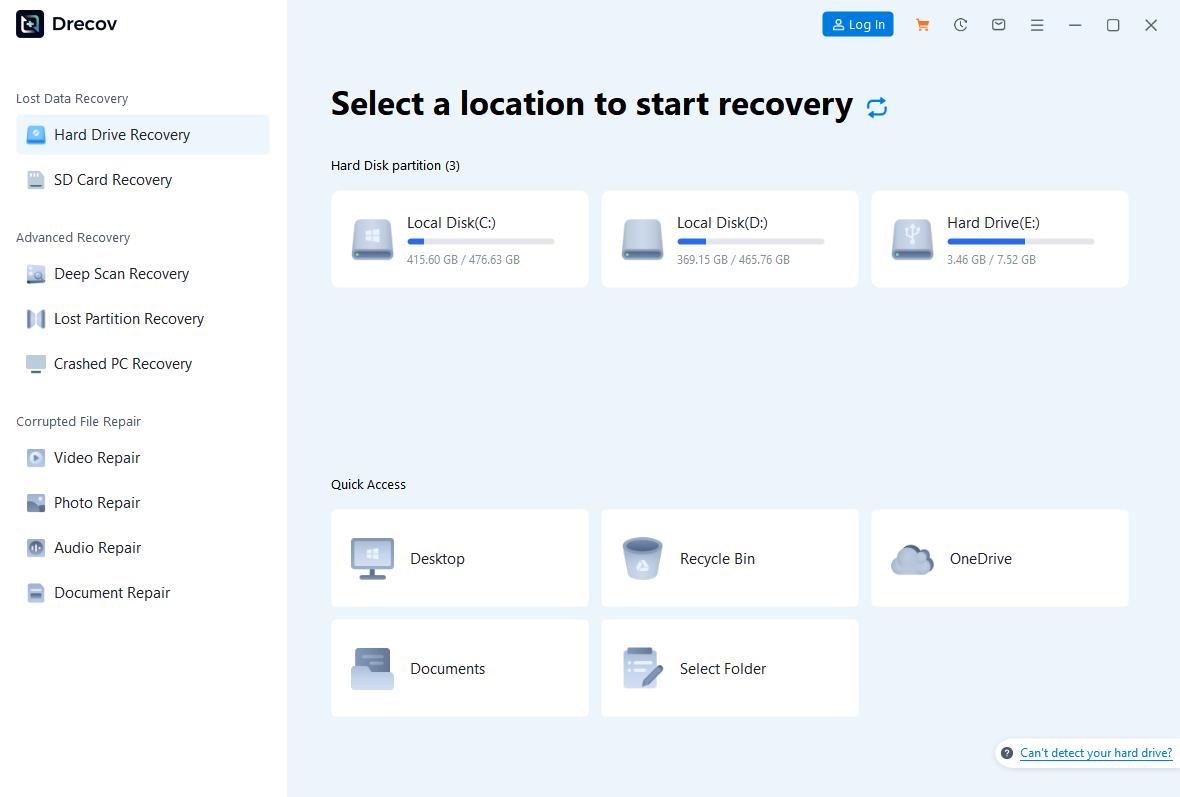
Step 1: Select the original USB location
Open Drecov and choose the USB volume where the missing file last existed. Confirm the expected capacity and identity. If a partition is absent but the physical device remains steady, consider the separate Lost Partition Recovery mode rather than creating a new volume.
Step 2: Review a Quick Scan
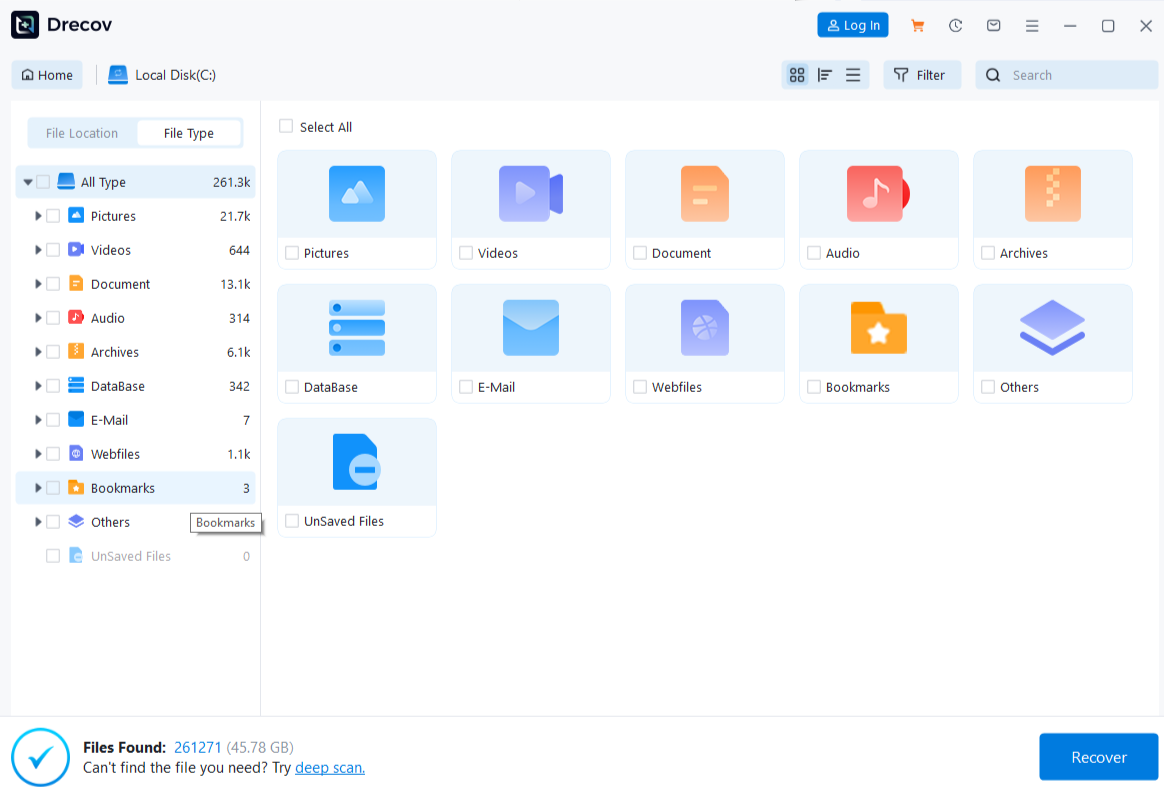
Run Quick Scan first. Look for the missing folder, filenames, and file types. A familiar name is only a candidate, so do not assume every listed result is usable. If the wanted item appears, proceed to preview.
Step 3: Deep Scan only if necessary and stable
When Quick Scan does not find the target, run Deep Scan only while the USB stays connected without serious read errors. A longer scan cannot fix electronics. If the stick disconnects, stop direct scanning and seek a safer recovery path.
Step 4: Filter and preview samples
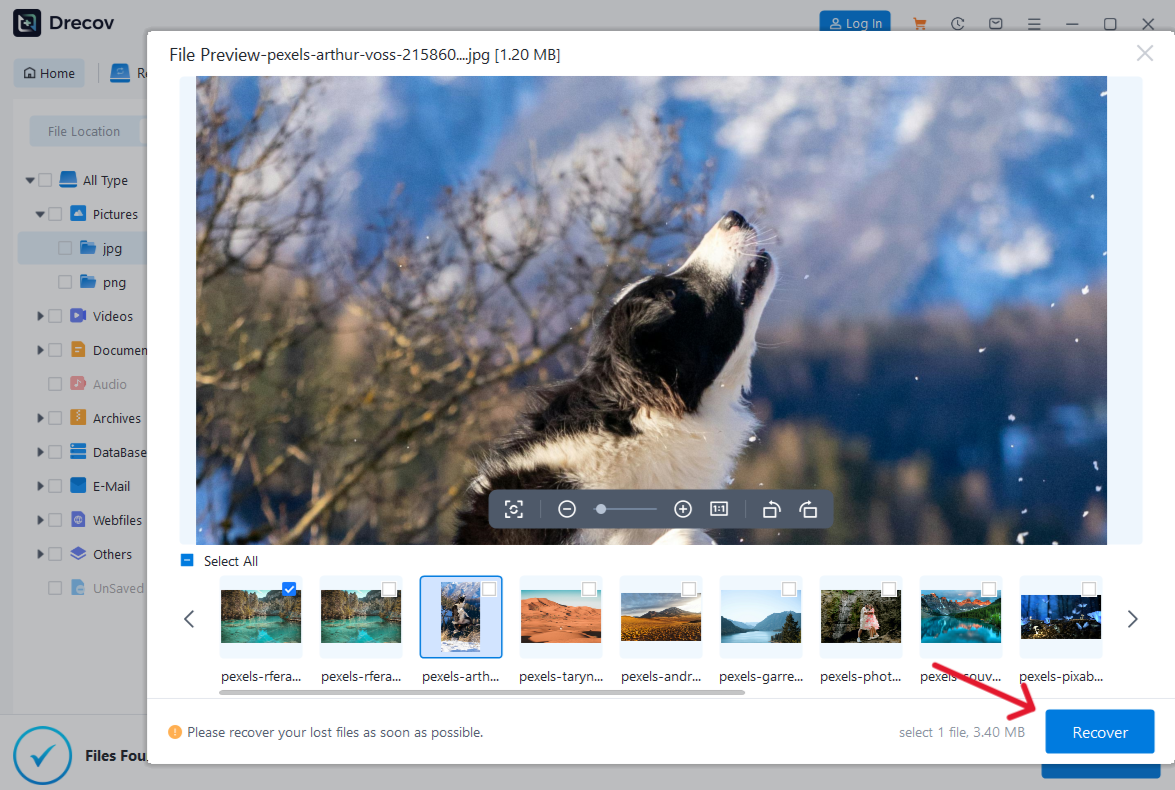
Narrow results by file type, former path, or name where available. Preview several representative files. A preview can confirm that one sample opens; it does not prove that every page, photo detail, or video frame is intact.
Step 5: Save files away from the source
Choose the healthy destination you prepared. Never restore onto the USB you are trying to recover. If the output is not in the expected folder, check the Drecov Folder or Recovery Folder before launching another scan.
Step 6: Verify the recovered content
Open important files from the destination and compare them with your expected documents or photos. Confirm that the recovered set is sufficient before using CHKDSK, formatting, or running any write-heavy test on the source. If the drive remains unreliable, retire it rather than trusting a temporary success.
⚠ Warning: Install it on a drive different from the one where your data was lost to prevent overwriting.
Frequently asked questions
Can Windows tell me whether a USB stick is healthy?
Windows can show a device status and help you read and write a small test file. Neither result guarantees future reliability. A stable connection and readable, verified backups matter more than a single health label.
Is a speed test the same as a reliability test?
No. A benchmark measures transfer performance during its run. It may not reveal intermittent disconnects or corrupted files. Some benchmarks also write substantial data, so do not use them before backing up a stick that holds important files.
Should I format the drive to see whether it works?
Not if it still contains files you need. Formatting writes a new file system and is not a recovery step. Copy or recover files first, then decide whether the device is worth reusing.
What if every file opens but the USB keeps disconnecting?
Back up the files while you still can, using the least stressful route available. Test a known-good port once. If the symptom follows the USB device, stop using it as an important storage location.
Can Drecov repair a failing USB drive?
No. It searches for missing files on suitable, stable storage and saves selected results elsewhere. A failing connector, controller, or memory chip requires a different response. Stop direct scans when the device cannot remain connected.
Conclusion
To test a USB drive responsibly, begin with identity, connection, and readable-file checks. Verify a separate backup before writing a test file, and judge the result after a clean eject and reconnect. A format is not a diagnostic shortcut for a stick holding important data. If files are missing but the device remains stable, Drecov can search the original USB location and restore candidates to another drive. Open those copies before any repair or write-heavy test. An unstable device deserves less testing, not more.
⚠ Warning: Install it on a drive different from the one where your data was lost to prevent overwriting.





