







Wondering how to recover deleted files from the Recycle Bin when it looks empty? Start with the Windows account and the file’s original drive. A file deleted under another sign-in may not appear in the Bin you are viewing. Files deleted from some locations may bypass that Bin entirely. Open the correct account’s Recycle Bin, search by name and deletion date, and restore a matching file if it is there. If it is absent, stop writing to its original storage device, check backups, then consider recovery from that device—not from a random drive or the desktop shortcut.
First identify the account and the original file
On a shared Windows PC, several people can sign in to separate profiles. They may see similar desktop layouts yet store files under different user folders. Before assuming the Recycle Bin was emptied, check the account name shown under Start or Settings > Accounts. If the deletion happened while another person was signed in, ask that person to check their own Bin. Do not take ownership of another profile or change permissions just to investigate; use the account that legitimately owns the files.
Write down three details that narrow the search
Record the best-known filename or a distinctive part of it, the approximate deletion date, and the folder or drive where the file used to live. A document removed from C:\Users\Name\Documents calls for a scan of that Windows volume if ordinary recovery fails. Photos removed from an external drive belong to a different source. The Recycle Bin icon itself is not the scan target. Knowing the source prevents the common mistake of searching a healthy backup drive while the missing content remains on the computer’s internal disk.
Use File Explorer search in the former folder and nearby folders before opening recovery software. Sometimes a file was moved, renamed, or saved under another account instead of deleted. Compare results by date modified and file size. A similarly named shortcut is not the original document; open the candidate and confirm its content. If it turns out to be a cloud-only file, use that service’s deleted-items or version-history interface rather than a local disk scan.
Search the correct Recycle Bin without changing anything
Open Recycle Bin from the Windows desktop or File Explorer. In the account that performed the deletion, switch to a detailed view and sort by Date Deleted or Original Location. Search for a distinctive name, but also inspect the correct date range. A renamed file may be easier to identify by its former folder and size. When you find it, right-click and choose Restore; Windows should return it to its original location. Open that restored file and verify the version you expected.
If the original folder no longer exists or the restored item is not visible, search the account’s files again before deleting or replacing anything. Be careful with duplicate names: restoring an older file can conflict with a newer one at the same path. Preserve the newer copy separately if Windows asks you to replace it. A Bin entry is a convenient path back, not proof that every copy or every version of a document is present.
What an empty-looking Bin can mean
- The deletion happened under a different Windows sign-in.
- The file came from another device or a cloud location with its own deleted-items area.
- A permanent-delete action bypassed the ordinary Bin.
- The Bin was emptied, or its storage limit removed an older item.
- The file was moved or renamed, not deleted.
These possibilities call for different next steps. Do not empty the Bin again, run a cleanup utility, or download files onto the affected drive while you are deciding. Microsoft’s Windows File Recovery guidance explains that deleting a local file can mark its space reusable; continued computer activity may overwrite recoverable content. The more important the missing file, the less experimentation you should perform on its original volume.
Decide whether the missing file was local or elsewhere
OneDrive, SharePoint, email attachments, and network shares do not all follow the same deletion path as a local file under Documents. Check where the file actually lived. If the path began with a synced OneDrive folder, inspect OneDrive’s web Recycle Bin and version history using the correct account. For a file deleted from a shared network location, contact the owner or administrator about server-side backups. A Windows recovery scan of your PC will not recreate data that existed only on a remote server.
For removable storage, identify the original device before trying anything. A USB stick may have its own deletion behavior, and the file may never have entered the PC’s visible Recycle Bin. Inspect the device without saving new files to it. Repeated disconnects or serious read errors call for stopping direct scans and considering professional imaging. A stable, correctly recognized device can be searched after you have checked its backups and ordinary folders.
This is why the Recycle Bin recovery overview and the file recovery page answer related but different questions. One describes the deletion event; the other addresses a file that cannot be found in its expected place. Here, the decision hinges on which account and original source actually owned the file.
Look for a backup before scanning the original drive
Check File History, a cloud version history, or an external backup made before the deletion. In File Explorer, right-click the former folder and look for Restore previous versions where available. Preview a dated version first. If you restore it directly, Windows may replace a newer folder or file, so use a different location when the interface offers that choice. Open the recovered document or photo and confirm its contents, not merely the filename.
Another household member might also have received a copy by email or chat. That may be enough to solve the problem without a recovery scan. For edited documents, compare the recovered copy’s date and content with what you remember. A backup from last week can be valuable, but it may not contain yesterday’s changes. Keep both versions until you can decide which material is missing.
If the missing file was on the Windows system drive, ordinary computer use continues to create temporary files. Minimize activity while you plan recovery. Do not install recovery software onto that same source volume if you can avoid it; use another healthy drive or environment. SSDs add a further limit: deletion and TRIM can reduce the amount of recoverable data, sometimes quickly. No tool can guarantee that an emptied-bin file remains intact.
Use Drecov only when the original local source is stable
Drecov is Windows data-recovery software for files lost from a PC or other recognized storage device. In this situation, it searches the volume where the file lived before deletion—not the Recycle Bin shortcut. Read-only recovery mode, Quick Scan, Deep Scan, filters, and preview help locate candidates while preserving the source for later decisions. Drecov also supports Lost Partition Recovery when an actual partition has disappeared, although that mode is not the normal choice for a single deleted document. It cannot pull a cloud-only item from a web service, repair physical disk damage, or guarantee overwritten content. The drive recovery overview explains the local source-device case.
Prepare a healthy destination separate from the original volume. If a laptop has only one internal disk, an external drive with sufficient free space is a practical output target. A disk that clicks, repeatedly disappears, or reports severe read errors needs imaging or professional help instead of repeated direct scans. For a stable disk, use the steps below only after checking the correct account and available backups.
⚠ Warning: Install it on a drive different from the one where your data was lost to prevent overwriting.
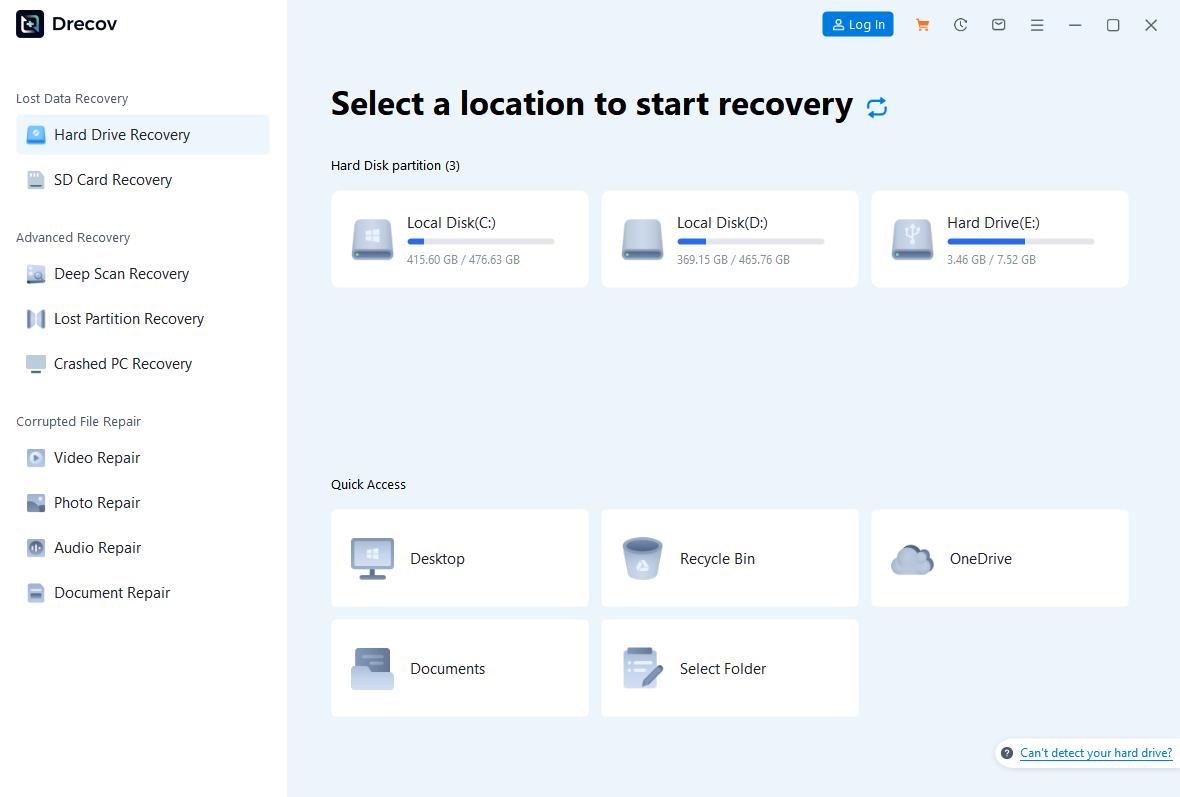
Step 1: Open Drecov and choose the former location
Run Drecov from a healthy installation. Select the internal drive or removable volume that held the deleted file. Confirm the correct disk by capacity and former folder; drive letters can change. Do not choose the output drive as the source simply because it has more free space.
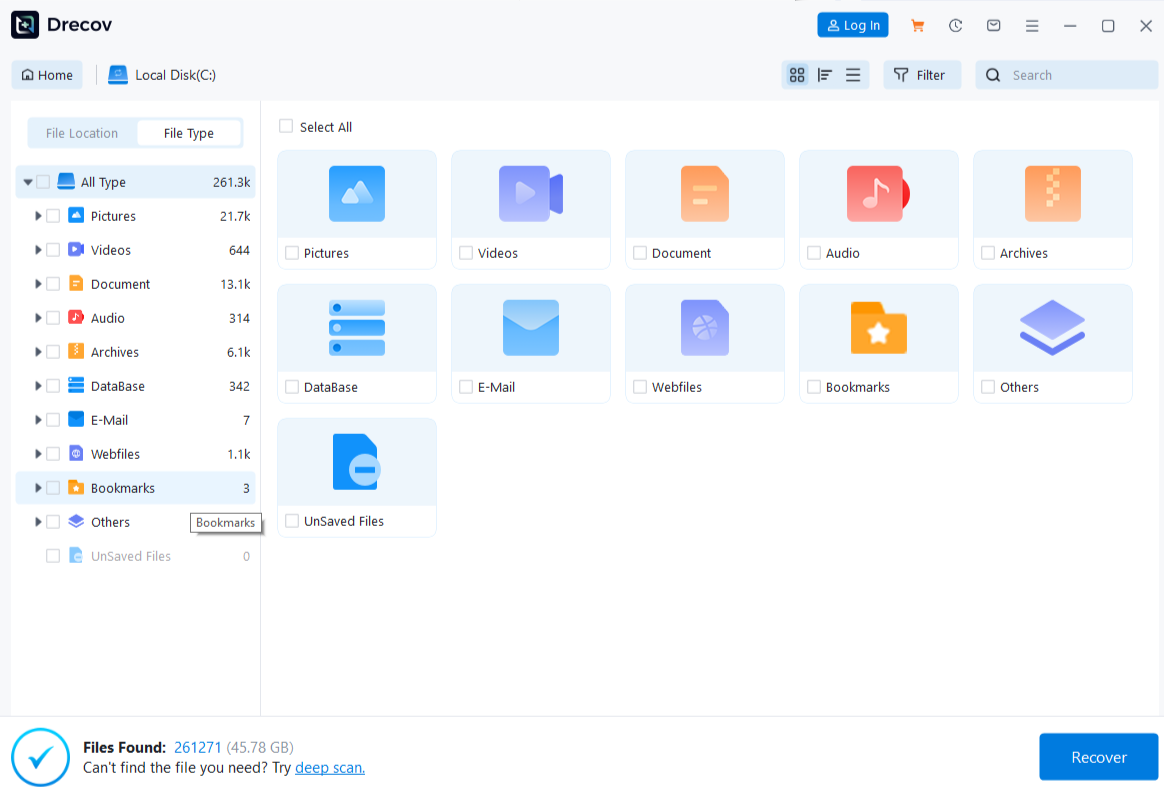
Step 2: Start Quick Scan and inspect likely matches
Run Quick Scan and look for the former filename, folder, and file type. The results can contain older copies or files with changed names. Note which candidate best matches the deletion time and expected size, but do not assume a matching name guarantees intact content.
Step 3: Deep Scan only if the disk remains stable
When Quick Scan misses the target and the source remains reliably connected, run Deep Scan. Stop if new hardware symptoms appear. A deeper scan may find more candidates, but it cannot reverse overwriting or force a physically failing disk to stay online.
Step 4: Preview, recover elsewhere, and verify
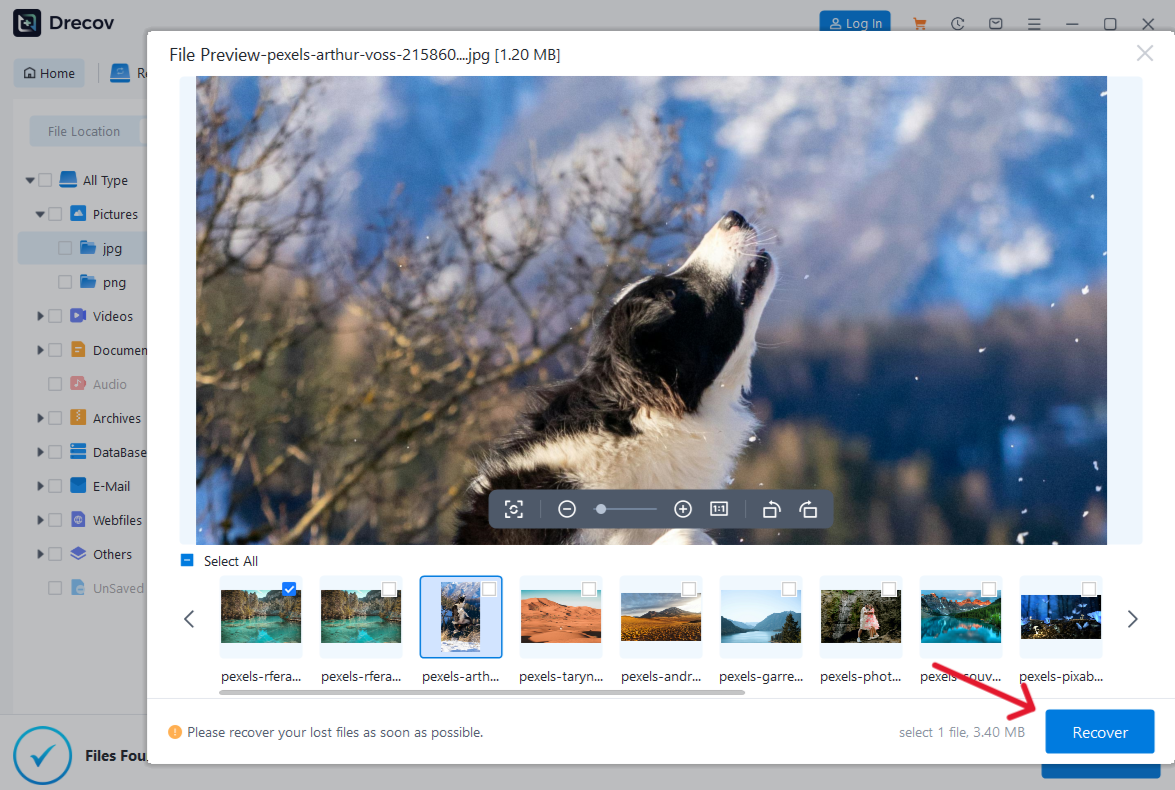
Filter by name, path, and type where available. Preview representative supported items; a document preview is helpful but may not prove that every page or embedded object survives. Recover selected files to the separate healthy drive. If the output is not in the expected folder, check the Drecov Folder or Recovery Folder at that destination. Open each important file and verify its actual content before resuming normal use of the source.
⚠ Warning: Install it on a drive different from the one where your data was lost to prevent overwriting.
What to do when the recovered version is incomplete
A file can appear in scan results but still be damaged or outdated. First compare its content with any backup, email attachment, or synced version. Search for alternate filenames and older copies rather than repeatedly restoring the same candidate. For a project folder, verify linked assets and subfolders as well as the main document. A photo thumbnail may look fine while the full-resolution image fails to open; test the actual recovered file.
If the original disk is an SSD, further scanning may not help after TRIM has removed the underlying data. On an unstable hard disk, stop software retries when read errors increase. A professional may be able to image remaining readable areas, but there is no honest promise of a particular outcome. Keep the source untouched until you decide whether that expense is justified by the file’s importance.
When you have a verified copy, place it in the intended working folder and create another backup. Avoid immediately cleaning the Bin or running system-maintenance tools on the source. You may need the original state if another file from the same deletion event turns out to be missing. Once the incident is resolved, review who owns the file, where it should live, and how often it needs a separate backup.
FAQs
Does switching Windows accounts erase the Recycle Bin?
No. Switching accounts changes the profile you are viewing. Check the sign-in that performed the deletion before concluding that the item is permanently gone.
Can I restore a deleted file to a different folder?
The Recycle Bin’s Restore command normally returns it to the original location. If you need a separate copy, restore first, verify the file, then copy it to a healthy folder. For backups and recovery software, choose a different destination when offered.
Why does the Bin not show a file from a USB drive?
Deletion behavior depends on the source and how it was removed. Check the actual USB device and its backups; do not assume the PC’s Bin captured it. If the USB is stable, recover from that original source.
Will a scan recover files after I emptied the Bin?
It may find candidates on the original local volume, but the result depends on what has been overwritten and on device behavior. Stop unnecessary writes and save any recovered file to another healthy drive.
Should I reset Windows to bring the file back?
No. Resetting changes the computer and may overwrite recoverable data. Check the right account, backups, and a safe recovery route first.
Conclusion
Recovering a deleted file starts with identifying who deleted it and where it originally lived. Check the correct Windows account, restore a real Bin entry if present, and inspect backups or cloud history for the original source. When a stable local file is genuinely gone, Drecov can search its former volume, preview candidates, and save them to a different healthy drive. Verify the recovered content before changing the source or resuming ordinary writes.
⚠ Warning: Install it on a drive different from the one where your data was lost to prevent overwriting.






