







Image recovery software can help when the original photo file has disappeared from a Windows computer or a stable removable drive. However, a tiny thumbnail cannot become a full-resolution picture, and a recovery scan cannot repair damaged image data by itself. Before choosing a tool, identify the device that held the original, check the Recycle Bin and backups, and stop writing to that device. Then judge scan results by file type, dimensions, preview and the saved file you can actually open. Such checks tell you more about your own lost pictures than an unsupported list of supposed winners.
Work out which picture has gone missing
A gallery tile is not necessarily the photo you want back. Windows and editing applications may keep small previews so you can recognize an image even when its original file is absent. Open one surviving example and look at its pixel dimensions and file size. A 200-pixel thumbnail will not provide the detail of a camera original simply because you saved it with a new name. If you need a printable picture, define the expected resolution before scanning.
Find the last place where the full image opened: perhaps a folder on the PC, a USB stick used for transfer, or an external drive. Write down a distinctive filename, approximate date and format if you know them. JPEG, PNG and camera RAW files require different checks after recovery; an image-editing project can also depend on companion files. The correct source is the storage location where the original disappeared, not the healthy disk where you hope to save the result.
Check easy copies before touching the source
Inspect the Recycle Bin for a deleted local file. When you find it there, use its normal Restore command and open the result; no recovery scan is necessary. Look at backup folders, cloud version history and any device from which you originally copied the pictures. The Recycle Bin recovery overview explains why a file still in the bin is different from one already removed from it. Keep recovered copies on a separate healthy disk while you compare them.
If pictures vanished from an SSD, minimize new activity on that drive. Deleted data can be overwritten, and SSD TRIM can reduce the chance of finding old content. Neither point tells you the outcome for one specific file. If a removable device disconnects repeatedly, clicks, reports the wrong capacity or produces serious read errors, do not keep running scans. Consider a stable image of the device or professional help before it degrades further.
Judge software by evidence, not by a logo
Useful image recovery software should let you choose the original device, narrow results to relevant image types, inspect candidates when preview is supported, and save selected files elsewhere. Those criteria serve a practical question: can you identify the particular originals you need without writing over them? A broad format list on a website does not prove that every file from your camera will open after recovery. Nor does one successful preview prove that the entire folder is complete.
For a Windows user comfortable with commands, Microsoft’s Windows File Recovery documentation describes a command-line option for local files that are no longer available from the Recycle Bin. It requires careful source and destination choices. A graphical tool may be easier if you need to browse many pictures by appearance. Better yet, if a current backup exists, restore a few representative photos to a new location and check them before replacing the current folder.
Do not treat file repair and file recovery as interchangeable. Recovery looks for another copy of a missing file. If the only existing JPEG opens with colored blocks or only half an image, a scanner may find an earlier intact copy, but it does not mend the damaged pixels in that file. Likewise, changing `.jpg` to `.png` does not convert its contents. Preserve the affected original before trying a format-specific repair on a duplicate.
What a preview can and cannot tell you
A clear preview supports the decision to recover a candidate, especially when filenames have changed. It may show only a portion of a large image or a stored thumbnail. Compare dimensions when available, and recover a small sample to a different device. Open that sample at full size and inspect details near the edges, not just the center. For a RAW photo, check whether the result is the camera original or merely an embedded JPEG preview. Keep notes about which candidate came from which source.
Where Drecov fits this choice
Drecov is Windows data-recovery software for local sources such as a PC drive, USB stick, SD card or external drive. When originals are missing from a stable, recognized device, its Quick Scan and Deep Scan can locate candidates; filters and preview help you identify images before saving them to another healthy destination. Lost Partition Recovery is relevant when a partition has disappeared and its files need to be found. It is not partition-table repair, hardware repair or a way to reconstruct overwritten picture data. The photo recovery page provides context for this file type.
Its advantage in this situation is a visible decision path: choose the actual source, inspect what a scan finds, then recover only plausible candidates away from that source. That does not guarantee every thumbnail corresponds to a complete original. Use Drecov only while the storage device remains stable enough to be read. If the original image existed solely inside an online account, check that service’s trash and version features instead; a local scan cannot search a cloud server.
Run a cautious image search
⚠ Warning: Install it on a drive different from the one where your data was lost to prevent overwriting.
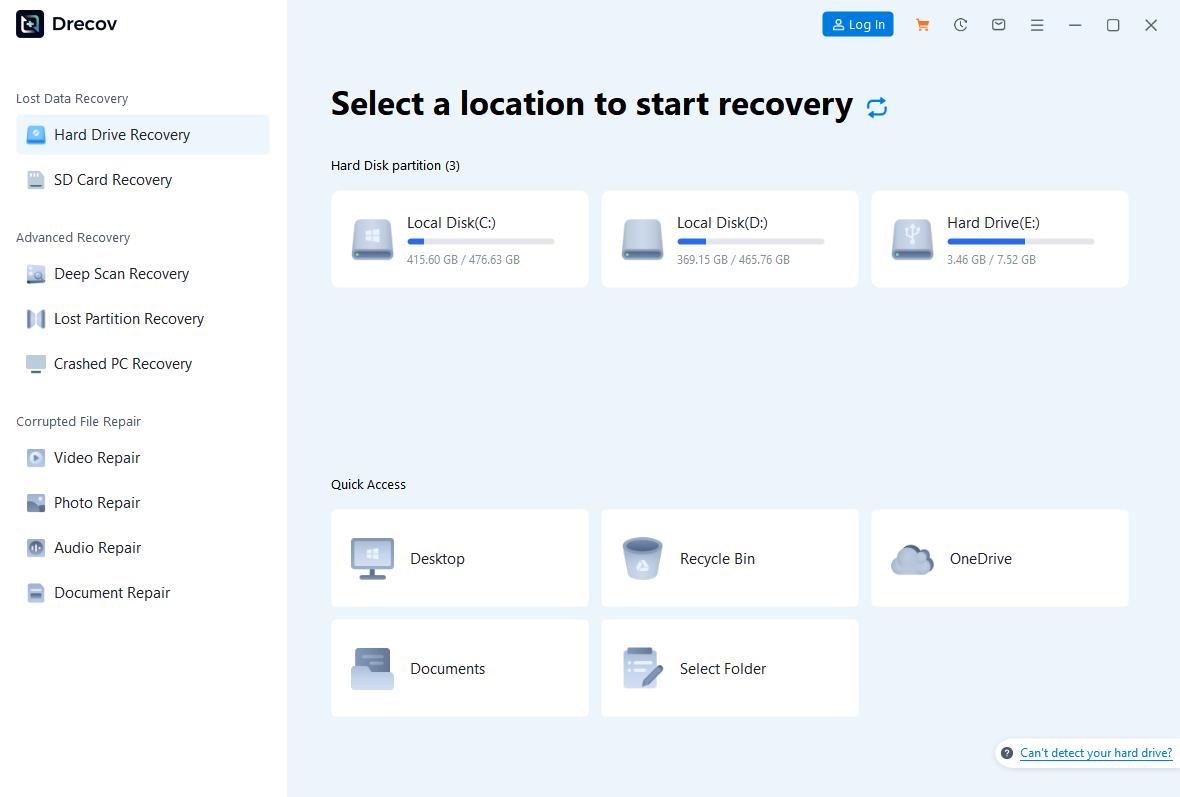
Step 1: open Drecov and select the original loss location.
Confirm its capacity and name. Do not install software on the partition that held the missing images.
Step 2: run Quick Scan.
Look for the former folder and likely formats, then note any candidates with familiar names or dimensions.
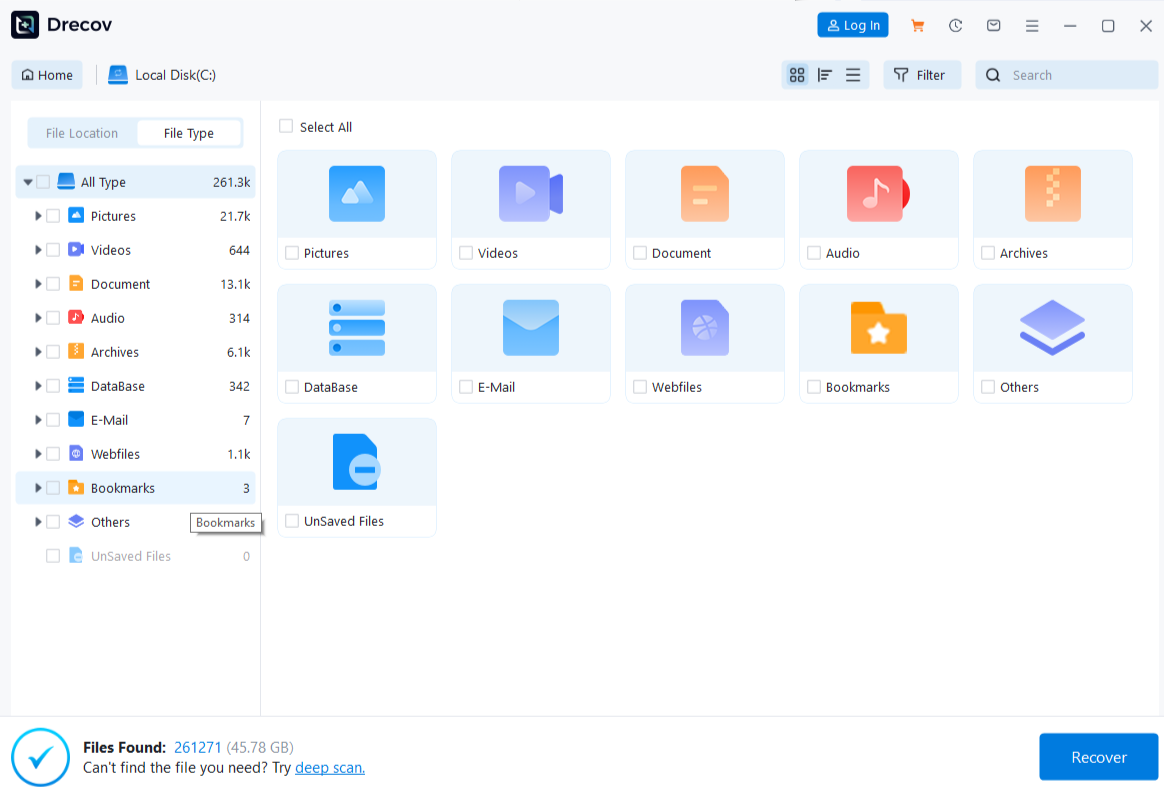
Step 3: use Deep Scan if needed and if the device is stable.
Stop if the device disconnects or read errors increase.
Step 4: filter and preview representative pictures.
Search by type, name or former path where available. A preview is a clue, not the final quality test.
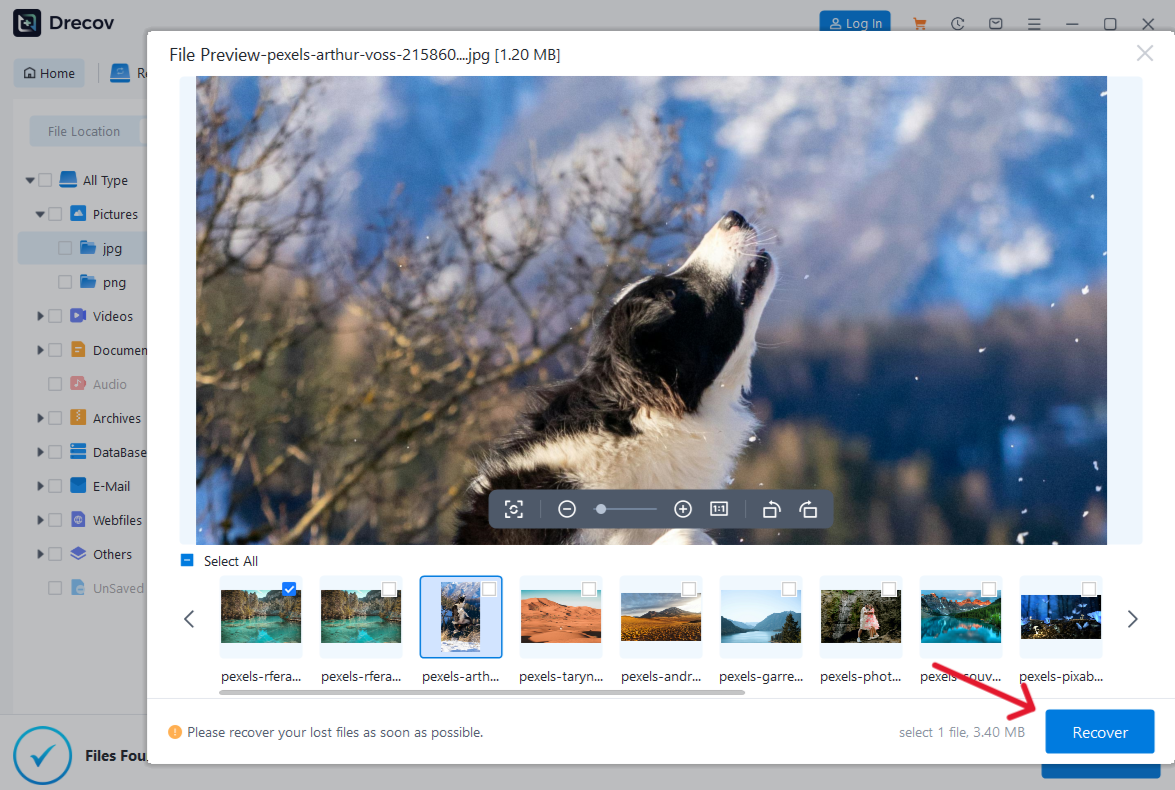
Step 5: recover selected files to another healthy disk.
Never write results back to the original source.
Step 6: open the saved files outside Drecov.
If they are not in the expected destination, check Drecov Folder or Recovery Folder there.
Check a few photos from different dates and folders rather than trusting one successful image. If you need documents as well as pictures, the broader file recovery overview explains the same source-versus-destination principle. Keep the source unchanged until the important files have been verified.
⚠ Warning: Install it on a drive different from the one where your data was lost to prevent overwriting.
Choose a path for the result you actually see
If your photos are still in the Recycle Bin, restore them there. A backup containing full-size originals may be the better source; compare its dates with the missing folder. If a stable local drive contains deleted originals and the easy copies failed, use a recovery tool that lets you inspect candidates and export to another disk. When you have only a low-resolution preview, continue searching for the original; enlarging the preview will not restore details that were never present in it.
Some results may have generic names after a deeper search. Group them by approximate date, file type and visible subject without overwriting anything. Examine several photos from the same event: a complete wedding folder, for example, should not be judged by a single portrait. If recovered images open but show the same damaged blocks as the known bad copy, return to backups or earlier exports. Switching tools repeatedly cannot guarantee that missing data exists on the source.
A device that becomes unresponsive during scanning is a different problem from a deleted folder on a healthy drive. Stop DIY scanning if it is physically unstable. Repeated attempts can consume the remaining readable time. A specialist may first make an image and work from that copy. Software selection matters only after you know the device is safe enough to read.
Verify originals before you close the case
Open the recovered file in a normal image viewer, not only inside the recovery program. Inspect its dimensions and compare them with a known original from the same camera or phone. Zoom into areas with fine detail. Scroll through a series to confirm that you have the right event rather than unrelated thumbnails. For RAW files, use a compatible viewer and check whether editing software can open the actual source file.
Then check the destination folder itself. Do the files still open after you disconnect the source device? Can you copy them to a backup without errors? If you expected 80 pictures but recovered 12, do not quietly rename the folder “complete.” Record what is missing and keep the original storage unchanged while you search other copies. Only after verifying the needed photos should you consider repairing or formatting the old device for reuse.
Keep at least one additional copy of the validated originals. A new folder on the same failing device is not a backup. Store another copy on a healthy external disk or in an appropriately managed cloud account so you can check it later. This step is particularly important when a collection includes irreplaceable family images, scans or project assets.
FAQs
Does image recovery software restore full resolution from a thumbnail?
No. A thumbnail is a smaller image. The software must find the full original file or another full-size copy to restore that detail.
Should I scan a USB stick that keeps disconnecting?
Stop repeated direct scans. Check one known-good connection, then consider imaging or professional assessment if the device remains unstable.
Why do recovered photos have unfamiliar names?
Some searches locate image data without its former directory information. Compare previews, dimensions and content, then keep candidate files separate until verified.
Can Drecov repair a photo with missing pixels?
It can search for another copy on a stable local source. No recovery scan can rebuild missing picture content inside a damaged file.
When can I reuse the original drive?
Only after important recovered files open correctly from another healthy destination and you have a backup. A physically unreliable device should not hold important data again.
Conclusion
Choose image recovery software by the original file you need, the device that held it and the evidence a scan can show. Restore easy copies first, then scan a stable local source without writing to it. Drecov offers a Windows path for finding missing image candidates, previewing them and recovering them to a separate disk; it cannot turn a thumbnail into an original or repair physical damage. The useful finish line is not a full results list. It is a set of photos that open at the expected dimensions, show the correct content and remain safe on another device.
⚠ Warning: Install it on a drive different from the one where your data was lost to prevent overwriting.






