







To transfer computer files to a flash drive in Windows, connect the USB device, open File Explorer, select the files on your PC, choose Copy, and paste them into a folder on the USB drive. Keep the originals until you open and verify the copies. Finally, use Eject before unplugging the drive. These checks matter more than simply watching the copy progress bar disappear.
Before copying, identify the source and the USB destination
Press Windows + E to open File Explorer. Under This PC, locate your flash drive by its label and approximate capacity. Its letter can change, so avoid relying on an old E: or F: path. If several removable devices are connected, disconnect the ones you do not need or rename the target drive after confirming it is the correct one. Open the USB drive and create a clearly named folder, such as November project backup, so the new copies do not mix with older files.
Now open the source folder in another File Explorer window. Typical places include Documents, Desktop, Downloads, Pictures, and a project folder chosen by an application. Be careful with cloud-synced folders: a file you can see in File Explorer might be online-only. Open it once or check its sync status before assuming a full local copy is ready to transfer. If you need a particular version, check the file’s modified date and content rather than copying the first matching name.
Look at free space on the USB drive in This PC. The destination needs room for the selected files and some working space. A drive that repeatedly disconnects, reports write errors, or shows the wrong capacity should not be your only backup destination. Use a healthy device first; investigate the unreliable stick after your files are safe.
Copy the files without removing the originals
Select the files or folders on the computer. Hold Ctrl to pick separate items, or use Ctrl + A inside the intended folder to select everything there. Right-click the selection and choose Copy. Open the prepared folder on the flash drive and choose Paste. You can also use Ctrl + C and Ctrl + V. Copying leaves the originals in place, which gives you a fallback if the USB write fails.
Do not use Cut for the first pass when these are important files. A move operation may remove the source after Windows reports a successful transfer, and an interruption creates more uncertainty about which copies are complete. If you eventually need to free space on the PC, make that a separate decision after verifying the USB copies and, ideally, keeping another backup.
Wait for the copy dialog to finish. A large video or a folder containing thousands of small files can take longer than its total size suggests. If Windows asks whether to replace files with matching names, stop and compare their paths, dates, and contents. Overwriting a newer USB copy with an older PC version can undo the very work you meant to preserve. Use Keep both files or copy into a fresh folder when you cannot tell which version is correct.
Check that the transfer produced usable files
Open the destination folder on the flash drive and compare it with the source. Confirm that the expected top-level folders appear and that a few important filenames match. File Explorer’s item count and size can help spot a large omission, although they are not a perfect integrity test. Pay special attention to folders with nested subfolders; the first screen may show only the outer folder.
Double-click representative files directly from the USB drive. Read the first and last page of a document, inspect a photo at full size, and play the beginning and middle of a video. A file with the correct name but zero bytes, an error on opening, or a shortened video is not a verified copy. For especially valuable material, compare the exact file sizes and maintain a second independent copy. A formal hash comparison can provide stronger evidence if your workflow already uses one, but most home users can begin with a careful sample and a backup on another device.
If one item fails to open, check whether the source works. A working source can be copied again to a new folder on a healthy USB device. If the source also fails, the issue predates the transfer; sending another copy to the same flash drive will not repair it. For broader missing-file cases, the file recovery overview separates a lost original from a damaged file that is still present.
What to do when a copy stops or files disappear
The progress bar stops or Windows reports an error
Keep the computer and USB connected while you read the exact message. Check which filename was being copied and whether the source still opens. A single inaccessible source file, insufficient destination space, a long path, or a failing USB stick call for different responses. Do not immediately delete the partial destination folder; it may contain usable copies of earlier files. Record what completed, then resume with a smaller set on a healthy device if the source remains safe.
The USB folder is empty after the transfer
First confirm that you opened the same device and destination folder used during Paste. Search the USB for one distinctive filename and check whether the files were placed inside another folder. If they are still on the computer, make a new verified copy. If the originals are gone too, check the PC’s Recycle Bin; the Recycle Bin recovery page explains that separate deletion route. Stop writing to both possible source locations until you establish where the files last existed. A shortcut, a cloud placeholder, and a real file are not interchangeable; inspect size and location before deleting anything.
The flash drive disconnects during writing
Do not keep forcing the transfer to finish. Save the computer originals somewhere else and test the USB only after its connection is stable. Repeated disconnections can leave partial files, and each new write makes it harder to tell what is intact. If the USB is the only place holding older important files, stop normal transfer work and treat it as a data-protection problem rather than a destination to format.
Where Drecov fits if the original file is truly lost
A transfer does not normally require recovery software. Drecov becomes relevant when a local file has been deleted or is inaccessible on a stable Windows PC or recognizable USB device, and no good copy exists. It supports Windows data recovery from local storage, with Quick Scan, Deep Scan when needed, result filtering, preview, and saving recovered files to another healthy location. Lost Partition Recovery can help find files from a lost partition; it does not repair a USB port or guarantee that overwritten bytes can be rebuilt.
Determine the actual original location before scanning. If the document vanished from the PC before Paste, the PC folder is the source. If an older file vanished from the USB drive, that USB is the source. Stop new writes to that source. Prepare another healthy destination and install the software somewhere other than the affected volume. A USB that repeatedly drops offline or reports severe read errors is not suitable for repeated direct scans; seek a controlled image or specialist help.
⚠ Warning: Install it on a drive different from the one where your data was lost to prevent overwriting.
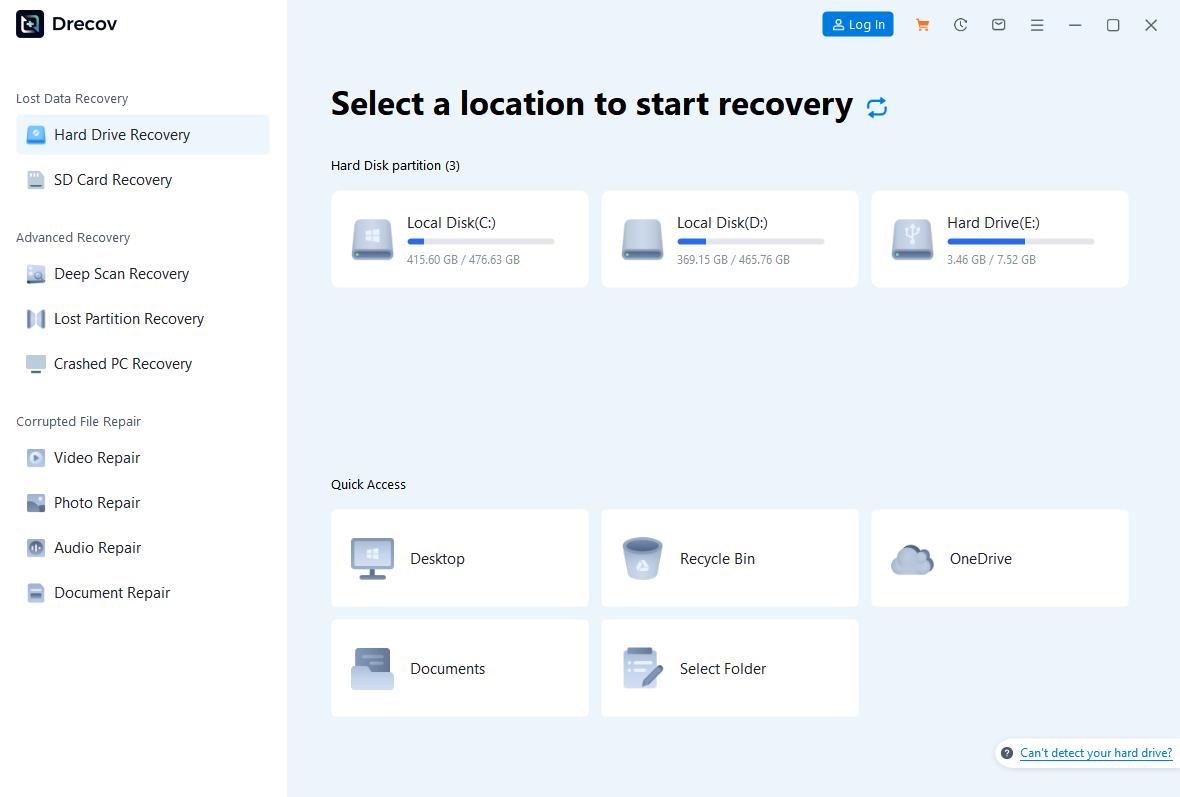
Step 1: Open Drecov and select the loss location
Choose the original PC volume or stable USB drive where the missing file last existed. Confirm its capacity and folder context. Do not select the new destination simply because it is the drive currently plugged in.
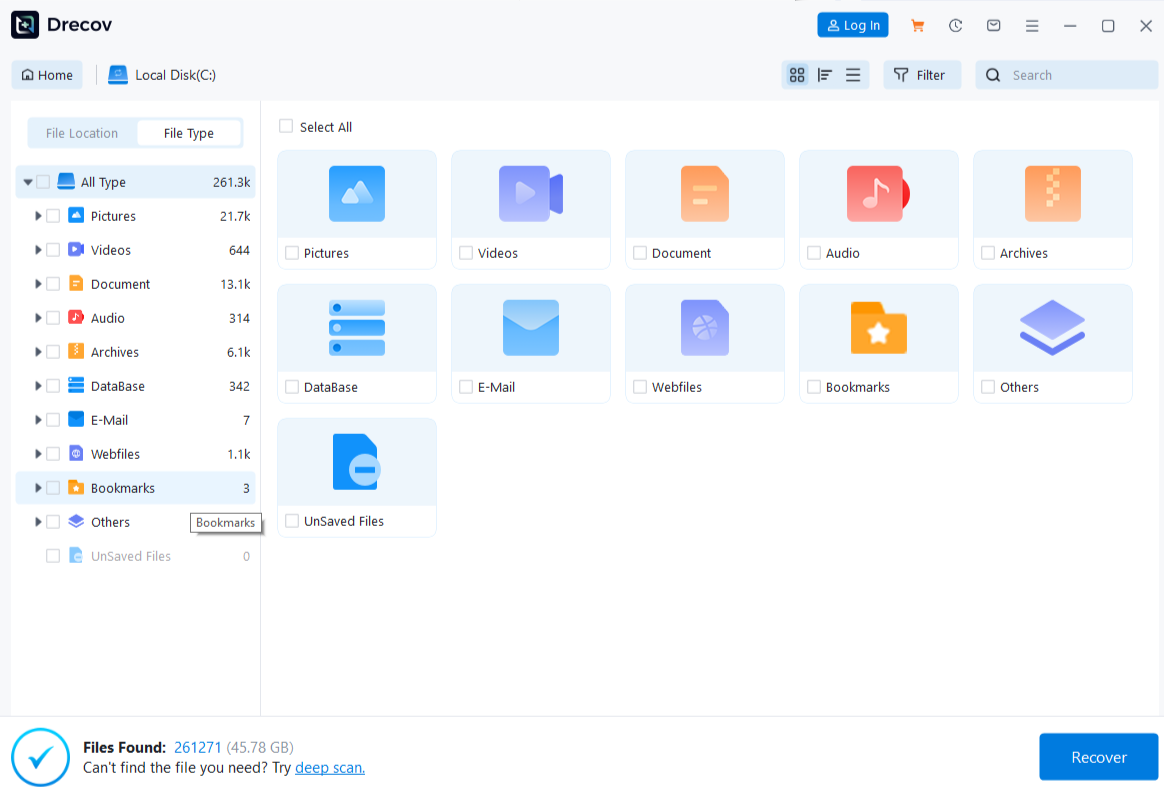
Step 2: Review a Quick Scan
Start Quick Scan and search for the expected filename or former folder. Separate full-size originals from shortcuts, previews, and partial transfer copies. If the needed files appear, proceed to preview rather than running another scan automatically.
Step 3: Use Deep Scan only on stable media
If Quick Scan misses the original, run Deep Scan only while the source remains reliably connected. Stop if the USB begins disconnecting or its reported capacity changes. More scans do not fix failing electronics.
Step 4: Filter and preview plausible results
Narrow the list by file type, path, or name where those details are available. Preview representative supported files. A preview gives useful evidence about a candidate, but it cannot prove every page, frame, or archive member will open.
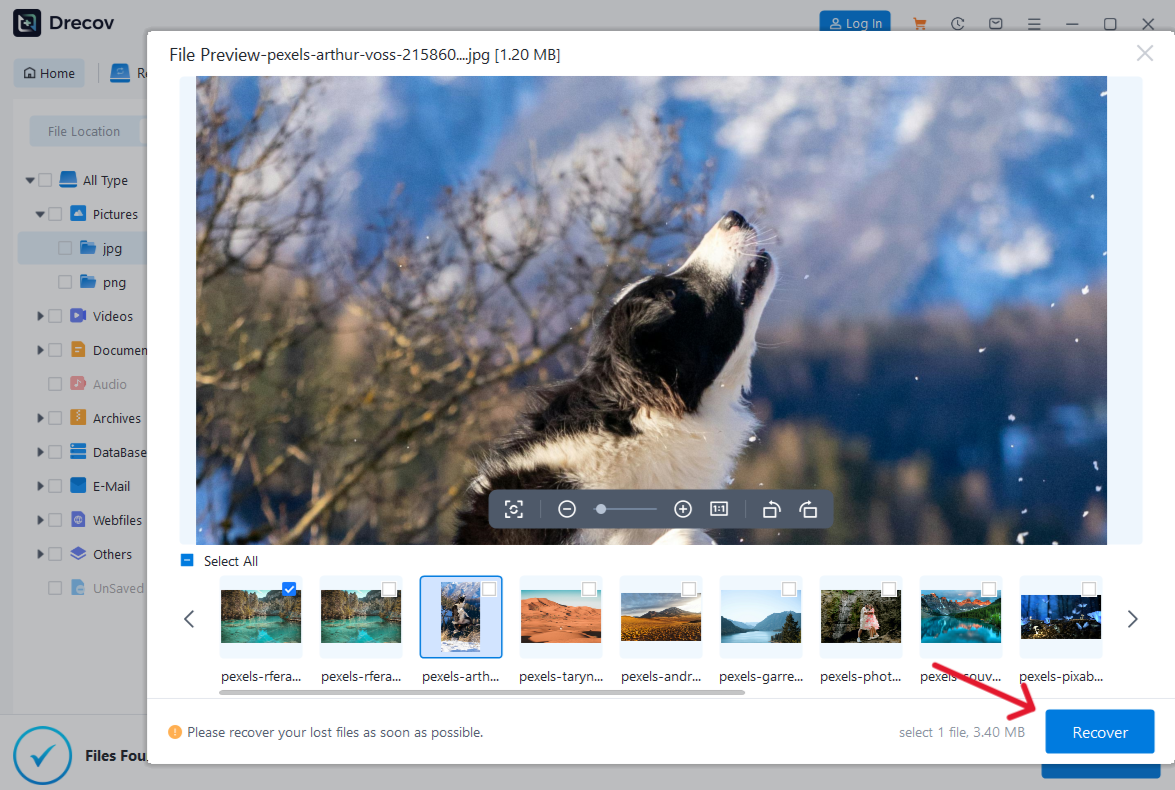
Step 5: Recover to a different device
Save selected results to the prepared healthy drive, never to the source location. If the output seems absent, inspect the Drecov Folder or Recovery Folder at the chosen destination before repeating work.
Step 6: Verify the recovered copies
Open the recovered files and compare them with what you needed. Keep any working original and the recovery output until you have a verified backup. The Drecov homepage describes the available Windows recovery paths; it is not a replacement for checking the result yourself.
⚠ Warning: Install it on a drive different from the one where your data was lost to prevent overwriting.
Finish by ejecting the USB drive
Close files that are open from the flash drive. In File Explorer, right-click the USB drive under This PC and choose Eject, or use the system-tray Safely Remove Hardware control. Wait for Windows to say that it is safe to remove the device before unplugging it. Microsoft’s safe-removal instructions explain the tray method and its confirmation message.
If Windows says the device is still in use, close apps that may be reading or writing files there, including a media player, document editor, backup tool, or File Explorer preview pane. Wait briefly and try Eject again. Do not unplug a drive while a copy is still running. When the computer no longer recognizes a device that has already failed or disconnected, the usual eject control may not appear; assess the device state rather than interpreting that absence as proof that all files were safely written.
For recurring transfers, keep a simple folder naming system and periodically open sample copies. A flash drive is convenient for carrying data, but a single removable device is a fragile only copy. If the files matter, keep at least one independent backup on another healthy medium or trusted service. The USB recovery topic is useful when files are actually lost, not as a routine part of copying.
Frequently asked questions
Does Copy remove files from my computer?
No. Copy leaves the source files in place. Cut or Move is different and can remove the source after the move completes. For important files, copy first, verify the USB result, and decide separately whether to delete anything from the computer.
Why does a large file refuse to copy when free space remains?
Free space is not the only possible limit. The destination file system, file permissions, a damaged source, or a connection error can block a transfer. Read the exact Windows message before changing the USB format. Formatting erases the current file-system structure, so protect existing USB files first.
Can I use the same USB drive for transfer and backup?
Yes, but one USB drive should not be the only copy of valuable material. Keep a separate copy on the PC or another healthy location. A transfer becomes a useful backup only when you can locate and open the copies after the device is disconnected and reconnected.
What if I accidentally deleted the USB copy?
Check whether the original is still on the computer, then copy it again if it is healthy. If the USB held the only version, stop writing to it and look for independent backups. On a stable recognized device, recovery software may be appropriate; do not format the stick or restore recovered output back to that same source.
Conclusion
Copy from the PC, open a few files on the flash drive to verify them, and eject the device only after writing has finished. That sequence protects the originals and catches incomplete transfers early. If a file genuinely disappears from its last known local location, Drecov can scan that stable source and recover plausible copies to another device. Verify the recovered files before deleting originals or reusing an unreliable USB stick.
⚠ Warning: Install it on a drive different from the one where your data was lost to prevent overwriting.





