







Recently deleted videos from a Windows PC may still be in the Recycle Bin, a backup or another copy you made before deleting them. Stop writing new files to the original drive while you check. Record the video’s former folder and name, then try normal Restore before any recovery scan. If the Recycle Bin is empty and no backup has the file, scan the stable original storage—not the folder where you want to save the result. A recovered thumbnail or first frame is not enough: play the saved video through its middle and end.
Do less on the drive that held the video
A deleted local file may leave recoverable data behind until Windows or an application writes over the relevant storage space. That is why the first useful action is often to stop using the source. Avoid installing new software, downloading a large replacement video or exporting edits onto the same partition. If the missing item lived on a USB stick, unplug it safely after checking the Recycle Bin on the Windows computer where deletion occurred. For a video on the PC’s system SSD, minimize normal activity while you investigate.
Write down what happened. Did you delete the video from a folder, remove it inside an editor or lose it during a move between drives? Also note whether you used Shift+Delete, emptied the Recycle Bin or ran a cleanup tool. The answer changes which built-in route is worth checking. “Recently” describes when you noticed the loss, not the method of deletion. It does not guarantee that an old file remains recoverable, particularly after substantial new writes or SSD TRIM.
Find the original location before searching
Open the folder where the video used to be, but do not create a replacement file there. Note its drive letter, approximate date, extension and any distinctive part of the name. Check whether the video was actually saved to a cloud-synced folder or a second removable drive. A copy in another location may be complete and safer to restore than a newly scanned candidate. If the file was never local to Windows, use the owning service’s history instead of a local scan.
Look in the correct Recycle Bin
Open the Windows Recycle Bin and search by name if possible. Sort by deletion date and inspect the original location column to distinguish similarly named clips. Once you identify the right file, choose Restore. Windows normally returns it to its former folder. Open the restored video immediately and confirm more than the thumbnail. If the former folder no longer exists or the device has changed, use the visible file details to track where Windows placed it.
A video removed from a USB drive, network share or application library may not appear in the PC’s Recycle Bin in the way a local file does. Using Shift+Delete or emptying the bin changes the route too. Do not conclude that “the Recycle Bin is broken” merely because it shows no matching entry. Check the actual source and the deletion method. The Recycle Bin recovery page explains how direct restoration differs from searching the original drive after the bin is cleared.
If several Windows accounts use the same computer, inspect the account that performed the deletion. Each profile can show a different view of its files. Avoid searching another person’s profile without permission. Once you find the clip, restore a copy to a healthy destination and verify it before cleaning up duplicates.
Check versions and copies before scanning
Look for a backup of the original folder, a File History version if it was enabled, or the computer or camera from which the video was copied. An editing project may contain only a proxy or preview while the full media remains elsewhere. Search for a distinctive filename and compare file sizes, but open any candidate before trusting it. A same-named item can be an earlier edit, a lower-resolution export or a short preview. Keep each version separately until you know which one contains the scene you need.
Cloud storage requires its own trash and version history. If a synced folder held the video, a deletion may have propagated to other devices. Check the service’s web interface without emptying its trash or forcing a new sync. If the video is still on a phone, camera or external drive, copy it to a healthy destination and confirm the copied result. Do not move the only remaining original while you are still working out where the missing local file went.
For a video you edited recently, inspect the export destination and the project’s media links. The project file itself may not include the source clip. Opening the application can reveal where it expects the media, but be cautious about automatic cache-cleaning or relinking that writes to the affected disk. The goal at this stage is to find a complete existing copy, not to force an editor to rebuild one from partial evidence.
When the ordinary restore routes fail
If the Recycle Bin and backups do not contain the clip, a scan of the original stable storage may find deleted-file data. Microsoft’s Windows File Recovery guide describes a command-line option for local files that cannot be restored from the Recycle Bin. The command requires correct source and destination choices. If you are not comfortable identifying drives by letter and filtering for file types, a graphical recovery tool may make candidate inspection easier.
Do not scan a drive that repeatedly disconnects, clicks or reports serious read errors. Software can only work with a source it can read safely enough. A specialist can assess imaging or physical recovery. On a healthy SSD, TRIM may reduce what a deleted-file scan can find; no software can promise to reverse fully overwritten data. Keep the original drive as quiet as possible while making these decisions.
If a successful scan finds several videos with similar names, avoid immediately restoring all results to the same source. A large video can occupy a lot of space, increasing overwrite risk. Prepare another healthy drive with adequate capacity. Test representative recovered files after saving. Do not treat a file preview as a replacement for playback outside the recovery application.
Search the local source with Drecov
Drecov is Windows data-recovery software for deleted files on a stable PC drive, USB stick or other recognized local storage. Quick Scan can find candidates first; Deep Scan is available when the initial search is insufficient and the device remains stable. Filters and preview help identify the particular video before saving it to another healthy drive. Lost Partition Recovery is for files on a missing partition, not for a video merely absent from a folder. Drecov does not repair physically failing media or guarantee that overwritten footage will return. The video recovery page covers the local-file branch.
Prepare the destination before scanning. The recovery software should not be installed on the partition where the video vanished. Note whether the original was in Downloads, Videos, a custom editing folder or a removable device. If you deleted several clips, list their names and approximate durations. That list gives you a way to judge results rather than choosing the first plausible thumbnail. For mixed file types, the file recovery overview explains why the original location matters.
From source selection to a verified video
⚠ Warning: Install it on a drive different from the one where your data was lost to prevent overwriting.
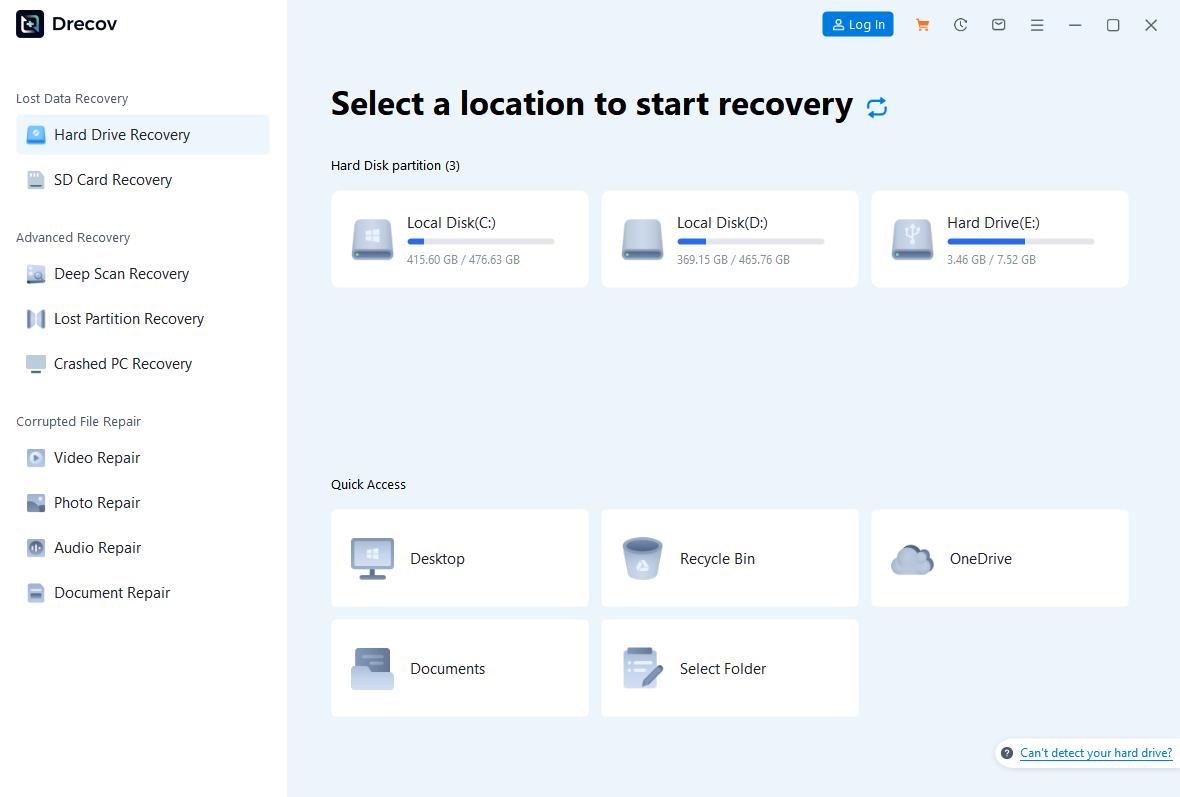
Step 1: open Drecov and select the original loss location.
Match the device and partition where the video was stored before deletion.
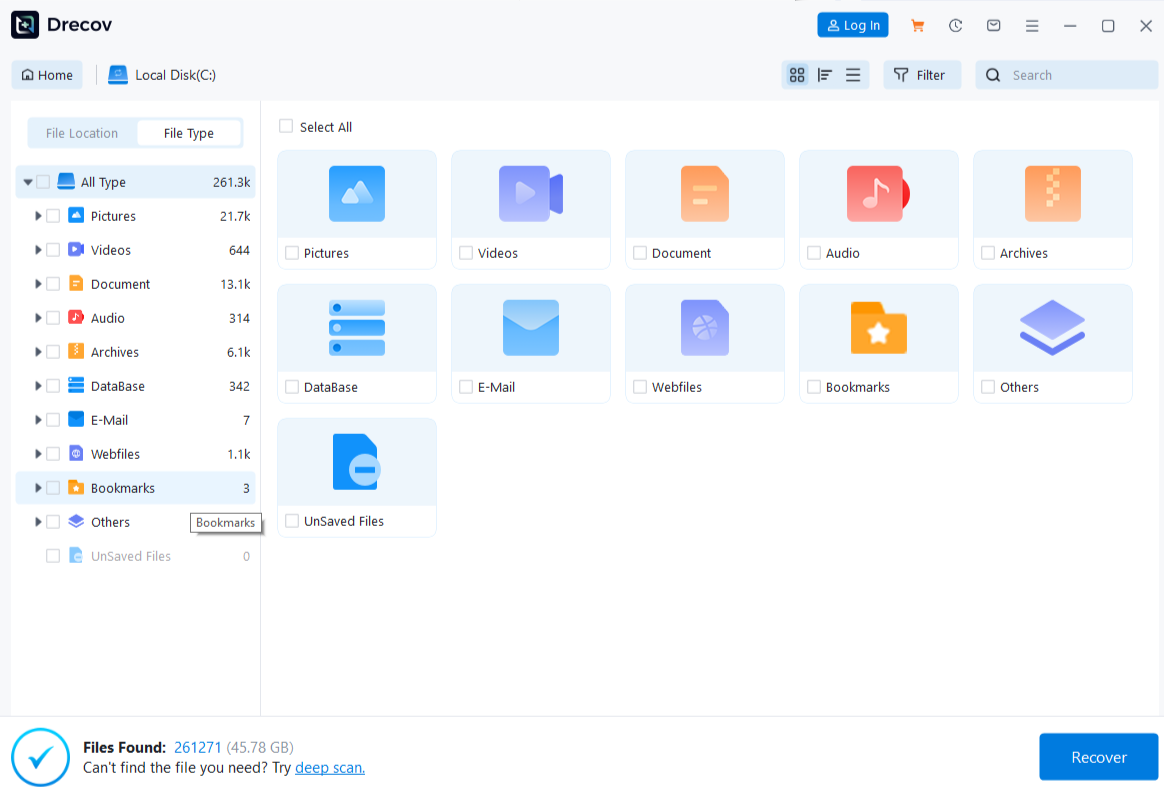
Step 2: run Quick Scan.
Browse the former folder and likely video file types for the missing name.
Step 3: use Deep Scan if necessary and stable.
Stop if the drive becomes unreliable rather than forcing repeated reads.
Step 4: filter and preview candidates.
Use name, type, path and visible frames where available, but remember a preview can be incomplete.
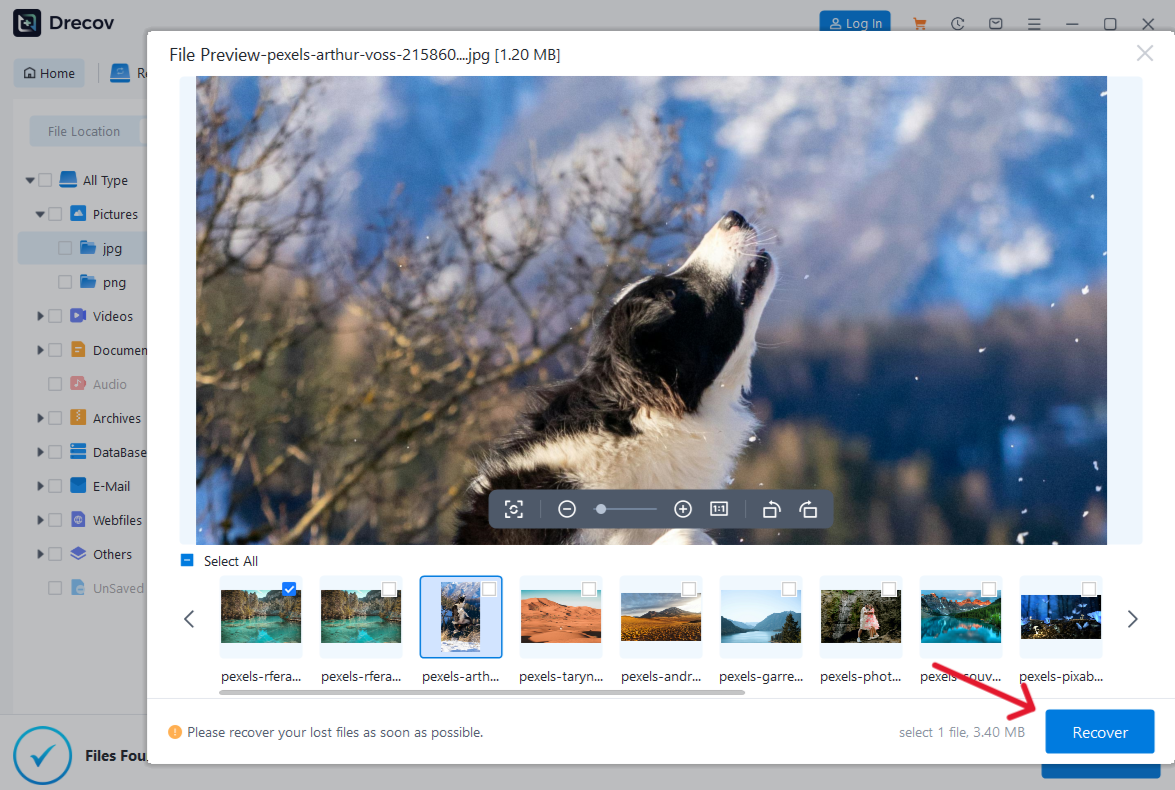
Step 5: recover selected files to a separate healthy drive.
Never save them onto the original source.
Step 6: open the recovered files in a normal player.
If they are absent from the expected destination, check Drecov Folder or Recovery Folder.
Do not delete the source or run a cleanup tool because one candidate played for five seconds. Keep the old storage unchanged until you have checked all important clips. If nothing usable appears, revisit backups and other devices before trying a more intrusive repair.
⚠ Warning: Install it on a drive different from the one where your data was lost to prevent overwriting.
Verify the clip you meant to save
A recovered video must contain the right event, not just the right file extension. Open it on the healthy destination, watch the opening and seek into the middle and last minutes. Confirm sound, subtitles if needed and the scene that made the clip valuable. Use thumbnail metadata or editing notes to check the duration, but do not trust that number alone. A partial file can sometimes show a plausible time while skipping or freezing at a later point.
If the content is correct, make another copy on a separate device or a managed backup service. Keep an untouched version until you have completed any edits or conversions. For a collection of many clips, check a sample from different dates and folders and mark any still missing. You may need to repeat the search for a specific original location, but avoid broad rescans of a source that is showing instability.
Only after the important media has been verified should you consider repairing a file system, reformatting a removable drive or replacing a failing device. None of those maintenance steps retrieves a deleted video by itself. The immediate outcome should be a playable, complete copy in a safe location.
FAQs
Where are recently deleted videos on Windows?
Check the Recycle Bin for a local folder deletion, then backups, File History and any source device or synced-service trash. The route depends on where the video actually lived.
Does Shift+Delete skip the Recycle Bin?
It commonly bypasses the ordinary bin. Stop writing to the source and check other copies before considering a deleted-file scan.
Can I scan the same drive and save results there?
No. Writing recovered files to the source can overwrite other deleted data. Use another healthy device with enough space.
Why does a recovered video show only the first frame?
The preview may survive while later video data is missing. Play the saved file through its middle and end before treating it as recovered.
Does Drecov search a cloud account directly?
No. Check the provider’s trash and version history for cloud-only files. Drecov searches appropriate local Windows storage.
Conclusion
For recently deleted videos on a Windows PC, the fastest safe path begins with the original location, the Recycle Bin and existing copies. Stop new writes before searching a stable local drive. When those routes fail, Drecov can find candidate files, preview them and save selected videos to another healthy disk. It cannot recreate fully overwritten footage or make a failing device stable. Open the result outside the scan, confirm the important scenes and sound, and keep a second copy.
⚠ Warning: Install it on a drive different from the one where your data was lost to prevent overwriting.






