Home » Fix USB Device Not Recognized: A Step-by-Step Recovery Guide
Fix USB Device Not Recognized: A Step-by-Step Recovery Guide
This expert guide provides 12 proven methods to fix USB recognition errors. From updating drivers to advanced registry tweaks, learn to restore connectivity and use PandaOffice Drecov software to safely recover your important files from unrecognized drives.
Encountering the “USB device not recognized” error can be incredibly frustrating, especially when you rely on USB devices like flash drives, keyboards, mice, or external hard drives for daily tasks. This common issue affects many users across different operating systems, particularly Windows, and can stem from hardware faults, driver problems, or system glitches.
In this comprehensive guide, you’ll learn how to fix usb device not recognized errors using proven solutions. Whether you’re a beginner or an experienced user, this step-by-step article will help you diagnose and resolve the issue effectively. When your hardware refuses to cooperate, it often feels like a digital wall has been built between you and your data. However, by systematically approaching the problem, we can dismantle that wall and restore your access.
When your computer displays this error, it means the operating system cannot properly communicate with the connected USB device. In technical terms, the USB controller is unable to handshake with the peripheral’s firmware. This could happen due to:
Faulty USB ports that have suffered physical wear.
Corrupted or outdated drivers that fail to interpret signals.
Power supply issues where the port provides insufficient voltage.
Damaged USB hardware internally or at the connector.
Software conflicts from recently installed applications.
Understanding the root cause is essential for applying the correct fix. If the system cannot identify the device descriptor, it simply gives up and labels it as “Unknown Device.”
Common Causes of USB Device Not Recognized Error
Before jumping into solutions, let’s take a look at the most common reasons behind this issue. Transitioning from a state of confusion to clarity requires identifying these five pillars of USB failure.
1. Driver Issues
Outdated, missing, or corrupted USB drivers can prevent your device from being recognized. Drivers act as the translator between your hardware and Windows; if the translator is missing, no communication occurs.
2. Hardware Problems
A damaged USB cable, port, or the device itself can cause connection failures. Over time, the gold-plated pins inside a USB port can bend or accumulate dust, leading to intermittent connectivity.
3. Power Supply Limitations
Sometimes your system may not provide enough power to the USB device. This is particularly common with unpowered USB hubs or laptops running on battery saver mode, which might throttle power to “non-essential” peripherals.
4. System Glitches
Temporary bugs in the operating system can interfere with USB detection. A simple “hiccup” in the Windows Explorer process or the Plug and Play service can cause a total blackout for new devices.
5. USB Controller Errors
Problems with the USB controller on your motherboard may also lead to this error. Since the controller manages the traffic for all ports, a failure here affects everything you plug in.
Quick Fixes to Try First
Before diving into advanced methods, try these simple solutions. These often resolve minor temporary glitches without requiring deep system changes:
Restart your computer: This clears the system cache and resets the USB bus.
Try a different USB port: Move the device from a front panel port to a rear motherboard port.
Test the USB device on another computer: This confirms if the device itself is dead.
Disconnect other USB devices: This reduces the power load and potential IRQ conflicts.
If the issue persists, proceed with the detailed solutions below to fix usb device not recognized.
Detailed Solutions to Fix USB Recognition Issues
We have organized these solutions from the easiest software tweaks to more complex hardware and registry adjustments. Please follow them in order for the best results.
Method 1: Update USB Drivers when USB Driver Not Detected
If your usb driver not detected error persists, the first logical step is to refresh the software layer. Windows relies on specific instructions to talk to your hardware. If these instructions are old, the “Fix USB device not recognized” error is inevitable.
Step 1: Right-click on the Start menu and select Device Manager.
Step 2: Scroll down and expand the Universal Serial Bus controllers section.
Step 3: Look for any entry labeled “Unknown USB Device” (yellow exclamation mark).
Step 4: Right-click on the problematic USB device and select Update driver.
Step 5: Choose Search automatically for drivers.
Step 6: Follow the on-screen prompts and restart your PC if requested.
Updating drivers ensures compatibility and fixes bugs that may prevent recognition. If Windows cannot find a driver, you may need to visit the Microsoft Update Catalog to find specific hardware IDs.
Method 2: Uninstall and Reinstall USB Controllers for Computer Not Recognizing USB
When you find your computer not recognizing usb even after a driver update, the stack itself might be corrupted. Reinstalling USB controllers can reset configurations and resolve deep-seated conflicts.
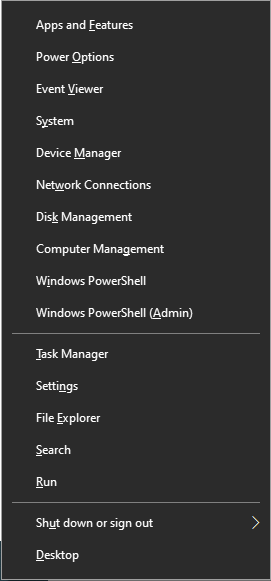
Step 1: Open Device Manager by pressing Win + X and selecting it from the list.
Step 2: Expand Universal Serial Bus controllers.
Step 3: Right-click each USB Root Hub or Host Controller and select Uninstall device.
Step 4: Do not worry; your mouse and keyboard might stop working temporarily if they are plugged into these ports.
Step 5: Restart your computer using the physical power button if necessary.
Step 6: Upon reboot, Windows will automatically scan for hardware changes and reinstall the necessary drivers.
Method 3: Disable USB Selective Suspend Setting to Fix USB Not Showing Up
If you notice your usb not showing up specifically on a laptop, it might be due to aggressive power management. Windows tries to save battery by “suspending” ports it thinks are idle, but it often miscalculates.
Step 1: Open the Control Panel and navigate to Power Options.
Step 2: Select your current active power plan and click Change plan settings.
Step 3: Click on the blue link: Change advanced power settings.
Step 4: In the pop-up window, find and expand USB settings.
Step 5: Expand USB selective suspend setting.
Step 6: Change the setting to Disabled for both “On battery” and “Plugged in”.
Step 7: Click Apply and then OK.
This ensures your USB ports remain active at all times, preventing the system from cutting power to your drive unexpectedly.
Method 4: Fix USB Could Not Be Recognized via Windows Updates
A common reason a usb could not be recognized is an outdated operating system kernel. System updates often include critical bug fixes for the USB 3.0 and 3.1 protocols.
Step 1: Open Settings by pressing Win + I.
Step 2: Go to Update & Security (or Windows Update on Windows 11).
Step 3: Click the Check for updates button.
Step 4: If optional driver updates are available, specifically look for those related to “Intel,” “AMD,” or “USB.”
Step 5: Install any available updates and restart your machine.
Keeping your system updated can resolve compatibility issues that the manufacturer has identified and patched.
Method 5: Address USB Drive Will Not Show Up via Disk Management
Sometimes the hardware is recognized, but the usb drive will not show up in File Explorer because it lacks a path. This is a common logical error rather than a driver failure.
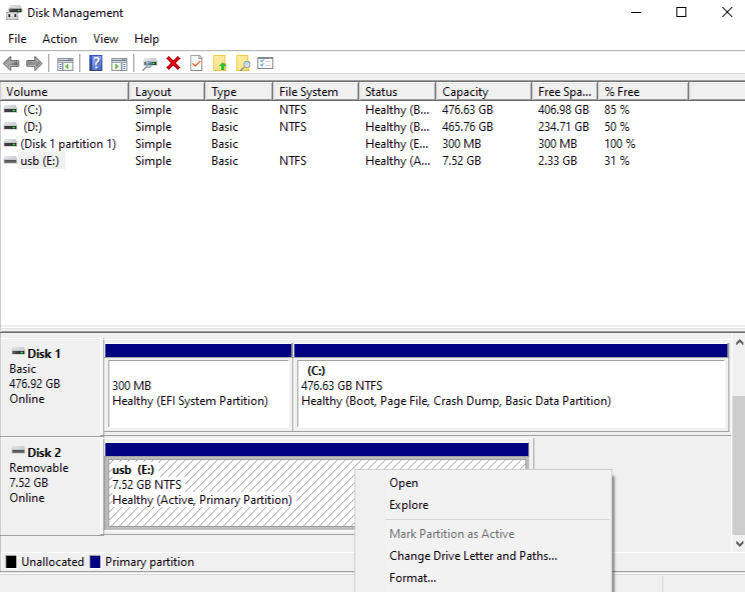
Step 1: Right-click on the Start button and select Disk Management.
Step 2: Look for a disk labeled “Removable” that shows “Unallocated” or has no drive letter (e.g., E:, F:).
Step 3: Right-click the block representing your USB storage.
Step 4: Choose Change Drive Letter and Paths.
Step 5: Click Add, choose a letter from the dropdown, and click OK.
Step 6: Open “This PC” to see if the drive is now visible.
If the drive appears as “RAW,” it may need formatting, which leads us to the crucial step of data recovery.
If you managed to fix usb device not recognized but the drive asks to be formatted, or if the files have disappeared, you need a professional recovery solution. PandaOffice Drecov data recovery software is designed to handle “Not Recognized” or “RAW” drive scenarios with high efficiency.
⚠ Warning: Install it on a drive different from the one where your data was lost to prevent overwriting.
Before you format the drive and lose everything, follow these steps using PandaOffice Drecov :
Step 1: Select the USB Drive
Launch the software. On the main dashboard, you will see a list of available drives. Locate your USB device under the “External Drives” section. Even if the drive didn’t show up in Explorer, PandaOffice Drecov can often detect the physical disk.
Step 2: Initiate the Deep Scan
Click the Scan button. The software will perform a “Quick Scan” followed by a “Deep Scan.”
Warning: The Deep Scan may take significant time depending on the size of the USB drive (e.g., 64GB might take 30 minutes). Do not disconnect the USB during this process.
Step 3: Preview and Filter Files
Once the scan is complete, PandaOffice Drecov allows you to preview images, documents, and videos. Use the search bar to find specific filenames or filter by file type (e.g., .docx, .jpg).
Step 4: Recover and Save
Select the files you wish to keep and click Recover. Choose a destination folder on your computer’s internal hard drive to save the recovered data.
Key Operation Point: Never save recovered files back to the same USB drive immediately. If the drive is failing, it could lead to permanent data loss.
If the standard methods haven’t allowed you to fix usb device not recognized, we must look deeper into the system’s hardware initialization.
Method 6: Disable Fast Startup
Fast Startup in Windows 10 and 11 saves a “snapshot” of your drivers to the hard disk to speed up booting. However, if a USB driver was in a glitched state, Fast Startup simply reloads the glitch every time you turn on the PC.
Step 1: Open Control Panel > Hardware and Sound > Power Options.
Step 2: Click Choose what the power buttons do.
Step 3: Click Change settings that are currently unavailable (requires Admin rights).
Step 4: Uncheck the box for Turn on fast startup (recommended).
Step 5: Save changes and Shut down (do not just Restart) your computer.
Step 6: Turn the computer back on and plug in your USB.
Method 7: Update BIOS and Chipset Drivers
The BIOS (Basic Input/Output System) is the firmware that controls your motherboard’s hardware. If your BIOS is outdated, it may not support newer USB 3.2 or USB-C protocols correctly.
Step 1: Press Win + R, type msinfo32, and press Enter.
Step 2: Note your BIOS Version/Date and BaseBoard Product (Motherboard model).
Step 3: Visit the manufacturer’s website (e.g., ASUS, Dell, HP, or MSI).
Step 4: Download the latest Chipset Drivers and BIOS update.
Step 5: Follow the manufacturer’s specific instructions to install.
Warning: A power failure during a BIOS update can permanently damage your motherboard. Ensure your laptop is plugged in or your desktop is on a stable power supply.
Method 8: Edit the Windows Registry (For Experienced Users)
If all else fails, you can manually tell Windows not to suspend USB devices via the Registry Editor. This is a surgical way to fix usb device not recognized errors.
Step 1: Press Win + R, type regedit, and hit Enter.
Step 3: If the USB key doesn’t exist, right-click “Services,” select New > Key, and name it “USB”.
Step 4: Right-click in the right pane, select New > DWORD (32-bit) Value.
Step 5: Name it DisableSelectiveSuspend.
Step 6: Double-click it and set the Value data to 1.
Step 7: Restart your computer.
Hardware Troubleshooting: When Software Isn’t the Problem
Sometimes, no amount of software tweaking can fix usb device not recognized if the physical layer is broken.
Method 9: Inspect for Physical Damage
Take a flashlight and look inside the USB port of your computer and the connector of the device.
Bent Pins: If the four internal pins are touching each other, it creates a short circuit.
Debris: Compressed air can be used to blow out lint or dust that prevents a solid connection.
Loose Housing: If the USB connector wiggles significantly, the solder joints on the internal circuit board may be cracked.
Method 10: Use a Powered USB Hub
Some external hard drives or specialized equipment (like MIDI controllers or high-end webcams) draw more than the standard 500mA provided by a standard USB 2.0 port. If you use an unpowered hub, the power is split between multiple devices, leading to the “not recognized” error. A powered USB hub that plugs into a wall outlet provides dedicated voltage to each port, often solving recognition issues instantly.
Tips to Prevent USB Errors in the Future
Preventing the need to fix usb device not recognized is always better than searching for a cure. Follow these industry-standard best practices:
Always Safely Eject: Right-click the USB icon in the system tray and select “Eject.” This ensures all “write” operations are finished and the file system is unmounted properly.
Avoid Cheap Cables: Low-quality USB cables often lack proper shielding, leading to electromagnetic interference that drops the connection.
Keep Ports Clean: Use a port cover if you work in dusty environments.
Update Regularly: Set Windows Update to automatic so you always have the latest microcode for your USB controllers.
Use Quality Recovery Tools: Keep a tool like PandaOffice Drecov ready so that if a failure does occur, you can recover data before the hardware degrades further.
Frequently Asked Questions
Why does my USB keep disconnecting and reconnecting?
This is usually a sign of a loose physical connection or a power management conflict. Try disabling the “USB Selective Suspend” as detailed in Method 3. If that doesn’t work, the internal cable of the USB device might be fraying.
Can a virus cause the “USB device not recognized” error?
Yes, certain types of malware target the PnP (Plug and Play) service or the inf files that Windows uses to install drivers. Running a full system scan with a reputable antivirus is recommended if the error occurs with every device you plug in.
Is my data lost if the USB is not recognized?
Not necessarily. In most cases, the data is still perfectly intact on the flash memory chips. The “not recognized” error is usually a communication failure between the USB controller and the OS. Using PandaOffice Drecov data recovery software can often bypass these OS-level errors to pull the data directly from the drive.
Does the “USB device not recognized” error happen on Mac?
Yes, although the error message is different (usually “Disk Not Ejected Properly” or simply nothing happens). The troubleshooting steps involve resetting the SMC (System Management Controller) and checking Disk Utility.
Conclusion
Mastering how to fix usb device not recognized involves a blend of patience and systematic testing. We have covered everything from basic driver updates and power settings to advanced registry edits and the use of PandaOffice Drecov data recovery software.
By moving through these steps logically—starting with the simplest software fixes and moving toward hardware checks—you can save time and potentially save your valuable data. Remember that hardware doesn’t last forever; if a device continues to fail after these 10 methods, it may be time to migrate your data using PandaOffice Drecov and invest in a new, high-quality replacement.