
Recover the LMMS song and its sound sources
To recover LMMS songs, preserve both the project and the files that produce its sound. A project can retain patterns, notes, and automation while a missing sample leaves an instrument silent. Conversely, a rendered audio export can preserve the sound of an earlier mix without restoring editable notes or mixer settings. Identify which of these components your recovery actually needs.
Record the song name, LMMS version, expected project folder, and a distinctive musical passage. Also note whether the song was saved as .mmp or compressed .mmpz. Preserve the current project, nearby backup files, and referenced samples before opening repeated sessions. This gives you several candidates without letting a new save replace a useful earlier state.
Save anything still audible or editable
If LMMS remains open with useful work, use Save As to create a new project name on healthy storage. Preserve an audio reference separately when practical. The project supports continued editing, while the render helps compare the intended sound later. Do not replace the editable project with a render simply because the render plays correctly.
If a project crashes on load, retain the exact error and avoid overwriting it with a newly created blank song. Work on copied candidates. Repeatedly launching different LMMS instances can complicate recovery-file handling, so keep track of which session owns the working song before responding to a recovery prompt.
Native route 1: save an offered autosave recovery
- Start the appropriate LMMS installation and inspect any Project recovery prompt.
- Choose recovery when it refers to the affected session.
- Inspect a distinctive passage in the recovered song.
- Use File, Save As, and give the recovered project a new name.
LMMS can offer an autosaved recovery project after an interrupted session when the relevant recovery data survives. This is conditional protection, not a promise that every last note was saved. Compare the arrangement and recent edits. Enabling autosave after the incident cannot recreate content that the earlier session never wrote.
Treat the recovery song as a candidate
Inspect the Song Editor, an important Piano Roll pattern, and a known automation change. A recovery project may predate the last editing minute. Keep the previous saved project too, because it may contain a useful difference. Do not assume the recovery candidate is automatically the most complete version simply because the application offered it.
After saving the candidate under a new name, close a test view and reopen the new file. Check the same passage again. This establishes that the recovered state now exists as an ordinary persistent project rather than only in the temporary recovery session. Keep the original recovery source untouched where possible until that check passes.
Native route 2: open an existing project backup copy
- Locate a surviving backup associated with the intended .mmp or .mmpz project.
- Copy it to a separate recovery folder and preserve the original name in your record.
- Restore a usable project extension on the copy where required by the documented workflow.
- Open the candidate and compare patterns, arrangement, and sound sources.
LMMS can retain a backup of an earlier saved project, depending on the version and configuration. Inspect the actual existing files rather than assuming that every song has one. A backup may represent an earlier save, so compare its contents with the incident timeline. Keep several plausible versions instead of replacing them all with one newly named file.
Keep compressed and uncompressed formats straight
A compressed project is not repaired merely by changing its extension to the uncompressed format. Preserve the original bytes and identify the file’s actual role before renaming a copied backup. If the application cannot read it, record the error and try another valid candidate rather than repeatedly changing extensions until one seems acceptable.
A file that opens may still be incomplete for your song. Check the last chorus, a recently edited note pattern, and a distinctive mixer setting. These tests reveal more than the project title or total duration. Save the accepted version separately and retain the original backup so you can revisit it if another missing element appears.
Native route 3: reconnect original samples and instruments
- Identify the silent track and inspect its instrument or sample source.
- Locate the original file or required legitimate plugin installation.
- Reconnect the correct source in a working project copy.
- Compare pitch, timing, playback behavior, and the intended mix passage.
A song can load successfully while samples or plugins are unavailable. First determine which track is silent and whether its notes and automation survive. Then inspect the actual source reference. Replacing a missing sound with any available sample can make the song audible, but it does not restore the original instrument or its intended musical result.
Match more than the sample filename
Compare the source audio’s content, length, and sample characteristics. Two files named kick.wav can belong to entirely different sound packs. A replacement with a different transient or tuning can change the groove even when the project loads without warnings. Preserve candidate samples separately until you identify the intended recording.
Also inspect sample start and end points, envelope settings, pitch, and any relevant instrument parameters. The original source may reconnect while a changed setting still alters the sound. Compare a short reference passage and listen in context with the other tracks. A waveform preview alone cannot confirm that the instrument behaves as expected in the arrangement.
Native route 4: reconstruct from surviving musical exports
- Preserve any original MIDI files, stems, renders, and written arrangement notes.
- Create a separate reconstruction project rather than overwriting a native candidate.
- Import only supported sources and map their tempo and instrument roles deliberately.
- Compare the resulting passage and document what remains manually rebuilt.
A MIDI source can preserve notes and timing information without preserving the original synthesis or mix. An audio render can preserve sound while flattening editable musical decisions. These sources can support a useful reconstruction, but neither automatically returns the complete LMMS project. Label the source and limits of each recovered component.
A stem may contain effects, automation, and processing already rendered into its sound. Importing it as audio does not restore the plugins or parameter curves that produced it. Keep the stem unchanged and record whether you are using it as a replacement performance, a mix reference, or evidence for rebuilding an editable part.
If only a stereo render survives, compare sections and identify which parts matter for continued work. You may choose to build new editable instruments around that reference, but this is new production work. Do not describe approximate note transcription or sound matching as direct restoration of the old patterns and presets.
Diagnose a silent project before replacing files
Check track mute states, mixer routing, master output, instrument availability, and the selected audio system. A project can appear broken because of an output configuration rather than missing song data. Test a simple known sound in a separate session if needed, while keeping the affected project unchanged. This separates system playback from project-specific loss.
Distinguish missing notes from missing sound
Open the relevant pattern and inspect the Piano Roll. If notes survive but the instrument source is absent, focus on reconnecting that source. If the pattern itself is empty, inspect another project milestone. Repeatedly reinstalling a sound library will not recreate a deleted note sequence, just as restoring a pattern will not supply a missing sample file.
Also compare the instrument’s channel and mixer assignment. A valid sound can route to a muted or differently processed channel. Correct an understood routing issue in a working copy, then compare the intended passage. Keep that fix separate from any later creative mixing decisions so you can explain why the recovered song sounds different.
Check automation after the song becomes audible
Automation can control volume, filters, effects, and other parameters across the arrangement. Inspect a distinctive automation passage and confirm its target parameter. A song may play while missing the curve that gave a transition its character. Compare the audible result and the actual automation data rather than accepting basic playback as complete recovery.
Verify timing and parameter relationships
A recovered automation pattern should occur at the intended position and affect the correct control. Listen before, during, and after the change. If you manually recreate a curve from a render, record that reconstruction. An approximate sweep can sound useful without reproducing the original values or editing flexibility exactly.
Check tempo and meter assumptions before comparing timestamps in an audio render. A tempo change can shift every later event relative to a fixed-time reference. Compare musical positions as well as elapsed time, and preserve the original candidate before making global timing changes. This prevents a recovery comparison from becoming an unintended rearrangement.
Preserve third-party plugin context
If the project uses an external instrument or effect, identify its legitimate version and any existing preset or bank files. A different plugin build may load the project while producing a different sound. Keep license access and plugin installation separate from the project-file recovery task. A recovered song file does not include every external dependency automatically.
When an instrument cannot load, preserve the original project before saving through a substitute configuration. A new save may reflect the missing or replaced component. Work on a copy and document the temporary substitution. If the original dependency becomes available later, the untouched source gives you another chance to restore its intended state.
Compare a known passage after reconnecting the plugin and inspect important parameters. Successful plugin loading establishes only that the software can instantiate something. The preset, sample bank, and routing still need checking. Use an existing reference render when available to identify obvious differences without claiming that an audible match proves exact state recovery.
Work through a crash during arrangement editing
Suppose LMMS closes after you move the final chorus and adjust its filter automation. Preserve the saved project and any existing backup before accepting a recovery candidate. Inspect the offered autosave, compare chorus position, and check the automation target. Save the best candidate under a new project name instead of overwriting the previous milestone.
Combine only verified differences
The saved project may contain the right instrument state while the autosave contains the new arrangement. Compare them deliberately and transfer only understood material through supported editing methods. Record what you reconstructed or copied. A hybrid result can be useful, but it should not silently replace both original candidates before you have checked the sound.
Render a short passage covering the recovered transition and compare it with your reference or intended musical structure. Then listen to the beginning and end of the full song. This checks both the specific recovery target and the possibility that a global setting changed while you were repairing one section.
Inspect song structure beyond total duration
Two versions can have the same duration but different repeated sections, notes, or transitions. Compare a verse, chorus, bridge, and final ending where relevant. Check a short note pattern with an intentional variation. These samples reveal whether the accepted project preserves musical decisions rather than simply filling the same number of bars.
Keep recovery and creative revision separate
If you improve the arrangement while checking it, save that as a later version. The accepted recovery should remain a clear milestone you can compare with the sources. Separating those saves makes it easier to identify whether a later problem came from the original incident or from a new creative change.
Also note which tracks rely on reconstructed sounds or incomplete source material. A playable song can still contain a substitute bass patch or a flattened vocal reference. That may be adequate for immediate work, but the limitation should remain visible to anyone who expects the original fully editable production.
Test the song from its planned storage location
Copy the accepted project and required local samples into the intended organized location using an appropriate project workflow. Reopen a working copy and test the distinctive passage. Check whether it still depends on temporary recovery folders. A project that plays only while an old desktop folder remains available has an unresolved dependency.
Retain a useful handoff package
Keep the native project, required source samples, existing presets where permitted, and an audio reference together with a short dependency record. Test that the intended LMMS installation can open the project and reproduce the important passage. A rendered mix helps immediate listening, while the native file and sources support continued editing.
Compare LMMS candidates with a musical checklist
Choose a short section that includes the arrangement change, an important instrument, and a recognizable automation event. Write down the expected bar positions and sound sources. Use that same section to compare the saved song, autosave, backup, and any reconstruction. This gives each candidate a fair test instead of relying on a vague impression that one version sounds more familiar.
Inspect a pattern’s actual note content
Open the relevant Piano Roll and compare note positions, lengths, pitch, and velocity. A pattern name can remain unchanged even when its musical content differs. Include an intentional variation, such as a pickup note or altered final chord, in your comparison. These details reveal whether the recovered song contains the intended performance rather than a similar earlier pattern.
Then inspect how the pattern repeats in the Song Editor. The notes may survive while a copied block occupies the wrong bar. Compare a transition before and after the pattern, not just the pattern in isolation. A structurally correct recovery should preserve both the musical material and its role in the arrangement.
Separate sound-source recovery from preset reconstruction
An instrument can depend on a sample, sound bank, plugin state, or several settings together. Identify which component is absent before choosing a replacement. A recovered project may preserve notes and envelopes but lack the source sample. Another candidate may preserve the sample while omitting the final patch settings. Record those strengths independently.
Compare one instrument without losing mix context
Listen to the affected part on its own, then with the surrounding tracks. A substitute can seem close in isolation while changing the groove or masking another instrument. Use a known reference passage and preserve the original candidate before adjusting it. If you rebuild the sound by ear, record that creative work as reconstruction rather than exact preset restoration.
For a source sample, compare tuning and transient timing as well as file duration. A short leading silence can shift the perceived rhythm even when note placement is correct. Correct the source relationship deliberately in a working copy, and keep the untouched recovered sample so you can revisit the choice if another section behaves differently.
Check automation links after moving project material
A curve can survive while its target relationship changes during reconstruction or transfer. Inspect the actual parameter it controls and listen across the affected section. A familiar curve shape does not establish that it changes the intended filter or volume control. Verify both the data and the connection before copying the same method to other tracks.
Use endpoints and an intermediate point
Compare the parameter before the automation, at a distinctive point during it, and after it ends. These observations reveal a curve that starts correctly but ends at the wrong value. If the project uses several related controls, test their interaction. A single successful sweep does not prove that the entire transition behaves like the earlier song.
When a rendered reference is your only evidence, preserve the limits of what you can infer. The sound can suggest a fade or filter movement without revealing exact parameter values. Save the approximate recreation as a new milestone and keep the reference unchanged. That gives future production work an honest baseline rather than an invented historical preset.
Review mixer routing before changing the arrangement
Follow the affected track through its mixer channel, processing, and master output. Check mute states, gain, and effects that depend on external plugins. A routing problem can silence a complete note pattern. Rebuilding the pattern would waste time and may introduce new differences while leaving the actual cause unresolved.
Compare a dry and processed reference where available
If an earlier stem or intermediate export exists, it can help identify whether the source performance or the processing changed. Compare timing and phrase content first, then processing. Do not assume a louder or more polished candidate is the correct historical one. Recovery should follow evidence about the intended state rather than a preference for whichever version sounds better today.
If a plugin remains unavailable, preserve the original project before substituting another processor. Keep the substitution in a separate working version and record its settings. A practical replacement can support continued work while the untouched source preserves an opportunity to restore the legitimate original plugin state later.
Evaluate partial exports as reconstruction sources
A MIDI export can carry useful note events while an audio stem can preserve performance and sound. List what each surviving export contains before importing it. Confirm tempo, start position, duration, and instrument role. These checks prevent a group of independently useful files from becoming a misaligned arrangement when placed together without context.
Align using musical evidence
Use a count-in, recognizable downbeat, or reference mix to establish the intended relationship between sources. A filename that says chorus does not reveal its exact bar position. Preserve original leading silence until you understand its purpose. Trimming every file to its first audible sample can destroy alignment information that would otherwise make reconstruction easier.
If several renders represent different song versions, keep them separate and compare their structures. Combining a later verse with an earlier chorus may create a useful new arrangement, but it is not proof that the original project returned. Record those choices so the accepted recovery remains distinguishable from subsequent production decisions.
Build an LMMS acceptance package
Keep the accepted native song, required samples, legitimate presets, and a reference render with a short dependency list. Reopen a copied project from the intended location and compare the diagnostic passage. This checks whether your source organization actually supports continued editing instead of relying on a temporary path left over from recovery.
Test the full song after the short passage passes
A repaired instrument or global setting can affect sections outside the immediate incident. Listen through the arrangement and inspect the final ending, repeated patterns, and automation transitions. Record any remaining substitute sound or reconstructed section. A useful recovery can be partial, but its limits should stay visible to the next person who opens the song.
Finally, create a new protected milestone after the accepted recovery and keep the old candidates separately. Use a naming scheme that distinguishes original, recovered, and creative revision states. That simple separation makes later comparisons easier and prevents the best surviving backup from disappearing beneath a sequence of ordinary saves.
When storage recovery can help LMMS songs
PandaOffice Drecov may help retrieve deleted local projects, existing backup files, samples, presets, or renders from readable storage. It cannot recreate an unsaved pattern that never reached disk or extract every original instrument setting from a stereo mix. Prefer surviving native candidates and source reconnection first, and minimize writes where deleted files may still remain.
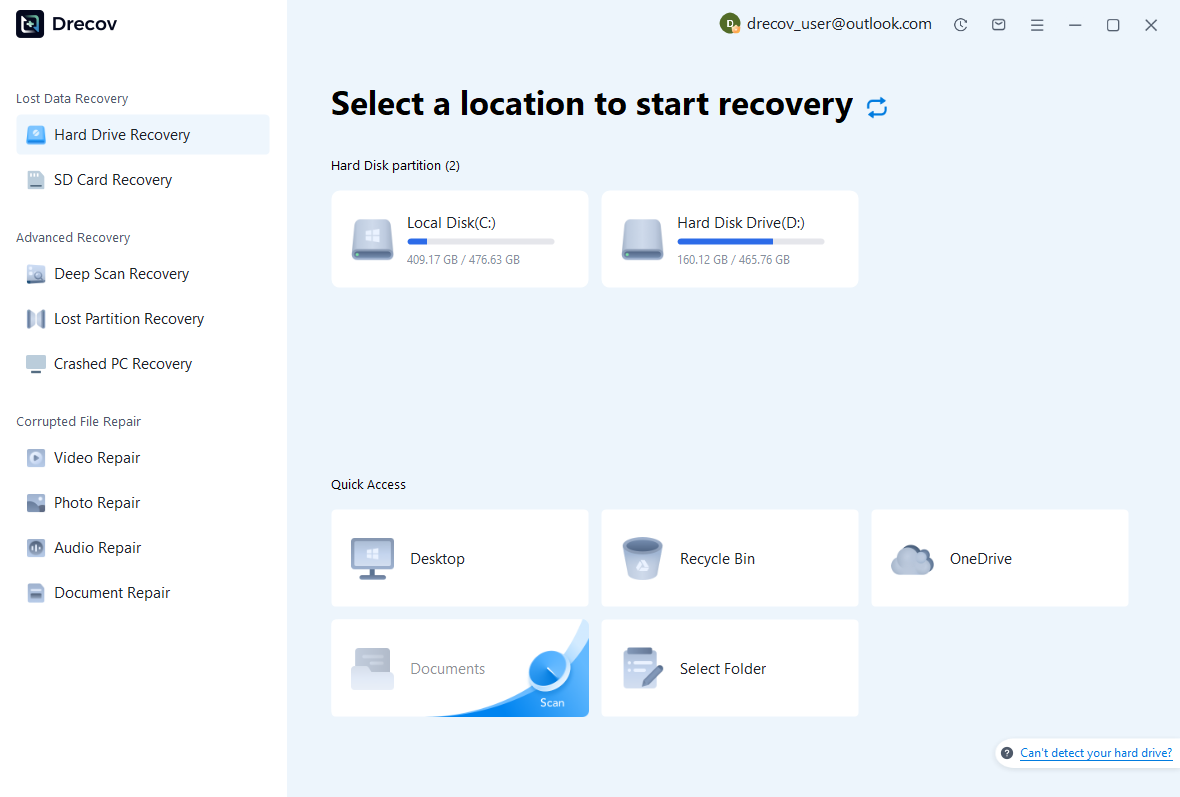
Step 1: identify project and sample storage
Choose the drive or partition that held the song project, configured recovery location, or original samples. Record which component each search targets. Keep recovered output on other healthy storage. If the source reports repeated hardware read failures or disconnections, assess that condition before continuing with a routine software recovery scan.
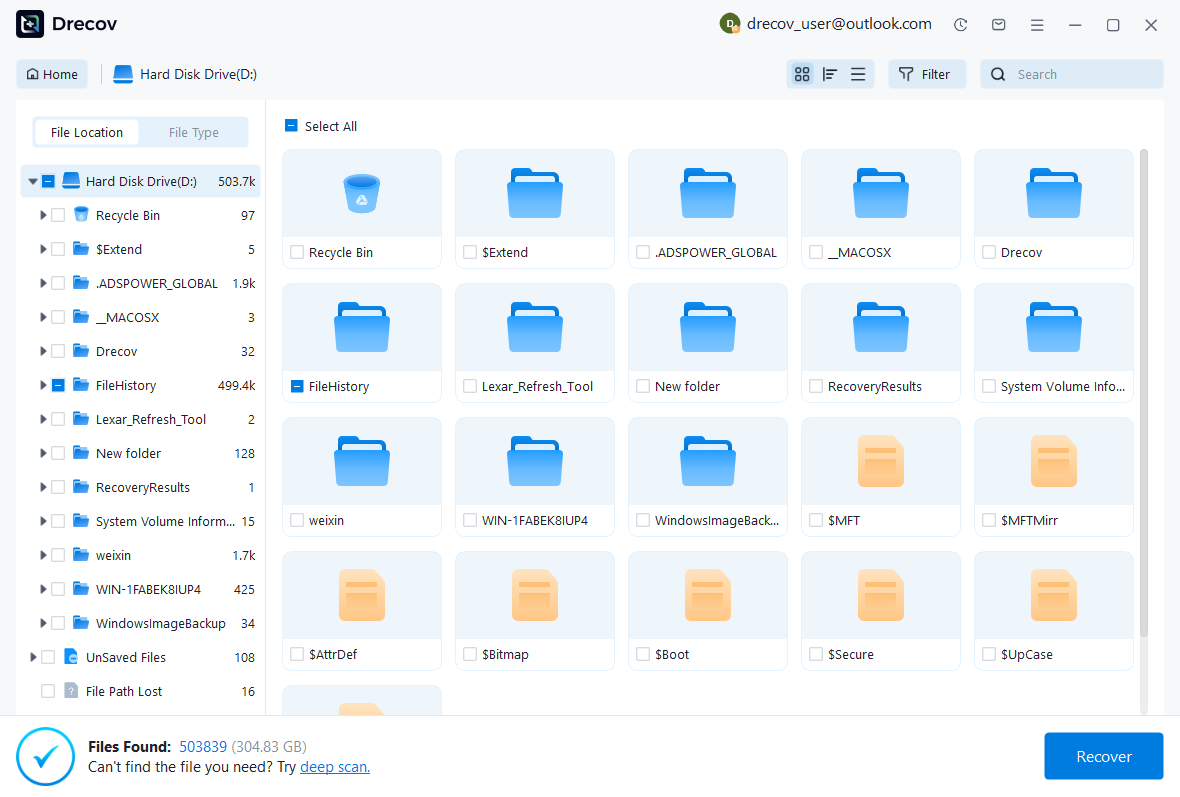
Step 2: compare project and sound candidates
Inspect available paths, names, sizes, dates, and supported previews. Preserve plausible .mmp, .mmpz, backup, and sample candidates without combining unrelated versions. An audio preview does not establish that editable notes survived. Likewise, a valid project filename does not prove every sample and plugin dependency remains available.
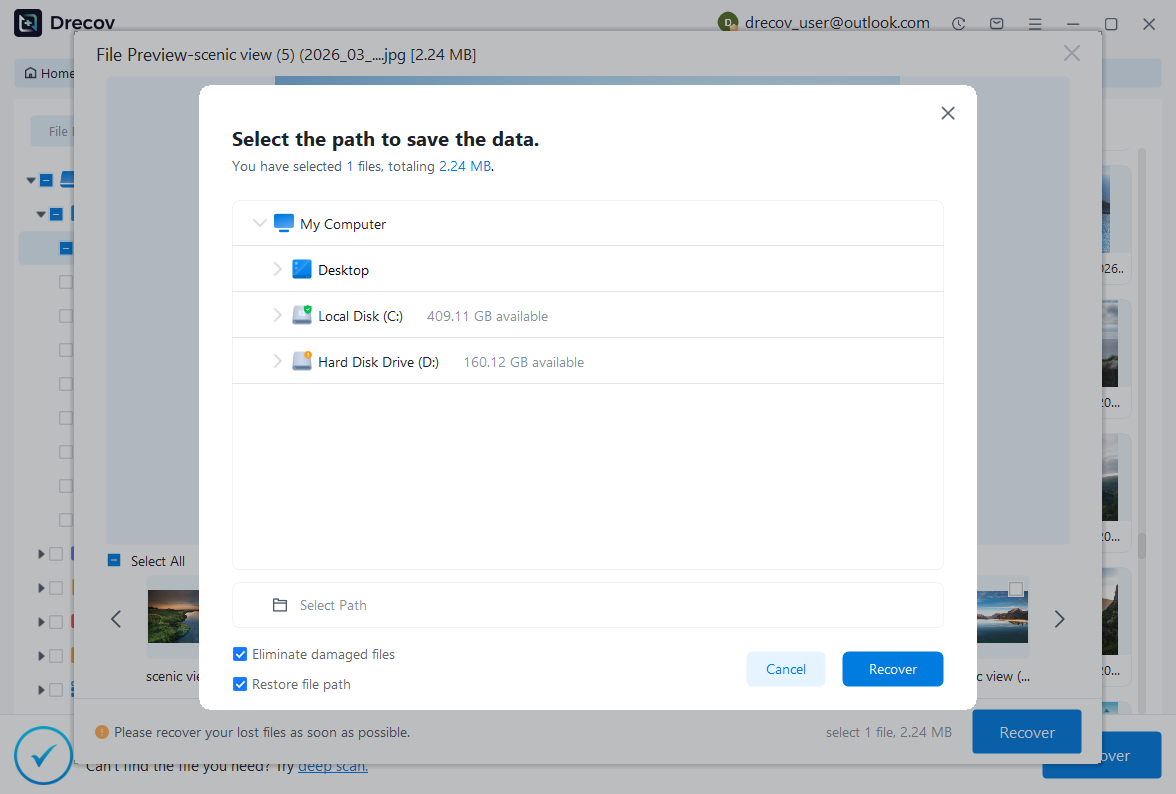
Step 3: restore elsewhere and compare playback
Recover selected files to a separate destination and retain an untouched source set. Open a copied project in the appropriate LMMS version, reconnect verified sound sources, and inspect patterns, automation, routing, and arrangement. Render and compare the incident passage. Record substitutions or reconstructed parts before calling the recovered song ready for continued production.
Preserve an editable musical milestone
Save the accepted native project with its required sources and a reference render. Add a short record of the recovery candidate, missing dependencies, and tested passages. This gives you a practical return point for the song’s editable structure, rather than relying only on a final audio file that cannot reveal how the music was built.
Related recovery resources
Explore the relevant recovery options: Hard drive recovery, External hard drive recovery.
For another recovery case and its practical checks, read the related recovery guide.
Check the vendor guidance for the installed version: official recovery documentation 1, official recovery documentation 2, official recovery documentation 3.