
An online photo repair service may help with some damaged JPG files, but do not upload your only copy first. Duplicate the file, check whether a backup or original camera copy opens, and decide whether the image is safe to send to someone else’s server. If the file contains private people, documents, or location details, a local test is the safer starting point. A repair site cannot guarantee that missing image data still exists.
Keep the original before testing a repair site
Find the JPG in File Explorer and copy it to another healthy drive. Work on that duplicate. Do not resave, rename over, or repeatedly edit the only original while trying tools. A repair attempt may produce a new image with different dimensions, color, or metadata; preserving the source lets you compare results and try a different method later. If the file sits on a USB device that disconnects or reports read errors, stop direct tests and protect the storage device first.
Check whether another copy exists in a phone gallery, camera card, email attachment, cloud history, chat download, or older PC folder. Open the copy before assuming it is good; thumbnails and previews can survive while the full image is broken. If the damaged JPG came from a recent transfer, compare file size at the source and destination. A zero-byte file or a copy that ends halfway through points to a transfer problem, not necessarily to a format defect an online service can repair.
Make a note of where the file originally came from. That location matters if the intact original has been deleted. A JPEG already damaged on every device needs a different response from a good original that vanished after a failed transfer. The photo recovery topic covers missing source files; it does not turn broken pixels in an existing file back into information that no longer exists.
Find out whether the file or the viewer is at fault
Try opening the duplicate in a second trusted program, such as the built-in Windows Photos app and a reputable desktop editor you already use. If one program shows the whole photo and another refuses it, you may have a viewer or compatibility problem. Save a new copy from the program that opens it, then compare dimensions and visible detail. Do not overwrite the original with that exported version.
Inspect the extension and the first available properties. A file named holiday.jpg is not necessarily a JPEG; someone may have changed its extension after export. Adobe’s file-format troubleshooting guidance notes that a mismatched extension, corrupt content, or display-related issue can cause an image to fail opening. Changing the extension alone does not transform the file’s internal format, so avoid random renaming until you know the original export type.
When only part of the photo displays, note where the break begins. A consistent lower half of gray blocks may suggest incomplete file content; an image that looks wrong only in one viewer suggests another route. Neither observation proves a repair percentage. It simply helps you decide whether a local export, an original copy, or a cautious repair attempt is worth trying.
Decide whether an online upload is acceptable
An online service receives a copy of the uploaded image. Before using one, read its current privacy and deletion terms, file-size limits, and whether it stores or shares uploads. Look for a clear account owner and a working contact route. A page that only promises “100% repair” without explaining what happens to your file gives you little basis for trusting it. Do not upload ID scans, medical records, intimate photos, work-confidential material, or images with sensitive location metadata unless you have explicit permission and an acceptable privacy agreement.
Use a duplicate, not the only file. Remove unnecessary metadata from that duplicate if doing so is safe and does not destroy information you need. Do not sign in with a work account to an unapproved service just because it offers a free preview. If the service asks you to install a browser extension or disable security controls, stop and use a different path. Online repair is a data-sharing decision as well as a technical one.
For a non-sensitive photo, you can compare the output with the preserved original and any thumbnail. Check the face, text, edges, and dimensions at full size, not just a tiny preview. Some sites may return a crop, a lower-resolution reconstruction, or a file that opens but contains missing regions. Whether such an output is useful depends on the photo’s purpose, not on a generic success badge.
What a repair tool can and cannot recover
JPG files use compressed image data. A tool may be able to rebuild some structure, find a readable embedded preview, or produce a partially viewable output. It cannot reliably recreate the exact original pixels when the relevant bytes were never saved or were overwritten. A clean thumbnail can help identify the picture, but it is not proof that the full-resolution original has returned.
If a photo is black, streaked, or color-shifted only after a particular export, revisit the source project or camera original. Export again from a known-good copy using an ordinary JPEG setting. If every copy exhibits the same missing region, move to a realistic salvage goal: the best viewable portion, a backup version, or a previously shared copy. Avoid paying for an output until you can inspect a representative preview and understand any limitations described by the service.
A file-recovery tool solves another problem: it searches for lost files on storage. It does not repair the internal content of a JPG that is still present but damaged. Before uploading a private image to an online service, check whether a camera card, backup, or shared copy still holds an intact original. The JPEG repair methods explain local options when the damaged file is your only copy.
If the intact original disappeared, recover that file first
Suppose a damaged JPG is the only file left after you accidentally deleted the original from a Windows PC or stable USB drive. In that case, finding the earlier intact file may be more valuable than repairing the broken copy. Check the Recycle Bin, backup history, and cloud version history first. The file recovery topic explains the wider missing-file path. Stop saving new files to the source device. Every new write can reduce the chance of finding a deleted original, especially on a drive where space is being reused.
Drecov is Windows data-recovery software for local storage, including PCs and USB drives. It can scan the original loss location in read-only recovery mode, present Quick Scan and Deep Scan results, let you locate and preview supported images, and save selected files to another healthy destination. Lost Partition Recovery can locate files from a missing partition, but it is not JPEG content repair or a partition-table fix. Recovery remains uncertain if the original data was overwritten. On a drive that clicks, disconnects, or reports severe errors, stop repeated software scans and seek a controlled image or specialist.
⚠ Warning: Install it on a drive different from the one where your data was lost to prevent overwriting.
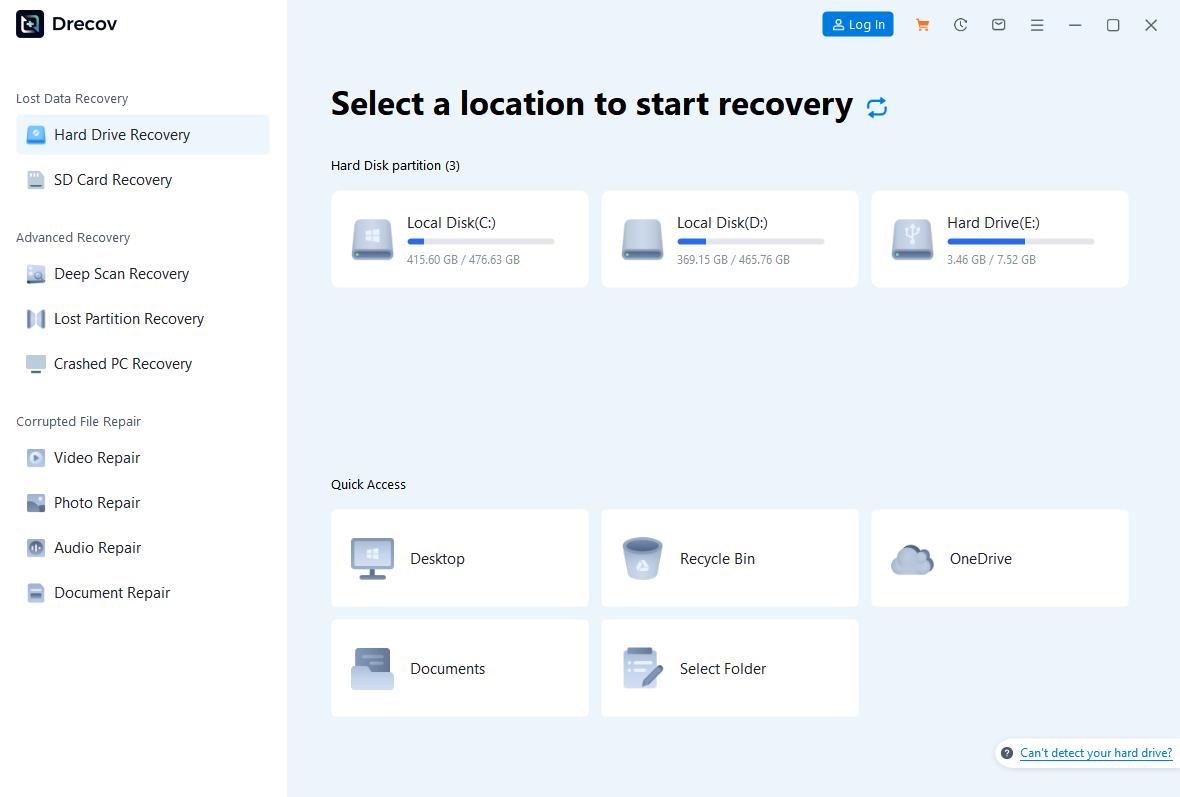
Step 1: Select where the full-size JPG last existed
Prepare a separate healthy destination and install Drecov away from the affected source. Open Drecov and choose the original PC folder’s volume or stable removable drive. If the original partition disappeared, use the relevant lost-partition mode rather than selecting the damaged copy’s new location.
Step 2: Inspect Quick Scan candidates
Start Quick Scan. Search for the old filename, camera folder, or expected file type. Compare sizes; a small thumbnail and a full-size camera image can share similar names.
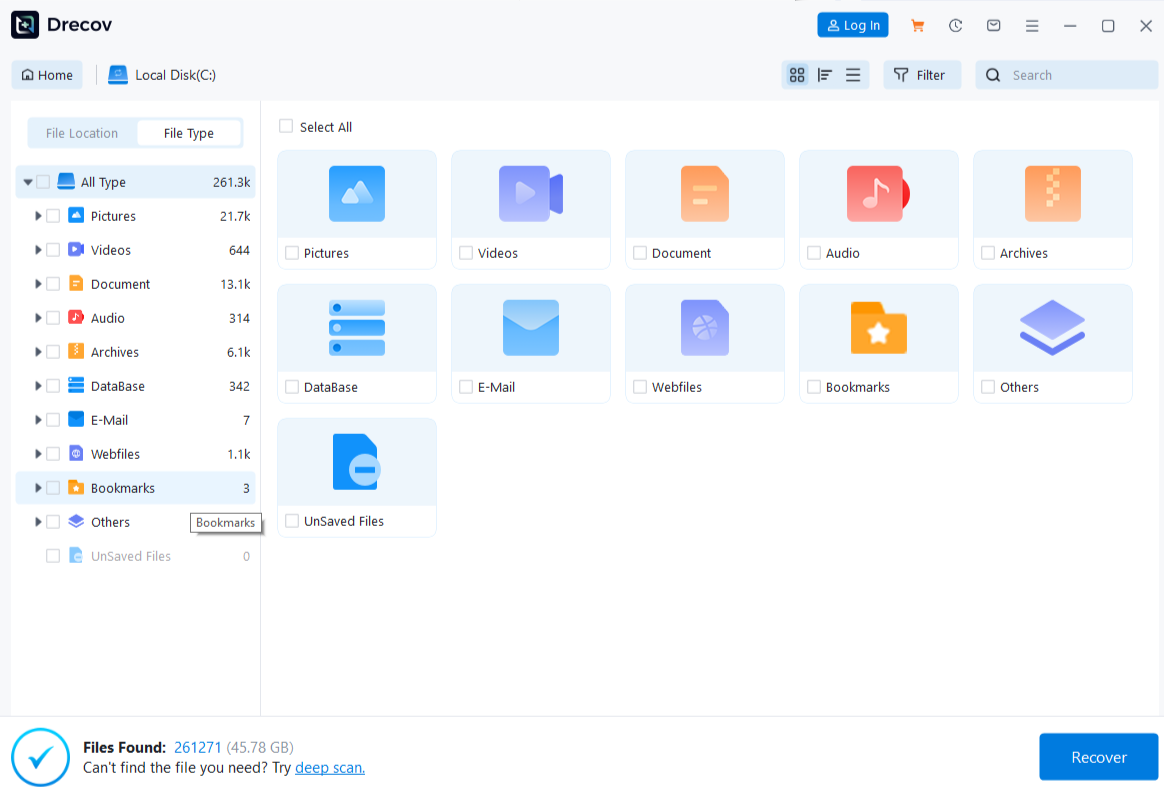
Step 3: Use Deep Scan only when warranted
If the original is absent from Quick Scan and the source remains stable, run Deep Scan. Do not repeat a long scan on a device that loses connection or changes reported capacity.
Step 4: Filter and preview representative images
Narrow results by file type, name, or path where available. Preview a few candidates at meaningful size. A preview confirms some readable content, not the condition of every pixel or the file’s complete metadata.
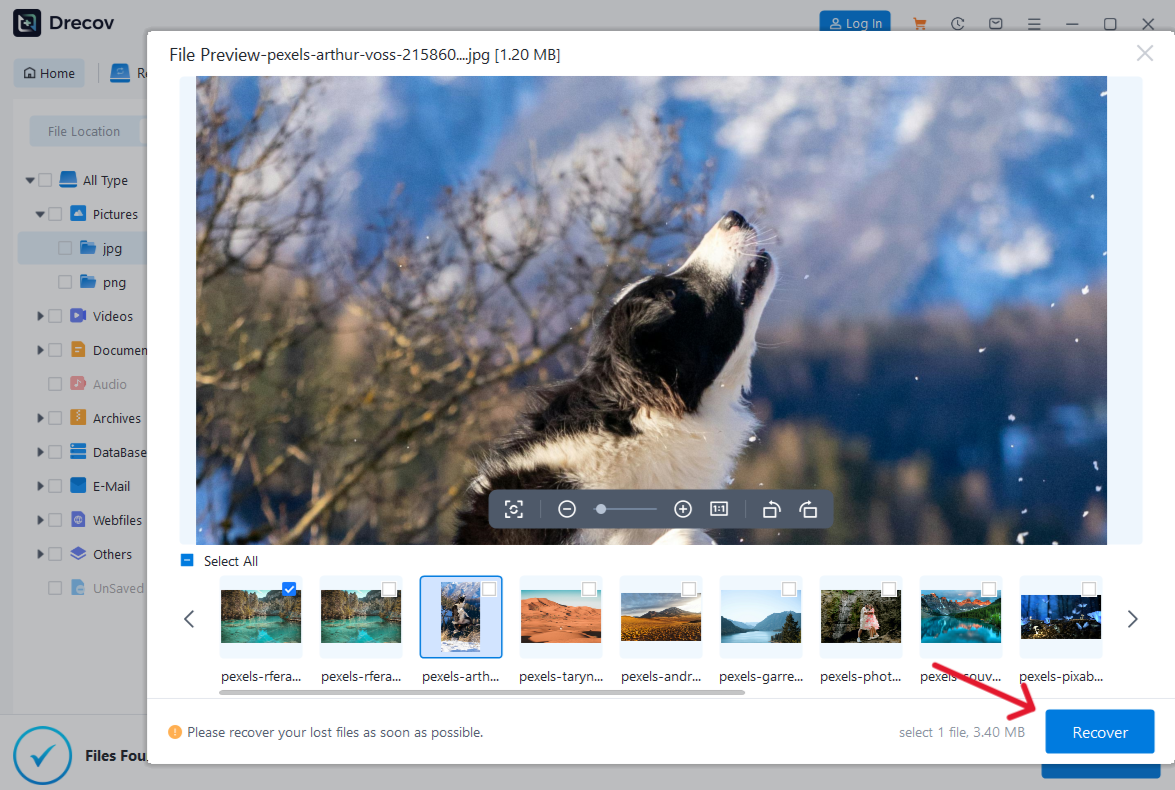
Step 5: Recover to another healthy drive
Save selected candidates away from the original source. Never recover back to the USB device or partition being searched. If output seems missing, check the Drecov Folder or Recovery Folder at the selected destination.
Step 6: Compare the recovered originals
Open the recovered images, inspect full resolution, and compare faces or details that matter. Keep the preserved damaged file until you know whether a better copy was found. The Drecov homepage lists its Windows recovery options; no software can promise exact reconstruction of overwritten image data.
⚠ Warning: Install it on a drive different from the one where your data was lost to prevent overwriting.
Frequently asked questions
Can an online service fix a severely damaged JPG for free?
Some services offer limited previews or trials, but terms can change. Check the current service’s limits and privacy conditions rather than assuming a free result. Preserve the original and inspect the returned file before paying or deleting any other copy.
Is it safe to upload a family photo?
That depends on the image and the service’s handling of uploads. Family photos can reveal faces, location, and private events. If you cannot verify retention and deletion terms, choose a trusted local method or work from an already shared non-sensitive copy.
Why does the online preview look better than the download?
It may show a thumbnail, crop, or compressed preview rather than the same output file. Compare dimensions and inspect the actual downloaded image at full size. A pleasing small preview does not establish that the original resolution was recovered.
Should I repair the JPG or search for the lost original?
If a known-good original was deleted, check backups and recovery options before spending time on a damaged derivative. If the only original still exists but will not open, work on a copy and investigate its file structure and viewer compatibility. These are separate problems with separate tools.
Conclusion
For online photo repair, protect the JPG first and decide whether its contents are safe to upload. Test a trusted viewer and look for a clean source copy before accepting a repaired preview as the original. If an intact full-size photo was deleted from a stable Windows device, Drecov can search that original location and save candidates to another drive. It cannot invent missing pixels or make an unsafe upload private.
⚠ Warning: Install it on a drive different from the one where your data was lost to prevent overwriting.