







Knowing how to format a flash drive starts with the device that must read it. A USB stick that opens on your Windows PC may fail in a television, camera, printer, car stereo, or older computer because that device expects a different file system. Before clicking Format, identify the USB stick, check the receiving device’s requirements, and copy off anything you need. If files have already disappeared, recover them before changing the drive. Then format in Windows and test the stick in its intended device, not just on the PC.
Confirm what the receiving device actually accepts
Windows may offer NTFS, exFAT, or FAT32, but that menu does not tell you what your other device supports. A television might recognize exFAT for a movie collection, while a particular camera may require a card or USB stick prepared in its own menu. Trust the device manual or on-screen storage message over a generic recommendation. Look up the exact model, its supported file systems, maximum storage capacity, and any required folder structure before erasing the drive.
Make the choice from the files and the device
FAT32 is widely recognized by older equipment, but a single file larger than 4 GiB cannot be stored on it. That makes a long video or a large installation image an immediate reason to check another supported option. exFAT commonly suits removable storage and large files when the receiving device explicitly supports it. NTFS is useful for Windows-focused work, but some appliances cannot write to or read it. Do not assume that a USB port guarantees support for every file system.
Consider a simple example. You want to play a 7 GB movie on a television. Windows can copy the movie to an exFAT stick, but the TV’s manual lists only FAT32. Formatting as exFAT will not solve the TV problem; formatting as FAT32 will reject that individual movie. The next choice is a supported playback method, a smaller compatible file, or a different device. Changing the file system cannot remove a device’s stated limits.
Check the stick before you change it
Connect only the intended USB stick if possible. In File Explorer, select This PC, note the drive letter, label, and capacity, then open Properties to see its current file system. The capacity is especially useful if several removable drives share the same generic name. A drive that shows the wrong capacity, disconnects repeatedly, or produces severe read errors is not a routine formatting candidate. Stop and assess the hardware and data before another attempt.
Decide whether the files are safe to erase
Formatting creates a fresh file system on the selected volume. It is not the same as making a backup, fixing a missing video, or changing a setting on the receiving device. When the USB stick contains documents, recordings, photos, or installers that matter, copy them to a different healthy storage device first. Open a few copied files rather than trusting a completed copy dialog alone. Check folder counts and sizes for large collections, and keep the original stick untouched until you know the copy is usable.
A second copy on another folder of the same USB stick is not protection against formatting. Nor is a shortcut to a file that still lives on the stick. Use a PC drive, an external drive, or a trusted cloud location with enough space. If a copy stalls or individual files show read errors, do not keep retrying a damaged drive indefinitely. Repeated access to unstable media can make later recovery harder. An image made by a specialist or professional recovery may be safer than another direct scan.
If the stick is empty and was never used for valuable data, you can proceed once you have verified its identity. Missing files, however, call for the recovery section below. A quick format can remove directory information, and new writes can overwrite recoverable content. For a more detailed explanation of loss after a completed format, see the formatted USB recovery overview.
Recover missing files before you format
Check the simplest sources first. The files may still exist on another PC, in a synced folder, or in a backup made before the stick was changed. Search by a distinctive filename and inspect the actual file, not merely a thumbnail. If the data is still missing and Windows recognizes the USB stick consistently, a file-recovery scan is a reasonable next step. Do not accept a Windows prompt to format the USB merely to make it accessible; that would change the source before you have protected its data.
Where Drecov fits
Drecov is Windows data-recovery software for missing files on a stable, recognized USB stick. Its read-only recovery mode, Quick Scan, Deep Scan, file filtering, and preview help you look for the original documents, photos, videos, audio, or archives before erasing the stick. Lost Partition Recovery addresses a disappeared partition when that is the actual problem. Drecov does not repair a broken USB connector, make unstable hardware reliable, or force a TV to accept an unsupported file system. The USB recovery page explains the applicable source-device path.
Prepare a separate healthy destination with enough free space. Do not install recovery software on the USB stick you are trying to recover. If the stick repeatedly vanishes, clicks, overheats, or returns severe read errors, stop direct software scanning; seek imaging or professional help instead. The steps below assume the device remains stable and appears with a plausible capacity.
⚠ Warning: Install it on a drive different from the one where your data was lost to prevent overwriting.
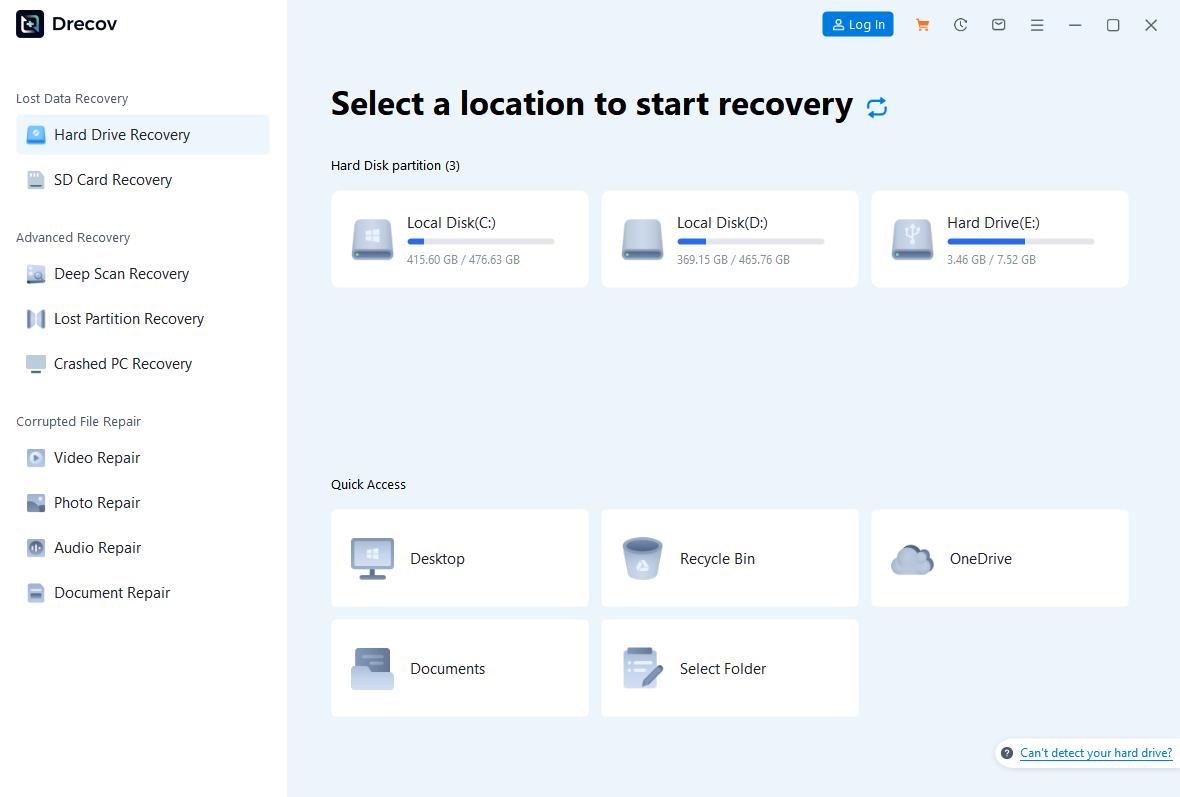
Step 1: Open Drecov and choose the original USB stick
Launch Drecov from the PC or another healthy drive. Identify the USB by its capacity and location rather than a drive letter alone, since letters can change after reconnecting. Select the stick or its original volume as the source. If an expected partition has disappeared, examine the appropriate Lost Partition Recovery mode rather than pretending a simple file scan repairs the partition table.
Step 2: Run Quick Scan and inspect the first results
Start Quick Scan. Look for the lost folders, familiar filenames, and representative file types. Results may include older or duplicate items, so a visible name is not proof that the content is intact. Keep the source connected and avoid saving anything to it while you review the scan.
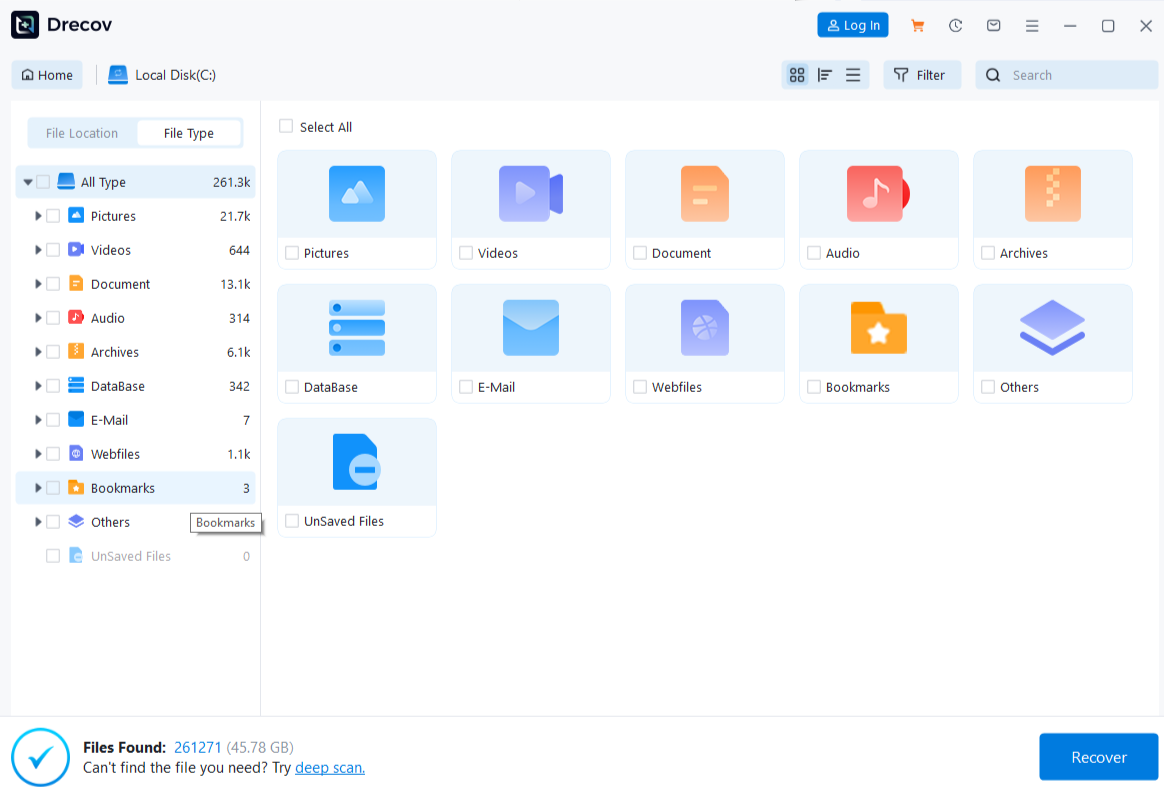
Step 3: Use Deep Scan only if the stick remains stable
If Quick Scan does not locate the needed files and the USB continues to connect reliably, run Deep Scan. A deeper search may find more candidates, but it cannot recreate data already overwritten. If the device begins dropping during the scan, stop rather than repeating the attempt. The hardware condition now matters more than completing a software checklist.
Step 4: Filter, preview, and recover to a different drive
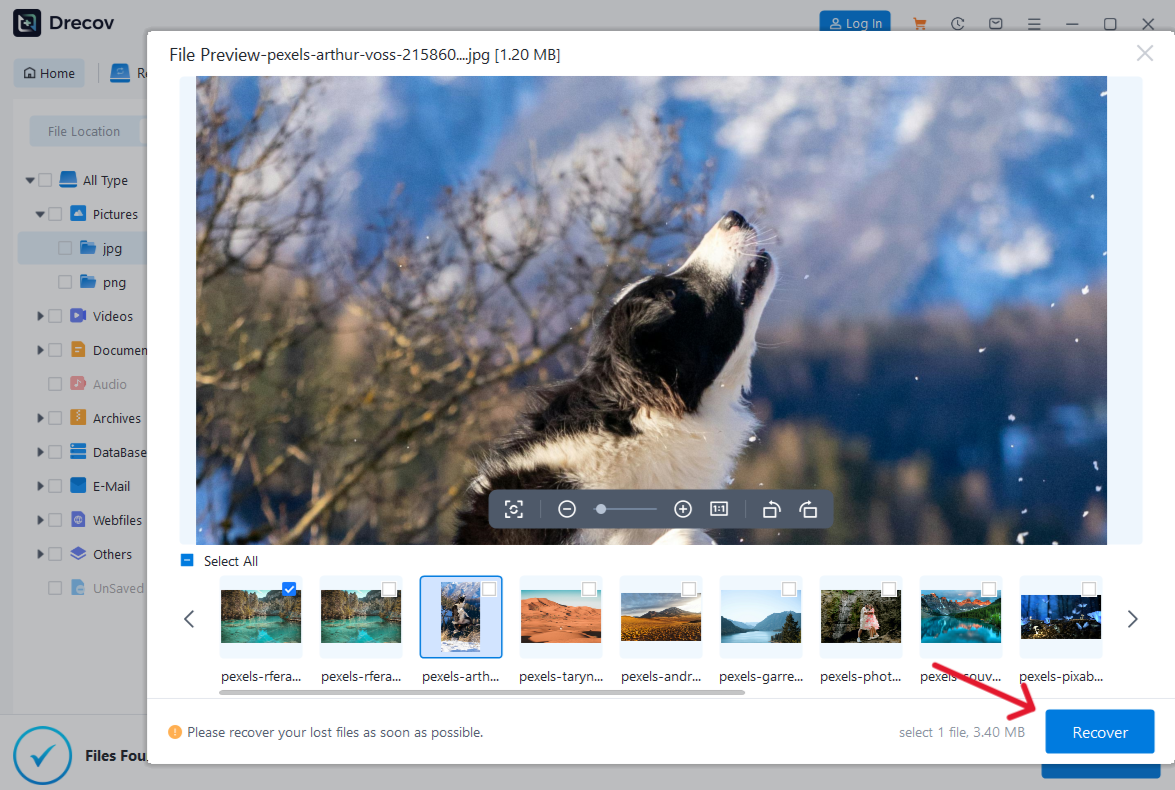
Filter or browse by the former path, filename, and file type. Preview representative supported files where possible; a preview helps assess a sample but does not certify every page, photo, or video frame. Select the files you need and restore them to the separate healthy destination, never back to the USB source. If output seems missing, check the Drecov Folder or Recovery Folder at the chosen destination. Open several restored files, including the most important one, before deciding the stick may be formatted. For broader file-location questions, the file recovery overview provides context.
⚠ Warning: Install it on a drive different from the one where your data was lost to prevent overwriting.
Format the verified USB stick in Windows
Proceed only after the files are backed up or recovered and checked. Disconnect other removable drives to reduce the chance of selecting the wrong one. Keep the receiving device’s manual or support page nearby so you can choose a file system it accepts. The steps below describe a normal removable volume that Windows can access; they are not instructions to initialize an unknown disk or erase a drive with failing hardware.
Use File Explorer for a normal, recognized volume
- Press Windows+E and open This PC. Match the removable drive’s capacity, label, and letter to the stick you just inspected.
- Right-click that USB volume and choose Format. Pause if the displayed capacity does not match. Do not choose the system drive or an unrelated external disk.
- Select the file system required by the receiving device. Leave allocation unit size at Default unless that device’s documentation specifies another value. Add a short label if it helps identify the stick.
- Choose Quick Format only for a previously used, healthy volume whose data is already safe. Microsoft explains that quick format replaces file-table information rather than scanning every sector. It is not a health test.
- Click Start only after reading the warning and confirming the correct drive. Wait for completion, then use Safely Remove Hardware before unplugging it.
Microsoft’s format command reference documents the file-system choices and explains what quick format does. It does not mean you need to use a command line. File Explorer is usually clearer for a novice because you can see the drive and its capacity before confirming the destructive action.
If a camera, recorder, or other dedicated device explicitly instructs you to format removable media inside its own menu, follow that maker’s documented process after safeguarding the files. Formatting in Windows first may not create the folders or settings that device expects. Never experiment with both formatting methods on a stick that still contains the only copy of important data.
Prove the new format works where it matters
A “format complete” message proves only that Windows finished its operation. Open the USB drive’s Properties and confirm the displayed file system. Copy a small, nonimportant test file from the PC, eject the stick safely, and insert it into the receiving device. Verify that the device recognizes the stick and can open the test file. If it must also write files, create a test item there and verify that Windows can read it afterward.
This two-way test catches a common false success: the PC accepts the stick but the television, printer, or recorder does not. If the destination rejects the file system, return to its manual. Check whether it also imposes a capacity, partition-style, folder-layout, or media-format requirement. Do not assume another format will help. For example, a TV may read the USB volume yet reject the codec inside a movie; those are different problems.
After that test, copy only the intended files back to the USB. If you restored lost material, keep a separate verified copy rather than making the newly formatted stick your sole storage location. Eject cleanly after copying. A flash drive used for transfer is convenient, but repeated movement between devices is a poor substitute for a backup you can check later.
If Windows cannot finish the format
A failed format can reflect a locked switch, a write-protected controller, an open file handle, a connection problem, or an unhealthy drive. Read the exact error text. If the stick disconnects, changes capacity, grows unusually hot, or repeatedly reports I/O errors, stop trying to format it. Software cannot make damaged flash memory trustworthy. Protect any remaining files and consider replacement or professional assessment.
For a stable stick, first close programs that might hold files open, remove the drive safely, reconnect it to a direct PC port, and check whether the same error returns. Avoid a questionable hub while diagnosing. If the stick has a physical lock switch, inspect it without forcing the mechanism. Do not jump to DiskPart clean, partition deletion, or CHKDSK: each can change source data or metadata, and none is a substitute for recovering needed files.
When Windows reports a file system it cannot read, the safest answer may be to stop and recover from the recognized device before any repair. If another computer can read the files, copy and verify them there. For an empty, disposable stick, replacement may cost less effort than repeated repair attempts. Recurring formatting errors also suggest that the drive should not hold valuable files.
FAQs
Does formatting a flash drive delete everything?
Formatting replaces the volume’s file-system structures and makes its previous files unavailable through normal browsing. Some data may remain recoverable until overwritten, but you should never rely on that. Verify a separate backup or recovered copy before you begin.
Which is better for a USB stick, FAT32 or exFAT?
The receiving device decides. FAT32 may suit older equipment but cannot store one file larger than 4 GiB. exFAT handles larger files when that device explicitly supports it. Check its manual rather than choosing by age or speed claims alone.
Why does my TV still reject a formatted USB stick?
It may require another file system, capacity, partition layout, or folder arrangement. The TV might also recognize the USB but reject the video or audio format. Use a small supported file for the test, and consult the exact TV model’s documentation before formatting again.
Should I use full format to fix an unreliable stick?
Not while valuable files remain. A full format is not data recovery, and repeated read or write failures can signal hardware trouble. Secure data first; if the drive stays unreliable, replace it instead of trusting it with another important copy.
Can Drecov restore files after I formatted the wrong USB?
It can search a stable, recognized source for lost files, but it cannot guarantee recovery, especially after new data has overwritten older content. Stop using the stick immediately, scan it from another healthy installation, and restore any recoverable files to a different drive.
Conclusion
How to format a flash drive depends on the device that will use it, not simply on the choices Windows displays. Verify that device’s requirements, secure the USB’s contents, select the correct volume, and test a small file in the destination device after formatting. When important files have vanished, Drecov can search a stable USB before you erase or repair it; preview what it finds and save verified copies elsewhere. A disconnecting or physically unreliable stick needs imaging, professional help, or replacement—not another round of formatting.
⚠ Warning: Install it on a drive different from the one where your data was lost to prevent overwriting.






