







A recovery app for Android can help with backups, Trash folders, accessible files, and some removable storage cases, but it cannot solve every deleted-data problem. Check Google, Samsung, app backups, and visible folders first. Use a desktop scan for SD cards. Avoid free-download recovery software that promises full internal-storage recovery after reset without explaining Android encryption.
This guide is a practical selection and recovery workflow for users comparing recovery application for Android tools, recovery software for Android phones free download claims, restore Android data options, and deleted picture recovery.
Quick Decision Table For recovery app for android
| Situation | Best First Action | Risk To Avoid |
|---|---|---|
| Need deleted pictures | Check Trash, cloud, and folders first | Do not install many apps |
| Need restore Android data | Check account backups and app backups | Do not reset before backup verification |
| Files on SD card | Use computer scan | Do not save recovered files to the same card |
| Phone was reset | Use cloud and device backups | Do not expect easy internal recovery |
| Free software claim | Look for preview and limits | Do not trust one-click promises |
What A Recovery App For Android Should Actually Do
A good recovery app should help identify the storage source, guide the user through backup checks, preview recoverable files, and save results safely. It should not hide behind vague wording like automatic recovery for every phone problem.
Permissions limit Android data recovery, encryption, overwriting, and whether files lived on internal storage or removable media. A trustworthy workflow explains those limits before asking for payment or broad permissions.
Commercial intent matters in this topic. Users searching for a free download may still need real steps. The article should not simply say use recovery software; it should identify which tool fits which storage source.
Method 1: Restore Android Data From Built-In Sources
Best For: photos, contacts, documents, messages, app media, and settings backed up before deletion.
Tool Used: Google Photos, Google Drive, Samsung Cloud, OneDrive, WhatsApp backups, Files by Google, and app-specific restore features.
Steps
- List the file types you need to restore.
- Open the Google or Samsung account tied to the phone.
- Check Trash, Archive, backup dates, and app-specific restore screens.
- Download important files to a computer.
- Verify recovered files before cleaning phone storage.
- Repeat the check from a browser when the phone app does not show Trash.
Risk Level: Low, because built-in restore avoids writing more data to the lost-file area.
Method 2: Evaluate Recovery Software For Android Phones Free Download Claims
Free download wording can be useful for trying a scan, but it does not prove recovery quality. A good tool explains supported devices, storage types, preview limits, and save locations. It also tells users when encryption or reset makes recovery unlikely.
Avoid any recovery application for Android that asks for unrelated permissions, pushes root as the first step, or claims it can restore all data after reset without backups. Safer tools start by protecting existing files and narrowing the target.
Steps
- Read what storage source the app or program scans.
- Check whether preview is available before recovery.
- Confirm where the tool will save recovered files.
- Avoid granting unrelated permissions for a narrow file case.
- Run safer backup and folder checks before installing the app.
- Stop if the tool asks for reset before recovery.
Method 4: Scan Removable Android Storage With PandaOffice Drecov
Use this method only when you stored the missing data on a readable Android SD card, Samsung microSD card, camera card used in a phone, or another removable storage device. This guide includes PandaOffice Drecov here as one practical desktop scan method for removable media. It is not a promise to bypass encrypted internal phone memory after reset or forgotten passcode.
Best For: deleted pictures, videos, documents, and app media from removable Android storage.
Tool Used: PandaOffice Drecov.
Test Environment:
Operating System: Windows 11
Device Type: Android microSD card through card reader
File System: FAT32 / exFAT
Problem Scenario: Android recovery app comparison case with deleted files on removable SD card
Tool Used: PandaOffice Drecov
Steps
- Stop using the Android phone or Samsung phone as soon as you notice the missing files.
- Power off the device and remove the SD card if you saved the lost files on removable storage.
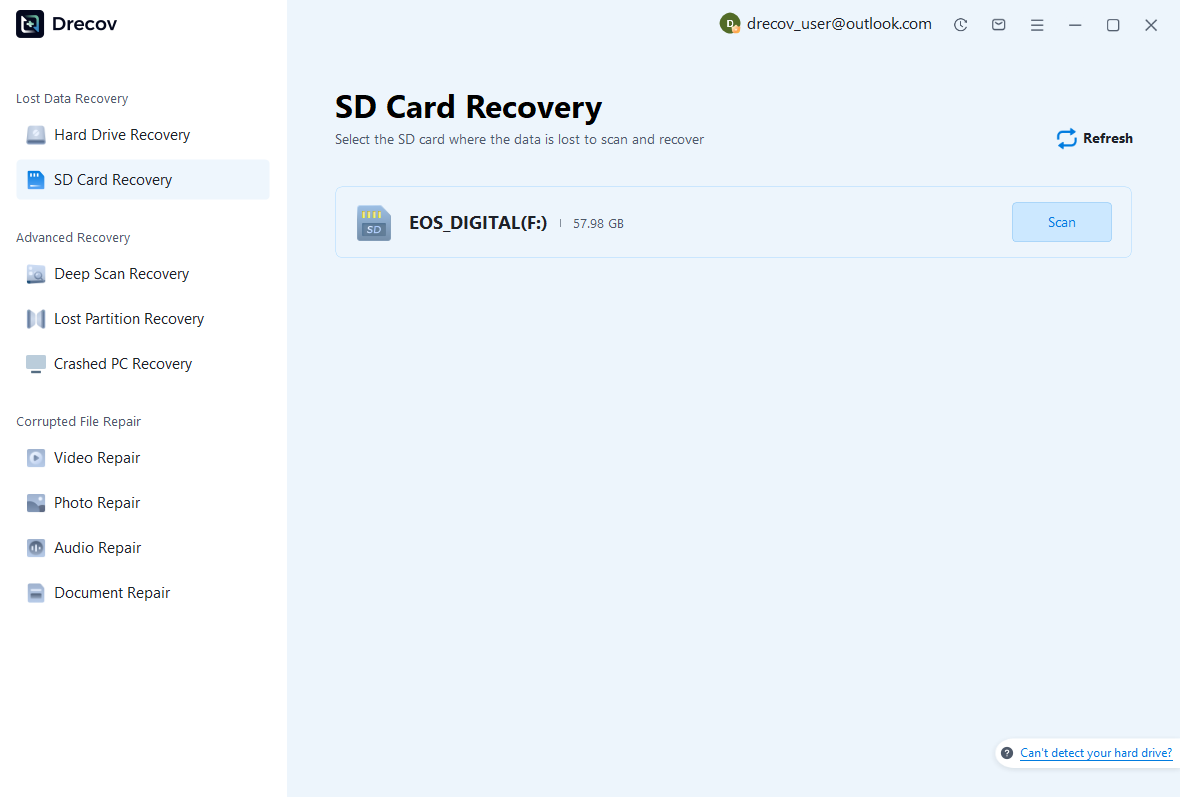
- Connect the card to the computer with a reliable card reader.
- Open PandaOffice Drecov and select the removable storage device, not the system drive.
- Start the scan and wait for both quick scan and deep scan results to finish.
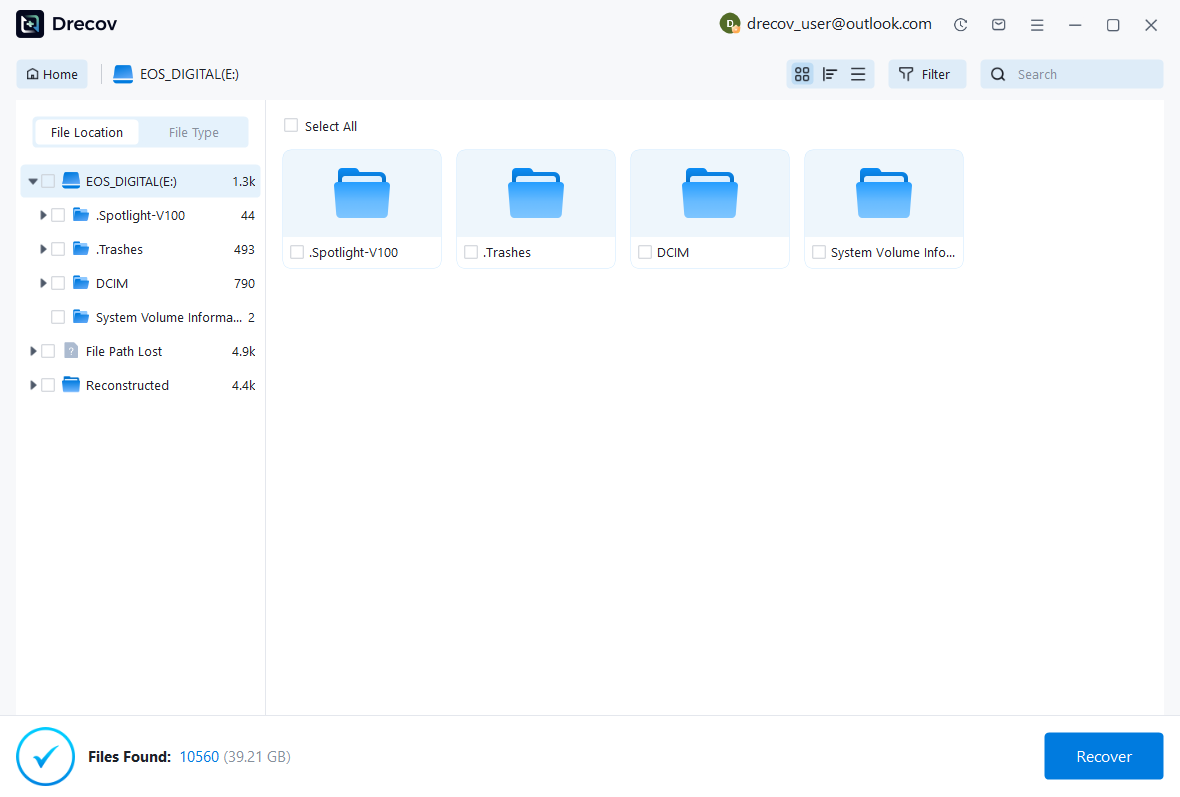
- Filter results by the file type you need, such as pictures, videos, documents, audio files, or browser exports.
- Preview recoverable files whenever preview is available.
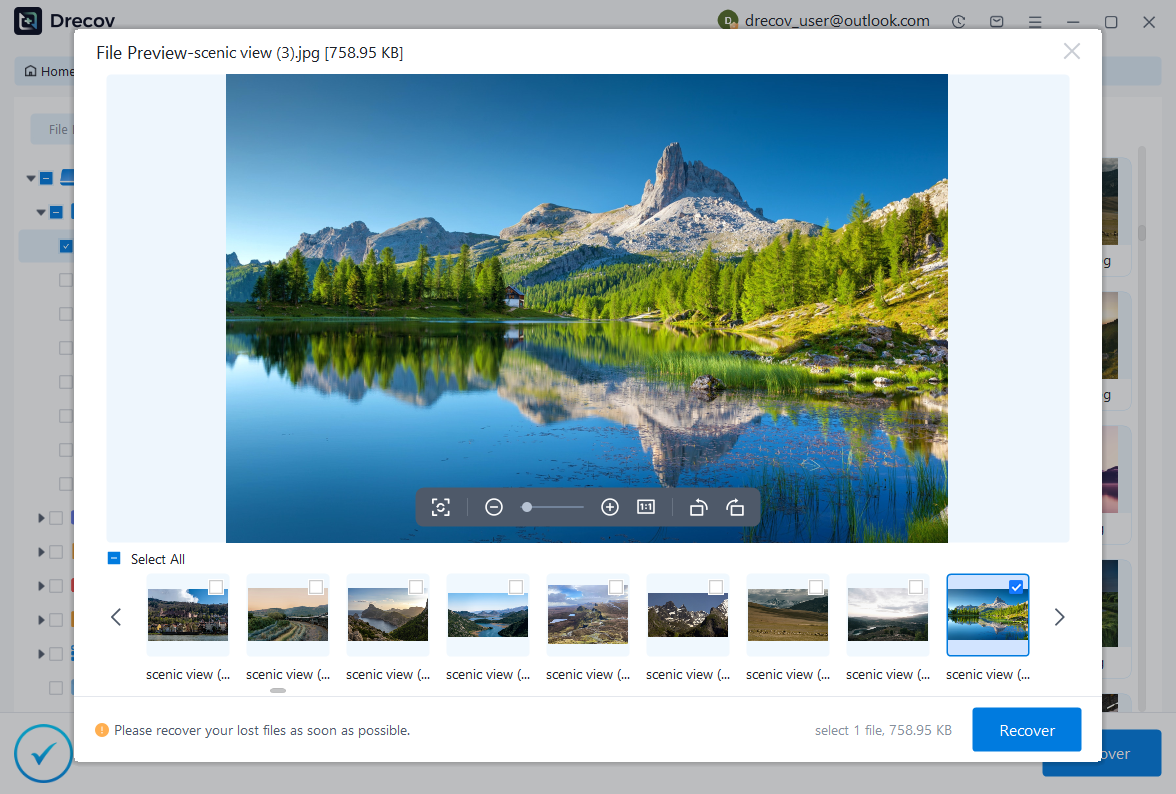
- Recover selected files to a computer folder or external drive. Do not save them back to the original SD card.
- Open recovered files before formatting, repairing, or reusing the original storage device.
What To Do If It Fails: Recheck cloud backups, app-specific Trash folders, Samsung or Google account data, and any computer copies. For internal storage on a locked, reset, or non-booting phone, software recovery may not be practical without restoring device access first.
Risk Level: Low when you remove the card promptly and you save recovered files to another healthy drive.
Detailed Recovery Scenarios For Android recovery app selection
Restore Android Data
Restore Android data from account backups before scanning. Contacts, photos, app settings, and documents often sync automatically.
Check backup dates carefully. A backup after deletion may not contain the missing file.
Download recovered files to a computer so the phone is not the only copy.
Restore Deleted Pictures Android
Deleted pictures should go through Gallery Trash, Google Photos, Samsung Gallery, OneDrive, and app folders. These sources can restore complete originals.
A recovery app should come after those checks, especially when the phone has little free space.
For SD card pictures, use a card reader and desktop scan.
Recovery Data Android
Recovery data Android searches often mix photos, videos, contacts, and app data. Separate the file types before choosing software.
Documents and downloads may be easier to find through folders or cloud accounts than through a broad scan.
Messages and voicemails depend on app and carrier rules, not only file recovery.
Recovery Application For Android
The best recovery application for Android is the one that fits the actual storage source. A cloud issue needs account restore. An SD card issue needs removable-media scanning.
Internal storage after reset needs realistic expectations because encryption blocks many normal recovery paths.
The tool should help the user make that distinction.
These scenarios also help you avoid keyword-stuffed recovery advice. A real recovery app for android article should tell the reader which storage source matters, which tool fits that source, and which steps can make recovery worse. That practical separation is more useful than repeating one generic software recommendation across every case.
Safety Rules Before You Try More Recovery Steps
Protect The Source Device First
The safest recovery habit is to preserve what still exists before you search for what disappeared. For Android recovery app selection, that means stopping new photos, videos, downloads, app updates, and cache cleaning. Android can write background data even when you are not actively using the phone, so a short pause can protect the remaining recovery chance.
Do not factory reset the phone as a recovery step. A reset may restore account backups later, but it usually removes local app data, temporary files, and internal storage references. Modern Android phones also use encryption, so internal files without backups may become unreachable after reset.
Avoid Storage Changes That Reduce Recovery Chances
Do not format an SD card when Windows or Android asks. A format can destroy file system records that help recovery software rebuild folder names and original paths. Copy readable folders first, then scan the card if important files disappear.
Avoid installing several recovery apps on the same phone. Every new install writes data, creates cache, and changes storage state. For removable storage, a computer-based scan is usually safer. For cloud-synced data, browser-based account checks are usually cleaner than app installs.
Save And Verify Recovered Files Safely
Keep recovered files away from the source device. Save them to a computer, external drive, or cloud folder. After saving, open the files and confirm that photos show full resolution, videos play fully, documents open correctly, and audio files contain the expected content.
Use a written checklist when the data matters. Note which files disappeared, where you stored it, what you checked, and where you placed recovered copies. This record prevents repeated risky steps and helps you explain the case if you need repair support later.
Choose The Next Step By Storage Source
For a recovery app for android case, the goal is not to try every possible tool. The goal is to protect the original storage, choose the right recovery source, preview the result, and save the recovered files somewhere safe.
Complete Operating Guide Before And After Recovery
Stage 1: Preserve The Current Storage State
Before you try another recovery app for android method, preserve the current storage state. Put the phone in airplane mode when possible, stop camera use, stop downloads, and pause automatic app updates. A recovery case often fails because the user keeps using the phone while searching for answers. New photos, message attachments, browser cache, and app updates can all write data to storage.
For removable storage, preservation is more direct. Remove the SD card, label it, and keep it away from the phone until recovery finishes. Do not test the card in several devices. Every mount can create logs or repair prompts. A single computer and a single recovery workflow give you a cleaner path.
For internal storage, preservation means reducing phone activity. You may still need to unlock the phone or copy visible files, but avoid experiments that create new data. Skip side-by-side app installs just to compare scan screens. Leave storage cleanup for later. Reject repair steps that include reset until backup checks are complete.
Stage 2: Build A Recovery Map
A recovery map lists the missing file type, original app, likely folder, backup account, and storage source. For Android recovery app selection, this map prevents the article from turning into generic advice. Missing camera photos point to DCIM, Gallery Trash, Google Photos, and SD card storage. Downloaded files usually point to Download, browser folders, email, and Drive. Deleted videos often point to Gallery Trash, app drafts, cloud albums, and removable media.
Write down the date of deletion, the last time you last saw the file, and what happened after the loss. A phone reset, screen break, cache cleanup, app reinstall, or SD card format changes the recovery path. This information matters more than the brand of recovery tool because it tells you whether a file may still exist in Trash, backup, visible folders, or raw storage.
The map also helps with Yoast-style usefulness. Readers stay longer when they see the exact decision they need to make. Instead of telling them to try recovery software, tell them which source to check and why that source fits the problem.
Stage 3: Recover The Easy Copies First
Easy copies are not second-rate. They are often the best recovery result. Cloud Trash, synced albums, chat attachments, app exports, computer downloads, and SD card folder copies may contain a complete file with the original quality. These sources should come before raw scans because they do not change the original phone storage.
Open cloud services from a browser as well as from the phone. Browser views often show Recycle Bin, version history, original folders, and download options more clearly. For Samsung users, OneDrive deserves a separate check because Gallery sync may store pictures and videos there. For Google users, check Photos, Drive, Contacts, and Chrome sync one by one.
When you find a file, download it to a computer and open it. Do not only restore it to the phone and assume the job is done. A second copy protects you from sync mistakes, app cleanup, and accidental deletion during later troubleshooting.
Stage 4: Copy Visible Folders Before Deep Recovery
Visible folders are the safest bridge between simple backup restore and deeper recovery. If the phone unlocks, connect it to a computer and copy folders before running repair or recovery steps. Copy DCIM, Pictures, Download, Documents, Movies, Music, Screenshots, and app media folders. Use copy rather than move, because moving files changes the phone.
After copying, search on the computer by extension, date, and size. Image checks should include JPG, PNG, HEIC, WEBP, and GIF. Video checks should include MP4, MOV, MKV, 3GP, and WEBM. Document searches should include PDF, DOCX, XLSX, PPTX, ZIP, and TXT. Audio searches should include M4A, MP3, OPUS, AMR, and WAV. This targeted search often finds files that Android apps no longer index.
Visible-folder copying also gives you a safety backup. If later recovery tools fail, you still have everything the phone could expose. That safety copy matters when the phone has physical damage, low storage, unstable SD card behavior, or pending repair.
Stage 5: Use Tool-Based Recovery Only For The Right Source
Tool-based recovery should match the source. Scan removable SD card data from a computer. Restore cloud data from the cloud service. Recover chat media from the chat app or its folders. Treat internal storage after reset with caution because encryption may block normal recovery.
A useful recovery tool shows file types, paths, previews, and output choices. It should let you save recovered files to a different healthy drive. It should not tell you to format, reset, or clean the original storage before recovery. When the target is removable media, preview and safe output are especially important.
For a recovery app for android case, the right tool is not simply the one with the broadest claim. The right tool is the one that can access the actual storage source without making the original problem worse.
Stage 6: Verify Every Recovered File
Verification is part of recovery, not an optional final glance. Open recovered pictures at full size. Play videos from beginning to end. Check audio sync. Open documents in the correct application. Confirm contacts, messages, or browser history entries from the account that restored them. A file name in a scan result is not enough.
For videos and audio, keep the first recovered copy unchanged. When repair or conversion becomes necessary, work on a duplicate. Picture checks should compare resolution and file size to nearby originals. Document checks should confirm the latest edits and not only the cover page. Browser history checks should confirm whether account sync shows the pages you actually need.
After verification, create a second backup. Use a computer, external drive, or cloud folder. The recovered files should not live only on the same phone that just had a data loss event.
Stage 7: Decide When To Stop
Stop experimenting when the recovery target is valuable and the next step would change the original storage. Repeated scans, app installs, cache cleanup, rooting attempts, and reset attempts can reduce recovery chances. If the data has legal, business, or emotional value, a controlled stop is better than another risky click.
Stopping does not mean giving up. It means preserving the source and choosing a better next step. That next step may be a repair that keeps data, a clean SD card scan, a cloud account review, or a specialist assessment. The important point is to avoid turning a recoverable case into an overwritten case.
This staged workflow is long because real recovery is not one button. It is a sequence: preserve, map, check easy copies, copy visible folders, scan the right source, verify files, and back up the result. That sequence gives readers a practical answer and keeps the article useful beyond a generic software recommendation.
How To Avoid Misleading Recovery App Results
Some apps show old file names, thumbnails, or partial records that look like recoverable data. Preview matters because a name in scan results does not guarantee a working file.
Other apps overuse vague labels such as deep recovery without explaining what they access. Ask whether the tool scans a backup, visible folders, removable media, or internal storage. The answer changes the risk.
Free scans can still be useful, but the user should not keep installing alternatives on the same phone. Each installation changes the storage state.
Related Recovery Guides
When the missing file is a TikTok draft or deleted social video, this TikTok video recovery guide gives app-specific checks that a general Android recovery workflow may miss.
For Adobe Illustrator files on a computer, use this Illustrator file recovery guide instead of a phone workflow. Desktop project files follow different recovery rules than Android media files.
When you need to save recovered files to a Mac external drive and that drive does not appear, this LaCie hard drive not showing up on Mac guide can help you prepare a safe destination.
If the recovery plan overlaps with a Windows rollback or restore point, read how to restore a computer to an earlier date on Windows before changing the computer that may hold backups.
FAQ
What Is The Best Recovery App For Android?
The best option depends on the storage source. Use cloud restore for synced data, folder copy for visible files, and desktop scanning for SD cards.
Can Recovery Software For Android Phones Free Download Recover Everything?
No. Free download tools still face encryption, overwrite, reset, and permission limits.
Can I Restore Deleted Pictures Android Without Software?
Yes, when they remain in Gallery Trash, Google Photos, OneDrive, Samsung Gallery, chat folders, or backups.
Conclusion
A recovery app for Android is useful only when it matches the storage source and explains its limits. Start with backups and visible folders, use desktop scanning for SD cards, and avoid tools that promise impossible internal-storage recovery.





