







Trying to learn how to remove a write protected USB? First find out what is actually read-only. A single document may be protected while the USB drive can still accept other files. The whole device may have a lock switch, a Windows disk attribute, or a controller that has stopped accepting writes. If you can read important files, copy and verify them on another healthy drive now. Do not format the USB or run an erasing command to “unlock” it; those actions can destroy the data you are trying to save.
Find out whether the file or the entire USB is locked
Make one low-risk test with a disposable text file. On your PC, create a small file and try to copy it to the USB. If that succeeds but one document still refuses to save, the issue may involve that file’s read-only property, permissions, or the application holding it open. When every new file fails to copy, the device or a system-wide setting is more likely involved. Do not run the test when the USB disconnects, reports severe read errors, or contains the only copy of essential data; protect the data first.
Use the exact message, not a guess
“The disk is write-protected” points in a different direction from “You need permission to perform this action.” An application may also report that a document is read-only because it was opened from email or is locked by another process. Record the error wording, the drive letter, and whether the same failure occurs on a second known-good computer. These observations prevent an unnecessary disk-level change for a problem limited to one file.
Check File Explorer’s This PC view for the USB capacity and label. If the capacity is suddenly wrong or the drive disappears during the test, stop. Some flash devices enter a persistent read-only state when the controller cannot safely write, but a message alone cannot prove that cause. Repeated format attempts will not turn unreliable hardware into trustworthy storage. A stable drive that still reads gives you a chance to make a verified copy before investigating further.
Save what you can still read
Write protection can be inconvenient, but it can also prevent you from accidentally overwriting files while you investigate. Use that opportunity. Copy the most important folders to a separate healthy device, then open a sample of the copies. For a photo collection, inspect full-size images rather than just thumbnails. With a document, confirm its pages and the most recent edits. A copied filename with a zero-byte or damaged file is not a successful backup.
If one file cannot be read, note its path and continue with other files only if the USB remains stable. Avoid repeatedly opening the same bad item until the device drops off the bus. When many files become inaccessible or the drive starts disconnecting, stop direct attempts. A specialist image may preserve more than repeated scans of the physical USB. Do not mistake an “unlock” procedure for data recovery: clearing a setting may allow future writes while doing nothing for files that already disappeared.
If your missing files were on a USB that was later formatted, follow the different formatted USB recovery path. That event changes the file system and should not be treated as an ordinary read-only toggle. For a stick that still contains visible files, verify a backup before you modify attributes, permissions, or partitions.
When Drecov can help with missing USB files
Drecov is Windows data-recovery software, not a write-protection switch. Its role here is to locate missing files on a stable, correctly recognized USB before you try a modifying fix. Read-only recovery mode, Quick Scan, Deep Scan, filtering, and preview help identify candidate documents, photos, videos, or archives. Lost Partition Recovery is available when a partition genuinely disappeared, but it does not remove a controller lock or repair flash hardware. The USB recovery overview covers that source category; a single missing file can also be approached through the file recovery route.
Prepare a different healthy destination and keep recovery software off the source USB. A drive that no longer appears with a plausible capacity or that disconnects repeatedly is not a good candidate for direct software scanning. In that case, stop and consider professional imaging or recovery. A stable, recognized device can be searched before you change its read-only state.
⚠ Warning: Install it on a drive different from the one where your data was lost to prevent overwriting.
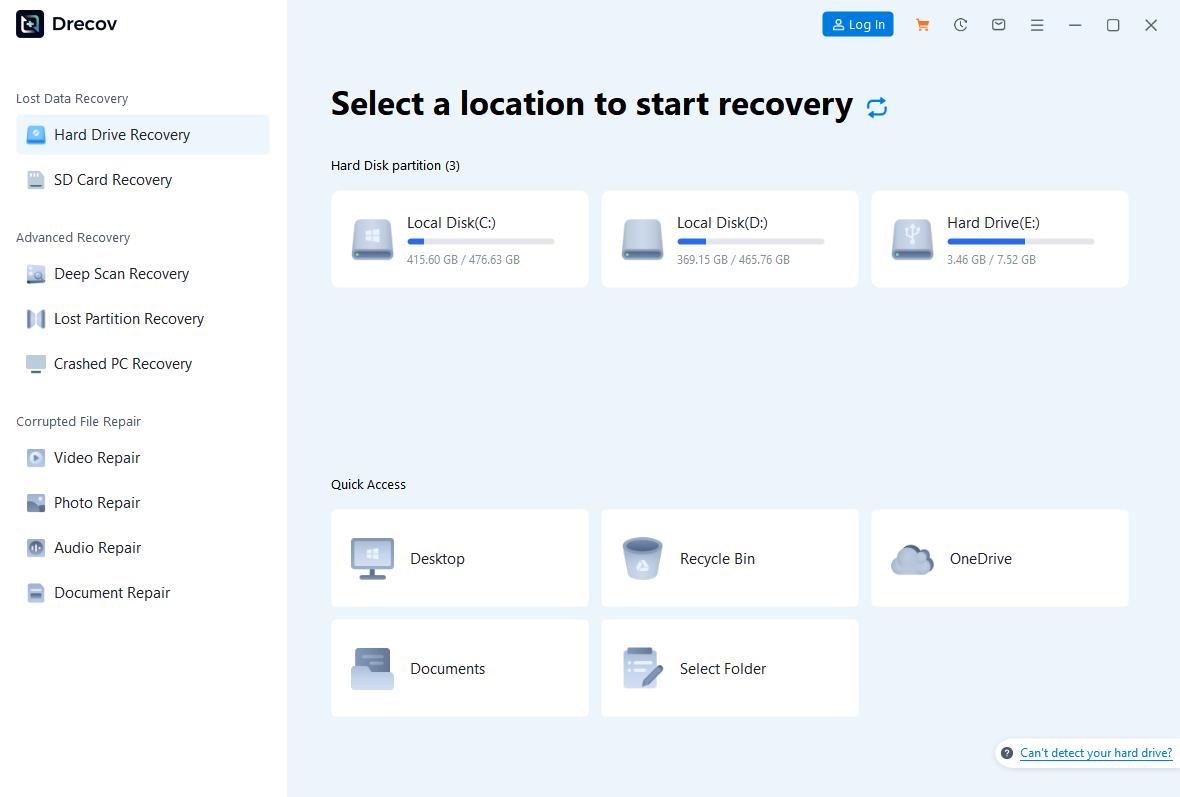
Step 1: Open Drecov and choose the original USB
Launch Drecov from the PC or another healthy disk. Select the flash drive where the missing files last lived, checking its capacity and location rather than trusting a remembered drive letter. A drive letter can change after reconnecting. If the entire partition is absent, consider the appropriate Lost Partition Recovery mode instead of treating a file scan as a partition-table repair.
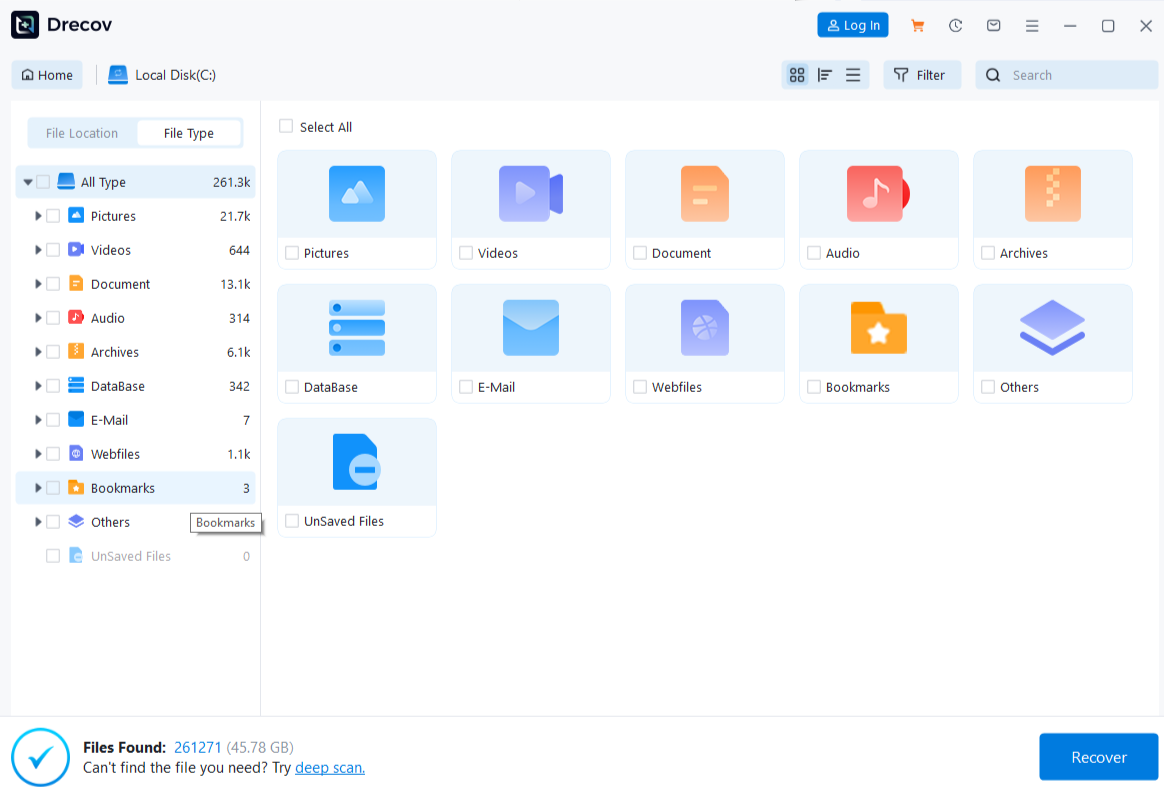
Step 2: Run Quick Scan and review its candidates
Start Quick Scan. Look through the results for the former folder, filename, or file type. Some entries can represent older copies. A name match is helpful, but it does not prove that every byte survived or that you have the latest version.
Step 3: Use Deep Scan only while the USB is stable
If Quick Scan misses the needed files and the device remains consistently connected, run Deep Scan. Stop if severe read errors or disconnects begin. Deep Scan can broaden the search, but it cannot reconstruct fully overwritten data or make a failing controller reliable.
Step 4: Preview and restore to another drive
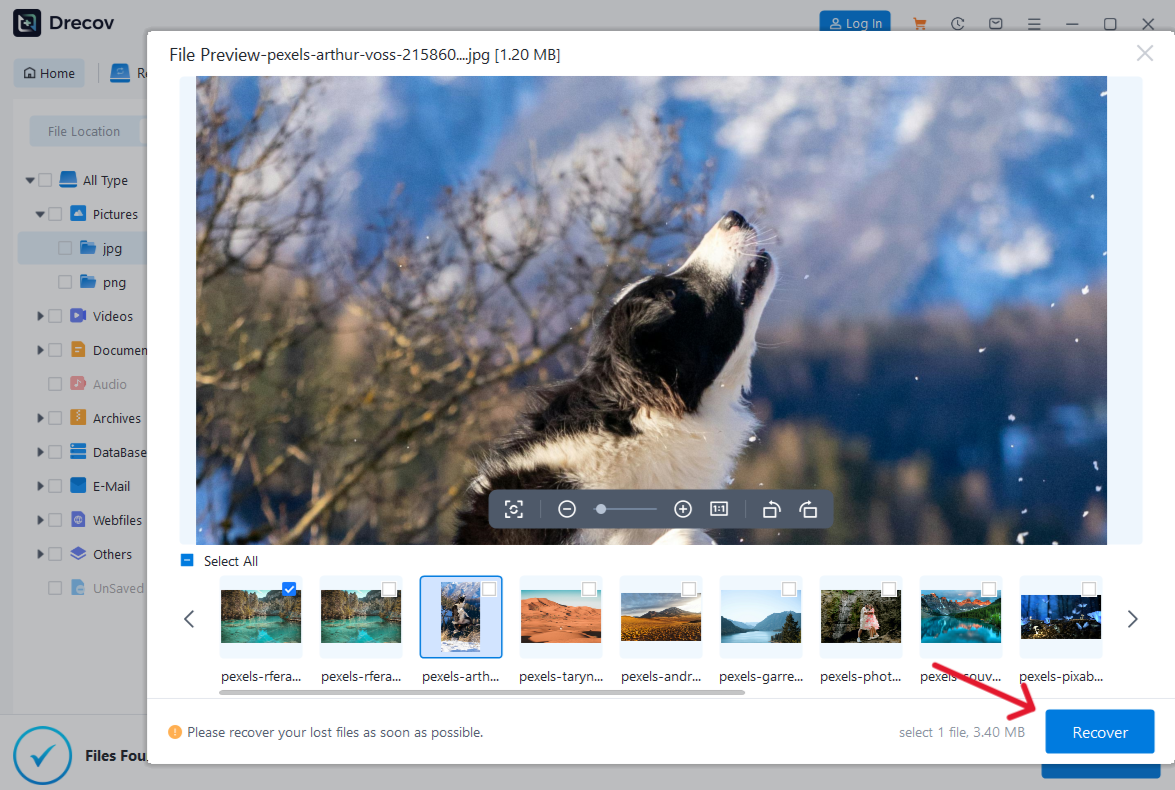
Filter by path, name, and type where available, then preview representative supported files. Treat preview as a sample, not proof that every page or video frame is intact. Recover selected items to the prepared healthy destination; never choose the source USB. If you cannot find the output, check the Drecov Folder or Recovery Folder there. Open several restored files and verify the most important content before proceeding to disk-level changes.
⚠ Warning: Install it on a drive different from the one where your data was lost to prevent overwriting.
Check the simple physical and file-level causes
Some USB sticks and card adapters have a small sliding lock. Inspect the casing under good light and move a genuine switch only as its markings indicate. Do not force a decorative seam or a broken slider. Reconnect the device once and retry the disposable-file test. If the switch feels damaged, preserve the data and replace the device rather than trying to repair its mechanism with the stick connected.
When only one file is affected, right-click it in File Explorer, choose Properties, and inspect the Read-only checkbox under General. Clear it only if you own the file and intend to edit it. Reopen the file and try saving a new copy on your PC first. A read-only document is not evidence that the USB disk itself is write-protected. If an application still refuses to save, check whether that application opened the file in Protected View or another session has it locked.
Try one direct USB port on the PC rather than a loose hub, then compare behavior on another computer you control. If the stick writes normally elsewhere, investigate the original PC’s device policy or permissions. On a managed work computer, ask the administrator instead of bypassing an organizational restriction. If no computer can write and the device remains read-only after a physical-lock check, a controller fault becomes more plausible.
Inspect a Windows disk attribute only after backup
DiskPart can show whether Windows has marked a disk read-only. The command targets the disk currently selected in DiskPart, so choosing the wrong number can affect the wrong device. Microsoft’s attributes disk documentation explains the read-only attribute and states that a disk must be selected before the command works. This is an advanced check, not a first response to a failing USB.
A careful DiskPart inspection path
After verifying the files elsewhere, open Windows Terminal as administrator and start DiskPart. Use list disk to view capacities. Identify the USB by matching its size with File Explorer and, ideally, disconnecting other removable drives. Select that exact disk number, then use detail disk to check the identity before attributes disk displays its flags. If any identity detail is uncertain, exit without clearing anything. Never paste a command that selects a fixed disk number from somebody else’s guide.
If the selected USB is confirmed and the attribute is set, attributes disk clear readonly requests that Windows clear it. This does not override a physical lock, an administrative policy, or a flash controller that has failed into read-only mode. Reconnect, repeat the harmless test-file copy, and open the copied file. If the command reports success but writes still fail, do not escalate to clean, repartitioning, or formatting while files remain at risk. Those commands can erase the current file-system view without solving a hardware lock.
Decide whether this USB deserves to be reused
After a genuine lock is removed and the files are safe, write a disposable file, eject the USB correctly, reconnect it, and read that file on the same PC. Repeat once on the intended device if compatibility matters. A successful copy message without a subsequent read test is weak evidence. Retire a drive that returns to read-only, changes capacity, or drops its connection. Keep the verified backup even if the test passes.
Formatting may be appropriate for a stable, empty drive that no longer needs its old contents, but it is not the unlock procedure and is never the first step when data matters. A full format does not prove long-term reliability. If the stick was used for a camera, TV, or another appliance, confirm that device’s file-system requirements before making any new volume. Repeated failures are a reason to replace a low-cost USB stick, not to keep valuable work on it.
Keep the failure notes and a copy of the exact error. They help distinguish a one-time Windows policy issue from a recurring storage fault. In the future, use a USB stick as a transport copy, not the only place a file exists. That simple habit makes a write-protection warning a manageable inconvenience rather than an emergency.
FAQs
Will formatting remove USB write protection?
Not reliably. A physical switch, system policy, or controller-level read-only state may still block writes. Formatting also changes or erases the file-system view, so protect data before even considering it.
Why can I open files but not save new ones?
Read and write access are separate. Check whether only one file is read-only, whether the whole USB rejects a disposable test file, and whether the problem follows the device to another computer.
Is DiskPart safe for a beginner?
It is powerful and easy to aim at the wrong disk. Back up first, verify capacity and identity, and stop if you cannot confidently match the selected disk to the USB. Never copy a fixed disk number from a web page.
Can Drecov unlock a write-protected USB?
No. Its relevant job is recovering missing files from a stable, recognized source to another healthy drive. A physical lock, policy, or failed controller needs a different response.
What if the USB is read-only on every computer?
Copy readable files immediately. If the device has no switch and keeps rejecting writes, retire it after data protection. Repeated forced formatting attempts do not make unreliable flash memory safe.
Conclusion
Removing USB write protection begins with identifying whether the restriction affects one file, Windows, or the whole device. Save readable files, test a genuine lock switch and a disposable file, and inspect disk attributes only after confirming the exact source and backing it up. If files are missing on a stable USB, Drecov can scan the original stick and restore verified candidates to another healthy drive. A stick that repeatedly disconnects or remains read-only across computers should be replaced, not trusted after a risky erase.
⚠ Warning: Install it on a drive different from the one where your data was lost to prevent overwriting.





