
Recover darktable edits without confusing them with the RAW file
To recover darktable edits, preserve the original image, its existing XMP sidecars, and the relevant library data before re-importing anything. darktable keeps editing instructions separately from the original pixels. Therefore, a perfectly readable RAW file can still lack the crop, masks, exposure choices, and color work that made up your finished edit.
The strongest candidate depends on what disappeared. An existing sidecar can preserve processing history, a database copy can preserve catalog context, and an appropriately exported image may contain useful embedded history. These sources are not interchangeable. Identify the missing edit and the actual original image before applying history, because loading the wrong candidate can replace useful current work.
Identify the intended image version
Record the camera filename, original directory, and a distinctive visual change such as a local mask or crop. Also note whether you created duplicate editing versions of the same image. Those versions can share the original RAW while using different histories. A filename match alone may therefore identify the photograph without identifying the particular edit you need.
Preserve the original image and all related sidecars together. Then keep any database backup separate from the copy you will inspect. Avoid immediately writing new sidecars over the original directory, especially when an older sidecar may contain the only surviving edit. A stable source set lets you compare candidates without losing useful historical instructions during synchronization.
Free route 1: load a surviving XMP into a safe duplicate
- Copy the original image and plausible darktable XMP candidates into a recovery workspace.
- Identify the appropriate image and create a separate editing version or test context.
- Use the history controls to load the intended sidecar into that working candidate.
- Compare the crop, modules, masks, and output before saving the accepted version.
Loading a sidecar can replace the selected image’s history. Therefore, preserve the current history and test on a duplicate or other suitable copy first. Also confirm that the sidecar actually came from darktable and corresponds to the intended original. A generic XMP from another application may contain metadata without the processing instructions needed to restore this edit.
Compare history content with the intended result
Inspect the relevant modules and their settings, then compare the visible image at an appropriate zoom. A candidate can restore a similar global appearance while lacking a local mask or a later crop. Use the distinctive change you recorded as the acceptance target. This provides stronger evidence than simply observing that a history stack contains many entries.
For masked adjustments, inspect the affected regions and transitions. A recovered module with the right name does not prove that its mask relationships survived as intended. Then export a review image to a new location. Comparing both the editable history and the rendered result helps establish whether the candidate supports continued editing as well as the immediate output.
Free route 2: inspect a consistent existing library backup
- Preserve the current darktable configuration and database files before testing a backup.
- Identify a coherent existing backup from the relevant editing milestone.
- Open the candidate in an appropriately isolated, compatible darktable environment.
- Compare the intended image history and catalog information, then preserve a new accepted copy.
A database copy can preserve information that individual sidecars do not fully reproduce. However, its age and compatibility matter. Keep related database files and the actual source-image paths in view. Do not replace the only current database simply to see whether an older one opens. A separate test environment makes revision comparison clearer and protects useful newer catalog work.
Distinguish processing history from collection organization
An XMP may restore image adjustments while a database preserves other collection relationships or application state. Decide which information matters for your recovery. For example, recovering a finished edit for export can require less catalog reconstruction than restoring an entire organized collection. State that scope before choosing a candidate, so an image-level success does not become an unsupported claim that all library state returned.
Also compare the source locations expected by the backup. A history can be intact while its RAW file has moved. Correcting access to the original is a separate step from restoring the edit. Keep the reference and candidate details together, and avoid substituting a different capture merely because it has the same camera-generated basename.
Free route 3: test embedded history in a suitable export
- Locate an existing image exported by darktable from the intended editing revision.
- Preserve that export and the matching original source image.
- In a safe working version, use the supported history-loading workflow with the export as the candidate.
- Compare the restored processing instructions and a fresh output against the reference.
This route depends on the export format and metadata settings having retained useful darktable history. A metadata-stripped image or screenshot may contain only rendered pixels. Therefore, do not promise editable recovery from every JPEG or TIFF. Inspect the actual candidate, and keep a fallback visual reference if no processing history is available.
Keep the source RAW in the recovery set
Embedded instructions do not replace the original capture. They describe processing that needs the corresponding input. A different exposure from a burst can produce a plausible image while responding differently to masks and tone choices. Compare the source identity, dimensions, and distinctive scene details before interpreting an export-history result as the recovered original edit.
If the history loads only partially or behaves differently in another darktable version, preserve that result separately. Compare modules and output before making migration changes. A useful partial recovery can still save work, but any recreated adjustment should remain identifiable. Do not force the image to resemble the reference through new edits and then describe the whole result as direct historical recovery.
Free route 4: reconnect a surviving original image
- Record the path and image identity expected by the catalog entry.
- Locate the exact RAW or original image in the preserved storage or an existing archive.
- Correct the source location through the appropriate collection workflow in a working environment.
- Open the edit and inspect the image, history, and export result.
This route restores access when the original merely moved. It does not recover an actually deleted RAW or generate original sensor data from a thumbnail. Also preserve the sidecars while moving test files, because the image and its editing instructions solve different parts of the problem. The goal is a matched source and history, not simply a warning-free catalog entry.
Compare same-name captures carefully
Camera filenames can repeat across cards, cameras, or resets. Inspect the capture details and the scene itself before accepting a replacement. A similarly named image can load successfully while applying the recovered crop and masks to the wrong photograph. Keep uncertain matches separate until you establish which original belongs to the intended edit.
After reconnecting, export a review at the size and color settings needed for the actual task. Then inspect fine detail and the important local adjustments. This tests more than a populated thumbnail. It also reveals an incorrect original or a missing history dependency that may remain unobvious in a small lighttable view.
Diagnose a disagreement between database and sidecar
A sidecar and the current database can represent different points in an image’s history. Preserve both before accepting any prompt that chooses one over the other. Then compare their intended content in separate working versions. Modification times help sort candidates, but the edit itself determines which source contains the crop, mask, or color decision you need.
Avoid synchronization that erases the older candidate
Do not broadly rewrite sidecars while investigating an overwritten edit. New writes can replace the evidence you wanted to compare. Instead, copy candidate XMP files elsewhere and inspect them through the supported history controls. Once you choose the accepted edit, record which source supplied it and keep the rejected historical candidate separately for reference.
If the database contains useful later work while the sidecar preserves the correct earlier crop, consider a deliberate reconstruction in a new editing version. Compare the relevant modules and decide which adjustments to retain. This is a controlled combination of sources, not a single untouched historical state. A short recovery note makes that distinction understandable to the next editor.
Check duplicate versions and mask-dependent edits
Several darktable versions can use one source image while carrying different processing choices. Inspect the actual duplicate entries and sidecars before concluding that a particular look disappeared. One version may preserve the desired monochrome treatment while another contains a later color edit. Keep them separate during recovery instead of merging histories without understanding their purpose.
Review copy-and-paste scope
When transferring a verified adjustment, inspect whether you are copying the whole history or only selected modules. Then compare any mask or ordering dependencies that the adjustment needs. A selective transfer can be useful, but its result may differ from the source version. Test the full image and export rather than assuming the transferred module alone recreates the original appearance.
Also avoid compressing or discarding history as an early cleanup step. Those actions can remove useful information during recovery. First preserve a complete accepted candidate, then make any simplification deliberately in another version if the workflow requires it. Keeping the source history intact gives you a way to revisit an adjustment that later proves important.
Use a rendered photograph as limited salvage
A clean export can preserve the finished appearance when no editable history survives. Inspect its dimensions, compression, color, and detail before deciding what it can support. A large export may be useful for an immediate delivery, while a small preview may only guide reconstruction. Neither supplies the full original RAW editing latitude automatically.
Rebuild adjustments without overstating recovery
If you recreate the look from a rendered reference, keep the reconstruction as a new edit and preserve the reference separately. Compare the crop, tonal transitions, and local details deliberately. Similar appearance does not establish identical processing history, especially when the export has already applied sharpening, noise reduction, or compression.
For future editing, identify which controls remain available. You may have recovered the original RAW but lost the specific mask work, or preserved the final JPEG while the RAW remains missing. Both outcomes can be useful. State the remaining limitation so the next task begins with realistic expectations about what the surviving information permits.
Define an image-level acceptance target for darktable
Choose the particular editing decision that distinguishes the desired version: a crop edge, a local exposure mask, a color treatment, or a perspective correction. Then compare that feature in every candidate. A history with many modules is not automatically the right history. The target should connect the recovered instructions with a visible detail and with the controls you need for continued editing. This makes it easier to reject a plausible-looking but older version without discarding useful source evidence.
Compare the crop against a recognizable scene detail
Inspect the crop boundary around a known object near the edge of the frame. Then compare rotation and any perspective correction. A candidate can show the same central subject while using a different composition. If you rebuild the crop from an export, record that adjustment as reconstruction and preserve the loaded historical version separately. This keeps a visual approximation from being mistaken for the original recorded parameter state.
Also inspect the source image before judging a history candidate. A different capture from the same burst can contain nearly identical scenery while shifting the subject or exposure. The recovered mask or crop may then appear wrong for reasons unrelated to the history itself. Compare capture identity, dimensions, and distinctive details before changing the instructions. Correct source matching prevents unnecessary reconstruction of a history that may already be valid.
Recover a local adjustment as a relationship
A local edit can depend on a module, its mask, and the surrounding processing sequence. Inspect those pieces together in the recovered version. A module name alone does not establish that the adjustment behaves as intended. Compare the affected region and the transition into neighboring areas at an appropriate zoom. This is particularly useful for selective exposure, skin work, or a sky adjustment whose edges reveal whether the recovered relationship matches the original edit.
Test selective history transfer before adopting it
If one candidate supplies a useful adjustment while another provides the preferred overall edit, preserve both and test a selective transfer in a new version. Inspect module instances, masks, and the resulting appearance. Then compare a fresh output with the intended reference. The transfer can save work without recreating an identical historical stack, so document any new adjustment needed to integrate it into the accepted image.
Avoid broad history replacement merely to recover one local detail. It can discard valid later work elsewhere in the image. A separate duplicate lets you compare the whole historical candidate while retaining the current edit. After deciding which information to keep, save a clear accepted version and retain the original sources. This gives you a route back if another mask or module later proves to depend on the source history you initially rejected.
Interpret an exported-image candidate cautiously
A suitable darktable export can carry useful processing information, but the actual metadata settings and file format determine what survives. Inspect the candidate through the supported history workflow and compare its results. Do not infer editable history from a visible image alone. A file that passed through a messaging service, editor, or metadata-removal process may preserve only rendered pixels, even when its appearance still closely matches the intended final photograph.
Compare the loaded history with the rendered reference
After testing the export as a history source, create a fresh output from the matching original and recovered instructions. Compare the crop, local contrast, color, and important detail. Differences can reveal missing instructions, an incompatible environment, or an incorrect source match. Preserve the test result before making migration edits. This helps you determine what the candidate actually supplied instead of hiding a partial restoration behind newly recreated processing.
If the export contains no usable editing instructions, retain it as a visual reference and identify the quality limit. It may support an immediate delivery or guide a rebuild, but it cannot supply the original RAW latitude or hidden editing decisions. State that scope before starting reconstruction. A good reference can still save substantial work without becoming evidence that the original editable history survived.
Compare library candidates without overwriting sidecars
A database backup and a sidecar set may represent different historical moments. Preserve both and inspect them in separate working contexts. Then compare a few known image versions and their organization. Do not let an automatic synchronization choice replace the older source before you understand the disagreement. The purpose of recovery is to identify the useful state, not simply to make every source display the same values as quickly as possible.
Use content to decide which direction is correct
Suppose a database candidate contains a recent color edit while the sidecar preserves an earlier monochrome version. Both can be valid creative states. Identify which one the task needs and retain the other as a separate version. If a source contains an unwanted overwrite, use its actual module and image content to establish that fact. A recent modification time can follow synchronization and does not independently prove that the instructions are preferable.
Keep collection-level gaps separate from image-level success. You might restore the finished edit while losing an organizational detail that the sidecar does not reproduce. Record those outcomes individually. This helps you resume the immediate image task while planning a separate catalog restoration, and prevents a successful export from being described as recovery of every aspect of the original library environment.
Test the final RAW-and-history pair independently
Once the accepted edit is stable, preserve its original source and current sidecar together. Test a copied pair in an appropriate separate environment and compare the distinctive adjustment again. Then inspect a fresh export at the intended delivery size. This practical test verifies the preservation method itself and can expose a dependency that remained available only through the original database or source directory.
Check output requirements without changing the recovered master
Create delivery variants separately when they need different sizing, sharpening, or color settings. Keep the accepted native editing milestone identifiable. A smaller web export may be useful without representing the same output settings as the archival reference. Recording which source and history produced each deliverable makes later comparisons easier and prevents a delivery-specific adjustment from silently replacing the recovered master edit.
Finish with an inventory of the original capture, accepted history candidate, application environment, reconstructed adjustments, and any missing catalog details. This gives another editor enough context to continue work without assuming that every similarly named XMP is interchangeable. If one local mask remains uncertain, say so explicitly. A mostly recovered edit remains useful when its limits are clear and its strongest source evidence is preserved.
Compare the recovered edit at its intended viewing scale
Inspect the image at full resolution for detail and at the intended delivery size for overall appearance. A local adjustment can look acceptable when zoomed out while revealing a misplaced mask edge at full size. Conversely, an export-specific sharpening choice can affect the delivery without changing the recovered RAW history. Keep those checks separate and preserve the accepted editing milestone before creating new output variants.
Record the source of the final appearance
State whether the accepted look came from a sidecar, a database candidate, embedded export history, or manual reconstruction. Then identify any region whose processing remains approximate. This concise record helps another editor decide which controls can be revised reliably. It also prevents a visually convincing output from becoming unsupported evidence that every historical module and mask relationship returned exactly.
If you later find a stronger candidate, compare it against the preserved milestone rather than the current document after new creative work. The recovery boundary gives that comparison meaning and protects useful recent production changes. Keep the original capture and the best history source together so a future restoration does not depend only on a rendered reference.
When storage recovery can help darktable work
PandaOffice Drecov may help retrieve deleted original images, saved XMP sidecars, or existing database backups from readable storage. It cannot infer the original edit from a catalog thumbnail alone. Use native history candidates first, and reduce writes to the affected source while assessing deleted-file recovery. Repeated hardware read failures require separate storage assessment.
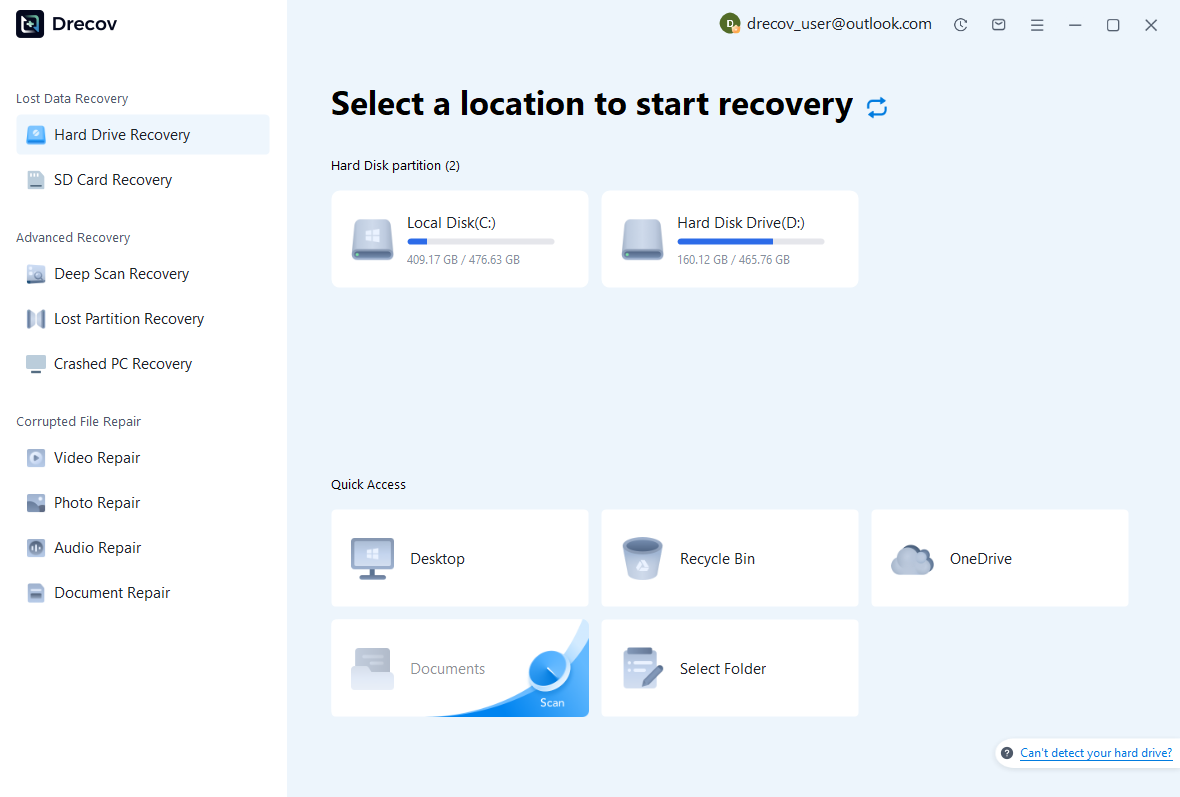
Step 1: choose the original or history location
Select the drive or partition that held the RAW files, XMP files, or actual database backup. Record which missing component each scan targets, since those locations may differ. Keep recovered output on other healthy storage. Preserve the source folder relationships where possible so that later image-and-sidecar matching remains reviewable.
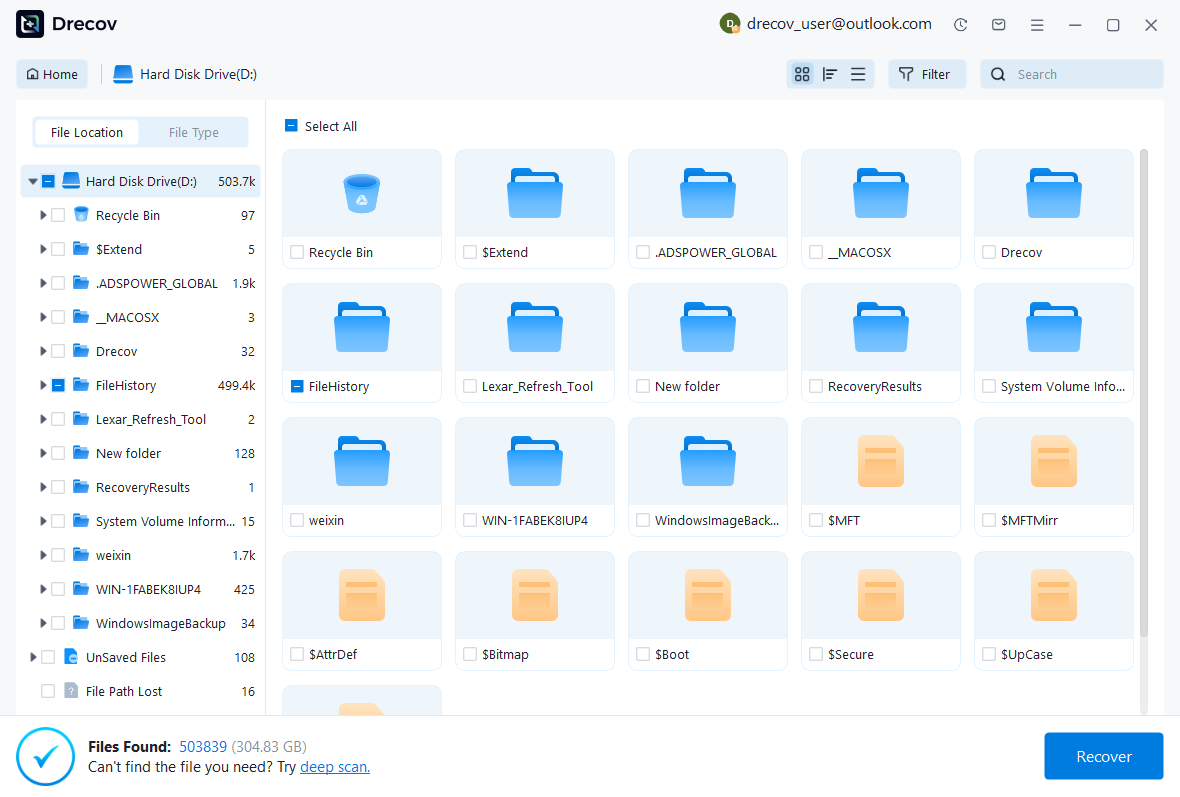
Step 2: compare matched image and history candidates
Review available names, paths, sizes, dates, and supported previews. Preserve plausible RAW and XMP candidates together without assuming that same-name files automatically belong together. A preview can help identify the photograph, but editable-history validation requires darktable. Keep several useful versions when necessary and inspect the exact adjustments after recovery.
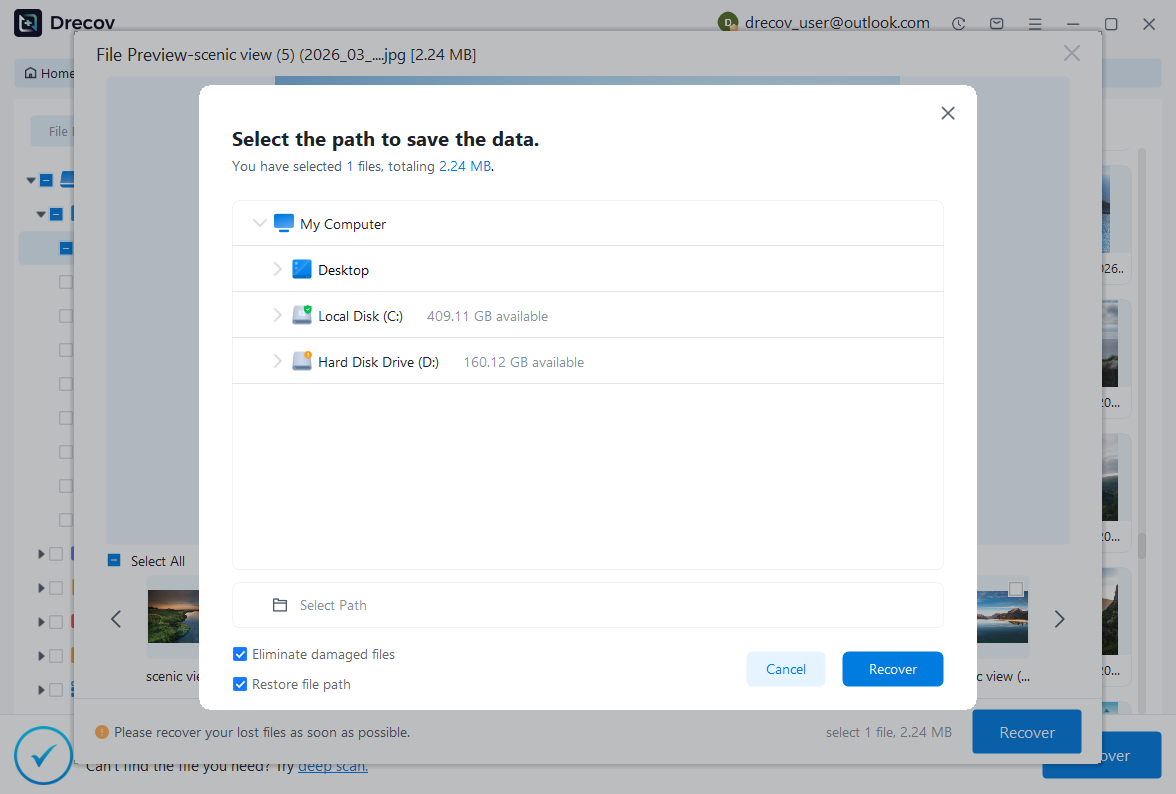
Step 3: restore elsewhere and verify the edited result
Recover selected files to a separate destination and preserve an untouched set. Then inspect a working image with its appropriate history in a compatible environment. Check crop, modules, masks, and a fresh export. Keep uncertain candidates separate from the accepted edit so that an incomplete source cannot overwrite a useful recovered version.
Preserve a verified editing milestone
Reopen the accepted image and compare its distinctive adjustment again. Then save an appropriate source-and-sidecar set and retain the relevant library backup separately. Record which candidate supplied the history and which adjustments you recreated. This gives the next editing session a clear baseline instead of several unexplained XMP files with nearly identical names.
Test an image-level restoration deliberately
Use a disposable copy to verify that an original and its current sidecar can restore the expected edit in a separate test context. Then compare a fresh output with the accepted reference. This practical test shows what your preservation method actually supplies and helps identify catalog information that needs separate backup beyond the individual image’s editing instructions.
Related recovery resources
Explore the relevant recovery options: Hard drive recovery, External hard drive recovery.
For another recovery case and its practical checks, read the related recovery guide.
Check the vendor guidance for the installed version: official recovery documentation 1, official recovery documentation 2, official recovery documentation 3.