







Understanding Google Photos Deletion and Trash System
What happens when photos are deleted in Google Photos
When users delete photos in Google Photos, the files are not immediately removed from the system. Instead, they are moved to the Trash folder where they remain temporarily before permanent deletion.
During this period, users can still recover photos from google photos trash as long as they act within the retention window. Once the limit is exceeded, the files are permanently removed from Google’s servers.
How the Trash system works in Google Photos
Google Photos keeps deleted files in Trash for up to 60 days. Within this time, users can restore images at any moment. After 60 days, the system automatically deletes them.
This makes timing critical when trying to recover google photos from trash, especially for users who delete images unintentionally or during device cleanup.
Why users cannot find deleted photos
Many users fail to recover photos from google photos because of incorrect account login, sync delays, or expired Trash retention periods. In some cases, photos appear missing simply because they are stored in a different Google account.
Common reasons Google Photos recovery fails
Expired Trash retention period
If more than 60 days have passed since deletion, Google permanently removes the files. At this stage, standard recovery methods for google photos recover deleted photos will no longer work.
Manual emptying of Trash
Some users manually clear the Trash folder without realizing it permanently deletes all stored files.
⚠️Warning: Once Trash is emptied manually, recovery chances drop significantly.
Sync and account issues
Google Photos relies heavily on cloud synchronization. If sync is disabled or interrupted, deleted photos may not appear correctly across devices.
This often causes confusion when users try how to recover deleted google photos but cannot locate expected files.
Wrong Google account login
Many recovery failures occur simply because users are logged into a different Google account than the one where photos were originally stored.
Basic methods to recover deleted Google Photos
Method 1: Restore from Google Photos Trash folder
Step 1: Open Google Photos app
Launch the Google Photos app on your mobile device and ensure you are signed into the correct Google account.
Step 2: Enter Trash folder
Tap on Library, then select Trash to view deleted images.
Step 3: Select photos
Long-press the images you want to restore. You can select multiple photos at once.
Step 4: Restore images
Tap Restore. The photos will return to your main library or original album.
Test Environment: Android smartphone (Google Photos latest version), stable internet connection, active Google account sync enabled.
Method 2: Restore using Google Photos web version
Step 1: Open Google Photos website
Go to photos.google.com using a browser and sign in.
Step 2: Access Trash folder
Click on the left menu and open Trash.
Step 3: Select deleted photos
Choose the images you want to recover.
Step 4: Click Restore
Click Restore to return photos to your account.
Test Environment: Windows 11 PC + Google Chrome browser + stable internet connection + verified Google account login.
Method 3: Check Google Drive backups
Step 1: Open Google Drive
Visit drive.google.com and log into your Google account.
Step 2: Search for images
Use search tools to locate image files such as JPG, PNG, or RAW formats.
Step 3: Check backup folders
Look for device backups or synced media folders.
Step 4: Restore or download files
Download or move images back into Google Photos.
Test Environment: Google Drive web interface + Android backup sync enabled + active cloud storage connection.
Method 4: Check device local backup
Step 1: Open Gallery app
Launch your phone’s default gallery application.
Step 2: Check Recently Deleted folder
Look for deleted photos stored locally.
Step 3: Restore images
Select photos and tap Restore.
Step 4: Verify cloud sync
Ensure restored images re-sync with Google Photos if backup is enabled.
Test Environment: Android device with OEM backup service enabled (Samsung/Xiaomi/Pixel cloud sync active).
⚠️Warning: Avoid overwriting deleted data
Avoid uploading new files or forcing repeated sync actions immediately after deletion, as this may overwrite recoverable data.
Advanced solutions when Google Photos cannot be restored from Trash
Deep account verification and recovery check
If basic recovery methods fail, the first step is to verify whether you are using the correct Google account. Many users mistakenly switch accounts and believe their photos are missing.
To fix this, sign out of all Google accounts and log in again using known email addresses. Then recheck Google Photos library and Trash folder to ensure the correct data source is being accessed.
This step is essential when dealing with how to recover deleted google photos cases where images appear missing but are actually stored in another account.
Photos that were shared with other users may still exist in shared albums even after deletion from your own library. If the image was part of a shared album, collaborators may still have access to it.
Open the “Sharing” tab in Google Photos and check all shared albums for missing files. In many cases, users successfully recover photos from google photos through shared copies even after deletion from Trash.
Test Environment: Google Photos shared albums + multi-account access (desktop browser + mobile app sync enabled)
⚠️Warning: Avoid overwriting cloud sync data
When attempting advanced recovery, avoid uploading new files or forcing repeated sync resets. This may overwrite cached metadata and reduce the chance of successful restoration.
Using device-based recovery and cache extraction
In some cases, deleted photos may still exist in local cache storage on Android devices. These cached files are not visible in the Google Photos interface but may still be partially recoverable.
This is especially useful when users attempt google photos recover deleted photos after sync interruptions or app crashes.
One-time deep recovery using professional tools
When cloud and local recovery methods fail, advanced tools can scan device storage and recover residual image fragments. One such tool is Pandaoffice Drecov, which can analyze storage sectors and reconstruct deleted or cached image data.
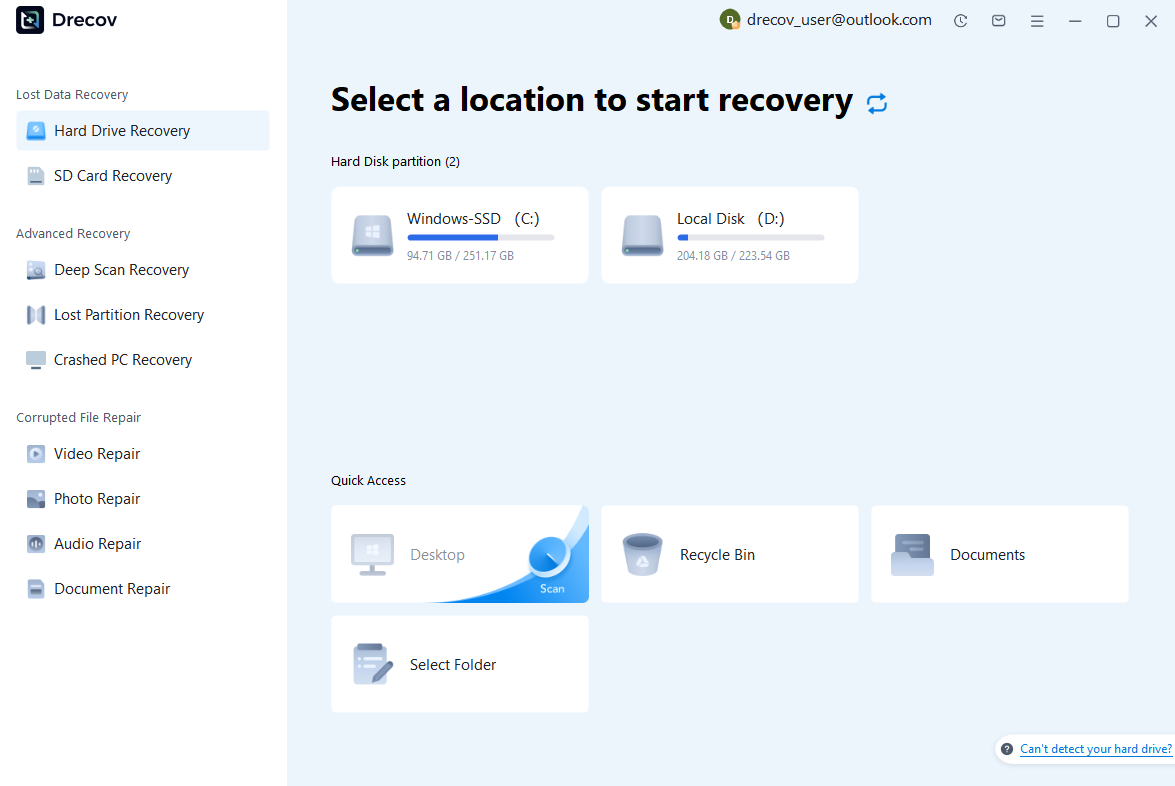
Step 1: Connect the Drive / USB)
Connect your device (SD card, HDD/SSD, or USB drive) to your computer and launch PandaOffice Drecov. Select the target device and start the scan. The software will perform a quick scan and deep scan to detect lost or deleted data.
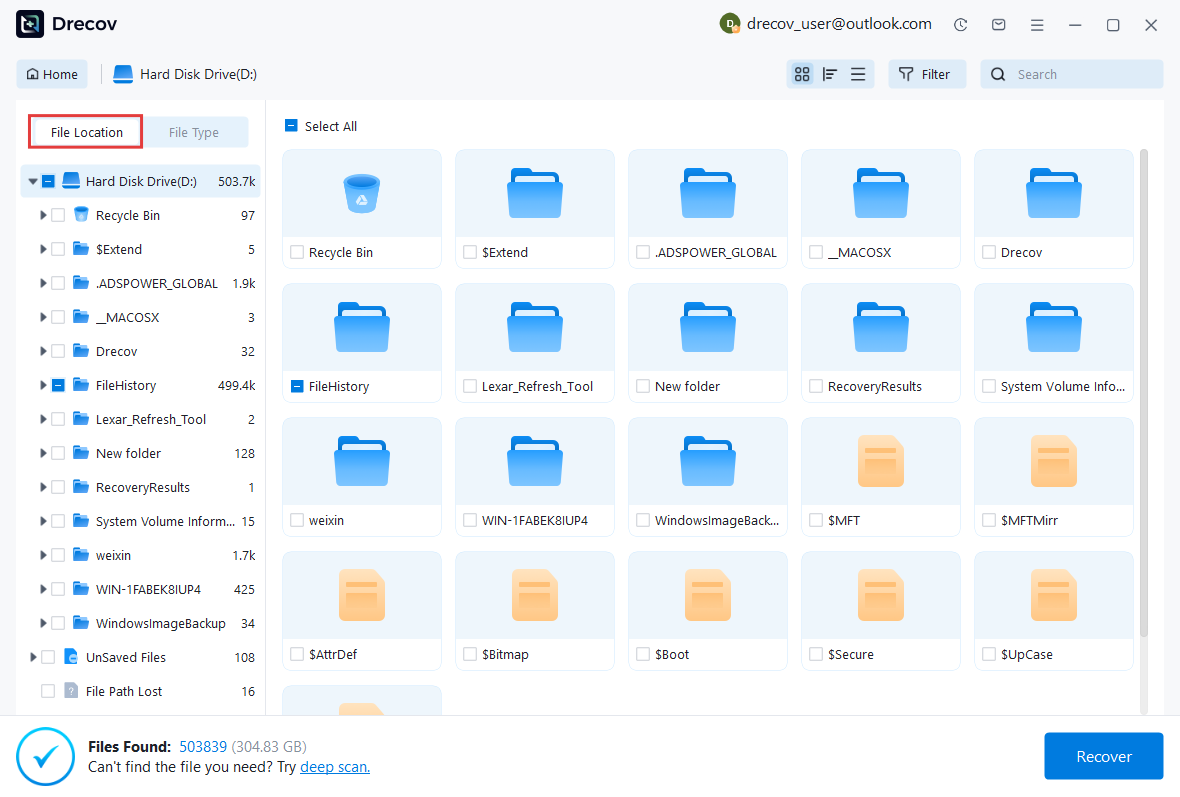
Step 2: Locate and Preview Lost Files
After scanning, browse the detected files and use the preview feature to check recoverable data. You can preview documents (Word, Excel, PDF), photos, and videos to ensure file integrity before recovery.
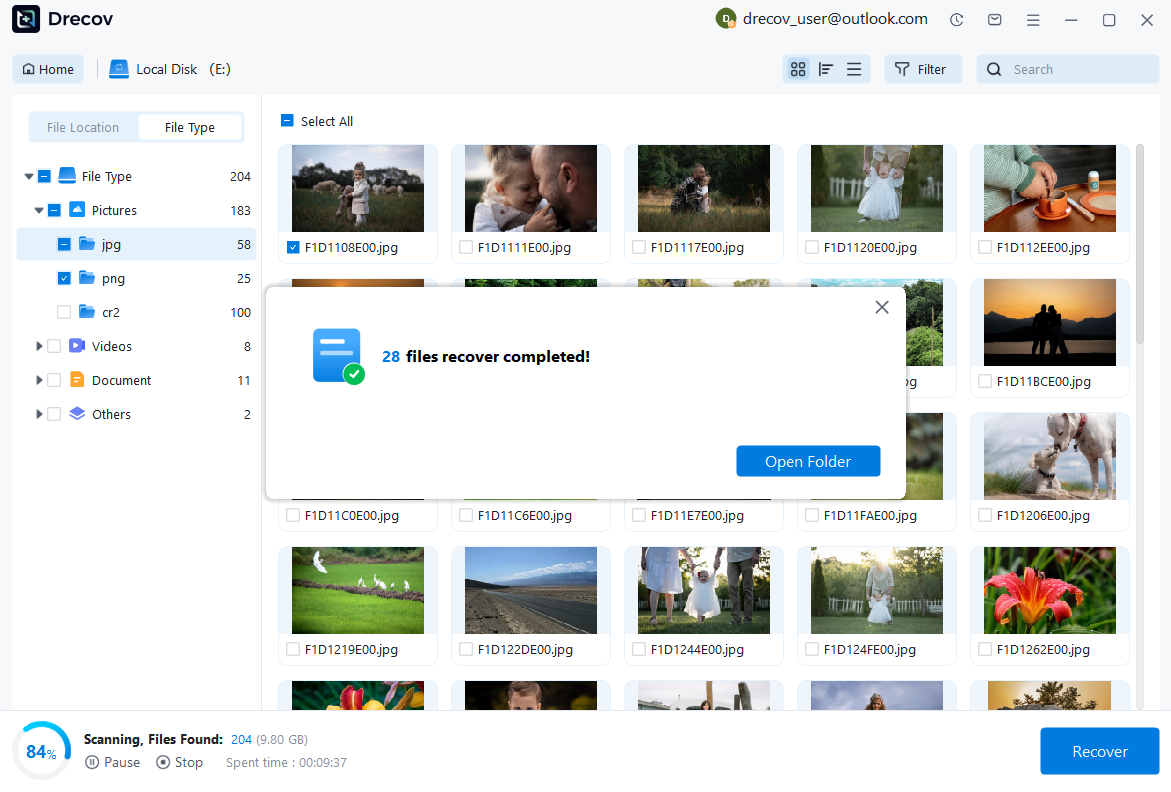
Step 3: Recover and Save to a New Location
Select the files you want to restore and click recover. Save all recovered data to a different drive or location (not the original device) to avoid overwriting lost data.
Why Choose PandaOffice Drecov Recovery Software?
PandaOffice Drecov offers a fast, secure, and user-friendly solution for recovering lost files across multiple scenarios. Whether you need email recovery, ZIP File Recovery, format data recovery, or help to recover deleted drafts Outlook, the software provides reliable recovery performance for both personal and business users.
PandaOffice Drecov supports recovery from formatted hard drives, SSDs, USB drives, SD cards, and external storage devices. Its advanced scanning engine can locate deleted archives, damaged ZIP files, lost Outlook drafts, and accidentally removed documents with high accuracy. For users searching for how to find deleted messages in Teams, PandaOffice Drecov can also help recover exported chat files, attachments, and related local cache data when available.
This method is typically used in severe recover deleted google photos scenarios where Trash is already emptied or sync data is missing.
Test Environment: Windows PC + Android device USB connection + storage cache scan + cloud sync residue analysis
Device-specific recovery methods
Android device recovery process
Step 1: Open Gallery and Trash folder
Check your Android Gallery app for any locally stored deleted images.
Step 2: Verify Google Photos sync
Ensure Google Photos backup is enabled and properly synced.
Step 3: Restore from device backup
If OEM cloud backup is enabled, restore deleted images from the device cloud system.
This method is commonly used for how to recover photos deleted from google photos on Android devices.
iPhone Google Photos recovery method
Step 1: Check Recently Deleted folder
Open Photos app and check local deletion folder.
Step 2: Verify Google Photos app sync
Ensure Google Photos is properly linked to your Google account.
Step 3: Restore from iCloud if available
Check iCloud Photos backup for missing images.
Test Environment: iOS device + Google Photos app + iCloud sync enabled + stable Wi-Fi connection
Desktop recovery via browser
Step 1: Open Google Photos in browser
Log in via photos.google.com
Step 2: Check Trash and archive
Review all available folders including Archive and Trash
Step 3: Restore images
Select and restore images back to main library
Test Environment: Windows/Mac + Chrome browser + Google account login + stable internet connection
Preventing future Google Photos data loss
Enable automatic backup correctly
Always ensure Google Photos backup is enabled for all devices to prevent accidental loss.
Use multiple backup systems
Combine cloud storage with local device backups for better protection.
Regularly check Trash folder
Review deleted files before the 60-day expiration period ends.
⚠️Warning: Do not rely on a single backup source
Depending only on Google Photos increases the risk of permanent loss if sync fails or retention expires.
FAQ about Google Photos recovery
Can I recover photos after deleting them from Trash?
If the 60-day retention period has passed, standard recovery is no longer possible. However, partial recovery may still be possible using device backups or cached data.
Why are some recovered photos missing or incomplete?
This usually happens when files are partially overwritten, corrupted, or not fully synced before deletion.
What is the safest way to recover deleted Google Photos?
The safest method is always to restore directly from the Trash folder before it expires, followed by checking backups across all devices.
How to recover photos deleted from Google Photos in the future?
Enable automatic backup, avoid manual deletion from Trash, and regularly verify sync status across devices.
Final conclusion and key takeaways
Recovering deleted photos from Google Photos is highly dependent on timing, sync status, and backup availability. In most cases, users can successfully restore files from Trash if action is taken within the retention period.
Once files are permanently deleted, recovery becomes more complex and may require deeper methods such as device-based scanning or specialized recovery tools.
Understanding the difference between temporary deletion and permanent removal is essential when dealing with recover google photos from trash scenarios. With proper backup habits and timely recovery actions, most data loss cases can be avoided.






