


We have all been there. You are cleaning up your digital workspace, dragging old folders to the Trash, and in a moment of productive zeal, you click “Empty Trash.” A split second later, your heart sinks. You realize that a vital project folder, a collection of family photos, or an indispensable spreadsheet was sitting in that bin. Now, the big question looms: Is it possible to undo empty recycle bin mac?
The short answer is yes. While macOS makes it appear as though those files are gone forever, the reality of data storage is much more forgiving. In this comprehensive guide, we will walk you through the technical nuances of data recovery, ranging from simple built-in features to professional-grade tools. We will also bridge the gap for cross-platform users by exploring how to empty recycle bin windows and recover data on PC using PandaOffice Drecov.
Understanding the Logic: What Happens When You Empty the Trash?
Before we dive into the “how,” we must understand the “why.” When you perform an empty recycle bin mac operation, macOS does not immediately shred the binary data of your files. Instead, it simply deletes the “pointer” to that data and marks the space on your hard drive as “available.”
Think of your hard drive like a massive library. Emptying the trash is like removing the entry for a book from the card catalog. The book is still on the shelf, but the librarian (the OS) no longer knows where it is and feels free to put a new book in its place.
Critical Warning: The moment you realize you need to undo empty recycle bin mac, stop using your computer immediately. Any new file you save, or even browsing the web (which creates cache files), could overwrite the “books” still sitting on your “shelves.”
Part 1: Professional Methods to Undo Empty Recycle Bin on Mac
Since PandaOffice Drecov is a Windows-exclusive powerhouse, Mac users must rely on macOS native tools and specific Unix-based architecture strategies. Below are the most effective methods arranged from simplest to most technical.
Method 1: The “Command + Z” Instant Rescue
If you have just moved a file to the Trash but have not yet clicked “Empty,” macOS allows for an instant reversal.
- Step 1: Ensure the Finder is your active application.
- Step 2: Press
Command + Zon your keyboard. - Step 3: Alternatively, go to the top menu bar and click Edit > Undo Move of…
- Key Point: This only works for the very last action you performed. If you have done anything else since deleting the file, this history may be lost.
Method 2: Using Time Machine (The Gold Standard)
Apple’s Time Machine is the most reliable way to undo empty recycle bin mac without third-party software. It creates incremental backups, allowing you to “travel back in time.”
- Step 1: Connect the external drive you use for Time Machine backups to your Mac.
- Step 2: Open the window for the folder where the deleted files were originally stored (e.g., Documents or Desktop).
- Step 3: Click the Time Machine icon in your Menu Bar and select Enter Time Machine.
- Step 4: Use the timeline on the right edge of the screen or the up/down arrows to find a backup date before you emptied the trash.
- Step 5: Preview the files by pressing the Space Bar. Once found, click Restore to return them to their original location.
Method 3: iCloud “Recently Deleted” Recovery
If you have “Desktop & Documents” folders synced to iCloud, you have a 30-day safety net that exists outside your local Trash.
- Step 1: Open your web browser and log in to iCloud.com.
- Step 2: Scroll down to the bottom of the home page and look for the Data Recovery link.
- Step 3: Click on Restore Files.
- Step 4: Browse the list of files deleted within the last 30 days.
- Step 5: Select the items you need to undo empty recycle bin mac for and click Restore.
Method 4: Terminal Command (The “Hidden Directory” Check)
Sometimes, macOS doesn’t immediately purge the .Trash directory at the system level. This is a technical approach for advanced users.
- Step 1: Open Terminal (Applications > Utilities > Terminal).
- Step 2: Type
cd .Trashand press Enter to enter the hidden trash folder. - Step 3: Type
ls -alto list all files, including hidden ones. - Step 4: If you see your file name, type
mv [filename] ../Desktop/(replace [filename] with your file’s name) to move it back to your desktop. - Warning: Terminal is a powerful tool. Typing the wrong command can lead to unintended data loss, so proceed with caution.
Part 2: Data Recovery and Management on Windows
While Mac users have their specific toolkit, Windows users often face the same dilemma. Whether you are looking for how to empty recycle bin windows to clear space or trying to recover a lost file on a PC, the process requires a different set of tools—most notably PandaOffice Drecov.
Method 1: Professional Recovery with PandaOffice Drecov
Since PandaOffice Drecov is a specialized Windows tool, it offers the highest success rate for recovering files after you empty recycle bin windows. It uses deep-sector scanning to reconstruct files that the Windows File Explorer can no longer see.
- Step 1: Selection of Target Area Launch the software. On the main dashboard, select the Recycle Bin icon under the “Locations” tab. This tells the software to prioritize the file headers associated with the bin.

- Step 2: Initiating the Scan Click Start. The software will run a Quick Scan first. If the files do not appear, the Deep Scan will automatically begin, searching for raw file signatures like
.png,.pdf, or.mp4.

- Step 3: Preview and Filter. Use the search bar to find specific file names. Use the Preview button to check the integrity of the file. If the image or text appears clearly in the preview, the recovery will be successful.

- Step 4: Safe Recovery. Select your files and click Recover.
Warning: Always choose a destination folder on an external hard drive or a different partition to prevent data corruption.
When the bin is empty, Windows tools often fail. This is where dedicated recovery algorithms are required. PandaOffice Drecov is a specialized tool designed to scan the “hidden shelves” of your hard drive.It can reconstruct file headers that Windows no longer recognizes. This makes it an indispensable tool for a wide range of data loss scenarios, including:
- Accidental Desktop Deletions: Instantly retrieving files wiped from your local workspace.
- Disk Formatting Errors: Salvaging files from drives that have been completely wiped or reformatted.
- External Media Rescue: Recovering lost data from formatted or corrupted SD cards and USB flash drives.
- Sync Conflict Resolution: Reversing data loss caused by synchronization errors between your PC and the OneDrive cloud.
- Browser Metadata Recovery: Restoring lost Chrome bookmarks and other essential application data.”
Method 2: Using Windows “File History”
This is the Windows equivalent of Time Machine. If you have a backup drive configured, this is a native way to bypass the need for third-party software.
- Step 1: In the Windows Search bar, type “Restore your files with File History” and press Enter.
- Step 2: Browse through the folders to find the version of the file you need.
- Step 3: Click the Green Restore button at the bottom center to return the file to its original path.
Method 3: Windows File Recovery (Command Line Tool)
Microsoft offers an official (though less user-friendly) command-line app called Windows File Recovery, available on the Microsoft Store.
- Step 1: Install “Windows File Recovery” from the Microsoft Store.
- Step 2: Open the app (which opens a Command Prompt).
- Step 3: Type the command:
winfr C: E: /regular /n \Users\<username>\Documents\(where C: is the source and E: is the recovery destination).
Key Point: This method is free but lacks the intuitive preview and filtering features found in PandaOffice Drecov.
Method 4: Restoring from a Previous System Restore Point
While System Restore is primarily for system files and registry keys, it can sometimes trigger the “Previous Versions” shadow copies of folders.
- Step 1: Navigate to the folder that used to contain the deleted files.
- Step 2: Right-click the folder and select Properties.
- Step 3: Click the Previous Versions tab.
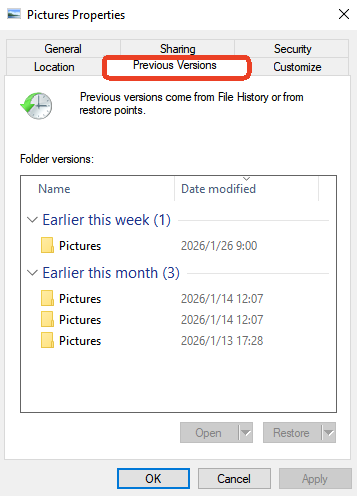
- Step 4: Select a folder version from an earlier date and click Restore.
Warning: This feature must have been manually enabled or triggered by a system update to contain any data.
Comparing the Experience: Mac vs. Windows
Understanding the differences between these two systems can help you manage your data more effectively.
| Feature | macOS (Trash) | Windows (Recycle Bin) |
| Common Shortcut | Cmd + Delete | Delete |
| Permanent Delete | Option + Cmd + Delete | Shift + Delete |
| Primary Tool | Time Machine | PandaOffice Drecov |
| Immediate Undo | Cmd + Z | Ctrl + Z |
Many users search for how to empty recycle bin windows because Windows tends to accumulate system “junk” faster than macOS. On Windows, you can right-click the bin and select “Empty Recycle Bin,” or use the Storage Sense feature in Settings to automate the process. However, always remember that once the bin is emptied, software like PandaOffice Drecov becomes your only lifeline.
Best Practices to Avoid Permanent Data Loss
To ensure you never have to frantically search for how to undo empty recycle bin mac again, follow these expert-level data hygiene tips:
- The “3-2-1” Backup Rule: Keep three copies of your data, on two different types of media, with one copy stored off-site (cloud).
- Think Before You Click: macOS has a setting in Finder Preferences: “Show warning before emptying the Trash.” Keep this enabled. It acts as a final “Are you sure?” barrier.
- Use Cloud “Trash” Folders: Services like Google Drive, Dropbox, and OneDrive have their own “Trash” folders that persist for 30 days, even if you delete the local file on your Mac or PC.
- Avoid SSD “Trimming” After Deletion: Modern SSDs use a feature called TRIM to clean up deleted data quickly. If you realize you’ve made a mistake, shut down the computer immediately to stop the TRIM command from running, then use a recovery tool.
Conclusion
The ability to undo empty recycle bin mac is a testament to how resilient modern file systems are. While the “Empty” button feels final, the data often lingers in the background, waiting to be rescued. For Mac users, the path usually involves Time Machine or iCloud. For Windows users, the process is made significantly easier through professional software like PandaOffice Drecov.
Whether you are trying to understand how to empty recycle bin windows safely or you are in the middle of a data recovery emergency, the most important factor is speed. The faster you stop using the drive and start the recovery process, the higher your success rate will be.


