


Imagine this: You are just hours away from a major project deadline, and you plug the device into your USB port, expecting the familiar chime of a successful connection. Instead, you hear a rhythmic clicking sound, or worse—total silence. A chilling dialogue box pops up with an ultimatum: “Drive is not formatted. Do you want to format it now?”
Heart-pounding moments like these are exactly why understanding data recovery from external hard drive is a vital digital survival skill. Whether you face a “File Not Found” error, an accidental deletion, or a drive that suddenly turned “RAW,” your precious information is not necessarily gone forever. In fact, most lost files are still exactly where you left them; they are just wearing an invisibility cloak.
Why “Deleted” Doesn’t Mean “Gone”
To master data recovery from external hard drive, we must first debunk a common myth: that clicking “Delete” wipes your files off the magnetic platters or flash chips.
Think of your external storage as a massive library. This library has two main components:
- The Master Index: A giant catalog at the front desk that lists every book’s title and its exact shelf location.
- The Stacks: The actual shelves where the books (your data) live.
When you delete a folder or format a partition, the computer does not send a shredder into the stacks to destroy the books. Instead, it simply takes an eraser to the Master Index. It removes the entry for that file and marks that specific shelf space as “Available.”
As long as the operating system sees the shelf as empty, it feels free to place a new book there. However, until a new “book” (new data) is written onto that exact shelf, the original book remains there in perfect condition. Data recovery from external hard drive works by bypassing the broken index and scanning the shelves directly to find these “homeless” files. This is why the golden rule of retrieving lost files from external storage is to stop using the drive immediately. If you keep saving new files, you risk overwriting those vacant shelves, making the old data unrecoverable.
Critical Precautions for Successful External HDD Data Retrieval
Before you dive into the technical steps of data recovery from external hard drive, you must follow these safety protocols to prevent permanent data loss:
- Cease All Write Operations: Do not save new documents, download files, or install software directly onto the affected external drive.
- Check the Physical Connection: Sometimes a “dead” drive is just a bad cable or a dusty USB port. Try a different port or a different computer first.
- Listen for Mechanical Noises: If your drive is grinding, scraping, or clicking loudly, unplug it immediately. These are signs of physical failure. In such cases, software-based data recovery from external hard drive can cause further damage. You may need a professional clean-room service.
Proven Methods for Data Recovery from External Hard Drive
We have categorized these methods from the simplest system-level fixes to professional-grade software solutions.
Method 1: Using Windows Check Disk (chkdsk) for Logical Repairs
If your computer detects the drive but cannot read it, the issue might be a corrupted file system rather than deleted data. Windows has a built-in utility that can sometimes repair the “Master Index” we discussed earlier.
- Step 1: Connect your external hard drive and identify its drive letter (e.g.,
D:,E:, orF:).
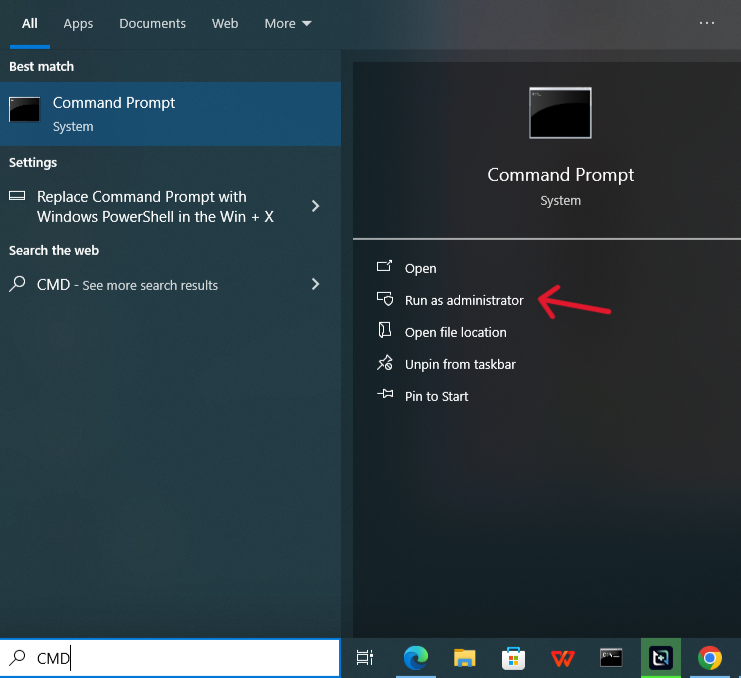
- Step 2: Press Windows Key + S, type
cmd, right-click on Command Prompt, and select Run as Administrator.
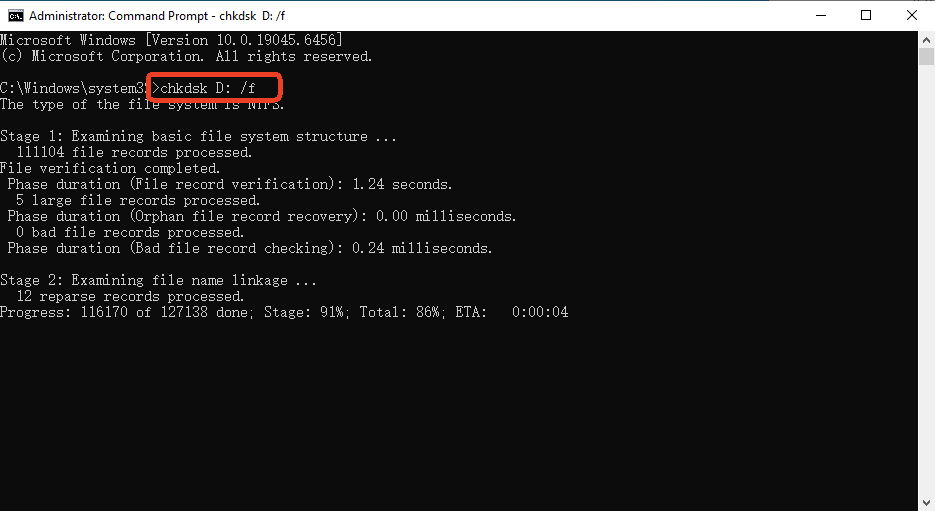
- Step 3: In the black window, type the following command precisely:
chkdsk D: /f(ReplaceD:with your specific drive letter). - Step 4: Press Enter. The system will scan the file structure and attempt to fix logical errors.
Method 2: Professional Recovery with PandaOffice Drecov (Recommended)
When the file system is too damaged for Windows to handle, or when you have emptied the Recycle Bin, you need a dedicated tool for data recovery from external hard drive. PandaOffice Drecov is a premier solution known for its industry-leading recovery rates.
Why Choose PandaOffice Drecov for Data Recovery from External Hard Drive?
- Unmatched Success Rate: With advanced deep-sector scanning algorithms, it boasts a recovery success rate of up to 99.8%.
- Massive Compatibility: It supports over 2000 types of storage devices (HDD, SSD, USB, SD cards) and more than 3000 file formats.
- Read-Only Safety: The software operates in a “read-only” mode, meaning it never modifies your original data during the scan, ensuring 100% security.
- Real-Time Preview: You don’t have to wait for the scan to finish. You can preview photos, documents, and videos for free to ensure you are recovering the right files.
- Versatility: It recovers photos, videos, audio, compressed files (ZIP/RAR), and even system files like EXEs.
- Accidental deletion from your computer desktop.
- Files lost after emptying the Recycle Bin.
- Data loss from disk formatting.
- Accidental deletion or formatting of SD cards/U disks.
- Sync error occurring with deleted OneDrive files
- Restore deleted Chrome bookmarked
- Privacy First: All recovery happens locally on your machine, so you don’t have to worry about your private data leaking to the web.
How to Use PandaOffice Drecov:
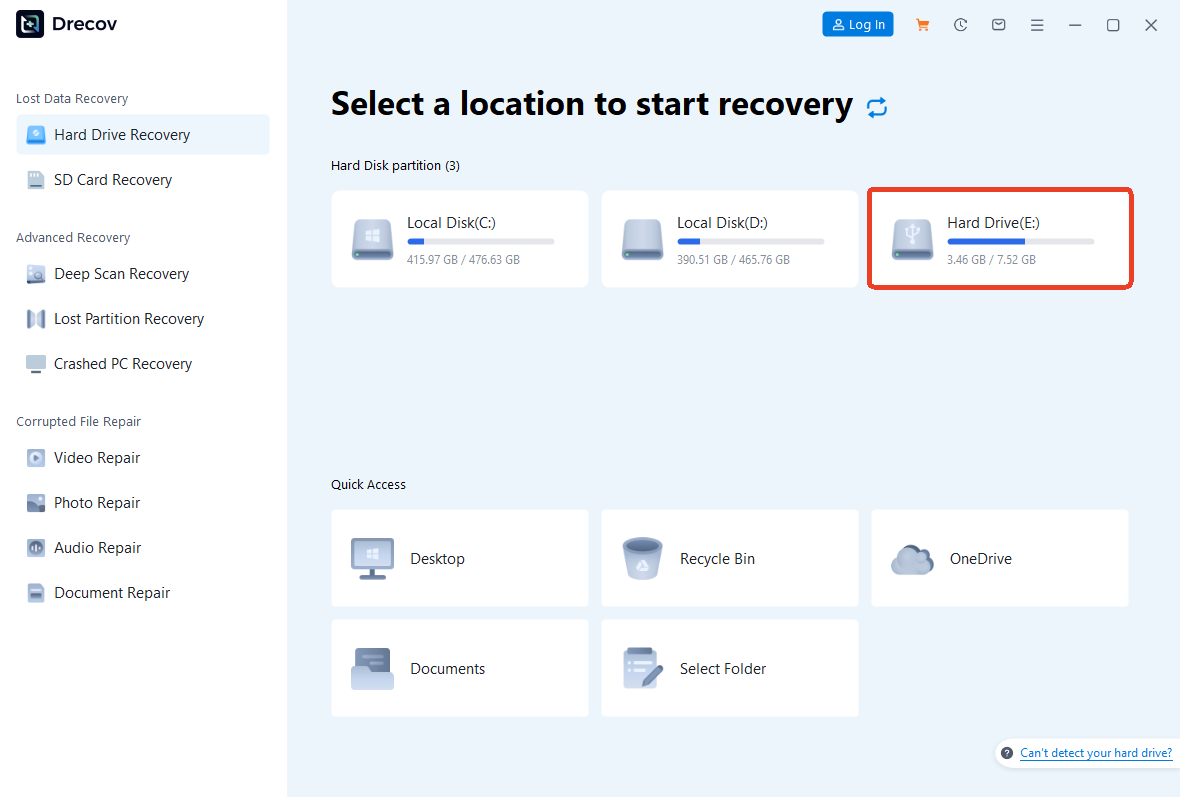
- Step 1: Launch the application and select your external hard drive from the list of connected devices.
- Step 2: Click “Scan.” The tool will perform a Quick Scan followed by a Deep Scan to locate every recoverable fragment.
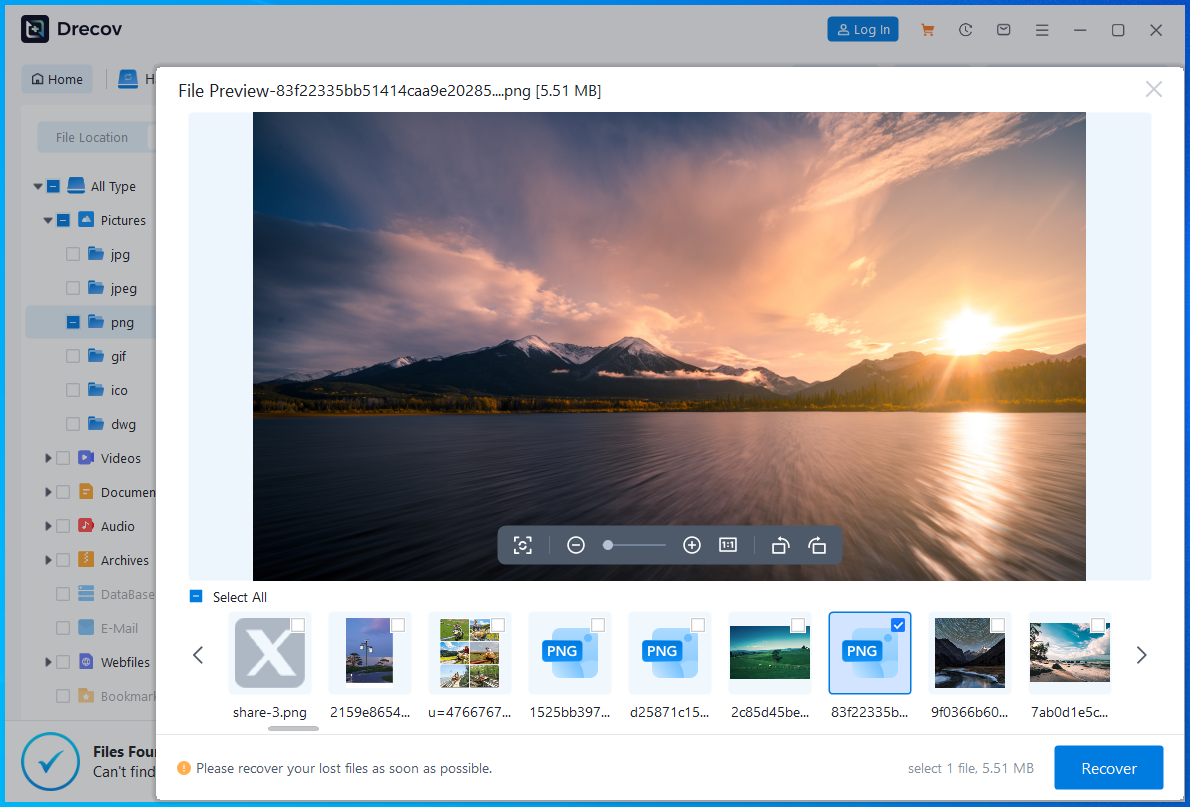
- Step 3: Use the filter to find your specific files. Double-click to preview, then select your files and click “Recover.”
Crucial Note: Always save the recovered data to a different drive (like your desktop) to avoid overwriting the original files.
🎬 Step-by-Step Visual Walkthrough
If you learn better through visual demonstration, watch our comprehensive video tutorial below. This concise guide simplifies the process of data recovery from external hard drive, covering everything from the initial device connection to the final file export. See exactly how the PandaOffice DRecov interface handles complex scans to rescue your lost documents and photos in just a few clicks.
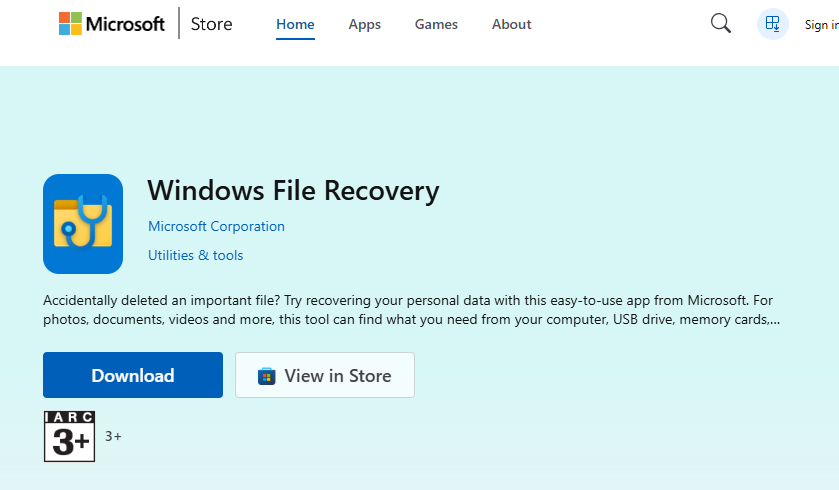
Method 3: The Official Microsoft Windows File Recovery Utility
For users comfortable with a command-line interface, Microsoft offers an official app specifically for data recovery from external hard drive available in the Microsoft Store.
- Step 1: Open the Microsoft Store, search for “Windows File Recovery,” and install it.
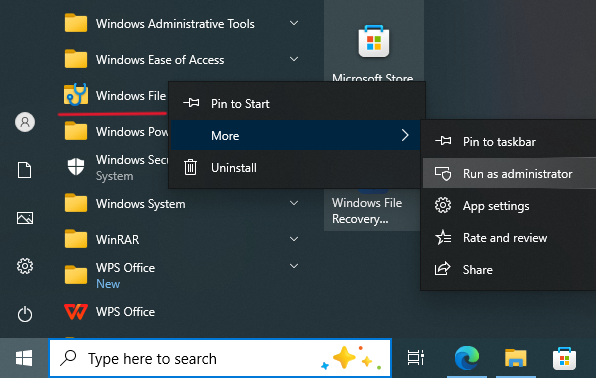
- Step 2: Launch the app. It will open a Command Prompt window.
- Step 3: For an external drive (likely NTFS format), use this syntax:
winfr E: D:\RecoveredFiles /regular(This tells the tool to scan drive E: and save results to a folder on drive D:).
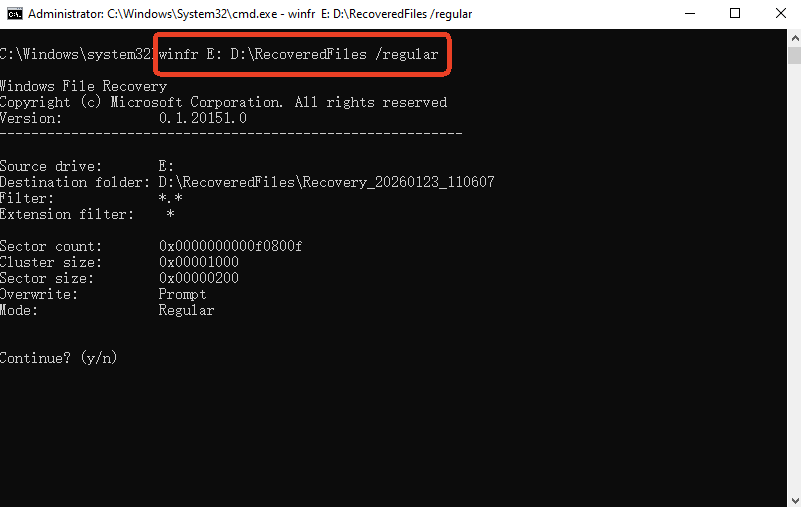
- Step 4: If the regular mode fails, try the Extensive mode:
winfr E: D:\RecoveredFiles /extensive - Step 5: Press Y when prompted to start the scan.
Method 4: Assigning a New Drive Letter for “Invisible” Disks
Sometimes data recovery from external hard drive is simply a matter of making the drive visible again. If your drive doesn’t show up in “This PC,” it might have a drive letter conflict.
- Step 1: Right-click the Start button and select Disk Management.
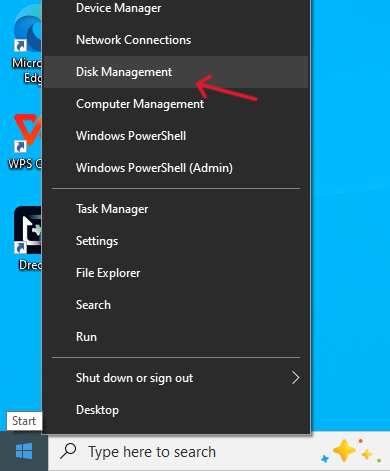
- Step 2: Look for a disk marked as “Removable” or “External” that has no letter assigned.
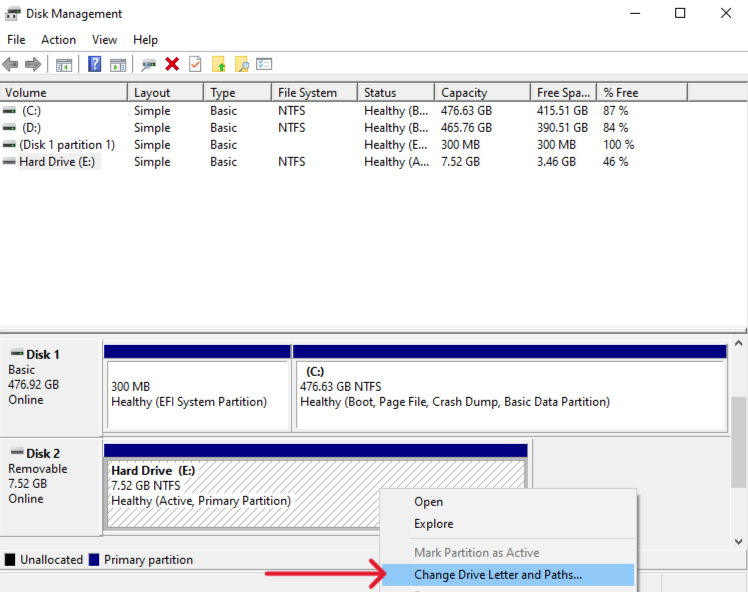
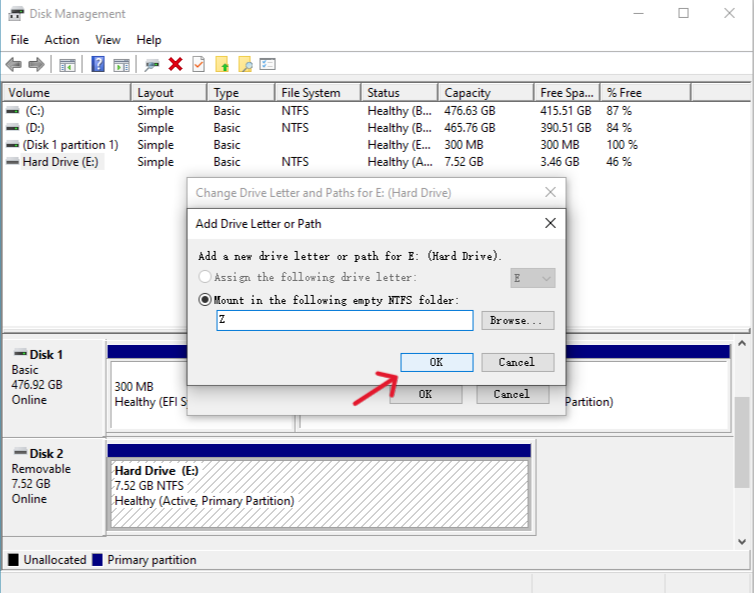
- Step 3: Right-click the partition and select “Change Drive Letter and Paths…”

- Step 4: Click “Add,” choose a new letter (like
Z:), and click OK. Check your File Explorer to see if your files are back.
Method 5: Using Attribute Commands to Unhide Files
Occasionally, a virus or a system glitch marks all your files as “Hidden” or “System,” making it look like the drive is empty even though the “Used Space” bar shows it is full. This is a common scenario requiring data recovery from external hard drive expertise.
- Step 1: Open Command Prompt as an administrator.
- Step 2: Type your drive letter (e.g.,
E:) and press Enter.
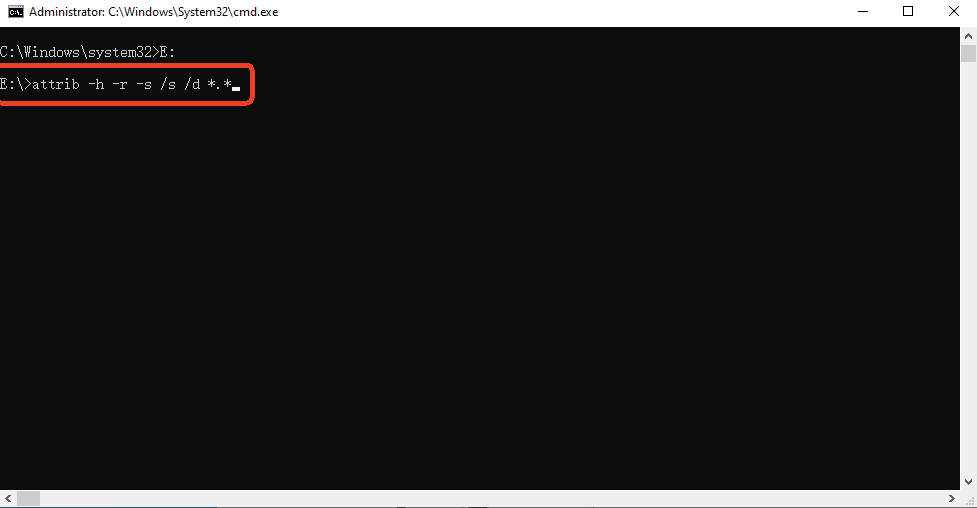
- Step 3: Type the following “Attrib” command:
attrib -h -r -s /s /d *.* - Step 4: Press Enter and wait a few seconds. This command strips away the “Hidden” (-h), “Read-only” (-r), and “System” (-s) attributes from all files and directories.
Comparison of External Storage File Restoration Methods
To help you choose the best strategy for data recovery from external hard drive, refer to the table below:
| Method | Best For | Difficulty | Success Rate | Core Advantage |
| PandaOffice Drecov | Accidental Deletion, Formatting, RAW Drives | Very Easy | Very High (99.8%) | Deep scanning, 3000+ formats, Free preview |
| Windows chkdsk | File system errors, drive “not accessible” | Moderate | Moderate | Built-in, no download needed |
| Win File Recovery | Basic file deletion (official tool) | Hard (CLI) | Moderate | Official Microsoft tool, free |
| Change Drive Letter | Drive not appearing in File Explorer | Easy | N/A | Fixes visibility issues instantly |
| Attrib Command | Files hidden by viruses or system errors | Moderate | Specific | Restores “invisible” file attributes |
Proactive Strategies to Prevent Data Loss
While knowing how to perform data recovery from external hard drive is essential, prevention remains the most effective form of data protection. Consider these proactive habits:
- Follow the 3-2-1 Backup Rule: Keep 3 copies of your data, store them on 2 different types of media (e.g., external HDD and cloud storage), and keep 1 copy off-site.
- Safely Eject Hardware: Always use the “Safely Remove Hardware” option in your system tray before unplugging your device. Sudden disconnection during a write cycle is a leading cause of file system corruption.
- Use Surge Protectors: Power surges can fry the delicate controller board of an external disk. Using a high-quality surge protector or UPS can save your hardware from electrical damage.
- Monitor Drive Health: Regularly check your drive’s SMART (Self-Monitoring, Analysis, and Reporting Technology) status using tools like PandaOffice Drecov to spot failing components before they crash.
Conclusion
Navigating the complexities of data recovery from external hard drive can feel overwhelming, but it is a manageable challenge when you understand the underlying principles. Remember that “deleted” files are merely waiting to be overwritten; speed and caution are your best allies in this process. By utilizing specialized tools like PandaOffice Drecov and following built-in system repair protocols, you can transform a potential digital disaster into a minor inconvenience. Your files are likely still there—you just need the right map and the right tools to find them.


