


OneDrive is a powerful companion for modern computing, but sometimes the “cloud” feels more like a “fog” that clutters your local storage. Whether you are running out of disk space or simply want more privacy, learning how to unsync OneDrive is a fundamental skill for any Windows user. In this guide, we will dive deep into the mechanics of synchronization and provide you with a comprehensive roadmap to take back control of your files.
1. The Technical Foundation of OneDrive
OneDrive is more than just a folder; it is a specialized implementation of a Virtual File System (VFS). When you install OneDrive, it integrates with the Windows File System (NTFS) using a technology known as Windows Cloud Files API.
Understanding “Placeholder Files”
At the heart of the “magic” are Placeholder Files. Technically, these are “reparse points” within the NTFS file system. A placeholder looks like a normal file in your File Explorer—it has a name, a size, and an extension—but it contains no actual data bits on your physical disk. Instead, it contains a “metadata pointer” that tells Windows: “The real data for this file is currently stored in the Microsoft Azure cloud; fetch it only when the user double-clicks it.”
This allows you to browse terabytes of data without consuming a single gigabyte of local storage. However, this abstraction is exactly why many users search for how to unsync OneDrive—because when the connection is severed or the “pointer” breaks, files can appear to vanish.
The Three States of File Hydration
When you are looking at how to unsync OneDrive, you must recognize which “state” your files are in. Microsoft uses a process called Hydration to describe how a file moves from the cloud to your disk:
- Online-only (The Cloud Icon): * Technical Status: Dehydrated.
- Description: These are pure placeholder files. They take up almost zero “Size on disk.” If you learn how to unsync OneDrive and delete these locally, they remain safe in the cloud. However, they are inaccessible without an internet connection.
- Locally Available (The White Circle with Green Check): * Technical Status: Partially Hydrated.
- Description: This happens when you open an “Online-only” file. OneDrive downloads the data temporarily. It takes up space on your disk, but Windows may “Dehydrate” it (send it back to being online-only) if your disk space runs low.
- Always Keep on This Device (The Solid Green Circle with White Check): * Technical Status: Fully Hydrated & Pinned.
- Description: This tells the Cloud Files API to never reclaim this space. The file is physically stored on your SSD/HDD and is mirrored in the cloud. If you are researching how to unsync OneDrive to save space, these are the files you need to target, as they are the ones consuming your physical storage.
2. Understanding Synchronization: From “Always On” to Selective Control
Microsoft OneDrive operates on a simple premise: it mirrors your local folders (Desktop, Documents, Pictures) to the cloud. This ensures that if your laptop dies, your data lives on. However, this seamless link can become a burden. When you delete a file on your PC, it disappears from the cloud; when you modify a document online, it changes on your hard drive.
While this “mirroring” is helpful, many users eventually reach a point where they need to break the link. This leads us to the core question: how to unsync OneDrive effectively without accidentally wiping your digital life? Transitioning from a fully synced environment to a managed one requires a strategic approach.
3. Comprehensive Methods: How to Unsync OneDrive
There isn’t just one way to stop the sync. By following the steps provided, you can choose the best option that fits your needs, whether it’s for a short-term fix or a more lasting solution. Understanding these methods will help you manage your OneDrive synchronization more effectively.
- Disable Microsoft OneDrive Permanently in Windows 11/10
- Forcefully Delete OneDrive
- completely remove onedrive personal
Method A: Using Selective Sync
If you only want to remove specific folders from your PC while keeping them safe in the cloud, this is the best way how to unsync OneDrive.
- 1.Locate the OneDrive icon (blue or white cloud) in your Windows system tray (bottom right corner).
- 2.Click the Gear icon (Settings) and select Settings again from the menu.
- 3.Go to the Account tab.
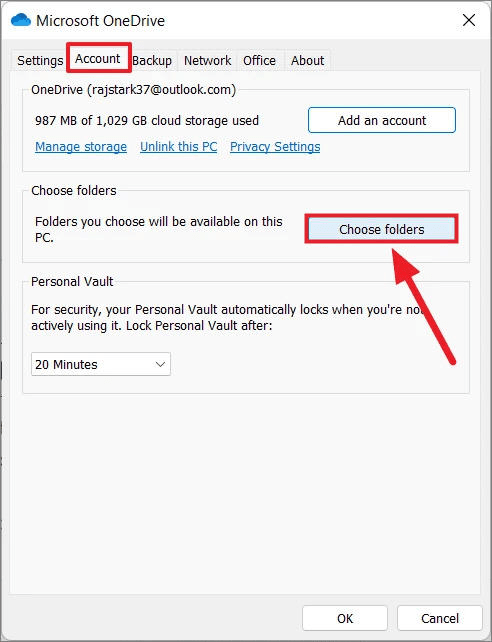
- 4.Click the Choose folders button.
- 5.Uncheck the folders you no longer want to see on your computer.
Note: These files will stay in the cloud but will be removed from your local hard drive to save space.
Method B: Unlinking Your PC (The Total Disconnect)
If you want to stop the OneDrive app from functioning entirely on your machine, follow these steps for how to unsync OneDrive at the account level.
- 1.Open OneDrive Settings from the taskbar.
- 2.Navigate to the Account tab.

- 3.Click the blue link that says Unlink this PC.
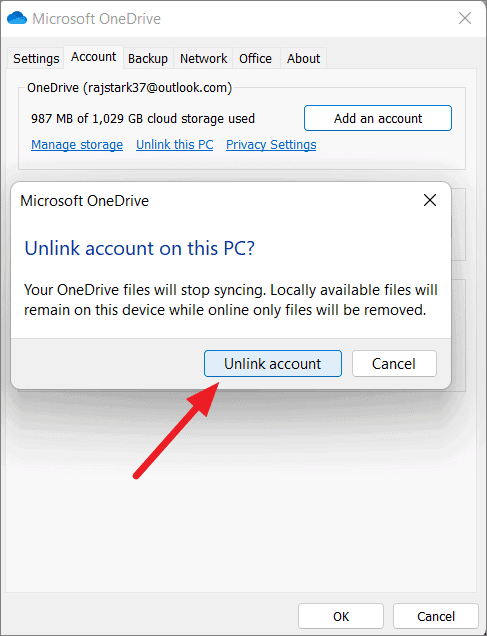
- 4.Confirm by clicking Unlink account in the pop-up window.
- Result: Your files stay on the hard drive (if they were downloaded) and in the cloud, but the “bridge” between them is broken.
Method C: Pausing Sync (The Temporary Break)
Sometimes you don’t need a permanent divorce; you just need a few hours of peace (or bandwidth).
- 1.Click the OneDrive icon.
- 2.Click the Gear icon.

- 3.Select Pause syncing and choose 2, 8, or 24 hours.
4. The Aftermath: Handling Data Loss Scenarios
A major fear when researching how to unsync OneDrive is the “Disappearing File Syndrome.” This often happens when users delete files locally before unlinking, or when they choose the “Online-only” setting and then lose internet access.
If you find that files are missing after you how to unsync OneDrive, do not panic. Data recovery is highly probable if you act quickly.
Emergency Recovery with PandaOffice Drecov
When standard “Undo” commands fail, professional tools like PandaOffice Drecov are the gold standard for restoring lost cloud-linked data.
Avoid installing it on the same drive where the data was lost to prevent overwriting.
- Step 1: Launch the application and select the local OneDrive folder path.

- Step 2: Select Deep Scan. The software will bypass the file system index to find “ghost” fragments of unsynced files.
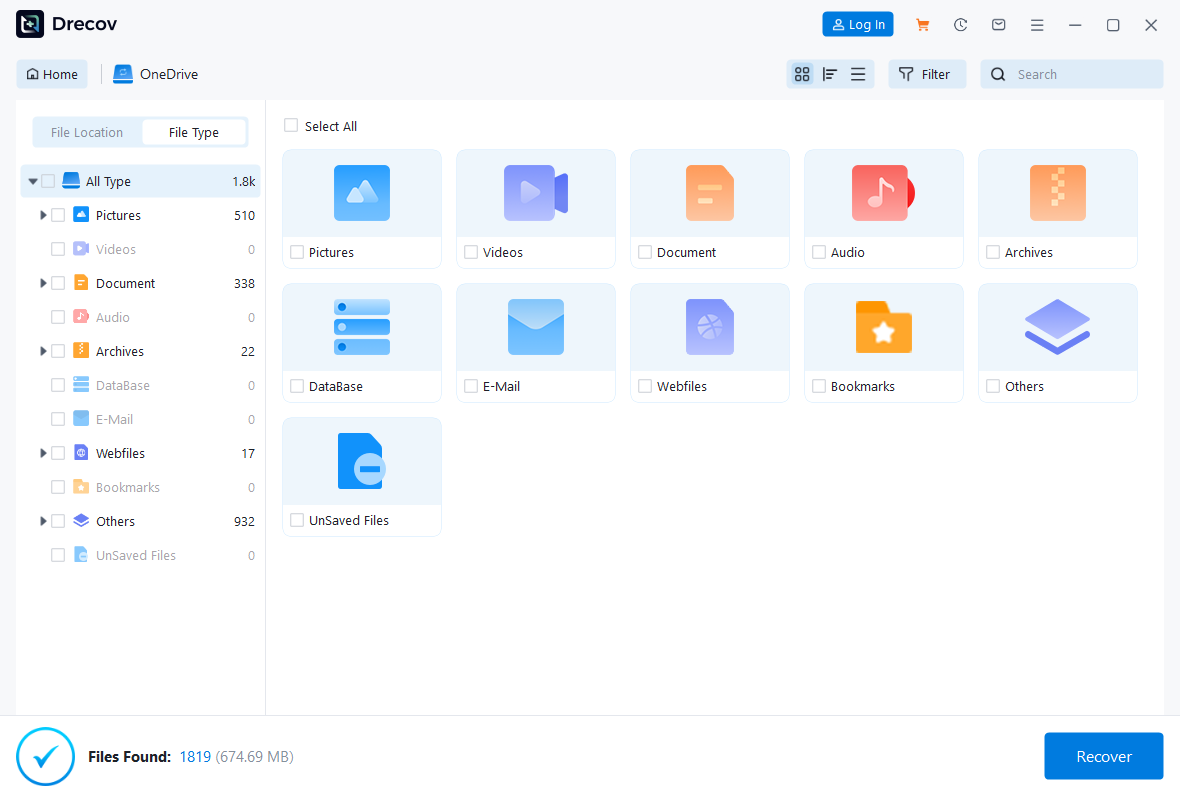
- Step 3: Preview the found items. Drecov allows you to see images and document headers before recovery.
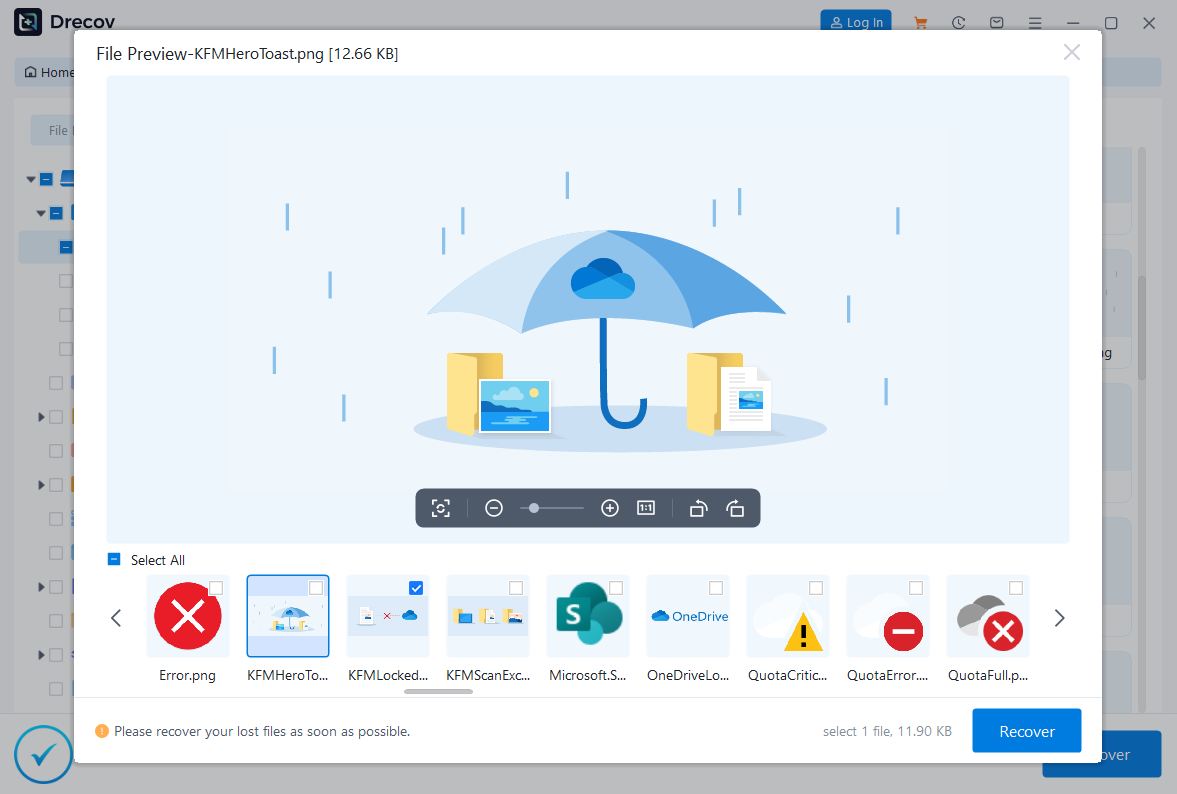
- Step 4: Select your files and click Recover, saving them to an external drive or a different partition.
5. Best Practices for Post-Unsync File Management
Once you have mastered how to unsync OneDrive, you need a system to keep your files organized.
- The 3-2-1 Rule: Always keep 3 copies of your data, on 2 different media types, with 1 copy offsite (the cloud).
- Manual Backups: If you have unsynced, get into the habit of manually uploading “Milestone” versions of your work to OneDrive via the web browser (onedrive.live.com).
- Storage Sense: Use Windows “Storage Sense” (
Settings > System > Storage) to automatically clean up temporary files that OneDrive might have left behind.
6.Expert Tips on How to Unsync OneDrive FAQs
Q1: Will unsyncing OneDrive delete my files from the cloud?
No. When you follow the steps for how to unsync OneDrive, your files remain safe at onedrive.com. Only the local “copy” is affected.
Q2: How do I unsync OneDrive from a specific device only?
You should use the Unlink this PC method described in Section 2. This removes the connection for that specific hardware without affecting your phone or other tablets.
Q3: Can I re-sync after I have unsynced?
Absolutely. Simply sign back into the OneDrive app with your Microsoft credentials. However, be careful with “Merge” prompts to avoid creating duplicate files.
Q4: Why does OneDrive keep syncing after I restart?
If you only “Quit” OneDrive, it will restart with Windows. To stop it permanently, you must Unlink this PC or disable it in the Startup tab of Task Manager (Ctrl + Shift + Esc).
7. Conclusion
Understanding how to unsync OneDrive is about striking a balance between the convenience of the cloud and the sovereignty of your local disk space. By using selective sync, unlinking your account, or employing tools like PandaOffice Drecov when things go wrong, you can ensure your data is always exactly where you want it. Remember: the cloud should work for you, not the other way around.


