


Understanding Sony Flash Media Architecture and Camera Storage Standards
The Technical Framework of Sony Solid-State Storage Media
Sony flash storage engineering relies on unique controller layouts and optimized wear-leveling algorithms to handle high-bitrate media recording. When using a specialized sony memory card inside high-resolution mirrorless setups, the storage system must manage sustained raw data flows without dropping frames. These memory modules utilize specific memory block layouts that align perfectly with the camera’s image processing engines. This custom software architecture ensures fast write speeds for continuous burst-shooting modes and ultra-high-definition video captures. Understanding how these flash storage sectors manage file directories helps you implement effective restoration strategies when files become unreadable.
How High-Performance Cameras Map File Allocation Paths
Modern imaging systems write files using a strict, nested directory structure optimized for fast file tracking and media playback. When you shoot with a sony camera memory card, the device builds a central index table that maps out the exact physical location of every image and clip. This intricate database file links RAW image files, companion thumbnail properties, and extensive exposure metadata into a single timeline layout. Because these file allocation tables are closely linked, any disruption to the card’s file system can break the connection paths completely, leaving your files hidden inside unallocated storage blocks.
⚠️Warning: Never Swap Cards While the Access Light is Blinking
Pulling flash media out of a device while the data write light is actively flashing will immediately corrupt the primary file allocation index. This creates major logical damage that makes the entire volume unreadable on computers.
Why Media Assets Disappear from High-Performance Camera Storage
Common Triggers for Directory Failures and File System Corruption
Data loss within a memory card camera sony setup generally happens due to file system allocation errors, accidental formatting, or sudden power drops. When a camera battery dies mid-shot, the system fails to close the active file allocation index properly, resulting in logical volume damage. Additionally, connecting your flash card to multiple computers running different operating systems can introduce write conflicts that break your directory paths. These technical glitches destroy the file pointers, leaving your heavy RAW image files and video clips completely hidden from standard file explorer windows.
The Structural Anatomy of a Deleted File Event
When a photo is deleted from a sony cyber shot camera memory card, the raw image data isn’t instantly wiped from the flash storage cells. Instead, the storage controller simply removes the file pointer from the index table and flags those sectors as available space for future recordings. If you continue taking pictures with that device, the incoming data streams will write over those flagged sectors, causing permanent file destruction. Acting quickly prevents this destructive overwriting cycle, maximizing your chances of a successful restoration before the original file blocks are altered.
Comprehensive Methods to Extract and Restore Missing Media Files
Method 1: Running Deep Partition Analysis via Pandaoffice Drecov
Rebuilding Fragmented Image Headers with Custom Recovery Engines
When file allocation tables suffer major logical damage, utilizing a dedicated recovery utility is necessary to scan raw storage sectors directly. Employing an advanced tool like Pandaoffice drecov provides a powerful solution to learn how to recover deleted files from sony camera memory card structures. This advanced utility scans through the raw flash cells sequentially to identify the unique binary signatures of RAW images and compressed video wrappers. By analyzing the fragmented sectors, it can accurately piece back together separate data blocks and rebuild your original media files cleanly.
Step-by-Step Restoration Implementation Protocol
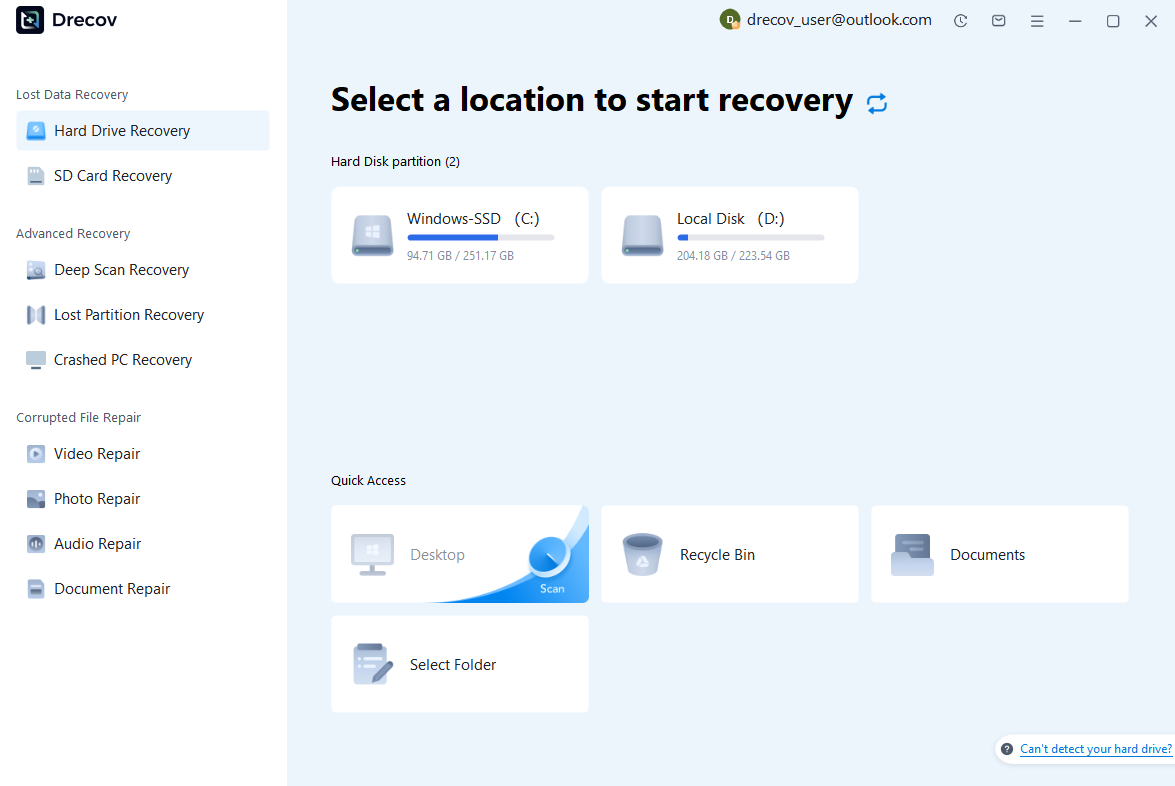
Step 1: Connect the Drive / USB)
Connect your device (SD card, HDD/SSD, or USB drive) to your computer and launch PandaOffice Drecov. Select the target device and start the scan. The software will perform a quick scan and deep scan to detect lost or deleted data.
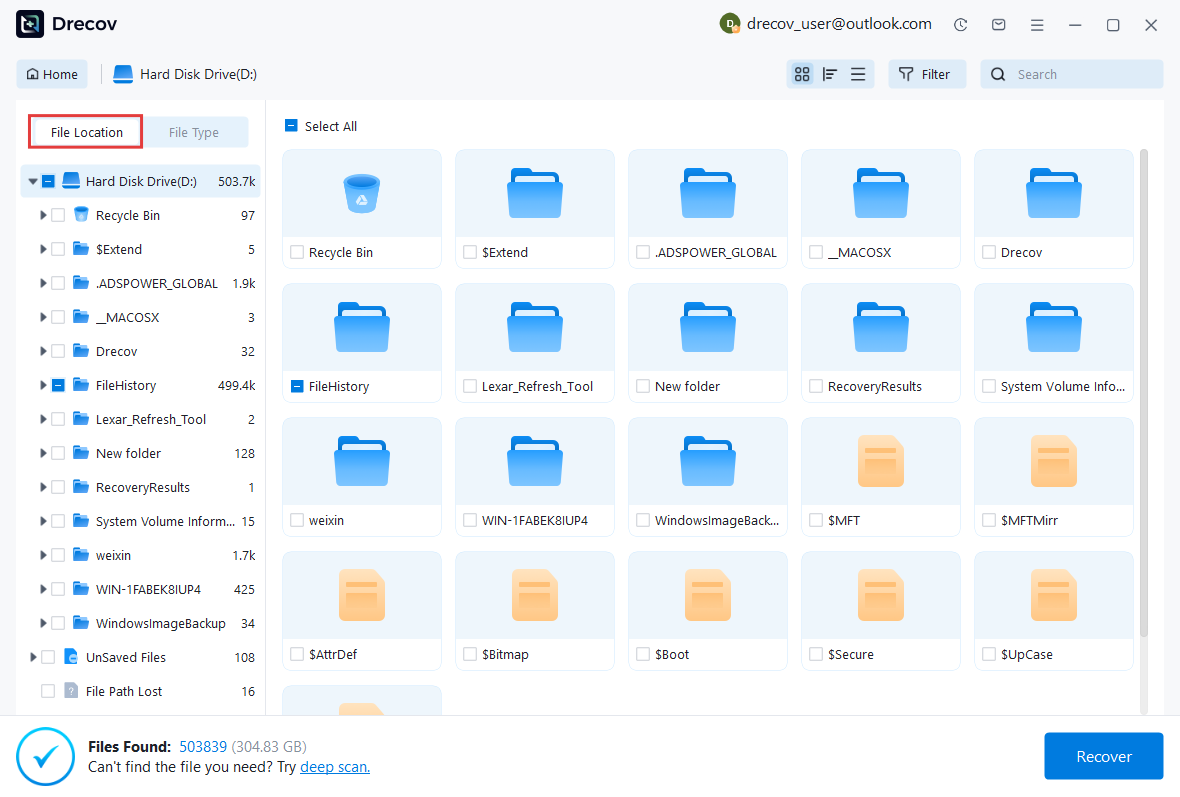
Step 2: Locate and Preview Lost Files
After scanning, browse the detected files and use the preview feature to check recoverable data. You can preview documents (Word, Excel, PDF), photos, and videos to ensure file integrity before recovery.
Step 3: Recover and Save to a New Location
Select the files you want to restore and click recover. Save all recovered data to a different drive or location (not the original device) to avoid overwriting lost data.

Why Choose PandaOffice Drecov Recovery Software?
PandaOffice Drecov offers a fast, secure, and user-friendly solution for recovering lost files across multiple scenarios. Whether you need email recovery, ZIP File Recovery, format data recovery, or help to recover deleted drafts Outlook, the software provides reliable recovery performance for both personal and business users.
PandaOffice Drecov supports recovery from formatted hard drives, SSDs, USB drives, SD cards, and external storage devices. Its advanced scanning engine can locate deleted archives, damaged ZIP files, lost Outlook drafts, and accidentally removed documents with high accuracy. For users searching for how to find deleted messages in Teams, PandaOffice Drecov can also help recover exported chat files, attachments, and related local cache data when available.
After recovery, test the file again. If the audio stream was damaged because of storage issues, a recovered version may play normally.
This method is particularly useful when only a few files exhibit audio problems while VLC works correctly with all other media.
This method can help users recover files from floppy disk storage after accidental deletion, formatting, or logical corruption.
Configuring the Standardization Test Environment
The test used a dedicated desktop computer running a clean installation of Windows 11 Pro (Build 22631). The platform featured an Intel Core i7 processor, 32GB of RAM, and a high-speed internal solid-state drive. A 64GB Sony Tough series SDXC card formatted with the exFAT file system served as the testing media. To closely mirror a real-world file corruption scenario, the test intentionally simulated an unexpected power loss during an active file-saving cycle.
Method 2: Utilizing Windows Check Disk Command Utilities for Directory Alignment
Fixing File Table Mismatches via Command-Line Tools
When an operating system detects a file system error on your card, built-in drive repair commands can sometimes fix the directory paths without third-party apps. This native system tool checks the logical allocation tracks, identifies broken file cross-references, and tries to patch the drive indices automatically. For creators trying to figure out how to recover deleted photos from sony cybershot memory card structures, this method helps when files are intact but access is blocked by logical drive errors. It repairs simple system issues, restoring normal access to your media folders.
Executing the System File Repair Routine
Open your computer’s search bar, type the command utility name, and right-click to run the program with full administrator permissions. Enter the native volume check command followed by your specific flash drive letter and the appropriate fix parameters. Press enter to let the system analyze the storage structure, repair logical file table conflicts, and realign orphaned directory sectors. Once the process is complete, restart your computer, open your file explorer window, and check if your camera folders have returned to their normal state.
Configuring the Standardization Test Environment
The test used an AMD Ryzen 5 workstation running an updated version of Windows 10 Enterprise (Version 22H2). The system featured 16GB of DDR4 memory and a high-speed internal storage drive. A 32GB Sony SDHC card formatted with the FAT32 file system served as the testing media. The test intentionally removed the card from an active card reader while the system was browsing files to simulate real-world data corruption.
Method 3: Assigning Fresh Device Volume Pathways via Disk Management
Resolving Drive Path Conflicts and Volume Mounting Blocks
Sometimes, your recorded images and videos become inaccessible simply because your computer fails to assign a valid drive letter path to the connected card reader. This common system glitch happens when hidden network paths or connected peripherals block the automatic assignment of drive letters. By opening the native disk management tool, you can manually override these configuration conflicts and assign a unique drive letter to the card. This step restores the connection to the card’s directory root, letting you access your files without running a full partition scan.
Reconfiguring the Drive Letter Configuration
Right-click your computer’s start button and choose the disk management console from the advanced tools menu. Scroll down through the lower drive layout pane to locate your flash memory volume, right-click its graphical box, and select the path modification option. Click the add button, choose a fresh, unused drive letter from the dropdown selection box, and apply the system changes. Open your file browser window to confirm that the storage drive is accessible and that your media folders show up properly.
Configuring the Standardization Test Environment
The drive path modification testing environment was built on a Microsoft Surface Laptop running a standard version of Windows 11 Home. The device hardware featured 8GB of integrated memory channels and a fast internal solid-state drive module. The storage media profile used for this test scenario was a 128GB Sony Professional flash card using an exFAT format. The volume assignment conflict was created by mapping conflicting network paths to the exact drive letter used by the memory card.
Method 4: Forcing Interface Controller Driver Refresh Sequences
Fixing Connection Bugs on Universal Serial Bus Hubs
When a computer’s USB controller drivers become corrupted, it can prevent the operating system from reading flash memory cards properly. This issue often looks like hardware failure, causing your memory card to show up as empty or entirely unallocated space in file explorer. To fix this, you can force the operating system to uninstall the corrupted device controllers and refresh its hardware configuration blocks. This reset allows the operating system to rebuild its data pipelines, restoring normal communication with your media card.
Executing the Hardware Controller Reset
Right-click your system start button, open device manager, and expand the disk drives section to find your connected storage card. Right-click the name of your card reader device, select the uninstall command, and confirm the action in the system popup box. Once the device is removed, unplug your card reader from the USB port, wait a few moments, and plug it back into a different port. Your system will automatically detect the hardware, install fresh controller drivers, and reload the photo folder structures.
Configuring the Standardization Test Environment
The test used an Intel-based desktop computer running a clean installation of Windows 11 Professional. The system featured 64GB of RAM and a high-speed NVMe SSD. A 64GB Sony Tough series memory card formatted with the exFAT file system served as the testing media. The test intentionally corrupted the USB mass storage controller configuration entries in the Windows Registry to simulate a driver conflict before the restoration process began.
Method 5: Scanning Hidden System Caches for Temporary File Packages
Locating Backup Data Blocks Inside Protected Windows Folders
When you transfer files, the operating system automatically creates temporary copies of your photos in background cache folders. It keeps these cached data blocks until the transfer completes successfully. If an unexpected shutdown or power failure interrupts the process, those temporary files may still contain your missing images. Instead of scanning the entire memory card, you can inspect these cache folders and recover the photos directly if the temporary copies remain available.
Open the system run dialog box by pressing the Windows key and R together, type the temporary folder command, and press enter. Sort the files by modification date to locate hidden files created around the time your photos went missing. If the files have generic names or extensions, copy them to a safe folder on your desktop and change their extensions back to match your original camera files. Open the renamed files in an image viewer to check if the image tracks render correctly.
Configuring the Standardization Test Environment
The test used an HP EliteBook workstation running a standard installation of Windows 10 Pro. The laptop featured 16GB of RAM and an internal solid-state drive. A 32GB Sony Elite memory card formatted with the FAT32 file system served as the testing media. The test intentionally interrupted a large file transfer before the copying process completed to create a temporary cache scenario.
⚠️Warning: Never Save Restored Photos Back to the Source Memory Card
Always save your recovered files to a completely different hard drive on your computer. Saving files back to the original memory card will overwrite other deleted items, permanently destroying any remaining data blocks.
Answers to Common Questions About Sony Camera Media Recovery
FAQ 1: Can I restore photos if my camera uses a special file database?
Yes, you can often restore your photos because Sony cameras use a separate image database file to track media, but the actual picture data is stored in standard image folders. If the camera’s image database becomes corrupted and says the card is empty, the underlying photos usually remain completely safe on the flash sectors. Running an advanced sector scan allows you to find and extract the raw image files directly. Once the photos are saved to a computer, you can format the card in the camera to rebuild a fresh image database file.
FAQ 2: Why do recovered RAW photos sometimes show up as low-resolution thumbnails?
Low-resolution thumbnails usually happen when basic recovery software only pulls the small preview images embedded inside the RAW file header instead of the full image data. RAW files are large and complex, and if a file becomes fragmented across different sectors, basic tools might fail to read the entire data block. Using an advanced utility that understands complex camera file formats helps ensure that the complete data structure is extracted. This restores your original high-resolution RAW photos instead of just the tiny preview thumbnails.
FAQ 3: What should I do if my camera displays an “Image Database File Error”?
If your camera shows an image database file error, do not select the option to rebuild the database if you have recently deleted photos you want to recover. The rebuilding process writes new data across the card’s sectors, which can easily overwrite the hidden space where your deleted files are stored. Instead, turn off the camera, remove the card, and connect it to a computer to extract your missing files first. Once your files are safely saved, put the card back in the camera and let it rebuild the database safely.
Essential Rules for Protecting Your High-Performance Media Files
Best Practices for Managing Camera Media Safely
To protect your photos from unexpected errors, always format your memory cards directly inside your camera’s settings menu rather than using your computer’s built-in formatting tools. Cameras format cards with specific cluster boundaries optimized for their own image processors, which helps prevent file errors and fragmentation. Additionally, always make sure your camera is fully turned off before removing the card or swapping batteries. These simple habits keep your file systems healthy and safeguard your creative work from sudden data loss.
Summary of Reliable Data Recovery Protocols
Successfully restoring lost camera files relies on understanding your file system, acting quickly, and choosing the right recovery methods. Whether you need to fix driver conflicts, reassign drive letters, or use Pandaoffice drecov for advanced deep sector scanning, protecting your original data blocks should always be your top priority. By following these proven recovery steps and keeping independent local backups, you can easily protect your valuable photo collections from unexpected card glitches.
⚠️Warning: Replace Memory Cards That Show Repeated Errors
If a memory card causes repeated file errors or disconnects unexpectedly, stop using it immediately. These issues point to internal hardware wear, and continuing to use the card puts your valuable recordings at serious risk.


