







A sudden ChromeOS device halt can be an alarming experience. The machine displays a stark white or black screen reading ChromeOS is missing or damaged. Consequently, the operating system demands critical external media. It shows a specific prompt: please insert a recovery usb stick or sd card. This system error indicates a severe logical corruption. Furthermore, it might point to an unreadable boot partition or a physical storage failure.
While this screen signifies that the current operating system cannot boot, it does not mean your underlying files are completely gone forever. Before you proceed with system reinstallation tools that completely format the drive, you must prioritize your local storage safety. Implementing a professional utility like PandaOffice Drecov data recovery software can help extract vulnerable files from standard external drives, local partitions, or corrupted storage media before a catastrophic wipe occurs.
Understanding the Basics of please insert a recovery usb stick or sd card
To properly resolve this issue, it helps to understand why the please insert a recovery usb stick or sd card prompt triggers. Google designs ChromeOS with a unique verification system called verified boot. Every single time you power on your machine, the system verifies the integrity of the cryptographic signatures on the firmware and operating system partitions. If the system detects unauthorized modifications, damaged configuration blocks, or localized hardware blocks that do not pass this scan, it completely blocks access to the user interface and routes you straight to this screen.
There are several distinct real-world situations where this error message manifests:
- Sudden Power Fluctuations: Turning off the computer during a major system upgrade can leave the main boot partition in an incomplete or broken state.
- Embedded Controller Synchronization Errors: A localized firmware glitch known textually as an EC software sync error can block communication between the motherboard and main storage blocks.
- Physical Media Fragmentation: Bad storage sectors on internal solid state drives or connected multi-media cards can render critical operating system directories completely unreadable.
Whenever you encounter this, resolving the prompt means you must create external restoration media using a secondary computer. However, the official Google recovery process removes all user files stored locally in the Downloads folder. If you have been utilizing the exact same USB drive or an external card for standard data storage and it suddenly turns raw, unreadable, or corrupted during this emergency, you need an advanced algorithmic tool to scan the sector blocks.
This is exactly where PandaOffice Drecov data recovery software provides an indispensable layer of security. This software specializes in deeply scanning storage blocks that standard file explorers fail to recognize. If your external media was corrupted while attempting to handle system operations, or if you accidentally formatted a drive containing critical personal work, running a deep raw search can parse structural remains of deleted data layers.
⚠ Warning: Install it on a drive different from the one where your data was lost to prevent overwriting.
Step-by-Step Solutions for the Chromebook Insert Recovery USB Error
When your screen freezes on this error, you have two urgent objectives: rescuing your files from compromised external storage media and executing a clean operating system repair. Fortunately, you can achieve both goals without losing your mind or your data. Below are the definitive structural solutions to get your machine and your files back into perfect working order.
Method 1: Recovering Crucial Files Using PandaOffice Drecov
If the USB flash drive or SD memory card you intended to use for the process has suffered a partition crash, file system corruption, or accidental deletion, do not attempt to write new data onto it. Writing new deployment files will overwrite the original data sectors. Instead, use the advanced structural parsing within PandaOffice Drecov data recovery software to rescue your important documents.
⚠ Warning: Install it on a drive different from the one where your data was lost to prevent overwriting.
Prerequisites and Specifications
- Required Tool: PandaOffice Drecov
- System Environment: Windows 11, Windows 10
- Estimated Scan Duration: 15 to 45 minutes depending on the total storage device capacity
- Storage Path Destination: A separate, secure folder on your main computer local C: or D: drive
Step-by-Step Recovery Process
Step 1: Connect Your Storage Media and Initialize the Application
Plug the affected external flash drive or card into an open port on your fully functioning secondary computer. Launch the main executable for the software. On the primary user interface dashboard, you will observe a complete visual map of all connected physical drives, logical volumes, and unallocated hardware spaces.
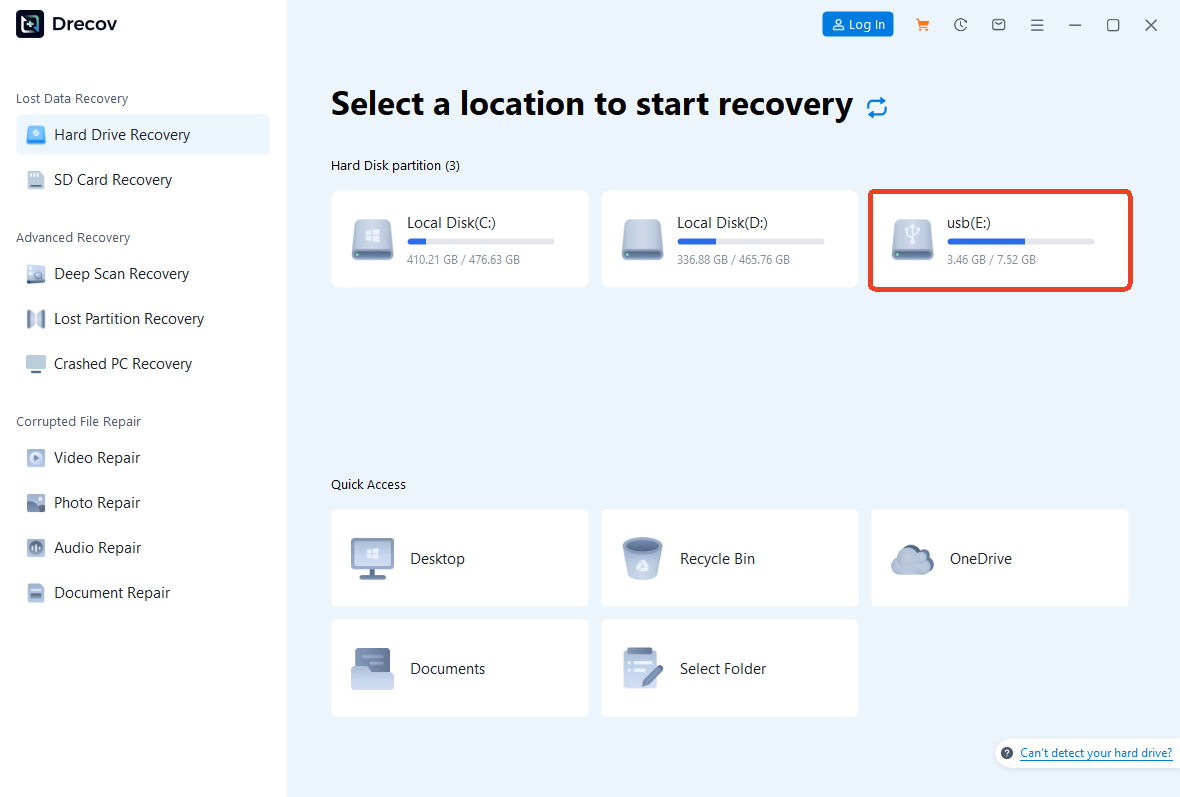
Step 2: Select the Compromised Volume and Execute Deep Scan
Locate the specific drive letter corresponding to your device. Click on it directly to highlight the volume. Select the deep scan button situated at the lower right corner of the dashboard panel. The software script will automatically run a dual-layered scanning protocol: a rapid file allocation table index check followed by a raw signature sector analysis.
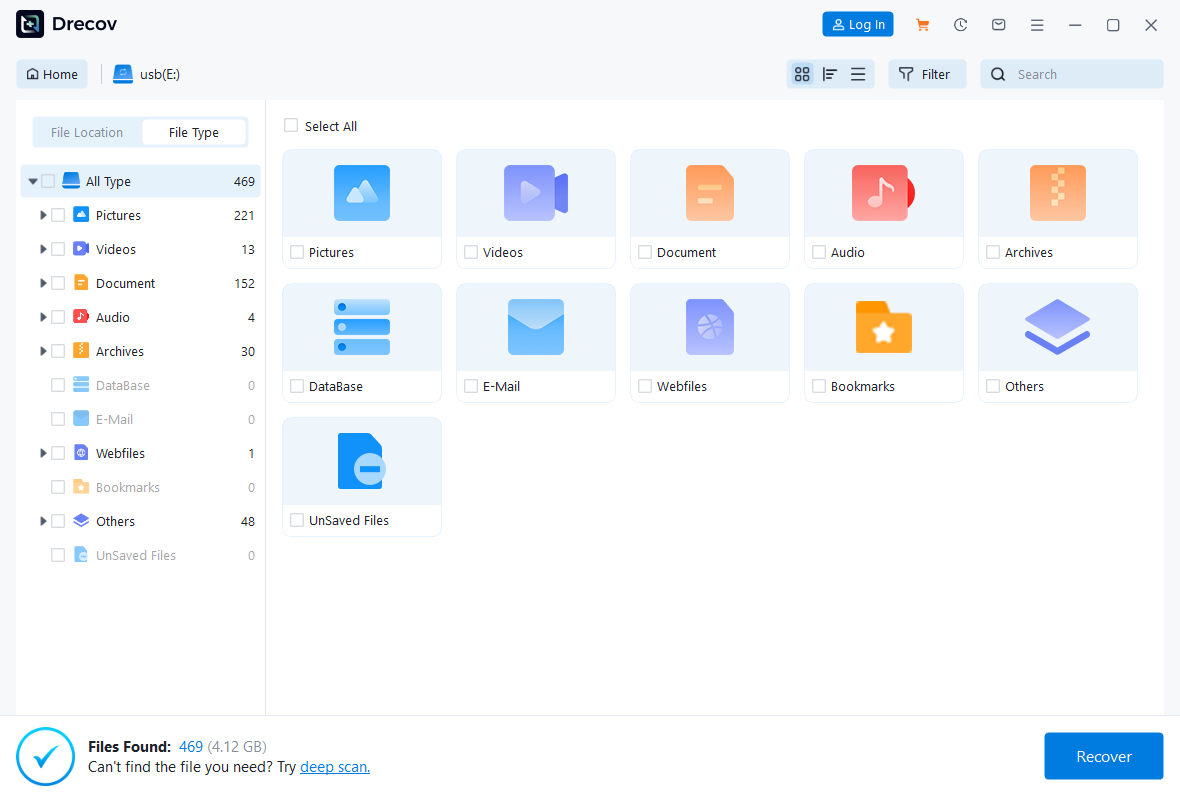
Step 3: Filter, Preview, and Reconstruct Lost Items
As the progress bar fills, you will see a real-time directory tree displaying detected file types. You can navigate through folders like documents, photos, or media archives. Use the built-in hex-viewer preview window to verify the structural integrity of your files before exporting them.

Step 4: Securely Export Extracted Data to a Safe Destination
Check the tick boxes next to the specific files or entire folders you want to save. Click the recover action button. Choose a target saving path that is entirely located on your local desktop internal hard disk drive. Never save the extracted data directly back onto the same corrupted flash drive or card, as doing so will permanently destroy other recoverable items.
Once your data is safely backed up, you can freely use that external drive to solve the operating system error on your machine without fearing complete file loss.
Method 2: Creating New System Media with the Chromebook Recovery Utility
With your personal data fully secured, you can now address the chromebook insert recovery usb mandate shown on your broken screen. This requires building a fresh, bootable image file from an external source.
Step-by-Step Reinstallation Process
Step 1: Install the Google Extension Tool
On your secondary working computer, open the Google Chrome web browser. Navigate directly to the official web store and search textually for the Chromebook Recovery Utility extension. Click the add to chrome installation option. Once successfully added to your browser workspace, click the extensions puzzle icon located at the top right section of the menu layout and launch the tool interface.
Step 2: Identify Your Specific Hardware Model
Click the blue get started button on the initial configuration screen. The interface will prompt you to enter the precise hardware model configuration code string. Look at the lower margin of the error screen on your broken machine to locate this specific model code. Type it directly into the input field text box, or select your manufacturer and exact device configuration name from the provided dropdown menus, then click continue.
Step 3: Prepare and Provision the External Flash Device
Insert a clean flash drive with a storage capacity of at least 8 gigabytes into the computer port. From the available storage selection dropdown menu list, choose the exact flash memory hardware you just connected. Review the text warning which explicitly states that all pre-existing partitions and configurations on this external tool will be permanently erased. Click continue, then select create now.
Step 4: Execute the Flashing Process and Safely Eject
The utility script will immediately download the latest verified official operating system image pack directly from Google cloud servers and write the uncompressed payload blocks onto your media. This process typically takes around 10 to 15 minutes depending on your internet download bandwidth. When the final notification reads your recovery media is ready, safely eject the device from your system slot.
Step 5: Trigger the Machine Update Sequence
Go to the unbootable machine showing the chromebook please insert a recovery usb stick message. If the device screen is blank or turned off, manually invoke the recovery mode screen. You can force this state by pressing and holding down the Esc key together with the Refresh key, then tapping the physical Power button once. Release the Power button first, and let go of the remaining keys when the alert graphic appears.
Step 6: Finalize Operating System Deployment
Insert your newly created bootable flash drive directly into an available side port. The internal firmware engine will instantly detect the presence of the root cryptographic image file and display a system restoring text message. Do not remove the media, close the laptop lid, or disrupt the electrical power during this step. Once complete, the machine will show a green checkmark instruction, reboot automatically, and present the standard factory startup welcome screen.
Alternative or Complementary Methods
While the official extension tool remains the standard automated protocol, technical alternative deployment paths exist for troubleshooting severe media write failures.
Localized Internet Recovery for Modern Architectures
If you are managing a contemporary machine built within the last few years, the hardware firmware may feature an integrated internet recovery mechanism. This completely bypasses the need for another computer or an manual external flash drive.
To check if your device supports this feature, boot into the error screen and look at the structural option menu listed at the bottom. If compatible, you can use keyboard arrow navigation keys to select the option reading recover using internet connection. Connect the device to your local wireless network or an attached Ethernet cable. The internal firmware will pull down the operating system payload directly to a hidden recovery cache partition and rebuild itself.
Manual Image Deployment via Rufus
For advanced technicians facing constant browser extension lockups or download network drops, you can download raw bin recovery images manually from credible online repository databases. Once you have the local uncompressed system bin file, you can utilize an alternative utility like Rufus.
Set the boot selection mode inside Rufus to all images, select your local bin file payload, and choose the target flash drive partition structure. This alternative method guarantees that the drive layout blocks are written bit-by-bit, which can resolve issues where the standard extension tool continuously fails to finish creation.
| Deployment Strategy | Success Rate | Requirements | Primary Drawback |
| Official Chrome Utility | Very High | Secondary PC, Chrome Browser, 8GB USB | Highly dependent on stable browser extension runtimes |
| PandaOffice Drecov File Rescue | Excellent | Windows or Mac Host PC | Focuses exclusively on file extraction, not operating system flashing |
| Internet Recovery Mode | High | Newer Model Hardware, High-Speed Wi-Fi | Completely unavailable on older legacy devices |
| Manual Image Partitioning | Moderate | Direct Local BIN File, Rufus Tool | Requires manual technical model matching |
Tips & Best Practices
To ensure maximum data protection and seamless system restoration when managing the chromebook please insert recovery usb error state, implement these professional recovery protocols:
- Avoid Substandard Media Brands: The internal verification engine inside ChromeOS devices is notoriously strict regarding block reading speeds. Avoid using low-cost unbranded flash drives or older generation multi-media cards. Opt for name-brand high-speed solid state storage media to prevent unexpected block write timeouts.
- Clear Peripheral Hardware Conflicts: Before you plug your restoration media into the broken machine, remove all secondary accessories such as external USB mice, drawing tablets, or headphones. Secondary connected peripherals can cause signal interference during the early motherboard boot phase.
- Maintain Your Restoration Storage Device: After successfully fixing your operating system, do not leave the drive in its multi-partitioned state. Open the official utility extension tool again, click the top right gear configuration icon, and select the option labeled erase recovery media. This restores the drive to its full original storage capacity format so you can use it for normal data management tasks.
Frequently Asked Questions
What causes the chromebook please insert a recovery usb stick or sd card screen to appear out of nowhere?
This screen indicates that your computer verified boot architecture has detected a fatal file mismatch or corruption inside the internal core operating system partition blocks. It acts as an internal safety shutdown mechanism to prevent a corrupted system layout from executing commands.
Will running an operating system recovery wipe all my old local files?
Yes, the system reinstallation process completely formats the internal solid-state storage drive blocks to write a clean copy of the operating system. Consequently, any un-synchronized documents or items sitting inside your local Downloads folder will be wiped. This makes running a preliminary data rescue scan on any corrupted backup media with software like PandaOffice Drecov data recovery software incredibly important.
The recovery utility tool keeps getting stuck at the writing stage. How do I fix this error?
This issue typically happens because local security software or antivirus programs on your Windows or Mac computer are blocking low-level drive writing permissions. Try running your browser with administrative access privileges, or check out helpful data management problem-solving guides such as the PandaOffice ChatGPT File Download Fix Guide to understand how localized download restrictions behave.
Can I utilize an external SD storage card instead of a standard USB memory stick?
Yes, you can absolutely use an external SD memory card, provided your broken machine has a dedicated physical card slot or you are using an external card reader accessory. The technical requirements remain identical: the card must feature at least 8 gigabytes of storage space and be completely free of important uncopied data.
How can I fix alternative app or gaming storage errors after my system is fully restored?
Once your operating system is fully functional, re-installing external application frameworks can sometimes present localized data file structure path issues. If you run into gaming client block errors or configuration issues during re-installation, you can follow specialized technical storage instructions via the PandaOffice Steam License Resolution Guide or review external storage configuration tips in the PandaOffice PS3 ISO External USB Media Guide to keep your media libraries running cleanly.
Conclusion
Encountering the system alert instructing you to please insert a recovery usb stick or sd card does not mean you have to lose access to your important digital files. By properly dividing your approach into data preservation and operating system reinstallation, you can completely recover from a system crash without losing data.
Always leverage the deep sector parsing capabilities of PandaOffice Drecov data recovery software to safeguard any vulnerable files stored on your secondary or corrupted media storage items first. Once your files are backed up, utilize Google’s official utility tool to rebuild your operating system configuration blocks. Moving forward, make it a habit to store your vital files on secure cloud platforms or verified external backup drives to stay ahead of unexpected hardware errors.






