


In the modern era of digital minimalism, the desktop has transformed from a cluttered storage bin into a serene digital sanctuary. Many users find that a clean, icon-free wallpaper helps them focus on the task at hand. However, Windows historically places one specific icon front and center that isn’t as easy to “delete” as a standard shortcut: the Recycle Bin. If you are looking for how to remove recycle bin from desktop to achieve that sleek, professional look, you have come to the right place.
This comprehensive guide will walk you through every method available—from simple toggle switches to advanced registry tweaks. Furthermore, because we understand that hiding the bin can sometimes lead to “out of sight, out of mind” data loss, we will introduce professional solutions like PandaOffice Drecov to ensure your files are always safe, even if the bin is hidden.
Why You Might Want to Remove the Recycle Bin
Let’s be honest—most of us don’t actually use the desktop as much as we used to. With modern taskbars, lightning-fast search features, and pinned applications, the desktop often becomes more decorative than functional. So why keep an icon there if it doesn’t serve your daily workflow?
Minimalist Desktop Setup
One of the biggest reasons people choose to remove recycle bin from desktop is pure aesthetics. A clutter-free desktop feels like a clean desk in real life; it significantly improves mental focus. When you boot up your PC and see nothing but a beautiful, high-resolution wallpaper, it feels intentional and organized. For graphic designers, content creators, or anyone who frequently shares their screen during presentations, that clean look matters immensely.
There is also a very practical, security-oriented reason. On shared or public computers, knowing how to remove the recycle bin from desktop can prevent the unauthorized restoration of deleted files. Imagine deleting sensitive documents, only for a subsequent user to restore them with a simple right-click. Removing the icon adds a subtle layer of privacy. It doesn’t delete the underlying functionality—it simply hides the access point from casual users.
Important Things to Know Before Removing It
Before you jump into your system settings and start toggling switches, let’s clarify a vital distinction: removing the Recycle Bin icon does NOT disable the Recycle Bin itself.
- Logic over Visibility: Files you delete will still gravitate toward the Recycle Bin unless you specifically configure the drive settings otherwise. You just won’t see the icon sitting on your wallpaper.
- System Protection: You cannot simply right-click the Recycle Bin and select “Delete” like you would with a shortcut to a Word document. It is a protected system object. This is why we must use Desktop Icon Settings, Group Policy, or Registry modifications.
- Reversibility: Every method discussed in this article is 100% reversible. If you decide next week that you miss the convenience of dragging files to the bin, restoring it takes less than sixty seconds.
How to Remove Recycle Bin from Desktop Windows 11
Windows 11 introduced a refreshed UI, but the core mechanics of system icon management remain familiar. If you’ve updated to the latest OS, follow these steps.
Method 1: Using Desktop Icon Settings
This is the safest and most official method provided by Microsoft. It requires no technical expertise and carries zero risk to your system files.
- 1.Right-click on any empty space on your desktop.
- 2.Select Personalize from the context menu.
- 3.In the Personalization window, scroll down and click on Themes.
- 4.Look for the “Related settings” section and click Desktop icon settings.
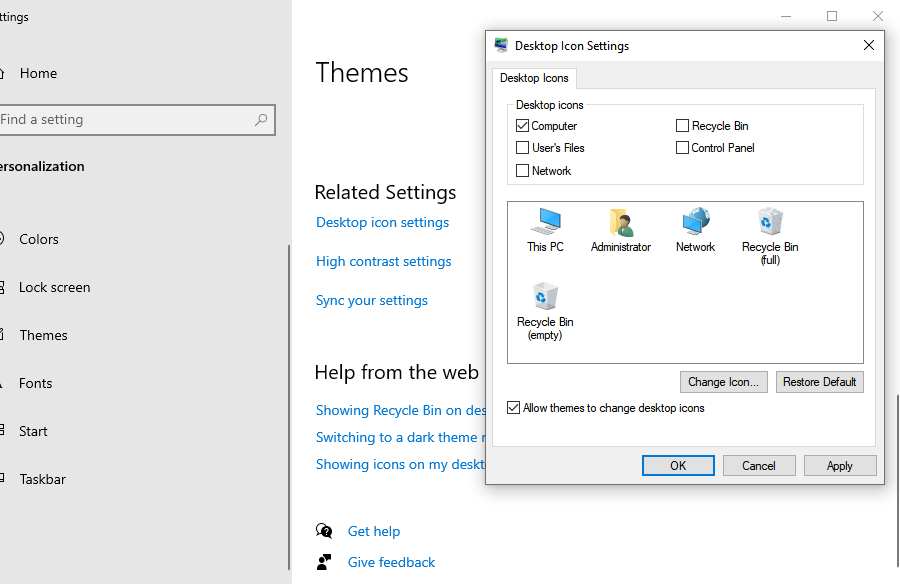
- 5.In the pop-up window, uncheck the box next to Recycle Bin.
- 6.Click Apply, then click OK.
Method 2: Using Registry Editor (Advanced Users)
For those who enjoy a more “under the hood” approach or are building a custom Windows deployment, the Registry Editor is an option.
Warning: Incorrectly editing the registry can cause system instability. Always export a backup of your registry keys before making changes.
- 1.Press Windows + R on your keyboard to open the Run dialog.
- 2.Type
regeditand hit Enter. - 3.Navigate to the following path:
HKEY_LOCAL_MACHINE\SOFTWARE\Microsoft\Windows\CurrentVersion\Explorer\Desktop\NameSpace - 4.Locate the key associated with the Recycle Bin (usually
{645FF040-5081-101B-9F08-00AA002F954E}).
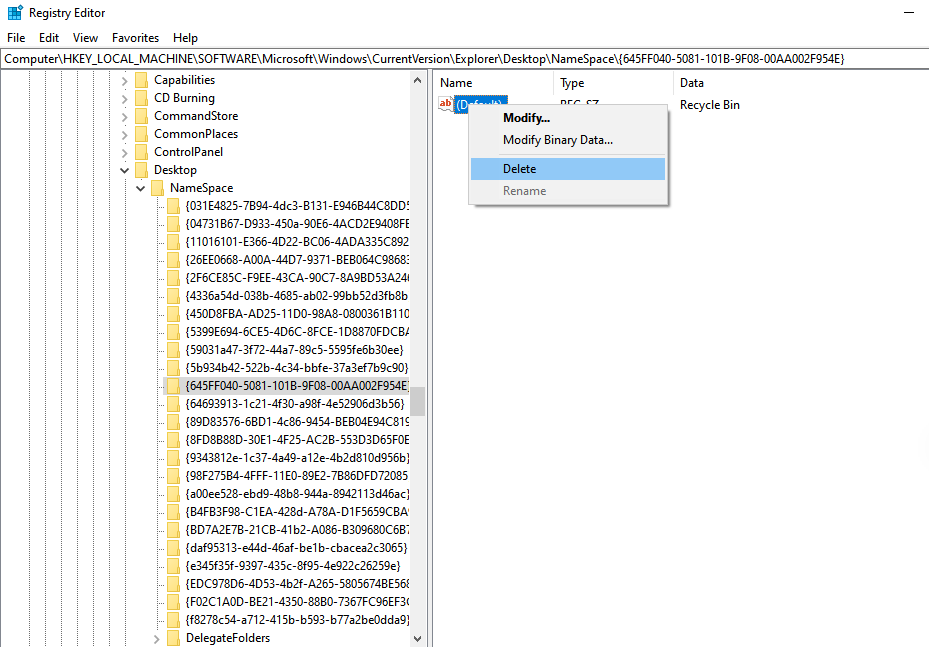
- 5.Right-click the key and select Delete.
- 6.Restart your computer or refresh the desktop.
How to Remove Recycle Bin from Desktop in Windows 10
Windows 10 remains the workhorse for many professionals. The process here is nearly identical to its successor, ensuring a smooth transition if you are managing multiple devices.
Method 1: Using Personalization Settings
This is the primary way to remove the recycle bin from desktop in the Windows 10 environment.
- Right-click the desktop and select Personalize.
- On the left-hand sidebar, click on Themes.
- On the right side (or at the bottom if your window is small), click Desktop icon settings.
- Uncheck the Recycle Bin checkbox.
- Click Apply to confirm the change.
Method 2: Using Group Policy Editor (Pro & Enterprise)
If you are using a professional version of Windows, you can use the Local Group Policy Editor. This is excellent for ensuring the icon stays gone even if other settings are changed. To understand the full scope of what Group Policy can do for your desktop environment, refer to the Microsoft Learn documentation on Group Policy.
- 1.Press Windows + R, type
gpedit.msc, and press Enter. - 2.Navigate to: User Configuration > Administrative Templates > Desktop.
- 3.In the right pane, find the policy titled Remove Recycle Bin icon from desktop.
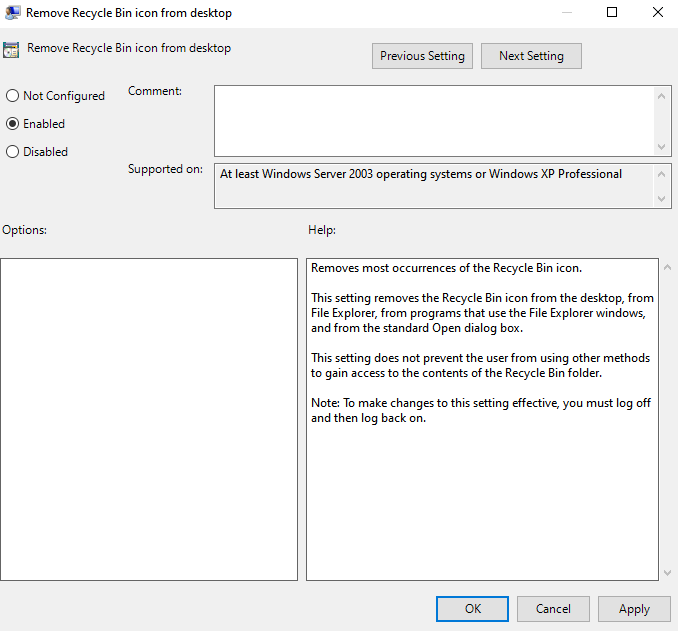
- 4.Double-click it and select Enabled.
- 5.Click Apply and restart your Explorer or PC.
What Happens After You Remove the Recycle Bin?
Once you successfully remove recycle bin from desktop, you might feel a brief moment of panic. “Where did my safety net go?”
Rest assured, nothing dramatic has changed under the hood. Deleted files still occupy space in the hidden $Recycle.Bin folder on your C: drive. The functionality remains fully intact in the background. Think of it like removing the handle from a kitchen drawer; the drawer and its contents are still there, you just haven’t made it easy to open from the outside.
How to Access Recycle Bin After Removing It
If you have hidden the icon but suddenly realize you accidentally deleted a crucial spreadsheet, don’t worry. You can still access the bin without re-enabling the desktop icon:
- The Search Bar: Simply click the Start button or press Windows + S and type “Recycle Bin.” It will appear in the results.
- File Explorer Address Bar: Open any folder, click the small arrow in the address bar (or type directly), and select Recycle Bin from the dropdown menu.
- The Run Command: Press Windows + R and type
shell:RecycleBinFolder. This will launch the bin immediately.
Critical Data Safety: Using PandaOffice Drecov
When you remove recycle bin from desktop, you lose the visual cue that tells you when your bin is full or when you’ve deleted something important. If you accidentally empty your bin or use Shift + Delete to bypass it entirely, you need a professional-grade recovery tool.
PandaOffice Drecov is a premier data recovery solution designed for both casual users and IT professionals. It specializes in retrieving data that has been “permanently” deleted, formatted, or lost due to partition errors.
⚠ Warning: Install it on a drive different from the one where your data was lost to prevent overwriting.
How to Recover Data with PandaOffice Drecov
If you’ve hidden your Recycle Bin and accidentally lost a file, follow these steps to get it back:
Step 1: Select the Location
Upon launching, the software will display a list of drives. If you deleted a file from your desktop or “Documents” folder, select the C: Drive or the specific “Recycle Bin” location within the utility.

Step 2: Deep Scan for Deleted Files
Click the Scan button. PandaOffice Drecov will perform a Quick Scan followed by a Deep Scan. The Deep Scan is highly effective at finding file fragments that the Windows operating system can no longer see.

Step 3: Preview and Filter
One of the best features of Drecov is the Preview function. Before you commit to a recovery, you can click on images, documents, or videos to ensure they are intact. Use the search bar to filter by file extension (e.g., .docx, .jpg).

Step 4: Secure Recovery
Select the files you wish to restore and click Recover.
Critical Warning: Always save the recovered files to an external hard drive or a different partition. Saving them back to the original location significantly increases the risk of permanent data corruption.
How to Permanently Disable the Recycle Bin
For some users, simply hiding the icon isn’t enough; they want the system to stop hoarding deleted files altogether. If you want deleted files to bypass the bin and free up space immediately:
- If you haven’t hidden it yet, right-click the Recycle Bin.
- Select Properties.
- Select the drive you wish to modify.
- Check the box: Don’t move files to the Recycle Bin. Remove files immediately when deleted.
- Click Apply.
Proceed with extreme caution. This setting removes your “undo” button. If you delete a folder with this setting active, it is gone instantly unless you have a tool like PandaOffice Drecov ready to perform a deep-sector scan.
Common Problems and Fixes
Occasionally, users encounter issues when trying to remove recycle bin from desktop. Here are the most frequent hiccups:
- The “Apply” button is greyed out: This usually happens if you don’t have administrative privileges. Ensure you are logged in as an Admin.
- The icon reappears after a reboot: This is often caused by third-party “desktop organizer” software or theme-syncing settings in Windows. Disable “Allow themes to change desktop icons” in the Desktop Icon Settings menu.
- Cannot find Desktop Icon Settings: In Windows 11, Microsoft moved many settings. Use the search bar in the Settings app and type “Desktop Icon” to jump straight there.
Should You Remove the Recycle Bin? Pros and Cons
| Pros | Cons |
| Aesthetic Minimalism: Creates a clean, professional-looking desktop environment. | Slower Access: Requires extra clicks or search commands to restore accidentally deleted items. |
| Reduced Clutter: Helps you focus on active project files rather than system icons. | Risk of Overfilling: Without the visual “full” icon, you might forget to empty the bin, wasting disk space. |
| Privacy: Prevents guests or colleagues from easily snooping through your deleted files. | False Sense of Security: Users might forget that “deleted” doesn’t mean “permanently gone” without manual emptying. |
Advanced Data Recovery Insights
Hiding the bin is a cosmetic choice, but data management is a technical necessity. As you master the interface of your PC, it is equally important to master the safety of your data. Many users believe that once the Recycle Bin is emptied, the data is physically erased.
In reality, Windows simply marks the space as “available.” The bits and bytes remain on the disk until a new file (like a large game download or a high-def video) overwrites them. This is why professional tools are so successful at recovery.
If you are interested in diving deeper into the world of file restoration, check out these essential resources:
- 4 Best Ways: How to Recover Files from Recycle Bin After Emptying
- How to Recover Deleted Data from Recycle Bin: 2026 Guide
- How to Recover Emptied Recycle Bin in 3 Easy Steps
- Windows 10: Empty Recycle Bin Recovery in Minutes
Remove Recycle Bin from Desktop FAQs
1. Can I delete the Recycle Bin permanently from the system?
No. The Recycle Bin is a core component of the Windows File Explorer architecture. You can hide the icon or disable its storage function, but you cannot “uninstall” it.
2. Does removing the icon free up any hard drive space?
No. Removing the icon is strictly a visual change. To free up space, you must actually empty the bin or reduce its maximum allowed size in the Properties menu.
3. Is using the Registry Editor safe for beginners?
Generally, no. While the steps are straightforward, a single typo in the Registry can cause apps to stop working or prevent Windows from booting. We always recommend the Desktop Icon Settings method for most users.
4. Will my files still go to the bin if I hide the icon?
Yes. Unless you have specifically enabled the “Remove files immediately” setting, Windows will continue to store deleted items in the background.
5. How do I bring the icon back if I change my mind?
Simply repeat the steps in the Personalization menu: Go to Themes > Desktop icon settings, check the box for Recycle Bin, and click Apply.
Conclusion
Learning how to remove recycle bin from desktop is one of the easiest ways to take control of your Windows user experience. Whether you choose the user-friendly Personalization menu or the more robust Group Policy Editor, the result is a cleaner, more efficient workspace.
However, visual minimalism should never come at the cost of data security. Always keep a recovery tool like PandaOffice Drecov in your digital toolkit. By combining a clean interface with powerful recovery capabilities, you get the best of both worlds: a beautiful desktop and the peace of mind that your files are never truly lost.


