







If you are asking how to delete a flash drive’s contents, first decide whether you mean a few files or everything on the USB stick. In Windows, open the correct drive in File Explorer, copy anything worth keeping to another device, then delete the selected files. Do not format the drive merely to remove a folder. Formatting rebuilds the file system for the whole volume, while ordinary deletion removes the items you choose. Neither action is a substitute for a verified backup.
Decide whether you mean files, the whole volume, or the device itself
People use “delete a flash drive” for three different jobs. You might want to remove one old folder, clear the drive so you can use it again, or erase personal information before giving it away. Windows has different operations for each. This page starts with the least broad one: deleting selected files from a working USB device. You can stop after that if the drive still has a purpose and you do not need to change its file system.
Formatting is a whole-volume operation. It may be appropriate when you have already saved everything and need a different file system for another device. It is not a faster way to choose which files remain. Secure disposal is another goal again: ordinary deletion and quick formatting do not prove that private data cannot be recovered. If the USB will leave your control, use a device-appropriate sanitization process or do not pass along a sensitive drive.
Confusing these meanings is how people erase the wrong data. Write down what should remain on the stick before you start. If you cannot name the files you are willing to remove, do not select all. The published wipe-versus-format comparison addresses the broader erase-for-reuse or disposal decision; it is not needed to remove one ordinary folder.
Identify the correct flash drive before selecting files
Plug the USB stick into the computer and open File Explorer with Windows + E. Select This PC. Compare the drive’s name and approximate capacity with the device in your hand. Windows may assign a different letter each time, so do not rely on the letter from a previous day. If several external drives are connected, disconnect those you do not need. That reduces the chance of selecting files on a backup drive by mistake.
Open the USB and inspect its top-level folders. If you are not sure which files belong to a camera, application, or another person, do not delete them yet. Some programs place configuration or project folders on removable media. A folder that looks expendable by name may contain the only copy of a project. Check the modified dates and open representative files before deciding what can go.
When the USB opens with errors, shows the wrong size, or repeatedly disconnects, stop. Deletion will not diagnose the connection or make the hardware more reliable. First copy readable data to another healthy device. If the stick cannot stay connected even for a basic read, do not run repeated scans or formatting attempts; a specialist or controlled image may be the safer path.
Make a backup you can actually use
Before deleting, copy the files you want to keep to a different drive or trusted cloud location. A copy on another folder of the same USB is not a backup against the USB failing. Keep the original layout for now so you can compare the copied folders. When the transfer ends, open a document beyond its first page, view a photo at full size, and test a large file if you have one. A progress bar reaching the end does not guarantee every copied item is intact.
Check whether a sync app has changed the source while you were copying. If a folder is shared with OneDrive or another service, confirm which side holds the current version before deleting anything. A file that exists online may not be fully downloaded to the USB, and a deletion can propagate through synchronization. When in doubt, pause the sync and preserve independent copies before making changes.
Keep the backup connected but clearly separate from the USB you will clean. Labeling the drives in File Explorer can help if you have several similar devices. Do not use Windows’ Select All shortcut until you are certain the current window belongs to the right USB and every item in it can go. Taking another minute to verify the destination is easier than trying to reconstruct a deleted folder later.
Delete selected files in File Explorer
Open the intended USB folder. To remove one file, click it once and press Delete, or right-click and choose Delete. For several items, hold Ctrl while selecting each one. For a continuous range, select the first, hold Shift, and select the last. Read the highlighted names before confirming. Avoid Shift + Delete unless you deliberately want to bypass any ordinary recovery route Windows might offer.
Wait for File Explorer to finish. Do not unplug the drive while Windows is still deleting or updating its folders. Reopen the folder and confirm that the intended files are gone while the ones you wanted to keep remain. A file that refuses to delete may be open in an application, protected by permissions, or affected by a failing device. Close the application and try once; do not immediately run a forced command against a path you have not verified.
Do not assume files removed from a removable drive will appear in the Windows Recycle Bin. Behavior can differ by device and setup. Check the Bin if you make a mistake, but do not keep writing to the USB while hoping the file is there. The Recycle Bin recovery page explains that separate route. If the desired file is absent, move promptly to backups or a careful recovery decision.
If your real goal is an empty drive, know what formatting changes
When every file on the USB is expendable and you need a fresh file system, you can consider formatting after verifying the backup. In File Explorer, right-click the correct USB volume and select Format. Check the displayed capacity again before choosing the file system required by the devices that will use the stick. The quick-format checkbox changes how much work Windows does; it does not select individual folders to keep. Formatting the wrong volume can affect an entirely different drive.
Microsoft’s format command documentation explains that formatting creates a new file system and can remove access to the old contents. Do not copy a command from a guide and substitute a guessed drive letter. If you only wanted to delete a few files, return to File Explorer instead. If you are preparing a USB for someone else, note that a normal reuse format is not the same as a verified secure erase on flash memory.
After a format for reuse, copy a small nonessential test file to the USB, open it, eject the drive, and reconnect once. This checks the workflow you will use. It does not certify the entire device. If the drive changes size, drops offline, or fails to reopen the test file, stop using it as the only location for important data. The USB data recovery overview is for files already lost from stable storage, not a way to fix unstable hardware.
Recover an accidentally deleted file without writing over it
If you removed a needed file, stop new writes to the USB. Check the Recycle Bin and the independent backup first. Drecov is Windows data-recovery software that can search a stable, recognized USB drive for deleted or inaccessible files. It uses a read-only recovery workflow with Quick Scan, Deep Scan when needed, filtering, preview, and a separate recovery destination. Lost Partition Recovery is also available if partition information disappears, but Drecov does not repair a broken USB connector or guarantee recovery of overwritten data.
Prepare a healthy second device with enough space for recovered files. Install the software on the computer or another healthy location, never on the USB that held the lost file. If the drive repeatedly disconnects or reports serious read errors, stop direct scanning and seek help with imaging or professional recovery. Finding deleted data and repairing a failing storage device are different tasks.
⚠ Warning: Install it on a drive different from the one where your data was lost to prevent overwriting.
Step 1: Point Drecov to the original USB
Open Drecov and select the original flash drive or its volume. Match its expected capacity and name rather than trusting a drive letter alone. Do not choose the backup drive as the source.
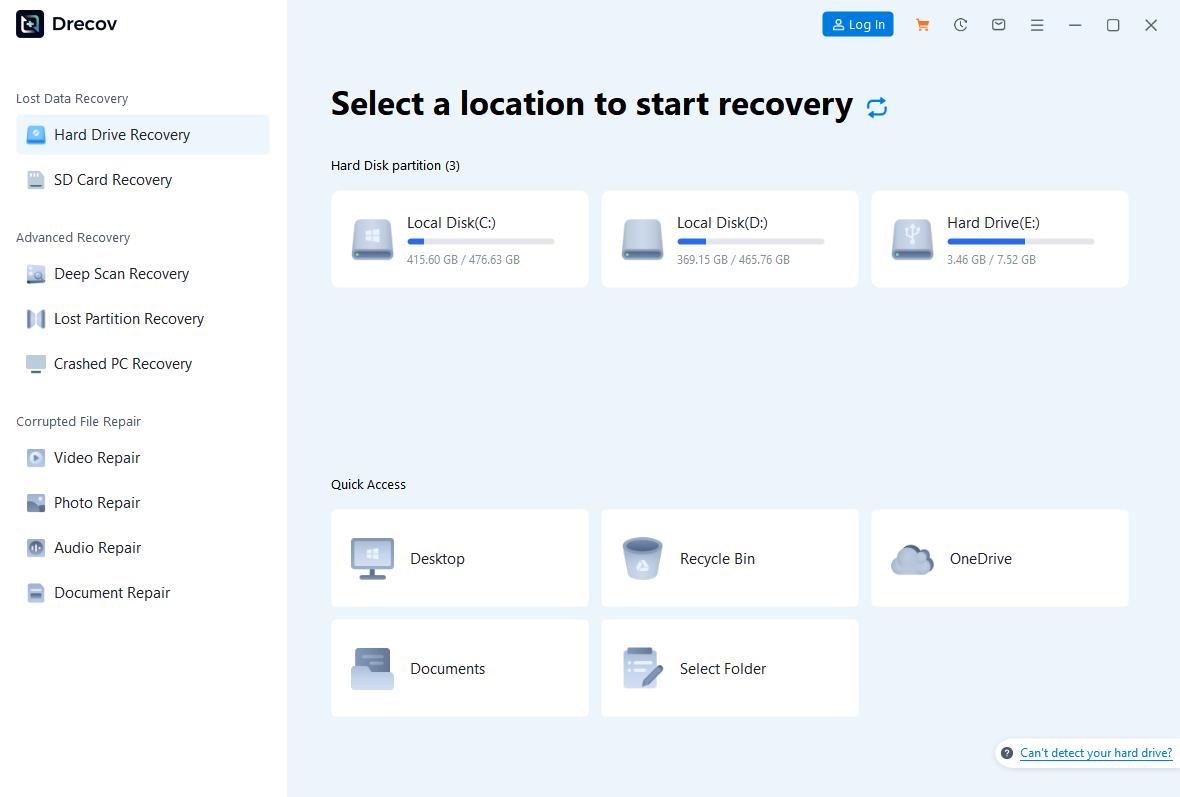
Step 2: Start with Quick Scan
Run Quick Scan. Look for the deleted folder, file type, and familiar names. If the target appears, inspect it instead of starting another scan automatically. A filename on a result list does not yet prove the content is usable.
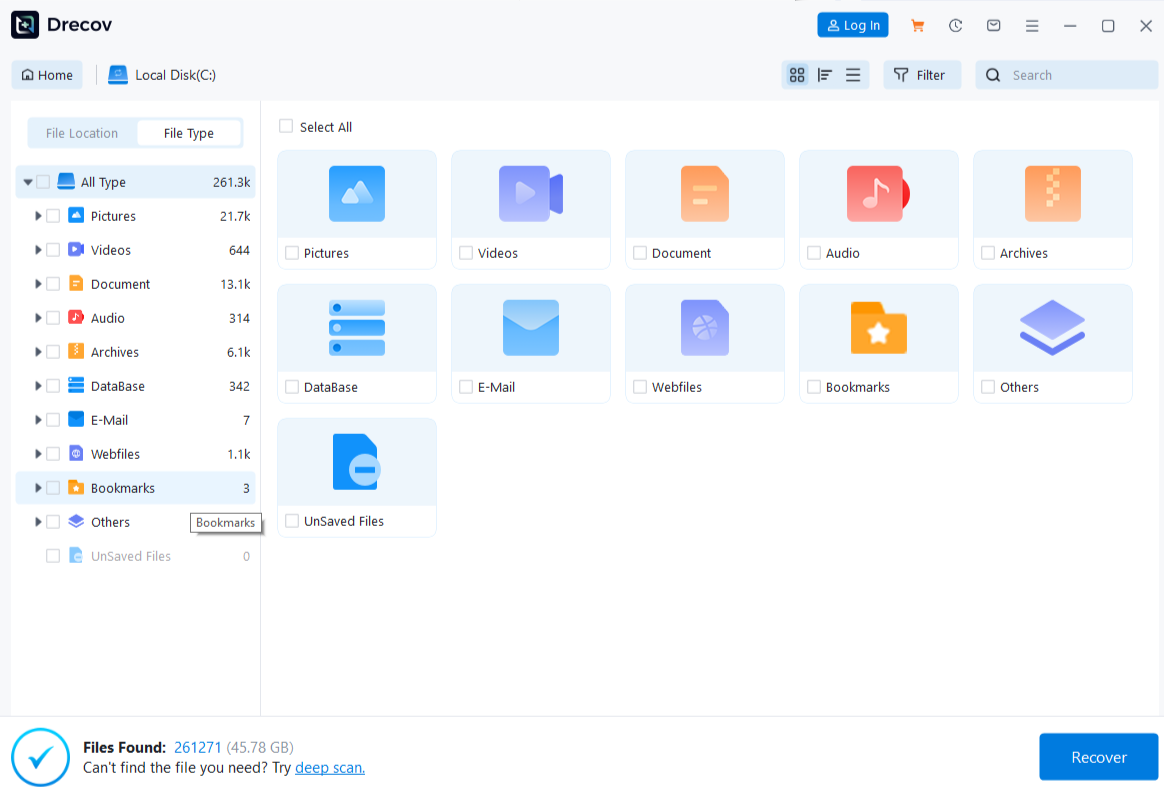
Step 3: Use Deep Scan only if the source stays stable
When Quick Scan misses the needed file and the USB has a steady connection, run Deep Scan. Stop if the drive disconnects or produces serious read errors. More direct scans do not repair hardware and cannot recreate sectors overwritten by later copying.
Step 4: Filter and preview the candidates
Narrow results by file type, former folder, or name when those details are available. Preview several representative documents, photos, or videos. A preview is helpful evidence, but it cannot guarantee every page or frame is complete.
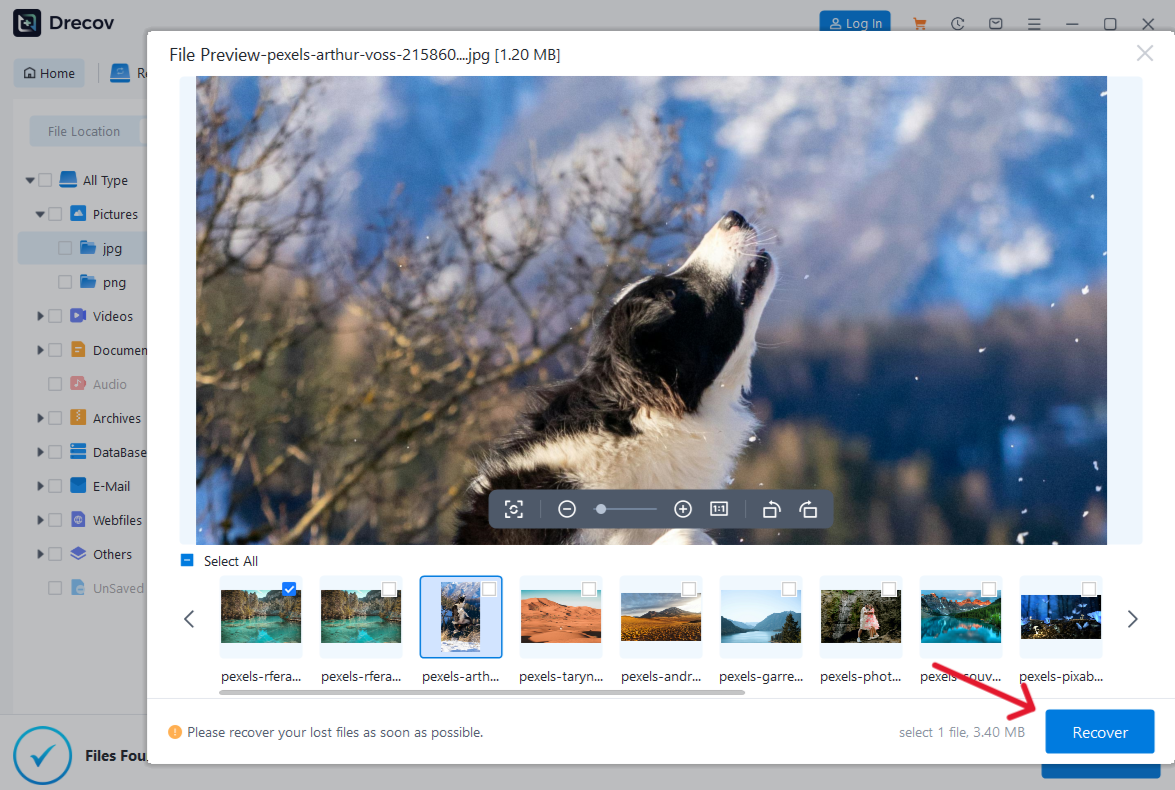
Step 5: Recover to a different healthy device
Save selected files to the separate destination you prepared, never back to the source USB. If you cannot see the output where expected, look in the Drecov Folder or Recovery Folder before scanning again.
Step 6: Verify before using the USB again
Open the recovered copies and check important content. Compare them with your backup or expected filenames. Only after you have confirmed the data is safe should you decide whether to keep using, format, or retire the original stick.
⚠ Warning: Install it on a drive different from the one where your data was lost to prevent overwriting.
Frequently asked questions
Will deleting files from a USB always move them to Recycle Bin?
Do not rely on that. Removable storage can behave differently from an internal Windows drive. Check the Bin after an accidental deletion, but also stop writing to the USB and look for a backup.
Can I delete everything by choosing Format?
Formatting makes the whole selected volume appear empty and creates a new file system. It is appropriate only after you have copied and verified everything you want to keep. It is not a way to remove just one folder.
Is ordinary deletion secure enough before giving away a USB?
No guarantee. Ordinary deletion and quick formatting can leave data recoverable in some conditions. A device-appropriate sanitization or disposal process is a separate task. Do not give away a drive containing sensitive information on the assumption that a missing filename means the bytes are gone.
What if a file comes back after I delete it?
Check whether a sync program or application is restoring it. If the USB also reports errors or becomes read-only, back up readable files and stop using it for important data. Repeatedly deleting the same item is not a repair.
What should I do if I deleted the wrong file?
Stop copying to the USB. Check the Bin and a verified backup. If the file is still missing and the drive remains stable, use a recovery workflow that saves results to another device. Do not format the USB first.
Conclusion
Deleting a flash drive usually means clearing files from it, not destroying the device or securely erasing every block. Identify the correct USB, verify a separate backup, and remove only the selected items in File Explorer. Treat formatting and secure disposal as different decisions. If you delete the wrong file, leave the stick idle and check ordinary restore routes first. On a stable Windows-recognized USB, Drecov can search the original location and recover selected files elsewhere; open those copies before making any further changes.
⚠ Warning: Install it on a drive different from the one where your data was lost to prevent overwriting.





