








Recover the KeePass Database without Losing Its Key Context
To recover KeePass databases, separate three questions: whether the encrypted database file survives, whether an earlier entry version survives, and whether you still have the required opening credentials. A valid KDBX backup can restore a database milestone, but it does not remove its master-key requirements. Entry History can restore an older value only when the relevant database and history remain accessible.
Record the database path, KeePass version, approximate incident time, and a nonsecret identifier for the affected entry. Do not put actual passwords into a recovery checklist or search request. Keep the investigation local and use the legitimate credentials you already control. A damaged file, a wrong key factor, and an older database copy require different recovery decisions.
Preserve Encrypted Candidates before Testing
Close applications that may write to the database and copy the surviving encrypted files to a separate recovery directory. Keep originals unchanged and label candidates by source and date. Preserve the required legitimate key-file context separately according to your existing secure arrangement. Then use working copies for comparison, synchronization, or repair.
If an unlocked database still contains useful current information, save an additional encrypted copy through KeePass before exploring older states. Do not replace that protection with a plaintext export. An encrypted native copy preserves a useful recovery candidate without creating an unnecessary unencrypted collection of secrets during a routine content comparison.
Native Route 1: Restore an Existing Entry History Version
- Open the intended database using its legitimate key factors.
- Select the affected entry and inspect its History tab.
- Compare the relevant earlier version without replacing the current value immediately.
- Restore an accepted version and save a separate encrypted milestone.
KeePass can retain previous entry versions within the database. Availability depends on the history that actually survives and its maintenance settings. Enabling or expanding history retention after the incident cannot recreate removed versions. Compare the entry’s identity and revision context before accepting an older secret or note as the information you need.
Keep Current and Historical Values Distinct
An earlier entry may contain a useful note or username while its password has since changed at the real service. Restoring it locally does not change that service’s current credential. Decide which field or version you actually need. Preserve the current encrypted candidate so the investigation cannot discard a still-valid newer value accidentally.
Also inspect attachment presence and nonsecret entry context where relevant. A familiar title may refer to a similarly named entry for another account. Use the expected group, URL context, and legitimate account identity to distinguish candidates. Do not test secrets indiscriminately against unrelated services as a way to identify which entry belongs where.
Native Route 2: Open a Legitimate Existing KDBX Backup
- Locate a preserved encrypted database copy from the relevant milestone.
- Keep the original backup untouched and open a working copy.
- Supply the legitimate key factors that applied to that candidate.
- Compare groups, entry identity, history, and required attachments locally.
A native database backup can preserve an earlier complete collection, but it represents its own save state. Another copy might contain newer useful changes. Compare actual entry information and history rather than selecting solely by modification time. A recent file timestamp can reflect a transfer or synchronization operation rather than the moment the missing entry last existed.
Identify the Correct Opening Requirements
A database may require a master password, key file, or another configured factor. A backup created before a key change can have different requirements from the current copy. Preserve that context without exposing the secrets in filenames or reports. A storage scan can retrieve encrypted bytes, but it cannot promise access when required key material is unavailable.
If a candidate will not open, record the exact error without posting credentials or the database publicly. Compare version compatibility and the known opening requirements before declaring corruption. Repeatedly renaming the file or trying unrelated key files does not establish a safe recovery route and may obscure which source you actually tested.
Native Route 3: Synchronize Two Preserved Valid Copies
- Preserve separate encrypted originals of both useful database copies.
- Open a working candidate through KeePass with legitimate access.
- Use the native synchronization workflow for compatible copies of the same database.
- Compare the merged entries and history before adopting either resulting file.
KeePass synchronization can merge changes from compatible database copies at entry level. It can write the merged result to both participating locations, so never test it on the only original candidates. Use separate working copies and understand the destination paths first. This is a controlled merge of surviving data, not a way to recover an unrelated missing database automatically.
Inspect Conflicting Entry Changes
When two copies contain different useful edits, compare the actual entry and its History after synchronization. KeePass may retain a displaced version in history, subject to its rules and maintenance limits. Verify the information you needed rather than assuming every conflict resolved in your preferred direction. Preserve the original copies until the accepted collection passes inspection.
Do not treat the database file’s timestamp as the sole authority for every entry. The synchronization mechanism considers entry-level information, and useful changes can coexist across different copies. A manual filesystem overwrite can discard one side entirely. Compare the native merge result before choosing a final working location and resuming any external synchronization service.
Native Route 4: Test Native Repair Only on a Damaged Copy
- Preserve the damaged encrypted file and all valid alternatives first.
- Confirm the database format, compatible KeePass version, and legitimate key requirements.
- Use the documented native repair option only on a disposable working copy when appropriate.
- Inspect recovered groups and entries individually and record the result as potentially partial.
A repair feature may salvage readable information from some damaged databases, but it cannot guarantee completeness or supply missing credentials. Prefer a known valid encrypted backup when one meets the recovery goal. Keep the damaged original unchanged so another legitimate investigation can compare it if the repair produces uncertain or incomplete results.
Verify Salvage Rather Than Trusting an Entry Count
A repaired database can contain fewer entries, missing attachments, or incomplete historical information. Compare a representative affected entry and several unrelated groups. A successful opening message or plausible total count does not prove every secret and relationship survived. Record what you could verify without exposing the secret values in the recovery report.
Save any useful salvage as a new encrypted candidate. Do not silently replace a valid working database with a partial repaired collection. If some information remains unavailable, preserve that gap and return to other legitimate sources. A clear partial recovery is more useful than a file labeled complete whose missing entries nobody has assessed.
Diagnose an Apparent Missing Entry before Rolling Back
Check the active database, group selection, search scope, and filters. A moved or renamed entry can disappear from a familiar view while remaining intact. Search using a nonsecret identifying term and inspect the expected group. This can restore access to existing information without merging or repairing any database files.
Compare Identity Instead of Title Alone
Two entries can share a common title while referring to different environments or accounts. Compare legitimate nonsecret context and attachment names before transferring information. An entry recovered from an older database might belong to a retired account. Keep it separately until you understand its relationship to the current entry and the actual recovery need.
If an entry genuinely disappeared, look for useful history or another encrypted database candidate. A plaintext document that mentions an account can provide context, but it does not automatically restore the original native entry, identifiers, or attachment structure. Label any new entry you reconstruct from verified evidence as reconstruction.
Protect the Only Intact Copy on Another Device
If another device might retain an older useful database, prevent its external synchronization process from overwriting that candidate before you inspect it. Copy the encrypted file through an authorized local workflow and preserve it separately. Do not assume every device has an independent history once all copies participate in the same current synchronization state.
Establish a Recovery Authority Deliberately
Compare which candidate contains the missing entry and which contains valid later changes. Then decide whether to use native synchronization on working copies or a narrower reviewed transfer. Keep both originals. Choosing the newest file blindly can discard the older entry, while choosing the oldest file can discard recent account changes that remain important.
After accepting a result, confirm the intended final path before reconnecting ordinary synchronization. An old folder watched by another service can reintroduce an unwanted file state. Preserve the accepted encrypted milestone and record which source should resume normal use. This keeps storage synchronization decisions separate from deciding which entry information you actually recovered.
Inspect Attachments and Structured Fields
An entry can contain attachments and additional fields beyond its visible title and password. Select an affected entry that exercises those features and compare what survives. An earlier backup may restore the secret while omitting a later document attachment. Keep those outcomes separate rather than declaring the whole entry complete because one field is present.
Test Necessary Attachments Locally
Open a copied attachment through an appropriate trusted local application when its content is needed. Compare a distinctive nonsecret feature and confirm the file is usable. A listed attachment name can survive while its content is damaged or belongs to another revision. Preserve the original encrypted candidate while making that assessment.
Also inspect any expected custom fields and relevant history. If you manually rebuild information, record the source and the fact of reconstruction without copying secret values into the audit log. The recovery record should explain what happened while remaining safe to review alongside ordinary project notes.
Work through an Accidental Entry Rewrite
Suppose an account entry still exists but its notes were replaced with a short sentence. Save the current encrypted database, open the entry’s History, and compare a revision from before the rewrite. Recover the needed note deliberately while preserving useful current fields. A full database rollback may be unnecessary when the relevant historical entry survives.
Distinguish Local Recovery from Service State
If the older version also contains an old password, do not assume that value is now valid at the service. Database history and the external account’s state are separate. Recover the information you intended to preserve and retain current legitimate access details where appropriate. No password change at the service is part of this file-recovery procedure.
If History lacks the note, inspect an existing encrypted backup or compatible surviving copy. Compare the actual account identity and revision before merging. Then save a new encrypted accepted milestone and reopen a copy. This checks persistence without sacrificing either original candidate.
Work through Two Diverging Database Copies
Imagine a laptop contains a missing research entry while a desktop contains newer changes in other groups. Preserve both databases and their legitimate opening context. Use native synchronization on working copies only when they are compatible versions of the same collection. Then inspect the affected entries and their history instead of judging the result from the database title.
Retain a Reviewable Merge Record
Record source paths, candidate dates, and which entries you checked using nonsecret identifiers. List missing attachments or uncertain historical versions without recording passwords. Keep the untouched encrypted sources until the accepted merged collection passes inspection. That record explains the result without turning routine recovery documentation into another sensitive credential store.
Create a Nonsecret Database Recovery Inventory
List candidate databases by full path, source device, approximate save milestone, and whether you can open a working copy with legitimate access. Do not include passwords or key-file contents in the list. This inventory separates a useful encrypted backup from an inaccessible or unrelated file without creating another collection of secrets during recovery documentation.
Use Stable Entry Context for Comparison
Choose a nonsecret entry identifier, expected group, and legitimate account context. A common title such as Email can describe several accounts. Comparing the correct context helps avoid replacing one entry with an older record for another service or environment. Preserve both candidates until the relationship is clear.
Include one affected entry and several ordinary entries from unrelated groups. This sample tests more than the immediate recovery target. A repaired database can restore one recognizable entry while losing another part of the collection, so the acceptance claim should follow the actual scope you checked rather than the first successful search result.
Inspect Entry History before Considering Whole-Database Rollback
When the entry survives, inspect its retained History locally in the unlocked database. Identify the version containing the missing information and compare the current fields. A useful older note does not automatically mean you should replace every field with the historical version. Preserve the current encrypted milestone before choosing the intended result.
Distinguish History Retention from a Guaranteed Archive
History maintenance settings can limit what remains. A database copied after older versions expired may no longer contain them. Changing retention now cannot recreate those removed states. Keep that limitation clear before spending time searching another identical copy of the same current database in the hope that a different filename will reveal more history.
If another encrypted backup predates the maintenance or overwrite, inspect that copy separately. Compare the actual entry rather than assuming every older database contains the desired value. A backup created before the entry itself existed cannot restore it, even if that file is otherwise healthy and opens successfully.
Preserve Opening Context without Exposing It
A recovery candidate can use key requirements from an earlier milestone. Record only the nonsecret fact that a candidate needs a particular legitimate factor, while keeping the actual secret material under your established protection. A short recovery report should explain which candidate opened without becoming a plain-text guide to the database’s credentials.
Compare a Changed Key Context Carefully
If legitimate database protection changed between milestones, the current opening method may not apply to an older copy. Use the correct historical context you control. An opening failure alone does not prove corruption. Conversely, an apparently intact header does not guarantee that required key material is available or that the rest of the encrypted file survived.
A missing key factor and a missing database are separate recovery targets. Retrieving one does not automatically retrieve the other. Keep the outcome precise: encrypted bytes recovered, valid database opened, or entry information verified. This lets you assess practical usefulness without implying that storage recovery bypasses encryption.
Review Native Synchronization Destinations before Merging
KeePass synchronization can update both participating copies. Therefore, create disposable working copies with clearly identified paths before testing a merge. Keep original encrypted candidates elsewhere. This boundary is important when one file sits inside an externally synchronized directory, because another process could otherwise propagate the test result before you have accepted it.
Inspect Entry-Level Differences after the Merge
Compare the affected entries and retained history in the result. An overall database timestamp cannot explain how every conflicting entry resolved. Check the specific older note and the valid newer fields you intended to preserve. Keep the source candidates until those tests pass, even when the merged collection opens without warnings.
If the result does not meet the goal, return to the untouched copies and reassess the comparison. Do not repeatedly merge uncertain results into each other. That makes it difficult to distinguish original information from a later test and can obscure which candidate supplied a value you now need to review.
Understand the Boundary of Native Repair Mode
KeePass 2.x documents repair as a special KDBX import into a new database, while older major versions provide a different interface. Use the procedure for your actual format and version. Preserve the original damaged source and prefer a valid backup when one meets the need. Repair is a last-resort salvage route, not routine database maintenance.
Verify the Salvaged Collection Thoroughly
Repair mode can relax normal integrity checks to rescue readable material. Therefore, inspect the resulting groups, fields, history, and attachments rather than assuming every recovered record is reliable. Keep unfamiliar or malformed information separate until you understand it. A successful import does not establish that the original complete database structure survived.
Repair cannot supply a lost master key or recreate essential missing decryption information. If the relevant opening information is unavailable, preserve the source and record that concrete limit. Do not describe an encrypted file recovered from disk as an accessible credential collection until legitimate opening and content verification actually succeed.
Compare Attachments and Custom Fields Locally
A password entry can preserve a useful secret while omitting an attachment or custom field needed for the task. Inspect those components explicitly in a working copy. A familiar attachment label is not proof that its contents are correct. Test a copied attachment locally through an appropriate trusted application when you need to verify it.
Record Results without Recording Secret Values
Use a checklist such as expected field present, attachment readable, and relevant history available. Keep actual passwords and protected notes out of ordinary audit files. This allows a useful recovery review without multiplying exposure. The documentation should explain the process and remaining gaps, not duplicate the sensitive database itself.
If an attachment comes from another legitimate source, record it as a replacement or reconstruction. A newly supplied document may be useful while differing from the historical attachment that was lost. Preserve that distinction so the accepted entry does not silently claim a provenance the evidence cannot support.
Work through an Overwrite Followed by External Synchronization
Suppose one database copy loses a note and another device may retain the earlier version. Preserve the second copy before its external synchronization process replaces it. Open working candidates locally with legitimate access and compare the affected entry. Then decide whether native synchronization or a narrower reviewed restoration best preserves useful information from both sides.
Choose the Accepted Collection before Reconnecting
Keep a verified encrypted milestone outside the test workflow. Record which path will resume ordinary use and which older copies remain evidence. This reduces confusion when other devices reconnect. An unreviewed file overwrite is different from accepting a tested database whose affected entry and ordinary groups you have actually inspected.
Also verify a useful newer entry that should remain unchanged. Recovering the older note is only one side of the merge goal. The second check helps establish that the chosen procedure did not unnecessarily discard valid later information elsewhere in the collection.
Test the Encrypted Backup as a Restore
Open a copied accepted database from its planned backup source using the legitimate factors. Inspect the incident entry, representative history, and a necessary attachment. This demonstrates a useful restoration path without relying on a currently unlocked session. Keep the original candidates until the test meets the actual recovery objective.
Keep a Clear Long-Term Recovery Record
Record the accepted database milestone, compatible application version, nonsecret opening context, and known gaps. Preserve the encrypted file and required key arrangements through your existing secure protection method. A tested encrypted restore is more useful than a folder of unverified copies, and it avoids the false assumption that any file ending in KDBX guarantees access to the needed entries.
When Storage Recovery Can Help KeePass Files
PandaOffice Drecov may help retrieve deleted local encrypted databases, existing backups, or legitimate key files from readable storage. It cannot bypass database encryption, infer a missing master password, or guarantee that every retrieved file is complete. Prefer valid surviving encrypted copies and entry history first, and reduce writes where deleted file candidates may remain.
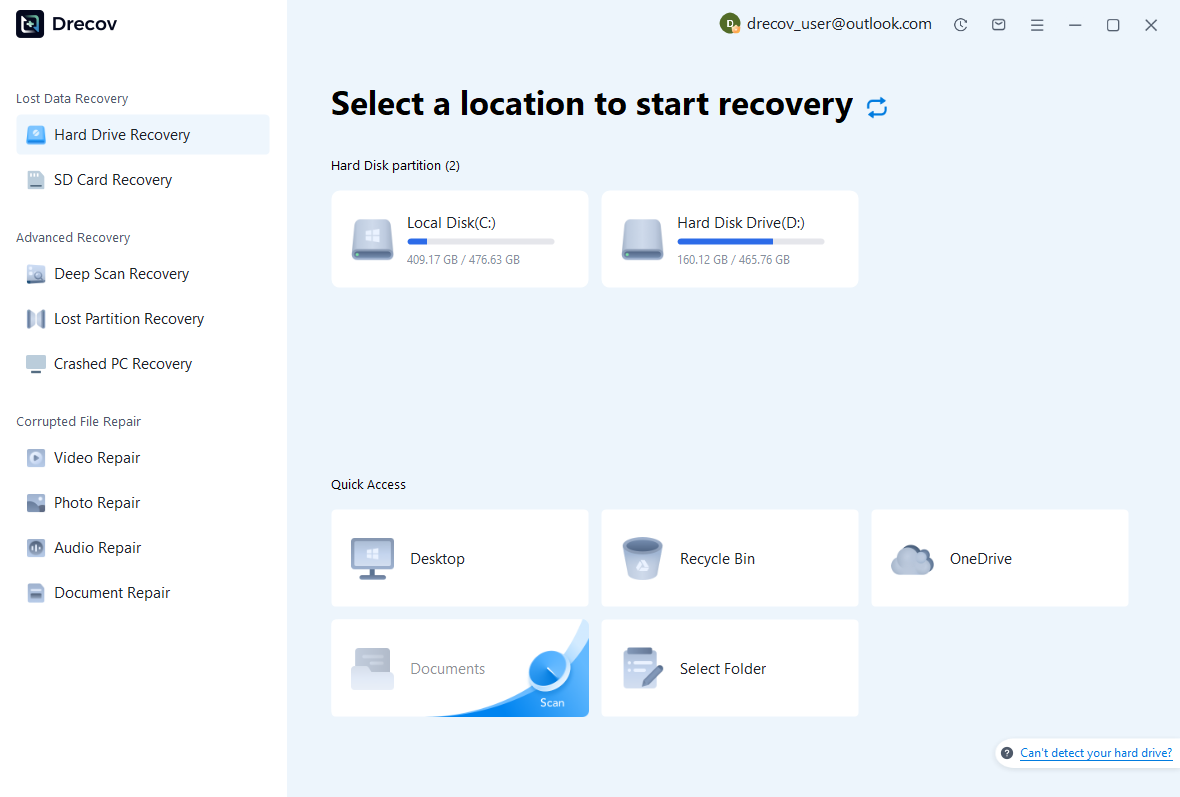
Step 1: Identify the Database and Backup Storage
Choose the drive or partition that held the encrypted database or its legitimate backups. Record the file component you are trying to retrieve without exposing key material. Keep recovery output on separate healthy storage under your existing access protections. Assess repeated hardware read failures before proceeding with a routine software scan.
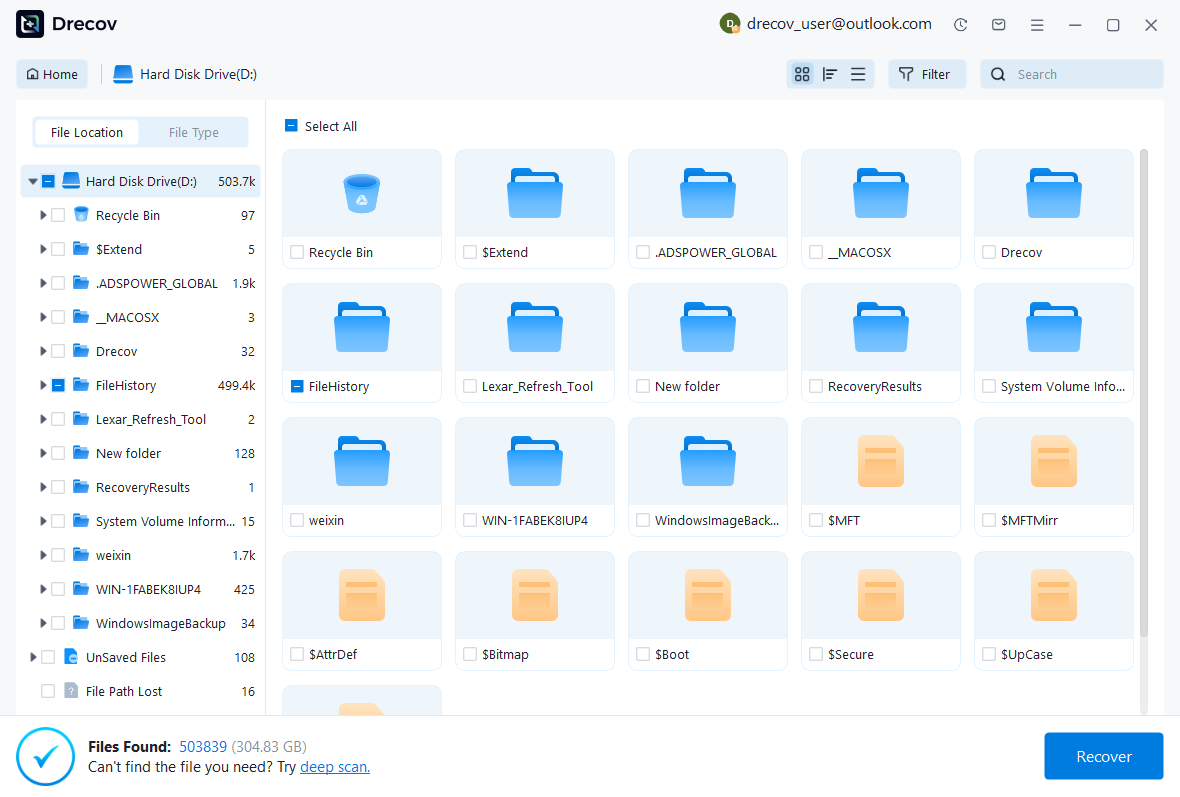
Step 2: Compare Encrypted File Candidates
Inspect available paths, names, sizes, dates, and supported previews. Preserve plausible encrypted database candidates without modifying or uploading them to unrelated services. A recognizable filename does not prove the database is complete or that its required key factors survive. Keep alternatives until you can assess a working copy with legitimate access.
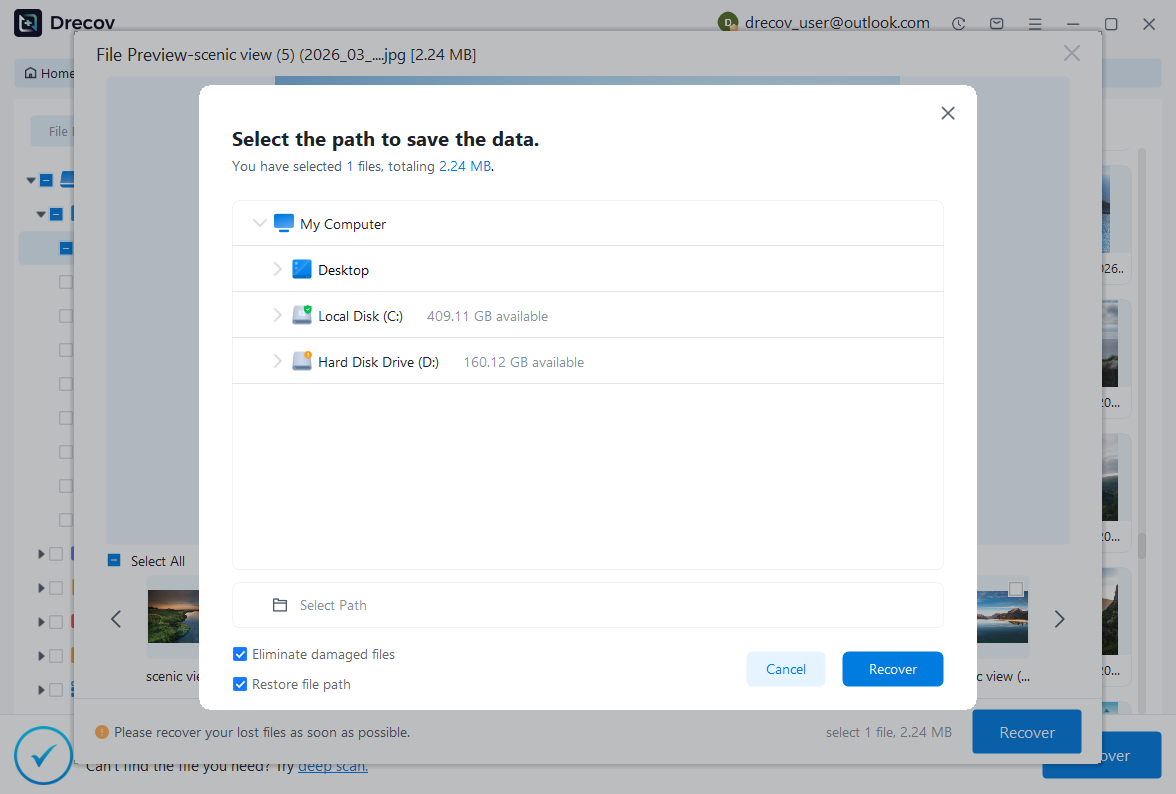
Step 3: Restore Elsewhere and Inspect Locally
Recover selected files to a separate destination and preserve untouched originals. Open a copied candidate through a compatible KeePass version using the legitimate keys. Compare entry identity, relevant history, groups, fields, and attachments. Record partial salvage or manually reconstructed information before returning the accepted encrypted database to normal use.
Keep a Verified Encrypted Recovery Milestone
Retain a tested native encrypted copy and a nonsecret record of its source and required opening context. Reopen a working copy and inspect the incident entry again. This provides a practical restoration path while preserving the distinction between recovering a database file and possessing the legitimate means to unlock it.
Related Recovery Resources
Explore the relevant recovery options: Hard drive recovery, External hard drive recovery.
For another recovery case and its practical checks, read the related recovery guide.
Check the vendor guidance for the installed version: official recovery documentation 1, official recovery documentation 2, official recovery documentation 3, official recovery documentation 4.





