







If an MP4 suddenly stops playing, keep the file you have before trying to repair it. Copy it to another healthy drive when the source reads normally, then test that copy in a second trusted player. These two actions often tell you whether the problem is the player, an incomplete transfer, or the recording itself. To understand how to repair damaged MP4 video files, first separate file repair from recovery of a missing original. A repair attempt can rebuild usable structure in some files, but it cannot recreate video frames that were never recorded or were later overwritten.
Find the best surviving copy before trying repair
Where did the video originate? A camera card, phone, screen recorder, cloud account, editor export, and messaging app each leave different possibilities. The newest copy on your desktop is not always the best one. A transfer can stop early while the full recording remains on the camera. Messaging apps may compress or replace an upload. Your cloud folder may still hold an earlier version. Preserve every plausible source before changing one.
Compare copies before making another
Compare file sizes and dates in File Explorer. A zero-byte MP4 contains no recorded video to reconstruct. A copy that is much smaller than the source likely ended mid-transfer. If the source device is stable, copy the original once to a healthy drive and test that new copy. Do not repeatedly copy from a card that disconnects, clicks through an adapter, or reports serious read errors. Imaging or professional help is safer when hardware cannot sustain normal reads.
Keep the originals under clear names such as camera-original.mp4 and desktop-transfer.mp4. Work on a duplicate in a separate folder. That small discipline prevents an attempted remux or repair tool from replacing the only remaining evidence. If the clip is a legal, medical, or irreplaceable personal record, record the byte size and source path before experimenting.
Decide whether the MP4 or the player is failing
A video that plays in one reputable app but not another usually points to playback support, not lost footage. MP4 is a container; the video and audio inside may use codecs that your current player cannot decode. Microsoft’s Media Player troubleshooting distinguishes codec problems from other playback errors and lists formats for which optional extensions may be needed. Do not install a random all-in-one codec pack because one file produced an error.
Test the duplicate in a second trusted player. If it opens, play the beginning, middle, and end; do not judge the entire clip from the first frame. If only one PC rejects it, use the player or an official codec extension that supports the actual encoded stream. Renaming .mp4 to .mov does not change the encoded data. If every player rejects the same complete copy, inspect the file and source rather than stacking software changes.
Look at the thumbnail, duration, and file size, but treat them as clues. A thumbnail can survive when later frames are unreadable. An apparently normal duration does not prove that the audio track is complete. Conversely, a missing thumbnail does not prove the underlying file is damaged; Windows may simply lack a preview decoder.
Match the failure to the recording event
The copy failed during transfer
If the original still plays on the camera or phone, make a fresh copy with a reliable connection and enough free space on the destination. Compare byte sizes afterward, then play the new file through its full timeline. Repairing the truncated destination would be needless work when the source is sound. If the destination drive is full or flaky, use a different healthy drive.
Recording stopped before normal finalization
A power loss, app crash, full storage device, or disconnected camera can leave an MP4 without the information a player expects to locate its streams. This is a different failure from a missing codec. If a repair tool asks for a reference clip, choose one produced by the same camera and recording settings, and verify the tool’s documentation before supplying private footage. There is no universal reference that can recreate an unknown recording.
Only part of the timeline is bad
Play a duplicate and note the time where sound or picture first fails. If the first half works but the latter part breaks, a remux may preserve readable packets, though it cannot restore frames absent from the file. Keep the original untouched and save every output under a new name. A repaired clip that is shorter than expected may be a useful partial rescue, not a complete restoration.
Try a bounded local repair on a duplicate
If a trusted player can read the input streams but the MP4 container behaves badly, a remux is worth testing. Remuxing copies encoded streams into a new container without re-encoding them. FFmpeg’s official documentation explains stream copy with -c copy, including that it can fail when a required stream or container detail is unavailable. For a nontechnical user, a trusted editor’s export or remux option may be easier, provided it saves a new file rather than replacing the original.
When using FFmpeg, run it only on a duplicate in a healthy folder. In a terminal opened in that folder, an example is ffmpeg -i "source-copy.mp4" -c copy "remuxed-copy.mp4". Replace those names with your actual duplicate and a new output name. The command attempts to copy readable streams into a fresh MP4; it does not invent missing frames or decrypt protected content. Do not add overwrite flags, and read any error message before retrying. A complaint that no usable stream can be found means a simple remux is not the right next step.
Verify the output rather than the success message
After a successful output, check its size and duration, then sample the beginning, middle, and end. Listen as well as watch. If the remux plays but skips a segment, preserve both versions. If it fails, do not repeatedly run variations against the only copy. Return to the source or consider a repair service that explicitly supports this recording type. Review upload and privacy terms before sending family, client, or confidential footage to an online service.
Some tools specialize in interrupted camera recordings and request a healthy reference from the same device. Their fit depends on how the clip was made, not just its MP4 extension. A phone-recording case is different from an editor export or a downloaded file; the MP4Fix review covers that narrower Android scenario. Do not force a phone-specific method onto a camera or desktop recording.
When repair cannot supply the missing footage
Repair software works with bytes that still exist. If the original video was deleted, a transfer overwrote its destination, or the remaining file is zero bytes, the immediate task is finding another copy. Check the camera card, phone gallery, editor autosave or export folder, cloud versions, external backups, and Recycle Bin. Search for different names and extensions from the same session. A camera may have split a long recording into more than one file.
Do not record more footage onto the source card or keep installing apps on the disk that held the missing original. New writes can take the space occupied by deleted media. On SSDs, TRIM can further reduce what software can retrieve; it does not justify frantic repeated scans. If the source media is unstable, stop direct DIY scans and seek imaging or specialist recovery. For other deleted media, the file recovery overview explains the broader search path.
What Drecov can and cannot do here
Drecov is Windows data-recovery software for missing or inaccessible files on stable, recognized storage. Its read-only recovery workflow offers Quick Scan, Deep Scan, file filtering, preview for supported formats, and recovery to another healthy location. It can look for deleted video files from a PC, USB drive, SD card, or external drive; Lost Partition Recovery applies if the original partition disappeared. Here it is useful when the intact source MP4 was lost and a damaged derivative remains. Drecov does not repair codecs, rebuild missing video frames, fix failing hardware, or guarantee that overwritten footage can be retrieved.
⚠ Warning: Install it on a drive different from the one where your data was lost to prevent overwriting.
Recover a lost original before repairing the derivative
Before scanning, confirm that the source device stays connected and shows a stable capacity. Prepare a separate healthy drive with room for video files. Do not install the recovery program on the volume where the original disappeared, and never write recovered output back to that source. If the card or disk repeatedly drops offline or cannot be read steadily, pause and arrange a professional image instead.
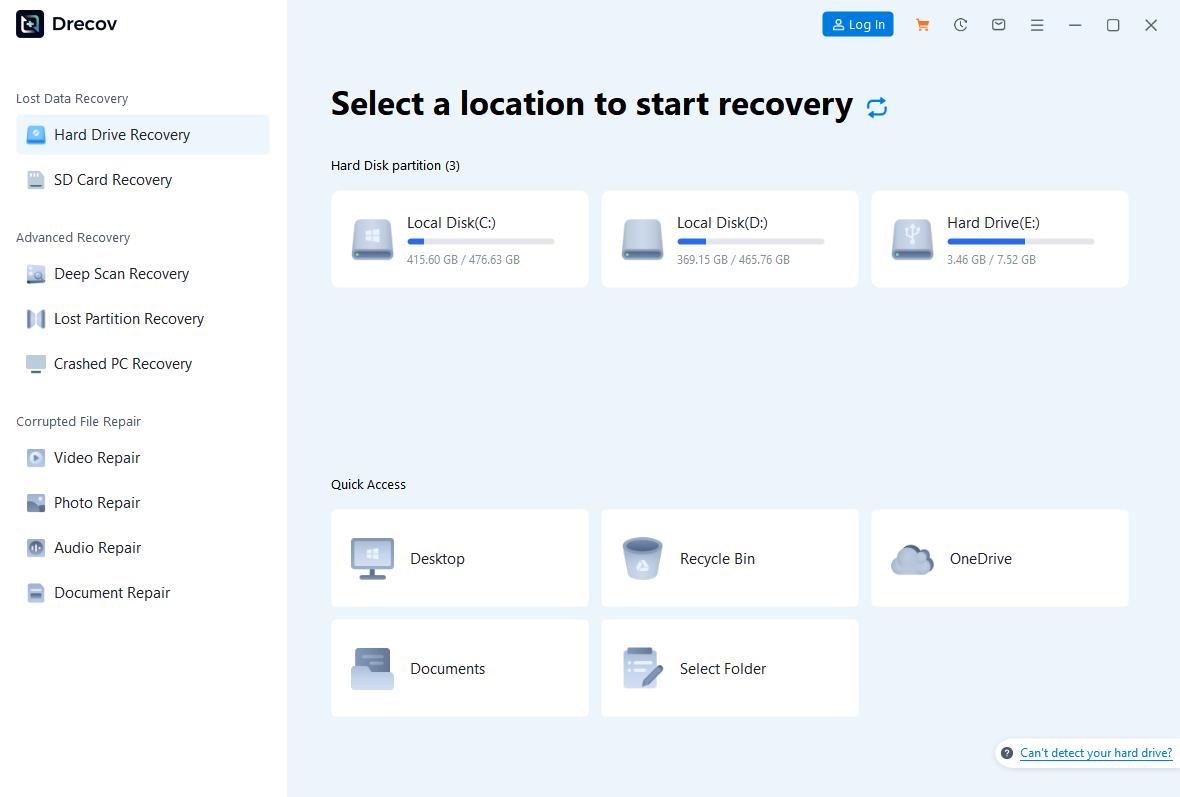
Step 1: Point Drecov at the original location
Open Drecov and choose the original camera card, USB drive, PC partition, or other Windows-accessible source that held the video. Do not scan the damaged desktop copy’s folder if the good original was deleted from a different device. If a whole partition is missing, use the relevant lost-partition mode rather than creating a new partition.
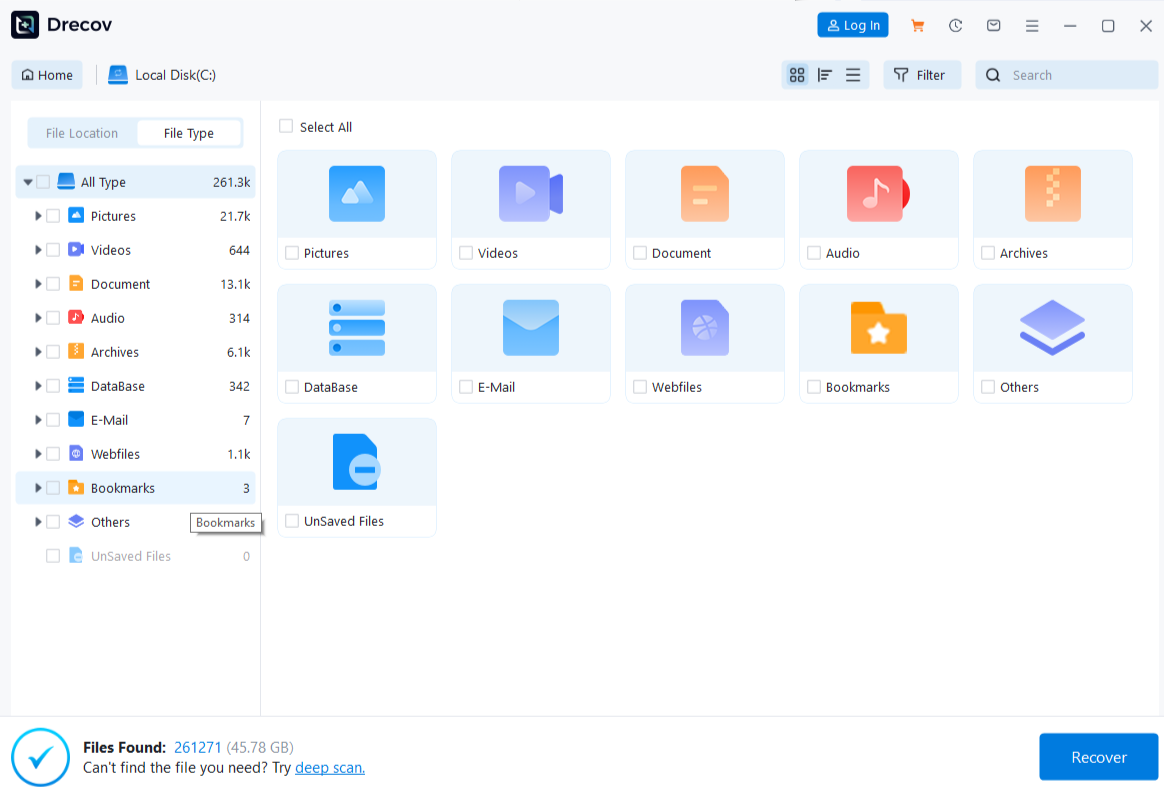
Step 2: Scan from quick to deep only when needed
Run Quick Scan and inspect the former camera or export folder. Search for the date, likely filename, and video type. If the original is absent and the device remains stable, run Deep Scan. Stop if the medium begins to disconnect or read errors escalate.
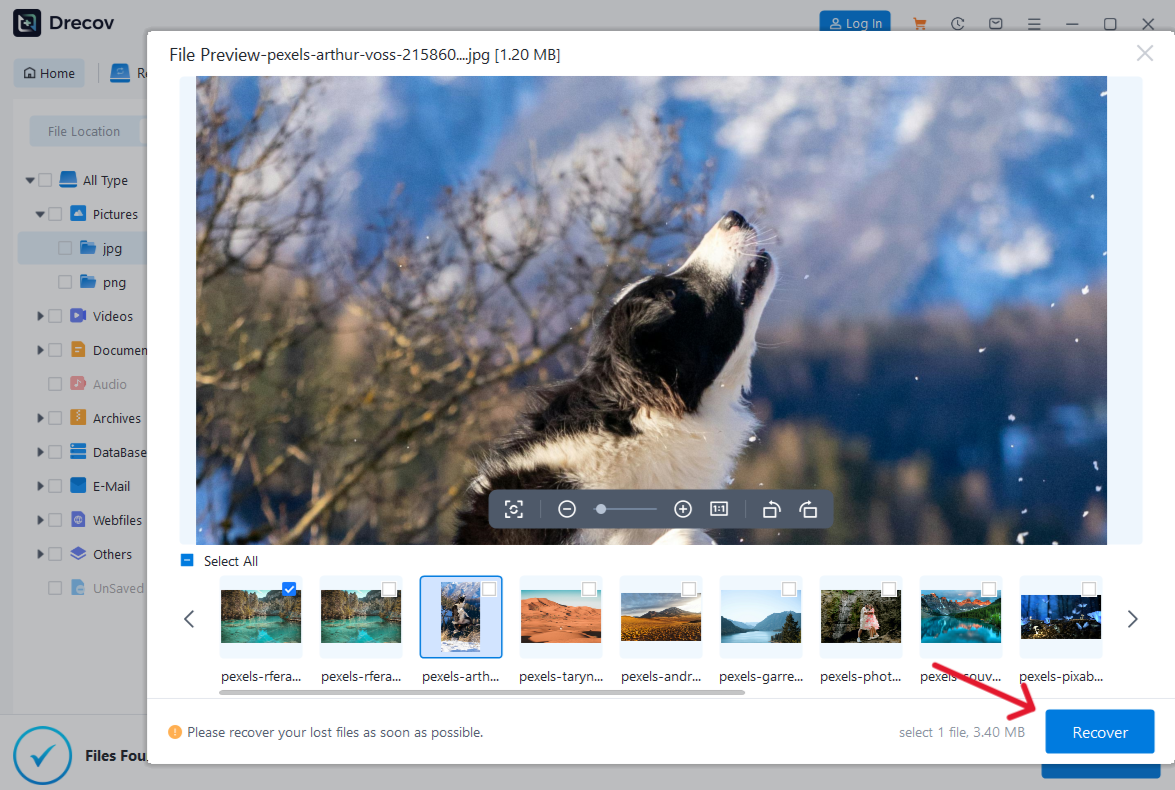
Step 3: Preview and save to a different device
Filter or browse likely MP4 and related video results. Preview representative supported files; a thumbnail or short preview is only a sample, not proof of a complete recording. Recover promising candidates to the healthy destination. If you cannot find the output afterward, check that destination and the job’s Drecov Folder or Recovery Folder.
Step 4: Verify the whole recovered clip
Open the recovered file and play several points across the timeline, including the ending. Compare audio continuity and expected duration with your notes. Only after you have verified a usable copy should you resume recording, format the card, run file-system repair, or discard the damaged derivative. For more on lost footage rather than file repair, see video recovery.
⚠ Warning: Install it on a drive different from the one where your data was lost to prevent overwriting.
FAQs about damaged MP4 files
Can changing the extension fix a broken MP4?
No. A filename extension does not rewrite the container or codec. Test a duplicate in a player that supports the actual streams, or remux readable streams to a new file.
Why does the first minute play but the rest fail?
The transfer or recording may have ended early, or later data may be unreadable. Compare the original device, file size, and whole timeline before using a repair tool.
Will a remux restore missing video frames?
No. It may reorganize readable streams into a playable container. Frames never written or already overwritten cannot be generated from the remaining file.
Should I upload the video to an online repair service?
Only after checking the service’s current privacy, retention, and output terms. Work from a copy, and avoid uploading confidential footage when you cannot accept the disclosure risk.
When should I use data recovery instead?
Use it when the intact original file or its partition is missing from a stable device. A visible damaged MP4 with no other lost source needs file diagnosis or repair, not a scan as the first response.
Conclusion
To repair damaged MP4 video files, first protect every available copy and determine whether the player, transfer, or recording failed. A fresh transfer or supported player may resolve the problem without repair. A remux or specialized tool may salvage readable material from some damaged files, but it cannot replace footage that never reached the file. If the sound original was deleted from stable Windows-accessible storage, Drecov can search its former location and recover candidates to another drive for full playback verification.
⚠ Warning: Install it on a drive different from the one where your data was lost to prevent overwriting.





