

Recover the Editable Sprite before Rebuilding Its Export
To recover Aseprite sprites, distinguish the native layered document from a flattened image or exported sprite sheet. A native candidate can preserve layers, cels, frames, tags, palettes, and other editing information. An exported sheet can preserve useful pixels while omitting some of that structure. Decide whether you need continued animation editing, a usable image export, or an exact historical project milestone.
Record the sprite name, expected canvas dimensions, a distinctive frame, and the last layer or animation change. Also identify whether Aseprite crashed, you closed the file accidentally, or the saved native document disappeared. Those incidents lead to different recovery sources. A retained closed document and a session recovery candidate should not be treated as the same mechanism.
Preserve the Current Session before Cleanup
If the sprite remains visible, save a separate native copy before closing it. Preserve existing session data and saved candidates before reinstalling or clearing preferences. Work on copied files where practical. This keeps temporary protection and earlier milestones available while you inspect what actually survived.
These native routes use features in an existing legitimate Aseprite installation without purchasing a separate recovery utility. They do not mean that every distribution of Aseprite is free. Use the installed version’s documented recovery workflow and inspect its actual retention settings rather than assuming a universal default guarantees the missing frame still exists.
Native Route 1: Open a Surviving Session Recovery
- Open the Home tab and inspect Recover Files when available.
- Select the relevant session or sprite candidate.
- Recover the sprite and compare a distinctive frame and layer.
- Save the accepted result under a new native filename.
Aseprite can retain recovery data from edited sprites according to its settings and surviving session information. A recovery candidate may exist after a crash or another interrupted session. However, it may predate the final changes. Compare the actual animation and layers rather than assuming the newest listed session necessarily contains the complete work you intended to save.
Compare a Recent Editing Detail
Choose an intentional difference that separates useful versions, such as a changed outline pixel, an added frame, or a corrected layer. Inspect that detail at appropriate zoom. A familiar thumbnail can identify the sprite while hiding the missing edit. Keep plausible alternative candidates until you know which one contains the relevant information.
After saving the recovered sprite, reopen a copied native file and repeat the same check. This establishes that the accepted state persists outside the recovery interface. Keep the original session data intact until that test passes. A successful recovery preview is useful evidence, but it is not a substitute for a working native document saved separately.
Native Route 2: Reopen a Recently Closed File
- Keep the running Aseprite session available after the accidental close.
- Use File, Open Recent, Reopen Closed File when the retained state is available.
- Inspect the reopened sprite and any useful undo information.
- Save a separate native copy before continuing work.
Aseprite can retain a closed sprite in memory for a configured period. This route depends on the application session and retained data still being available. It is not a promise that a restart recreates every closed file. Act on a surviving session first rather than closing the application as a generic troubleshooting step.
Separate Memory Retention from Disk Recovery
The reopened sprite can offer useful state that differs from the last saved native file. Preserve both before comparing. If the in-memory candidate is unavailable, move to existing session recovery or native backups. A preference changed after the accidental close cannot create content that is no longer retained anywhere.
Also compare the active frame, layer visibility, and any selection or editing context. A sprite can appear different because the application reopened another frame or hid a layer. Inspect the underlying content before concluding that pixels disappeared. A view correction may solve the immediate problem without restoring an older document.
Native Route 3: Open an Existing Native Milestone
- Locate an existing ASE or ASEPRITE file from the relevant project.
- Preserve the original candidate and open a working copy.
- Compare frame count, layers, tags, and the incident-specific edit.
- Save the accepted recovery under a distinct native name.
A native milestone can preserve editing structure that a PNG or GIF omits. Its usefulness depends on the actual version it contains. Compare the expected canvas and a distinctive animation segment before accepting it. A filename such as final or latest does not establish that the file includes the last useful changes.
Check Structure and Appearance Together
Inspect the layer hierarchy, visibility, cels, and frame timing as appropriate to the sprite. A document can look correct on one frame while losing an animation tag or an editable layer. Include a sample that exercises the feature you need for continued work, rather than testing only the easiest frame to display.
If an older milestone contains the missing material while the current sprite contains valid later edits, preserve both. Transfer only understood content through supported editing workflows in a separate candidate. Compare frame placement and layer relationships afterward. A combined recovery can be useful while still requiring a record of which parts came from different milestones.
Native Route 4: Reconstruct from a Surviving Sprite Sheet
- Preserve the original sheet and any associated exported metadata.
- Create a separate reconstruction document.
- Import the sheet with its actual cell layout and sequence understood.
- Compare frame pixels and timing, documenting structure that you rebuilt manually.
A sprite sheet can preserve frame images even when the native file is unavailable. However, it does not automatically recreate every original layer, tag, palette choice, or editing relationship. Metadata can help describe exported frames, but inspect what the particular export actually contains. Treat the result as reconstruction unless a complete native source survives.
Verify Cell Layout before Importing
Compare sheet dimensions, frame order, margins, spacing, and any trimming. A sheet exported with variable bounds may not behave like a regular grid. Importing it with guessed cell sizes can cut frames incorrectly while producing a plausible-looking animation. Preserve the original and test a small representative range before accepting the reconstructed sequence.
If only a flattened image survives, keep it as useful pixel content and a visual reference. Do not claim that hidden layers returned. You may separate or redraw elements for continued editing, but that is new work. Record those decisions so another artist can distinguish original recovered pixels from reconstructed editing structure.
Diagnose an Empty-Looking Frame before Restoring
Check the active frame, selected layer, layer visibility, and any relevant timeline context. A frame can look blank while the intended content exists elsewhere in the document. Inspect neighboring frames and known layers before replacing the sprite. This keeps a display or selection issue from prompting an unnecessary rollback.
Compare Linked and Independent Cels Carefully
A change can affect several frames when their cel relationships share content. Inspect the actual structure before copying or painting over a recovered frame. A visually identical frame can have a different editing relationship, which matters when you continue animation work. Preserve the candidate and test changes in a separate working copy.
If you reconstruct a missing cel, record which reference supplied its pixels and position. A recovered image export may omit off-canvas content or layer separation. Keep that limitation visible instead of treating a successful import as proof that the original cel structure returned exactly.
Inspect Frame Timing and Animation Tags
A usable animation needs more than the expected frame count. Compare durations, sequence order, and the tags used by the project. A recovered document can contain every visible pose while playing at the wrong speed. Use a distinctive transition or pause as an acceptance test, then inspect the actual timing values.
Review More Than One Playback Cycle
Watch the animation loop through its beginning, transition, and end. Compare any intended hold or return pose. An imported sheet may restore frame pixels without the original timing. If you reconstruct durations from a reference animation, record that inference rather than presenting the values as directly restored native data.
Also inspect how tags select ranges for export. A correct full timeline can still produce an incomplete deliverable if a tag covers the wrong frames. Export a representative animation using the intended settings and review it independently. This checks the actual production path, not merely playback inside the editing window.
Preserve Palette and Transparency Context
For indexed or palette-sensitive work, compare the actual palette, transparency, and pixel values that matter to the project. A visually similar candidate can behave differently when exported or edited. Keep the native source before changing color mode or remapping colors, because those operations can alter the information you wanted to assess.
Test the Intended Output Format
Export a small sample to the format used by the next workflow and inspect it independently. Check transparent edges, background behavior, and a distinctive color. A sprite that looks correct against the editor’s background may show a halo or unexpected fill elsewhere. Record any manual correction separately from the recovered state.
If you rebuild from a rendered image, preserve the limits of its color information. A lossy export or scaled screenshot may not retain original pixel values. It can still be a useful reference, but it is different from recovering the exact native palette and pixel data required for a production sprite.
Recover a Layered Character after a Crash
Suppose Aseprite closes after you add an animation frame and correct a character outline. Preserve the saved native file and existing session data. Open Recover Files, compare candidates against that outline and frame, and save the best one separately. Then inspect the relevant layer rather than accepting a thumbnail that merely resembles the character.
Keep Useful Later Changes Available
The saved file may contain a useful palette adjustment while the recovery candidate contains the new frame. Preserve both and combine only verified material in a working document. Check cel relationships, frame order, and timing after the transfer. A hybrid result can meet the practical need while remaining distinguishable from one exact historical save.
Reopen the accepted native file and export a short animation sample. Compare the corrected outline and the new transition. This tests persistence and output behavior, which can reveal missing tags or timing that a static recovery preview would not show.
Recover from an Export-Only Animation Copy
If only a sprite sheet and an animation preview survive, preserve both. Use the sheet for available frame pixels and the preview for timing evidence. Identify any trimming or scaling before import. Reconstruct into a separate native document and record which layers or relationships are unavailable rather than inventing hidden structure from the flattened result.
Mark the Reconstruction’s Limits
A reconstructed animation may preserve appearance well enough for continued work while lacking the original editing organization. List the missing layers, inferred timing, and manually rebuilt tags. Keep the original exports unchanged. This lets another artist assess whether the result suits the next task without mistaking a plausible recreation for a complete native recovery.
Define an Aseprite Recovery Checklist Around the Actual Sprite
Record the expected canvas size, color mode, important layers, frame count, and a distinctive animation tag. Then identify the single edit that triggered the recovery request. This checklist gives every candidate the same test. A familiar character preview can hide a missing layer or timing change, while a structurally complete candidate may open on an unfamiliar frame.
Choose an Informative Frame Sample
Include an early pose, a transition, a final pose, and a frame with an intentional small detail. Pixel-level work often depends on changes too subtle for a recovery thumbnail. Compare the actual pixels at suitable zoom and inspect the relevant layer. This provides stronger evidence than accepting whichever session candidate has the newest listed time.
For an animation with a held frame or deliberate repeated pose, check the timing as well as the image. Two candidates can contain identical frame pixels while playing differently. Record whether the useful recovery preserves appearance, timing, native structure, or all three, so the acceptance claim matches what you actually tested.
Preserve Session Data before Changing Preferences
Aseprite stores recovery information through its own session workflow. Keep surviving session directories intact before resetting settings or reinstalling. The directory name can help identify an application run, but it does not prove every sprite inside contains the latest useful change. Inspect candidates through the supported recovery interface where possible rather than editing their internal files speculatively.
Keep Session and Saved Milestones Separate
An ordinary native file and a recovered session candidate can preserve different useful details. Save both before combining them. A native file may contain a palette correction while the recovery retains a new animation frame. Comparing those differences deliberately is more reliable than allowing the first recovered candidate to overwrite the only earlier source.
If the application cannot recover a session candidate, preserve it unchanged with the exact error. A failed recovery attempt does not establish that every byte is useless, but it also does not justify inventing a manual reconstruction procedure for undocumented internals. Continue with valid native sources and retain the original evidence for appropriate specialist assessment if needed.
Use Reopen Closed File While Its Conditions Still Hold
An accidentally closed sprite may remain available in the running application for the configured retention period. Keep that session open and inspect the supported reopening command promptly. Restarting the application can remove the in-memory opportunity you wanted to use. This route is different from opening a saved file from disk or recovering a previous session.
Save the Reopened State before Further Editing
Once the sprite returns, save a separate native milestone and inspect a useful recent change. A closed document can reopen on another active frame or layer, so compare its content rather than judging the first view. Preserve the last saved disk copy too until you know whether the reopened version includes the information you need.
If the reopening route is unavailable, record that condition and move to session recovery or native backups. Do not assume changing the memory-retention preference afterward can recover a state that has already disappeared. A clear prerequisite check prevents repeated attempts at a route whose required source no longer exists.
Compare Cels and Layer Relationships
A sprite can contain the expected pixels while its editing relationships differ. Inspect cels, layer visibility, grouping, and the timeline around the incident. Shared or linked content can make later edits affect more frames than expected. A recovered appearance alone does not establish that the native structure supports the same continued editing behavior.
Test a Working Copy without Altering the Source
Use a copied candidate to inspect an intentional small edit and its effect on related frames. Then revert or discard that test. This can reveal whether the relationships are what you expected. Keep the original native candidate untouched so a structural inspection does not become another accidental change to the only useful sprite.
If you reconstruct a layer from a flattened image, record that the layer separation is new. The recovered pixels can be authentic while the organization you build around them is not historical. This distinction helps another artist understand what remains flexible and what depends on manual reconstruction.
Assess Sprite-Sheet Metadata before Rebuilding Frames
A sheet can use fixed cells, variable trimmed bounds, or another export arrangement. Inspect any legitimate accompanying metadata and compare it with the actual pixels. Do not assume every sheet is a uniform grid. A guessed import can cut frames or change their alignment while producing an animation that looks plausible at first glance.
Preserve Pivot and Frame-Position Evidence
If exported information records original bounds or positioning, keep it with the sheet and use it as evidence during reconstruction. Verify the relevant behavior in the intended workflow rather than assuming every metadata field imports automatically. A correctly displayed image sequence can still jump between frames if the original placement relationship is missing.
When only the sheet survives, compare each recovered frame against the source and mark uncertain timing. A preview movie can help estimate duration, but it does not prove exact native frame values. Preserve those limits in the reconstruction record and keep the source exports unchanged for later review.
Check Tags, Slices, and Other Production Features
A production sprite may rely on tags or other named regions for export and integration. Inspect the features the project actually uses and compare representative values. A recovered native document can retain visible frames while missing a range definition needed by the next workflow. Choose the acceptance sample according to those dependencies rather than a generic image-open test.
Validate the Actual Export Path
Export the intended tag or animation segment to a separate test location and inspect the result independently. Check ordering, timing, transparency, and any metadata the next stage needs. This tests the production path, which can differ from simply playing the full timeline inside Aseprite.
If you rebuild a missing tag or region manually, record the source of its range and purpose. The new setting may be correct and useful while remaining a reconstruction. Keeping that provenance visible prevents a future integration problem from being blamed on an assumed original setting that did not actually survive.
Compare Indexed Color and Transparency Carefully
An indexed-color project can depend on palette organization as well as visible appearance. Inspect the native mode and a distinctive palette entry where relevant. A flattened export may preserve apparent colors without the original palette relationships. Keep the native candidate before conversions or remapping so the comparison does not alter the information you wanted to recover.
Inspect Edges Against More Than One Background
A transparent sprite can look acceptable in the editor while revealing a halo or unintended fill elsewhere. Test a representative output against the background used by the next workflow. Compare a distinctive edge and color. This reveals whether the accepted recovery preserves usable pixel content, not just a thumbnail that looks familiar against one checkerboard view.
If a reference was scaled or compressed, label any extracted pixels accordingly. A screenshot can support visual reconstruction while lacking exact original values. Do not invent precision by describing resampled pixels as an exact native recovery. Preserve the best original export and record any new drawing or cleanup you perform.
Create a Practical Native Restore Test
Save the accepted sprite and reopen a copied version from its planned location. Inspect the incident frame, layer relationships, timing, and a production export. This tests persistence and continued use together. A candidate that only appeared briefly in the recovery interface has not yet demonstrated the same restoration value as a verified native file.
Retain an Artist-Friendly Handoff Record
Record the source milestone, directly recovered parts, reconstructed layers or timing, and unresolved features. Keep a short reference animation with the native file. Another artist can then continue work without mistaking an export-based reconstruction for a fully restored editable original, and you retain a clear comparison point for later creative changes.
When Storage Recovery Can Help Aseprite Files
PandaOffice Drecov may help retrieve deleted local native sprites, existing recovery data, sheets, or exported frames from readable storage. It cannot infer every hidden layer from a flattened image or recreate edits that never reached persistent storage. Prefer surviving sessions and native milestones first, and reduce writes where deleted candidates may remain.
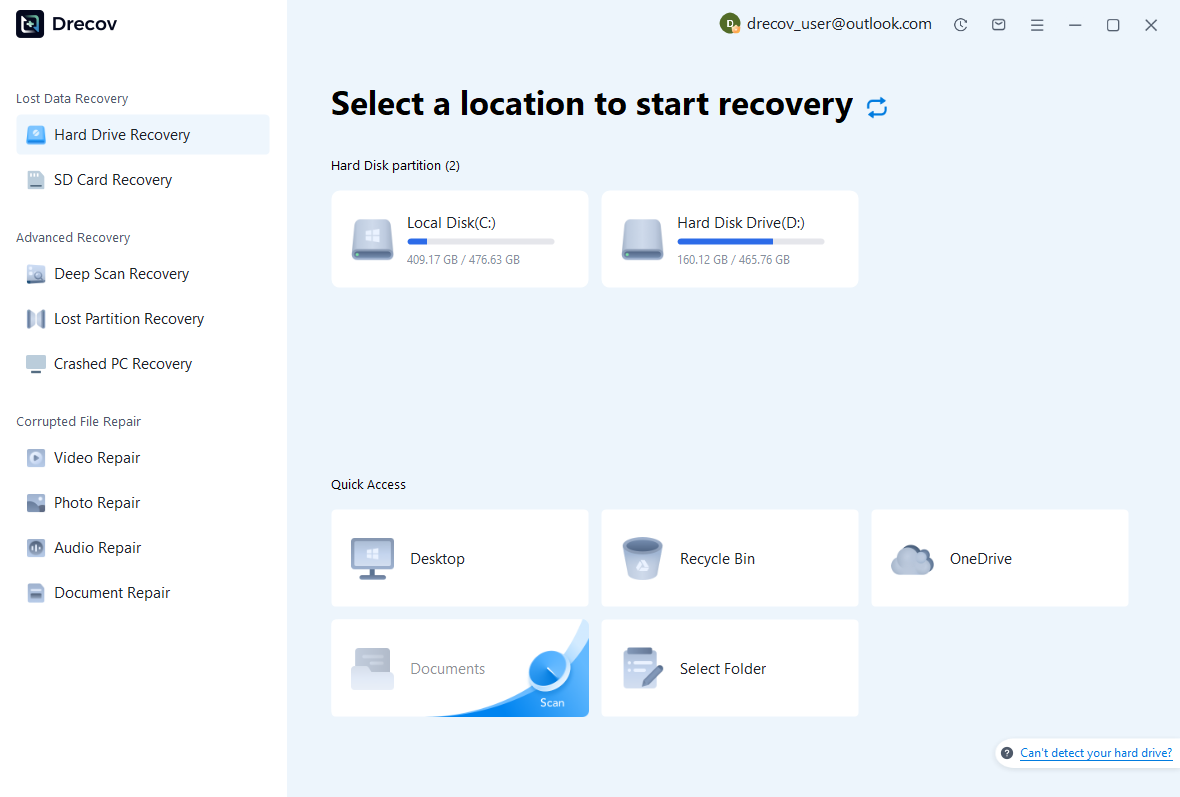
Step 1: Identify the Sprite and Session Storage
Choose the drive or partition that held the native sprite, configured recovery data, or original exports. Record which component each search targets. Keep recovered output on separate healthy storage. If the source repeatedly disconnects or reports hardware read failures, assess that condition before continuing with a routine software recovery scan.
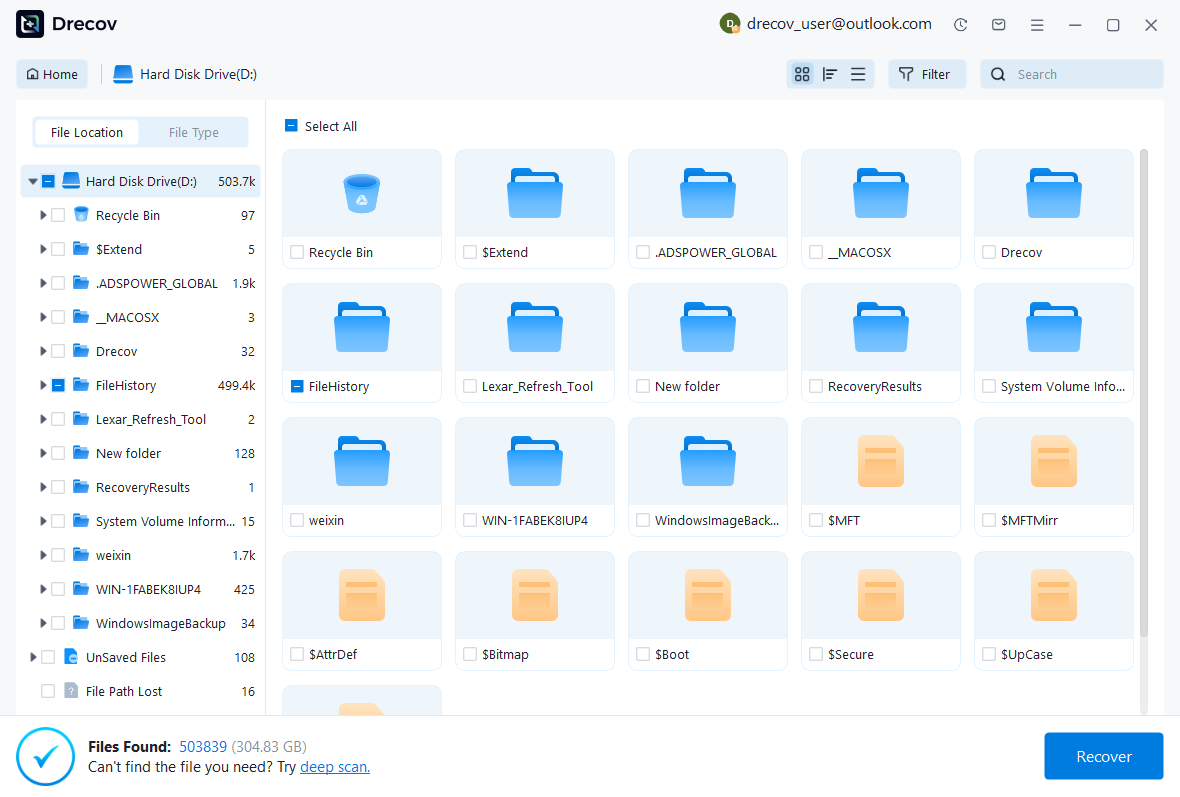
Step 2: Compare Native and Export Candidates
Review available paths, names, sizes, dates, and supported previews. Preserve plausible native files and session candidates separately from flattened output. A recognizable frame does not establish that layers or timing survived. Keep alternatives until Aseprite can inspect the working candidate’s actual animation structure.
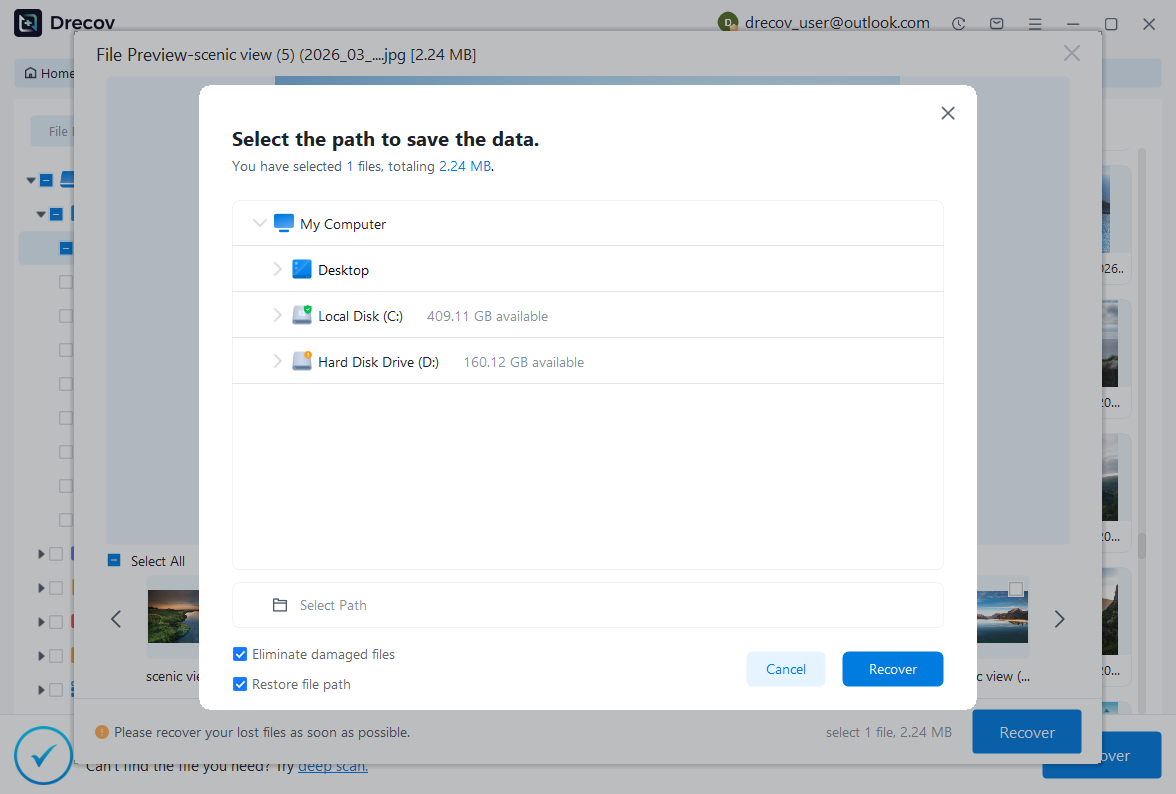
Step 3: Restore Elsewhere and Verify the Sprite
Recover selected files to a separate destination and preserve untouched originals. Open a working native candidate through the appropriate Aseprite version, then compare layers, cels, frames, tags, palette, and timing. Save and reopen the accepted file and export a sample. Record reconstructed structure before returning the sprite to ordinary production.
Preserve a Verified Native Animation Milestone
Keep the accepted native sprite, a representative output, and a short record of the recovered source and remaining gaps. Test a copied restore with the incident frame and animation segment. This preserves a practical route back to editable work rather than relying only on an image that happens to show the right character.
Related Recovery Resources
Explore the relevant recovery options: Hard drive recovery, External hard drive recovery.
For another recovery case and its practical checks, read the related recovery guide.
Check the vendor guidance for the installed version: official recovery documentation 1, official recovery documentation 2, official recovery documentation 3.