


USB flash drives are the unsung heroes of our digital lives. We use them to transfer school projects, store sensitive work documents, and carry our favorite photos. However, there comes a time when you need to start fresh. Perhaps your drive is sluggish, full of “ghost” files, or you are preparing to sell it. Knowing how to clear a usb drive effectively is a fundamental digital skill.
In this comprehensive guide, we will explore the nuances of clearing storage, the technical differences between “deleting” and “wiping,” and—most importantly—how to rescue your files if you realize you cleared the wrong thing.
Understanding the Basics: Why and How to Clear USB Storage
Before we dive into the technical “how-to,” we must distinguish between a quick cleanup and a permanent wipe. Many users believe that dragging files to the Trash or Recycle Bin is sufficient. In reality, the operating system simply marks that space as “available,” while the actual data remains on the NAND flash chips until overwritten.
How to Clear USB Storage for Performance and Security
If your goal is to optimize performance, a standard format is usually enough. But if you are handing the drive to someone else, you need a “sanitization” approach. When you learn how to clear usb storage, you are essentially managing the file system—the map that tells your computer where data lives.
Common file systems include:
- FAT32: Great for compatibility but limited to 4GB files.
- exFAT: The modern standard for USB drives, working across Windows and Mac.
- NTFS: Best for Windows-only environments requiring high security.
Method 1: The Quickest Way (Windows File Explorer)
This is the most common method for users who want a fresh start without diving into complex menus. It is ideal for general maintenance.
- Step 1: Insert your USB drive into an available port. Open File Explorer (Windows Key + E).
- Step 2: Locate your drive under “This PC.” Right-click the drive icon and select Format.
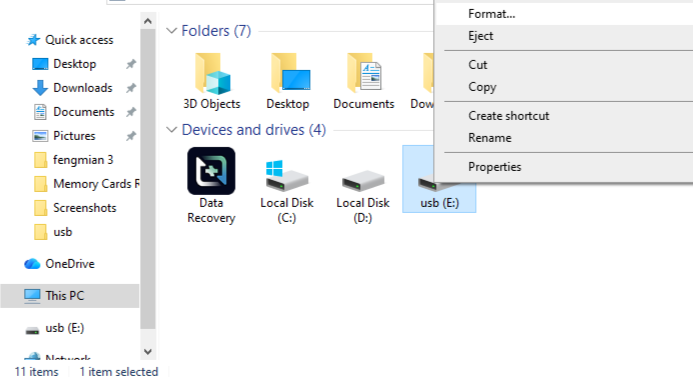
- Step 3: Choose your desired File System. For most users, exFAT is the best choice.
- Step 4: Keep “Quick Format” checked if you just want to clear the index. Uncheck it if you want Windows to check for bad sectors (this takes much longer).
- Step 5: Click Start. A warning will appear; confirm that you want to erase all data.
Warning: Formatting permanently deletes the directory structure. While data recovery is possible after a “Quick Format,” it becomes much harder after a “Full Format.”
Method 2: Using Disk Management for Stubborn Drives
Sometimes, a USB drive won’t show up in File Explorer, or the “Format” option is greyed out. This usually happens due to partition errors.
- Step 1: Right-click the Start button and select Disk Management.
- Step 2: Locate your USB drive in the list. It is usually labeled as “Removable.”
- Step 3: If the drive has multiple partitions, right-click each one and select Delete Volume until the entire drive shows as “Unallocated.”
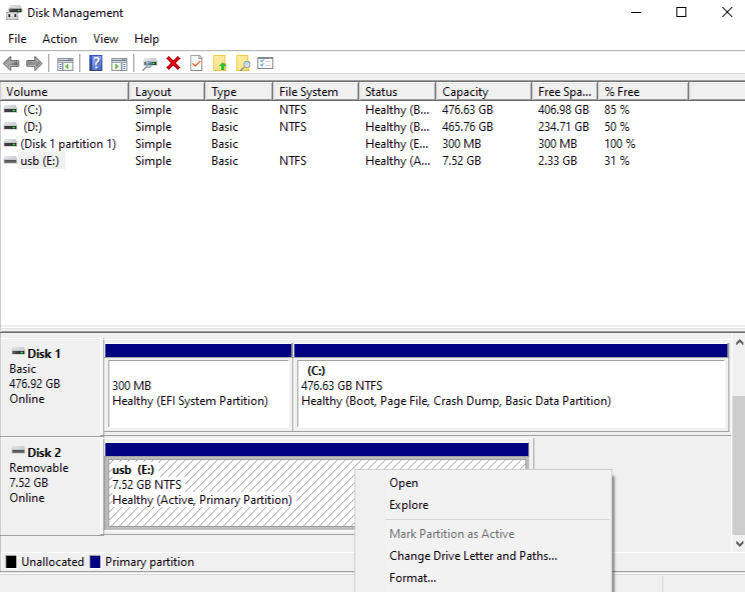
- Step 4: Right-click the unallocated space and select New Simple Volume.
- Step 5: Follow the wizard to assign a drive letter and format the drive.
Method 3: Advanced Clearing via Command Prompt (Diskpart)
For power users, the Command Line Interface (CLI) offers the most control. This method is excellent for clearing “read-only” attributes or hidden partitions created by Linux boot installers.
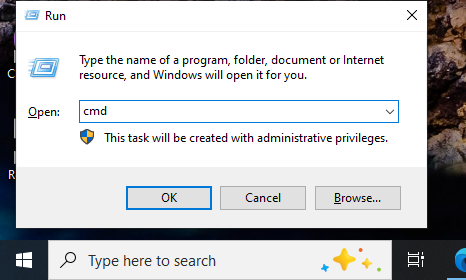
- Step 1: Type
cmdin the Windows search bar, right-click, and Run as Administrator.
- Step 2: Type
diskpartand press Enter. - Step 3: Type
list diskto see all connected drives. Identify your USB by its size (e.g., Disk 2). - Step 4: Type
select disk X(replace X with your USB’s number). Be extremely careful here; selecting the wrong disk will erase your hard drive. - Step 5: Type
clean. This command wipes the partition configuration completely. - Step 6: Type
create partition primary, thenformat fs=exfat quick. - Step 7: Type
exitto close the utility.
The Nightmare Scenario: “I Cleared the Wrong Drive!”
It happens to the best of us. You’re following a guide on how to clear a usb drive, you click “Confirm,” and a second later, your stomach drops. You realized your backup drive was plugged in, not the empty one.
Do not panic. When you format a drive, the data isn’t “shredded” instantly; the “pointers” are just removed. As long as you don’t save new files onto that drive, the old data is likely still there. This is where professional-grade recovery tools like PandaOffice Drecov come into play.
How to Recover Data Using PandaOffice Drecov
PandaOffice Drecov is designed for high-success rate recovery from formatted, corrupted, or “cleared” USB drives. It uses advanced deep-scanning algorithms to reconstruct file headers that the OS can no longer see.
⚠ Warning: Install it on a drive different from the one where your data was lost to prevent overwriting.
Step-by-Step Recovery Process
Step 1: Select the Target Location
Launch the software. On the main interface, you will see a list of “External Devices.” Select your USB drive.
- Key Point: If the drive doesn’t appear, try re-plugging it or using a different port.

Step 2: Initiate the Scan
Click the Scan button. PandaOffice Drecov will perform a “Quick Scan” followed automatically by a “Deep Scan.” The Deep Scan looks for raw data fragments, which is essential if you performed a full format.

Step 3: Preview and Filter
One of the best features is the Preview function. As the scan progresses, you can click on images, documents, or videos to see if they are intact. Use the filter sidebar to sort by file type (.jpg, .docx, .mp4).

Step 4: Recover the Data
Check the boxes next to the files you need. Click the Recover button.
Warning Prompt: Never save the recovered files back onto the same USB drive you are recovering from. This can overwrite the very data you are trying to save! Always save them to your desktop or an external hard drive first.
Post-Recovery Maintenance and Troubleshooting
Now that you’ve mastered how to clear a usb drive and how to get your data back, you might encounter hardware-level hiccups. Sometimes the drive refuses to format because of a physical fault or a port issue.
If your computer fails to recognize the drive at all, check out our USB ports troubleshooting guide to rule out hardware failure.
If you’ve successfully cleared the drive but realized later that specific files were deleted manually before the format, you can find more targeted tips in our guide to recovering deleted files from USB.
Finally, if you are working with larger drives and need specific file system compatibility, learn how to format USB to FAT32 on large sticks.
Best Practices for USB Health
To avoid future data loss while learning how to clear usb storage, follow these expert tips:
- Always Eject Safely: Windows has improved write-caching, but pulling a drive mid-write is the #1 cause of corruption.
- Use High-Quality Hardware: Cheap “no-name” drives often use recycled NAND flash that fails after only a few format cycles.
- Label Your Drives: Use physical labels or rename the drive in Windows (Right-click > Rename) to “BACKUP” or “TEMP” so you never format the wrong one again.
- Regular Scans: Periodically run the Windows “Check Disk” tool (chkdsk) to ensure the file system integrity is solid.
For more technical documentation on how Windows handles storage, you can visit the Microsoft Learn Storage Documentation.
Mastering How to Clear USB Storage FAQs
1. Why does Windows say “The disk is write-protected” when I try to clear my USB?
This is a common security feature that prevents any data from being written or erased. First, check if your USB drive has a physical Lock switch on the side and slide it to the “Unlock” position. If it doesn’t, you can clear the read-only attribute via Diskpart:
- Run
cmdas admin. - Type
diskpart, thenlist disk, thenselect disk X. - Type
attributes disk clear readonly. This should allow you to proceed with clearing the storage.
2. Is there a difference between “Quick Format” and “Full Format” when clearing a drive?
Yes, and it is significant for data recovery. A Quick Format only deletes the file system’s “table of contents,” making the drive appear empty while the data remains. A Full Format scans every sector for errors and replaces data with zeroes (in Windows Vista and later). If you use a tool like PandaOffice Drecov, it is much easier to recover files after a Quick Format than a Full Format.
3. How do I clear a USB drive so that the data is 100% unrecoverable?
If you are handling highly sensitive data, a standard format is not enough. You should use a “wiping” or “shredding” utility that performs multiple passes, overwriting the drive with random bits (e.g., the DoD 5220.22-M standard). For most users, the clean all command in Diskpart is sufficient, as it writes zeroes to every byte on the disk, making recovery nearly impossible even for advanced software.
4. Can I clear a USB drive on a Mac so it still works on a Windows PC?
Absolutely. When using Disk Utility on macOS to clear your drive, ensure you select exFAT as the Format and GUID Partition Map as the Scheme. This configuration allows the drive to be read and written to by both macOS and Windows without needing third-party drivers. Avoid “Apple File System” (APFS) if you plan to plug the drive into a PC.
5. What should I do if my USB drive shows “No Media” and I can’t clear it?
The “No Media” error usually indicates a hardware communication failure between the flash controller and the NAND chip. Before giving up, try:
- Checking the drive in a different USB port.
- Uninstalling the device in Device Manager under “Universal Serial Bus controllers” and restarting your PC.
- If the drive still shows 0MB or “No Media,” the hardware may be physically failing, and professional data recovery services might be required if the data is critical.
Conclusion
Mastering how to clear a usb drive is about more than just clicking “Delete.” It’s about understanding your hardware, choosing the right file system, and knowing that tools like PandaOffice Drecov are there to catch you if you fall. Whether you use the simple File Explorer method or the advanced Command Prompt “clean” technique, always double-check your drive letters!


