








Recover the Intended Change without Losing Newer Work
IntelliJ IDEA can retain local revisions that never reached a repository. This can help when a refactor removed useful code, a file disappeared, or a recent edit proved incorrect. However, local history is a limited working safety net rather than a permanent backup. Start by identifying the exact missing change and preserving the current project before applying any reversal.
Imagine that a method disappeared during cleanup, but several valuable fixes followed afterward. Reverting the whole project to yesterday could restore the method and remove those fixes. A better recovery target is the smallest coherent change: the method, its imports, and any necessary companion updates. This article focuses on that selective approach while also explaining what to check when an entire file is missing. Here, free recovery means using retained history or existing project copies without buying another recovery tool. You still need legitimate access to the installed IDE and any separately licensed dependencies.
Preserve Current Editors and Project Files
If useful code remains visible in an editor, save or copy it to a separate recovery location first. Include uncommitted changes that you might otherwise lose during a broad revert. Record the project root, IDE version, and approximate incident time. Keep the working project and any recovery candidates distinct so you can compare them without treating one as automatically authoritative.
Avoid upgrading, reinstalling, or clearing IDE system data while local history is still a possible source. Its retention and storage rules differ from ordinary project files. A project backup may not include the IDE’s local-history database, while copying the IDE settings alone does not preserve your source tree. Preserve both categories when possible, and note which one each copy represents.
Confirm the Project and Branch before Reverting
Check the full project path and current branch. A similarly named clone, another worktree, or a changed checkout can make code appear missing even though it remains in the expected location elsewhere. Compare a recognizable recent change and the repository status. If the wrong project is open, switch deliberately rather than trying to recreate absent code through unnecessary reversions.
Also inspect whether a view filter, excluded directory, or renamed package explains the missing file. Search for a distinctive symbol across the actual project. A file moved by refactoring may be present under a new name. Finding that file preserves more context than restoring an older duplicate that could conflict with the current design. Confirm physical absence before treating the problem as deletion.
Define a Testable Recovery Goal
Write down what success means in concrete terms. For example, you may need a parser to accept a known input again, a deleted test fixture to return, or a configuration key to keep its earlier value. This is more useful than a vague goal of making the project look like yesterday. It guides both candidate selection and final validation.
If you do not remember the exact implementation, use evidence from tests, issue notes, or known outputs to narrow the search. Keep that evidence separate from assumptions. Local history can show what existed, but it does not decide which implementation was correct. A recovered revision needs a reason to be accepted, especially when several experiments contain similar method names and different behavior.
Free Method 1: Recover a Code Fragment from Local History
For a file that still exists, open its Local History view and inspect revisions around the incident. The comparison can show the current file beside an earlier state. Locate the missing fragment and review its surrounding context. Preserve the current file first, then bring back only the relevant block when the comparison tools support that action in your version.
Read the restored code in its new context. Imports, renamed symbols, and changed method signatures may affect whether an older fragment still belongs. Do not accept the merge simply because the desired lines appear again. Compare the dependent call sites and tests. A small selective restoration can preserve newer work, but only if you understand the relationships that the earlier code expects.
- Open Local History for the existing file and find the relevant earlier state.
- Compare the missing block with current code and preserve the current version separately.
- Restore the smallest coherent fragment, including required companion changes.
- Review the resulting diff and run a focused check for the restored behavior.
Prefer a Fragment over a Whole-File Revert When Appropriate
Suppose you deleted an input-validation branch before fixing an unrelated logging issue. Restoring just the validation block may retain the logging fix. A whole-file revert would remove both changes. Use the history comparison to understand that boundary. If the missing block depends on a broader refactor, expand the recovery scope deliberately rather than assuming that a few copied lines will always suffice.
Keep a note of the revision and the reason you chose it. That record helps when a teammate asks why an older implementation reappeared. It also makes later review easier if the first trial fails. You can return to the preserved current version and test another candidate without guessing which manual changes came from recovery and which came from subsequent debugging.
Free Method 2: Restore a Deleted File through Its Parent
When the file itself is gone, inspect Local History on the parent directory or project node. Look for a state that still contains the missing file. Review its contents and path before restoring the selection. A file-level history action cannot help if you have no file to select, which is why the parent context matters for this recovery route.
Restore only the needed resource initially. Then inspect package names, references, and any generated counterpart that may now conflict. A deleted file can have a current replacement under another name. If you restore the old file without checking that change, you may introduce duplicate behavior rather than recover missing functionality. Use the project diff to see exactly what the restoration added.
Check Related Deletions and Renames
A deletion event may be part of a larger operation. Review neighboring changes to determine whether a test, resource, or configuration entry disappeared at the same time. Recovering only the source file may leave its feature unusable. Conversely, restoring every file from the event may undo intentional cleanup. Treat each related item as a candidate whose role you can explain.
For renamed files, compare content rather than relying on path names alone. The desired implementation may survive in the renamed destination, while only an old reference is broken. In that situation, repairing the reference can be more appropriate than restoring the deleted original. Keep the recovery goal in view: you want the intended behavior and trustworthy source, not merely a familiar filename in the project tree.
Free Method 3: Use Existing Repository Revisions Selectively
If the project already has version control, inspect committed history and surviving branches for the missing material. Export the desired file or create a separate trial checkout rather than resetting the current project. The repository provides a useful baseline, but it may not include recent uncommitted edits. Compare it with local history and surviving editor content before deciding which source is most complete.
For a change spread across several files, a coherent committed revision can be easier to validate than isolated fragments. Still, preserve later fixes that you need. Use a reviewed diff or patch to combine the accepted changes, and test the result in a separate working location when practical. This is a recovery operation, so keep unrelated formatting and dependency upgrades out of the same change.
Keep Repository History and Local History Distinct
A repository commit records a deliberate project state, while IDE local history can capture additional local changes. Neither automatically contains the other. If a missing function was written after the last commit, repository history may offer only its earlier scaffold. If local history has expired, a committed version may remain the only reliable source. Choose based on actual contents, not on which feature feels more comprehensive.
Do not push or publish a recovered experiment merely to create a backup during diagnosis. First preserve it locally and review what it contains. Recovered code can include obsolete endpoints, temporary debugging, or incomplete features. A verified local recovery checkpoint is useful, but external sharing is a separate action with its own audience and purpose. Keep the review focused on restoring the intended project safely.
Understand Local-History Retention and Storage
IntelliJ IDEA stores local history separately from ordinary source files, and the storage can depend on the product version and system-directory configuration. Consult the settings and documentation for the installation you used. If you changed versions or system paths, the current installation may not be looking at the same retained history. Preserve existing system data before attempting a migration or cleanup.
Do not assume that installing a fresh IDE rebuilds old revisions. Retention limits and upgrades can remove access to earlier local history. Increasing a retention setting now affects future storage, not already discarded states. If no relevant history appears, record the limit and move to other real sources, such as an existing clone or saved project copy. Repeatedly changing preferences cannot recreate absent revisions.
Avoid Editing the History Database Directly
The local-history store is not a folder of ordinary source files that you can rename into place. Treat its internal data as application-managed. If you preserve it, copy it while the application is closed when practical and keep the copy unchanged. Use supported recovery interfaces for inspection instead of modifying internal records in the hope that a missing revision will reappear.
If the entire project is gone, recovery can become more dependent on paths, retained system data, and the exact IDE version. Do not create new project files on a volume where deleted-file recovery may still matter. Preserve the existing evidence first and evaluate the supported options for your situation. Whole-project recovery should not be presented as a guaranteed extension of the simple file-history workflow.
Review a Recovered Refactor as a Coherent Change
Refactoring often updates declarations, usages, tests, and configuration together. If you restore only one earlier declaration, the project may compile incorrectly or fail at runtime. Compare the affected call graph and search for both old and new symbol names. That identifies references that need deliberate handling and helps you avoid mixing two incompatible stages of the same refactor.
Look beyond compilation errors. An old overload may still compile while accepting a different unit, default, or null-handling rule. Use representative tests to confirm the intended behavior. When a recovered block changes public behavior, review its expected inputs and outputs explicitly. Recovery is successful when the project behaves correctly with the accepted source, not when the editor stops showing red underlines.
Preserve Useful Newer Edits During the Merge
Before applying a larger revert, identify newer changes that must remain. Save them as a patch or separate copies using the tools available in your workflow. Then compare the combined result carefully. A patch can preserve text differences, but conflicts still require judgment. Do not resolve every conflict by automatically choosing the recovered side or the newest side across the whole project.
After merging, inspect the final diff without the history dialog. This fresh view reveals accidental deletions, duplicate imports, and unrelated formatting that a focused fragment comparison can hide. Remove only changes you understand, and keep the original candidates available. If you cannot explain a difference, mark it for review rather than silently treating it as part of the successful recovery.
Check Build Inputs and External Resources
A recovered source tree may depend on files outside the obvious code directories. Inspect build scripts, resource bundles, schemas, templates, and test data. If the lost behavior involves configuration, the relevant file may live outside the package where the error appears. A code fragment can be correct while a missing resource makes its execution fail, so validate the complete feature path.
Also record the runtime and dependency versions used by the accepted revision. An older source state may rely on an API that changed later. Decide whether you are recovering that historical environment or adapting the code to the current one. Keep those operations distinguishable in your notes and changes. Otherwise, a compatibility adjustment can make it difficult to tell whether the original implementation was recovered accurately.
Use a Controlled Validation Sequence
Start with static review and a local build, then run focused tests for the recovered behavior. Use a test configuration when the project normally writes to databases, sends requests, or modifies important files. An older configuration may point somewhere unexpected. Confirm destinations before execution, because recovering an authentic script does not establish that it remains appropriate for your current environment.
After focused checks pass, run the relevant broader project checks once. Do not keep changing code merely to make the recovered version resemble an earlier screenshot. If the accepted result meets its testable goal and preserves needed newer work, save a clear recovery checkpoint. That gives you a stable place to resume ordinary development without continuing to mix recovery decisions with unrelated improvements.
Recover from a Refactor with Mixed Good and Bad Changes
A broad refactor can improve several areas while accidentally removing one useful behavior. Before reverting, list the later changes you want to keep. Compare those against the missing block in local history and identify the smallest consistent combination. This turns recovery into a focused review rather than an all-or-nothing choice between the current project and an older snapshot. Preserve the current state so you can test alternatives without sacrificing valid work.
For example, a recovered method may expect an old data type while the current project uses a renamed model. Copying the method unchanged can create a subtle semantic mismatch even if the compiler accepts an overload. Review the values crossing that boundary and test representative inputs. If adaptation is necessary, record it as a new compatibility edit alongside the recovered logic, not as proof that the old implementation transferred without changes.
Compare Tests with the Intended Behavior
A test that passed historically is useful evidence, but it may target requirements that changed later. Review the purpose of the test before restoring it with the code. If the missing behavior still belongs in the product, use a current meaningful test to validate it. If requirements changed, preserve the historical implementation as evidence without automatically making it the active behavior again.
Also inspect tests that were deleted during the same event. They may reveal edge cases the recovered method needs. Restore relevant fixtures and helper data together, and check that they represent the intended current scenario. Avoid weakening assertions merely to obtain a green result after recovery. A passing check should support the specific behavior you meant to restore, rather than mirror whichever candidate happened to be easiest to compile.
Handle Files Outside the Project Root
Some work depends on scratch files, local scripts, or configuration outside the main source tree. Identify these separately from ordinary project files. If the missing fragment came from another location, project-root history or repository history may not cover it. Search the actual retained sources and preserve any surviving editor text. Do not assume that a project backup included every external file you opened during development.
When you bring a recovered external script into the accepted project, review paths and execution assumptions carefully. A local helper may have relied on a particular machine or temporary directory. Save a separate reviewed version rather than running the raw candidate directly. This gives you a useful recovery result while keeping historical machine-specific behavior from becoming an unexpected part of the current project workflow.
Create a Reviewable Patch for the Accepted Recovery
After choosing the source and merging the intended changes, inspect the complete resulting diff. Keep the patch focused on the recovery goal and include required companion files. A small reviewed patch is easier to understand than a project-wide revert with unrelated formatting and environment changes. Preserve the raw candidates separately so a reviewer can distinguish original recovered text from deliberate adaptations made during the merge.
Write the recovery note around the concrete result: which behavior returned, which newer work remained, and which checks support that conclusion. Mention unresolved gaps directly if the available history was incomplete. This practical record helps you stop searching once the intended recovery has been verified. It also provides a clearer starting point for future development than an undocumented collection of copied fragments and uncertain historical versions.
When Deleted-File Recovery Becomes a Separate Option
PandaOffice Drecov may help search for a source file or existing project copy that was actually deleted from readable storage. It does not automatically decode IntelliJ IDEA’s internal local-history database into a complete project. It also cannot recover code that never reached any retained storage. Use it when the missing item is a real disk file and the native history or repository routes do not supply it.
Stop unnecessary writes to the affected volume before scanning. Keep recovered outputs elsewhere, and preserve accessible project and system folders first. If the project and IDE system data lived on different volumes, note that distinction. A scan can produce several plausible versions, so plan to compare contents rather than assuming the largest or newest candidate is the desired implementation.
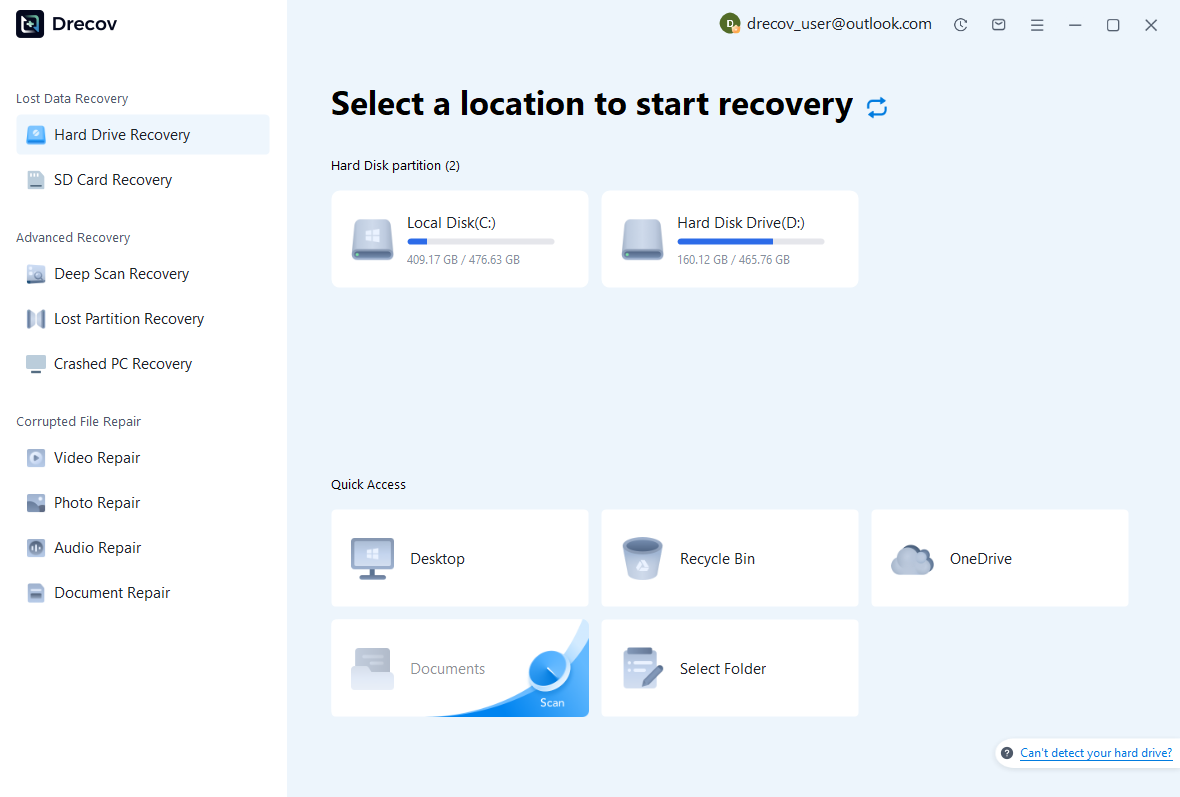
Step 1: Select the Storage That Held the Missing Source
Choose the physical volume containing the deleted project file or saved copy. Confirm the location through the full project path you recorded earlier. Avoid installing recovery software or creating a replacement project on that volume. Reserve another healthy destination for candidates. The source-selection interface is illustrative; your actual storage layout and drive labels will determine the correct selection.
Step 2: Compare Candidate Code and Project Context
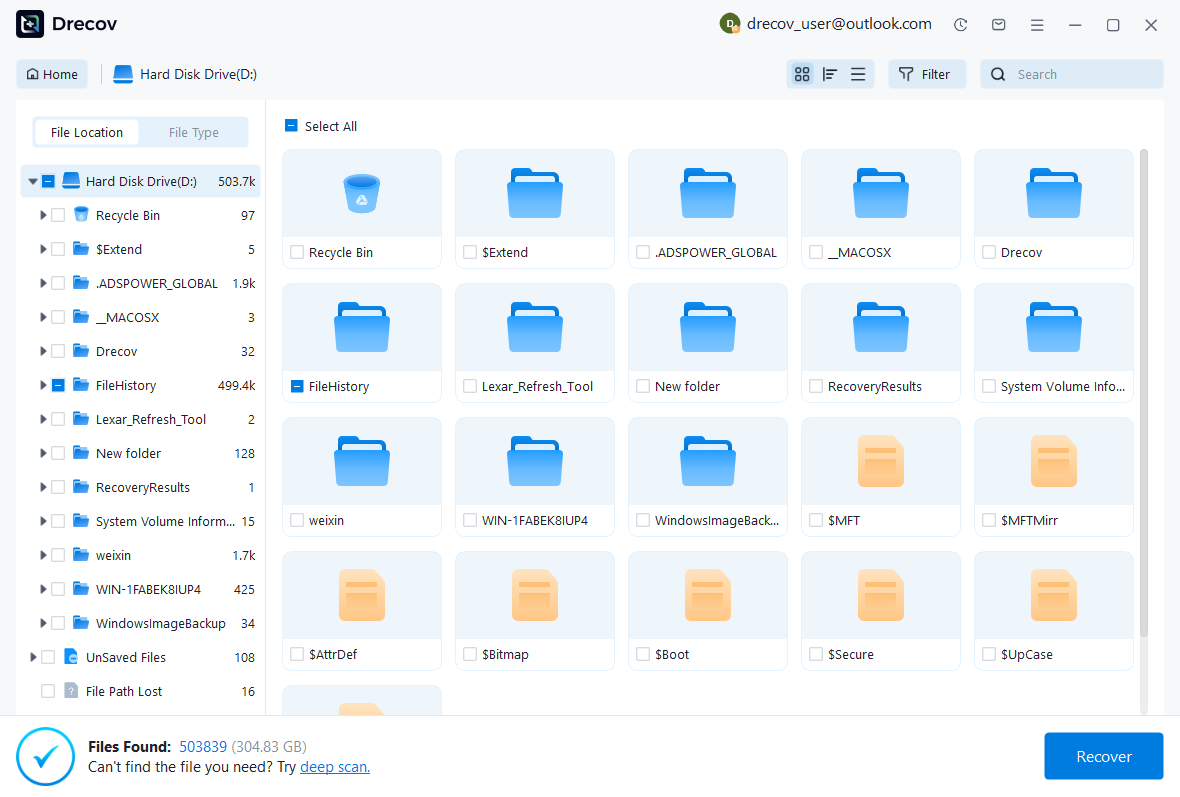
Inspect available names, paths, dates, sizes, and supported previews. Retain multiple plausible revisions if they contain different useful changes. Compare distinctive symbols and surrounding code rather than trusting a generic filename. Include relevant build files and resources when they survive. A source file with the right class name can still belong to another branch, exercise, or older project copy.
Step 3: Recover Separately and Validate the Accepted Merge
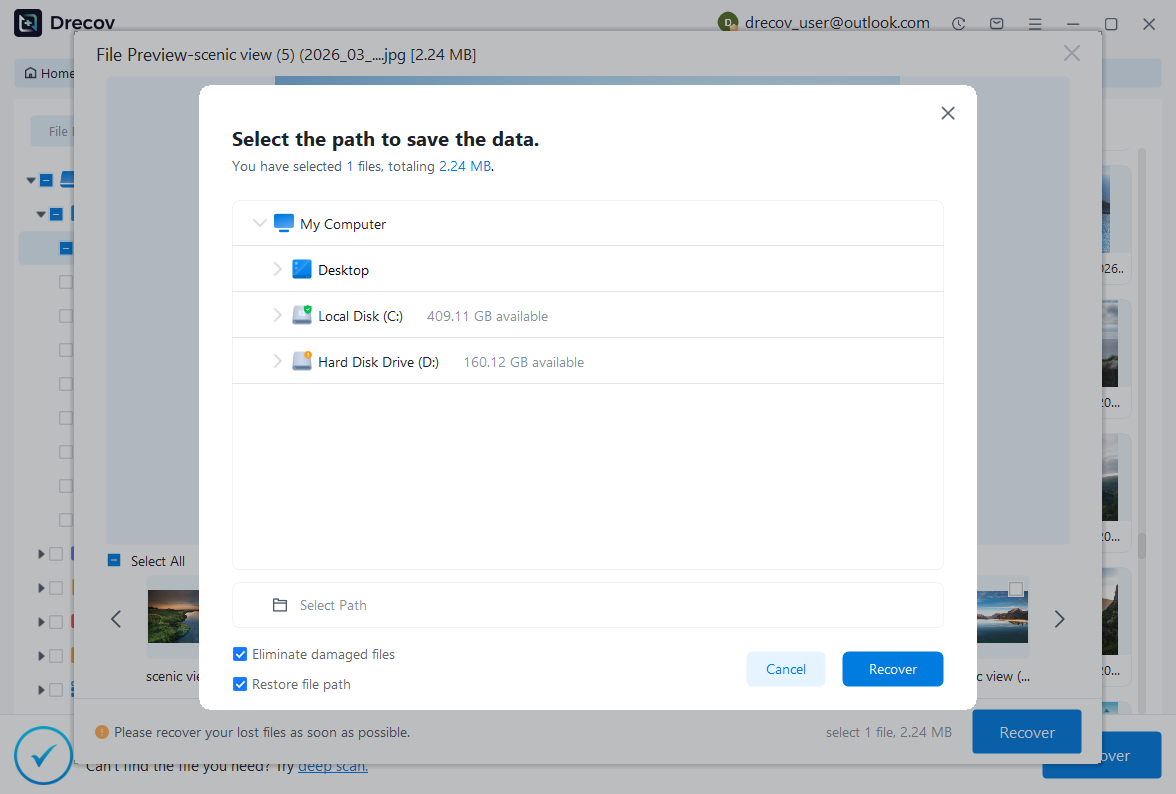
Save candidates to the separate destination, then build a trial project from copies. Review source before executing it, check dependencies, and merge only the material that meets your recovery goal. Run focused tests and inspect the final diff. Keep the original recovered candidates unchanged until you have confirmed both the missing behavior and the newer work you intended to preserve.
Establish a Clear Recovery Checkpoint
Record which revision or candidate supplied each restored file or fragment. Include the checks you ran and any uncertainty that remains. If the result contains newly reconstructed logic, label it separately from recovered code. This helps future review and avoids overstating what the available history proved. A short precise recovery note is more useful than a blanket claim that everything returned to normal.
- Confirm the project path, branch, and accepted files or fragments.
- Review the final diff for unwanted reversions and missing dependencies.
- Run focused validation and the relevant project checks in a controlled environment.
- Save a verified checkpoint and an independent project backup before continuing development.
Strengthen Protection for the Next Refactor
Use meaningful version-control checkpoints before broad changes, and keep independent backups of important project data. Local-history labels can make short-term navigation easier, but they do not turn the feature into permanent shared version control. Review retention settings according to your work pattern and storage capacity. Protect source files and build inputs, not just the IDE’s list of recently opened projects.
Finally, rehearse a selective recovery with a disposable file. Delete a small block, inspect history, restore only that block, and verify that a later unrelated edit remains. This teaches the exact behavior of your installed version without risking valuable code. The practical skill is knowing how to recover a coherent change while preserving the work that should survive around it.
Related Recovery Resources
Explore the relevant recovery options: Hard drive recovery, External hard drive recovery.
For another recovery case and its practical checks, read the related recovery guide.
Check the vendor guidance for the installed version: official recovery documentation 1, official recovery documentation 2, official recovery documentation 3.





