








Recover the OpenShot Edit and Its Original Media
To recover OpenShot projects, preserve the OSP file and identify which media or generated assets it needs. The project describes editing decisions and references source material. It does not automatically contain every imported recording. A recovered timeline can therefore remain incomplete until the original media and relevant project assets are available at usable paths.
Record the OpenShot version, project path, expected duration, and a distinctive clip or transition. Also note whether the project disappeared, failed to open, or opened with missing files. Those symptoms require different investigations. Start from one concrete missing element rather than repeatedly replacing the project with whichever backup has the newest timestamp.
Preserve Current and Recovery Candidates
Copy the existing project, its related asset directory, and available recovery information before resetting preferences or reinstalling. Keep an untouched set and use working copies. Preserve original media separately with its directory relationships. A recovery candidate may describe a useful edit while depending on files that were never copied into the project folder.
If OpenShot still displays useful work, use Save Project As to preserve a separate native milestone. Keep a short reference export when practical. The OSP supports continued editing, while the export helps compare the intended appearance and timing. A playable video does not replace the source project’s editable clip arrangement and dependencies.
Native Route 1: Use an Available Recovery Version
- Preserve the current project and existing recovery data.
- Open the supported recovery interface for your installed OpenShot version.
- Select a candidate from the relevant project milestone.
- Compare the edit and save an accepted recovery under a distinct name.
OpenShot can preserve recovery versions according to its settings and workflow. The recovery interface and candidate format can vary by version. Use the documentation for the installed release rather than assuming every installation presents the same menu. Inspect the actual content before accepting the candidate as the latest useful edit.
Understand Any Replacement Behavior
A recovery operation may preserve a backup of the current project while substituting the chosen candidate. Keep your own separate copies first so the operation’s file handling cannot remove your only useful source. Record which project you restored and where the application saved the displaced state. This makes later comparison possible if the selected version lacks another recent edit.
Check a distinctive clip position, transition, and title after recovery. A timeline can have the expected duration while omitting an important trim or using another take. Save the accepted candidate separately and reopen a copy. This verifies persistence outside the recovery operation and establishes a normal working project for further checks.
Native Route 2: Open an Existing Recovery-Folder Candidate
- Locate the recovery directory used by the original OpenShot profile.
- Preserve the relevant candidates before changing application settings.
- Prepare a copied candidate using the documented workflow for its format.
- Open it and use Save Project As to create a clear recovery project.
OpenShot’s documented recovery directory can provide useful project versions even when the current OSP cannot open. On Windows, the original user profile and its .openshot_qt recovery information matter. Inspect that actual environment rather than searching only beside the damaged project. A newly created profile may have an empty recovery directory while older candidates remain elsewhere.
Compare Candidate Content and Context
Identify the project name and the incident period, then inspect the actual edit. A candidate filename may include internal identifiers or timestamps rather than the familiar project title alone. Preserve plausible alternatives instead of renaming every file immediately. The correct source is the one whose content and dependencies match the recovery goal.
Some versions or workflows can store compressed recovery material. Preserve the original archive and use an appropriate documented extraction or recovery process on a copy. Changing the extension does not automatically make compressed data into a valid OSP. Record any preparation step so the candidate remains traceable to its original recovery source.
Native Route 3: Inspect an Existing Backup OSP
- Locate a backup created during an earlier save or recovery operation.
- Preserve the original and copy it to a separate test location.
- Open a usable working copy as an OSP project.
- Compare the edit and save an accepted result under a new filename.
An existing backup can preserve a useful state displaced during recovery or another save workflow. Its scope depends on the actual version and operation. Do not assume every project has a backup or that the backup is automatically newer than another recovery candidate. Compare the missing clip or effect against independent evidence.
Retain Useful Differences Between Projects
The backup may contain a correct arrangement while another candidate includes later title work. Preserve both and transfer only understood changes in a working project. Compare clip timing, source identity, and related assets after the transfer. A combined edit can meet the practical need without being an exact copy of one historical project file.
Also inspect whether paths change when the candidate moves to a test folder. A valid project can report missing media because its relative references now resolve differently. Preserve directory context and distinguish that path problem from project corruption before rejecting a useful backup.
Native Route 4: Reconnect Original Media and Assets
- Read the missing-file information and identify the expected source.
- Locate the original media in preserved storage.
- Reconnect the correct file through the supported project workflow.
- Check clip timing, effects, and any required generated project assets.
A moved or renamed recording can leave the project structure intact but unable to preview or render the edit. Reconnecting the original source can restore useful access. Match the actual recording, duration, and technical properties instead of choosing another file with the same basename. The wrong source can load while producing a misleading timeline.
Preserve the Related Asset Directory
Titles, generated material, and other project support can depend on the relevant asset folder. Keep that directory with the project when it exists. A recovered OSP with only the original camera clips may still lack a title or generated visual. Inspect the actual dependencies rather than treating every supporting folder as expendable cache.
Test the accepted project from its planned storage location. A title that works only while a temporary recovery folder remains available is an unresolved dependency. Preserve original assets and record any title you rebuild manually. A recreated title can support delivery without proving that the original editable asset survived.
Diagnose an OSP That Opens Slowly or Appears Frozen
A large or complex project can take time to load, while incompatible versions or damaged data can produce another kind of failure. Preserve the project and record the exact behavior. Use a compatible documented version on a copy and compare a simpler known project if necessary. Do not overwrite the only candidate with an empty test edit.
Separate Application and Project Problems
If unrelated projects also fail, inspect the application environment rather than assuming every OSP is corrupt. If only the incident project fails, compare an existing recovery milestone. A reinstall does not recreate a missing project revision, and clearing the profile can remove recovery information you still need. Preserve that data before environment troubleshooting.
When a candidate finally opens, inspect the actual timeline and save a separate working copy. Successful loading establishes only that the application can read something. It does not prove all source media, generated titles, or recent edit decisions survived, so continue with the incident-specific checks.
Verify Clip Identity and Timeline Position
Choose a distinctive action or spoken phrase in the affected clip and compare its placement. Two recordings can have similar thumbnails while containing different takes. Check the source’s actual content and the timeline in and out points. A recovered edit should preserve the intended performance and its relationship to neighboring clips.
Test Transitions and Speed Changes
A transition can appear in the timeline while referencing a different clip length or timing relationship. Preview before, during, and after it. Also inspect any speed changes or keyframed effects that mattered to the incident. A single correct still frame does not establish that the edit behaves correctly across a sequence.
If you reconstruct a trim or transition from a rendered reference, record that work. A visually close replacement can be useful without restoring the original exact parameters. Keep the source reference and the accepted project separately so another editor can understand where direct recovery ended and reconstruction began.
Inspect Audio Alongside the Picture
A project can regain its images while audio remains missing, offset, or routed differently. Compare a distinctive spoken phrase or sound cue in the recovered edit. Check the original source and timeline placement independently. An expected waveform does not prove that the correct recording and synchronization relationship survived.
Compare More Than the First Seconds
Listen to the beginning, middle, and relevant edit boundary of the affected section. A source can start correctly but differ in duration or timing later. If you substitute another audio version, record the change and verify its alignment across the needed range. Do not label an approximate replacement as recovery of the original recording.
For projects with several source formats, inspect a representative clip from each important source. This can reveal a dependency or interpretation issue that one easy sample misses. Keep original media untouched while testing project behavior so a compatibility investigation does not alter the evidence you needed for recovery.
Use Rendered Output with Explicit Editing Limits
A surviving video can preserve the visible and audible result of a milestone. It does not automatically preserve the OSP, source clips, editable titles, or effect settings. Keep it as a deliverable or reference according to its actual scope. If you build a new edit around it, label that project as reconstruction.
Identify the Reference Milestone
Compare the output’s content and creation context with the missing edit. An older export may omit the final correction even if its filename says final. Use a distinctive title, transition, or phrase to identify its actual scope. This prevents a reconstruction from unintentionally targeting an outdated production state.
If only a partial export survives, preserve the valid range and record the missing portion. You may reconstruct the rest from original recordings or another authoritative source, but the combined result is new editing work. Keep that origin clear so later users do not assume the recovered output represents an exact historical render.
Work through a Corrupt Project Candidate
Suppose an OSP no longer opens after an interrupted save. Preserve it and inspect existing recovery-folder candidates and backups. Open a copied useful version, compare the last distinctive edit, and save a separate recovery project. Then reconnect verified media and supporting assets rather than assuming the recovered OSP contains every source file.
Reject a Candidate for the Right Reason
If the project structure opens but media paths fail, investigate source location before rejecting the candidate as corrupt. If the candidate itself cannot parse or load, retain its exact error and compare another milestone. These findings have different next steps. Repeatedly replacing filenames without understanding the failure can obscure a still-useful source.
Work through Missing Titles after a Move
Imagine the timeline and original footage load, but generated titles disappear after you relocate the project. Preserve the current project and locate its related asset directory. Restore the intended folder relationship or reconnect the verified asset through the supported workflow. Then inspect a representative title and render a short sample.
Check the Actual Render Path
A title can appear in a cached preview while the final output still depends on an unavailable asset. Export a small section to a new folder and inspect the file independently. This tests the production result rather than relying solely on interactive preview. Record any manually recreated title as a repair made during recovery.
Build an OpenShot Recovery Inventory by File Role
List the active OSP, recovery-folder candidates, existing displaced-project backups, source recordings, and related asset directory separately. Record the milestone and verified contents of each. This avoids treating a large recovery file as automatically better than a small native project. Its value depends on whether it preserves the edit and dependencies you actually need.
Identify the Original User Profile
OpenShot’s recovery information belongs to the environment that created it. On Windows, inspect the relevant user’s .openshot_qt recovery directory rather than only the folder containing the project. A new profile can have no candidates while the original profile still holds useful versions. Preserve existing data before resetting settings or reinstalling.
Compare candidate names and dates with the actual project, then inspect their content. Internal identifiers or compressed recovery names can look unfamiliar. Keep the original candidate and any documented extraction steps recorded. Do not assume a filename change alone transforms a recovery archive into readable native project data.
Compare the Recovery Interface with Direct Candidate Opening
The supported Recovery interface can help select an earlier project milestone, while direct opening of a prepared copied candidate can help when the current project cannot load. Both require an actual surviving source. Use the workflow documented for your version and preserve the current OSP before any operation that may replace it.
Keep the Displaced Project Available
A recovery workflow can create a backup of the current project before substitution. Preserve that backup alongside your own pre-recovery copy. It may contain useful later changes absent from the selected candidate. The first recovered project that opens should become a comparison source, not an automatic reason to discard every other native milestone.
If the selected candidate lacks a needed title or trim, compare another recovery version before rebuilding. A coherent older milestone may still supply most of the edit. Record which version supplied the accepted structure and which specific differences you reconstructed or transferred during the repair.
Check OSP Structure and Media Availability Separately
A project can be readable while its sources are unavailable. Inspect the timeline and missing-file information, then locate the original media. Do not label the OSP corrupt simply because a moved recording fails to load. Conversely, a valid recording cannot recreate a missing native timeline on its own.
Use a Distinctive Clip to Match the Source
Choose an identifiable action, scene, or spoken phrase and compare the candidate recording independently. Several files can share common names or similar thumbnails. Duration and technical properties provide supporting evidence, but the actual content establishes the intended source. Keep uncertain alternatives until you understand which take belongs in the edit.
After reconnection, compare the event boundary and the surrounding sequence. A similar recording with a different start can make a correct trim appear wrong. Establish source identity before rewriting the edit, otherwise you may replace valid timeline decisions to compensate for an incorrect media choice.
Preserve Generated Assets Alongside the Project
Titles and other generated material can depend on the project’s supporting asset directory. Keep that folder with the native project when it exists. A recovery that restores camera footage alone can still leave important editable or generated content unavailable. Inspect actual references rather than treating every support file as disposable cache.
Test a Title with a Distinctive Feature
Choose a title containing a recognizable phrase or visual element and compare its native asset and rendered appearance. A cached preview can hide an unavailable underlying source. Export a short segment to a new directory and inspect it independently. This demonstrates whether the accepted project supports the real production path.
If you rebuild the title manually, record that it is new reconstruction. Keep the original reference and any surviving asset candidate. A recreated title can meet the immediate delivery need without proving that the original editable source and exact formatting returned from the recovered OSP.
Review Frame Rate and Source Interpretation before Retiming
A reconnected source can behave differently because of interpretation or project context. Compare the original frame rate assumptions, duration, and a recognizable motion event. A project that loads is not necessarily using the correct temporal relationship. Preserve the original candidate before changing global settings or adjusting many clips.
Test Early and Late Synchronization
Compare the beginning of the affected section and another event later in it. A source can start correctly while drifting relative to audio or another clip. Record whether the problem comes from the source revision, project settings, or a reconstructed timing decision. This keeps a recovery check from turning into unexplained retiming across the whole edit.
For speed changes or animated effects, inspect the full relevant interval rather than one frame. A familiar still cannot prove the original animation or transition behavior survived. Save any creative correction as a later version so the accepted recovery remains comparable with its original candidates.
Use Recovery Versions to Rebuild Only Verified Differences
Suppose an earlier OSP contains the right scene arrangement and another candidate contains a later explanatory title. Preserve both and compare those specific features. Build a separate working result through supported editing methods. Then inspect the interaction between transferred material and existing sources, rather than assuming a visible copy preserves every dependency automatically.
Keep the Source of Each Significant Repair
Record candidate milestone, copied section, and any manually recreated setting. A clear record helps explain a hybrid project without claiming that all its parts coexisted in one historical save. It also gives a future editor a useful comparison point if an effect or title behaves differently after another move.
Do not use the recovery comparison as an opportunity to redesign unrelated sections in the same file. Save creative revisions separately. This preserves a stable accepted milestone and makes later discrepancies easier to trace to either the original incident or subsequent editing choices.
Diagnose Environment Failures without Destroying Recovery Data
If multiple unrelated projects fail, inspect the application environment and compatible version before replacing their source files. Preserve the original profile and recovery directory first. A reset may help an environment problem while removing context you still need for a project-specific recovery. Keep those tasks separate and use supported procedures on copies.
Record the Exact Failure
Note whether a candidate fails to parse, opens with missing media, or simply takes a long time to load. Those observations lead to different next steps. Repeatedly renaming files or reinstalling without a preserved baseline can hide the useful distinction and make a recoverable project appear more mysterious than it is.
When a candidate opens successfully, save a separate native copy and run the incident-specific checks. Successful loading is a useful milestone, but it does not establish complete source availability, correct timing, or valid output. Keep the acceptance claim limited to the content and production behavior you actually verified.
Create an Independent Editable Restore Test
Copy the accepted OSP and required assets to the planned project structure, reopen a working version, and render a representative section. Check the distinctive clip, title, transition, and audio event. Confirm that no component still relies on a temporary recovery path. This test reveals hidden dependencies that the original machine can conceal.
Preserve a Useful Editor Handoff
Keep the native edit, full required recordings, project assets, reference output, and a brief record of reconstructed elements. Another editor should be able to identify the accepted milestone and remaining gaps. This is more useful than a folder of similarly named OSP files whose differences nobody has reviewed.
Retain original candidates until the independent restore meets the task’s needs. If only output-only salvage is available, state that scope clearly. A playable video can be valuable while offering a different level of editability from a verified native project with its original media.
When Storage Recovery Can Help OpenShot Files
PandaOffice Drecov may help retrieve deleted OSP projects, existing recovery candidates, backup files, original recordings, or project assets from readable storage. It cannot recreate unsaved edits that no source preserved or infer every editable effect from a final video. Prefer surviving recovery versions and verified media first, and reduce writes where deleted files may remain.
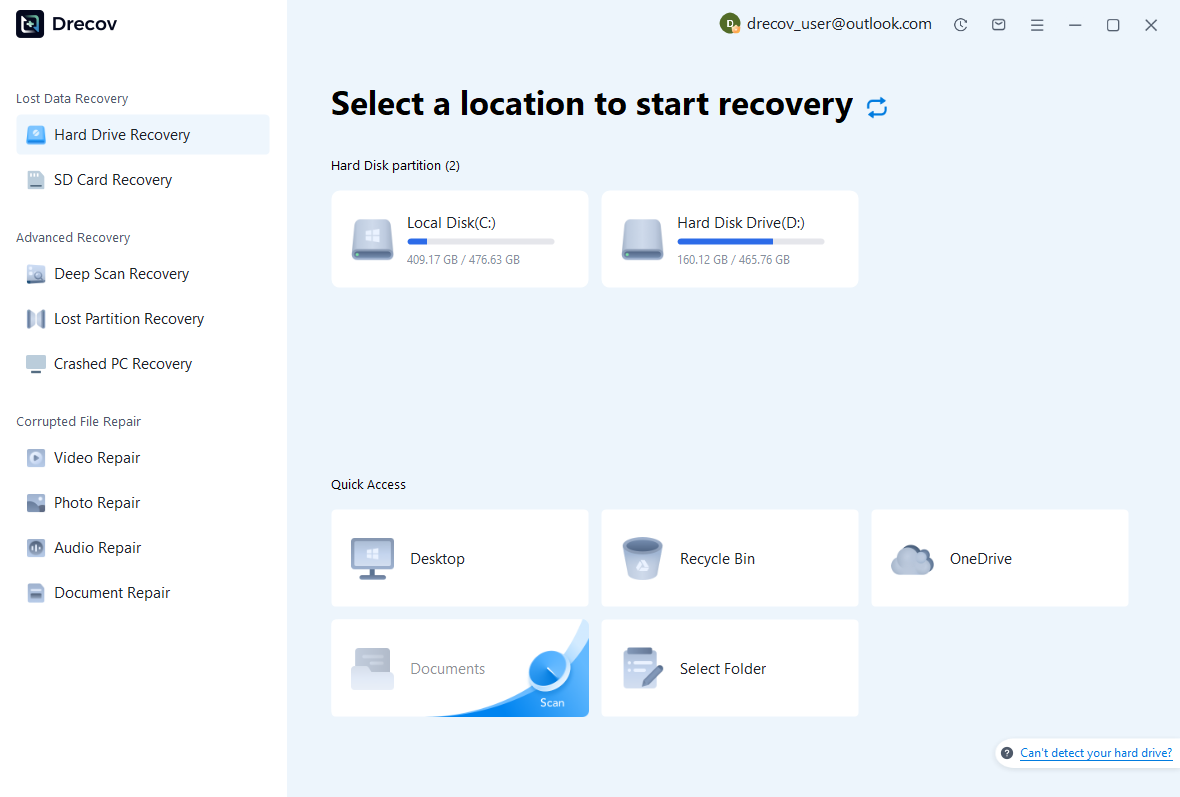
Step 1: Identify Project and Recovery Storage
Choose the drive or partition that held the OSP, original user-profile recovery data, or source media. Record which component each search targets. Keep recovered output on other healthy storage. Assess repeated disconnections or hardware read failures before proceeding with a routine software recovery scan.
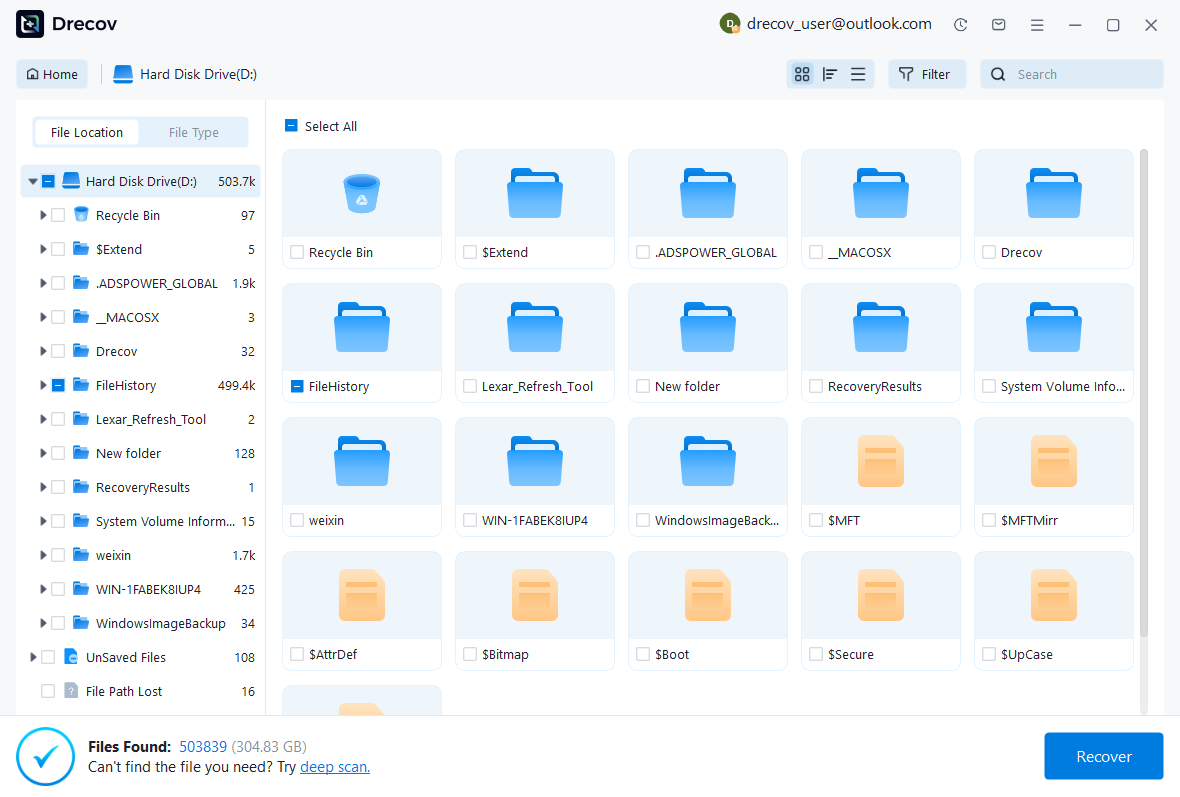
Step 2: Compare Projects and Dependency Candidates
Review available paths, names, sizes, dates, and supported previews. Preserve coherent OSP milestones and source sets without combining unrelated versions. A recognizable video clip does not establish that the edit survived. Likewise, a project file may contain useful structure while its supporting media remains unavailable.
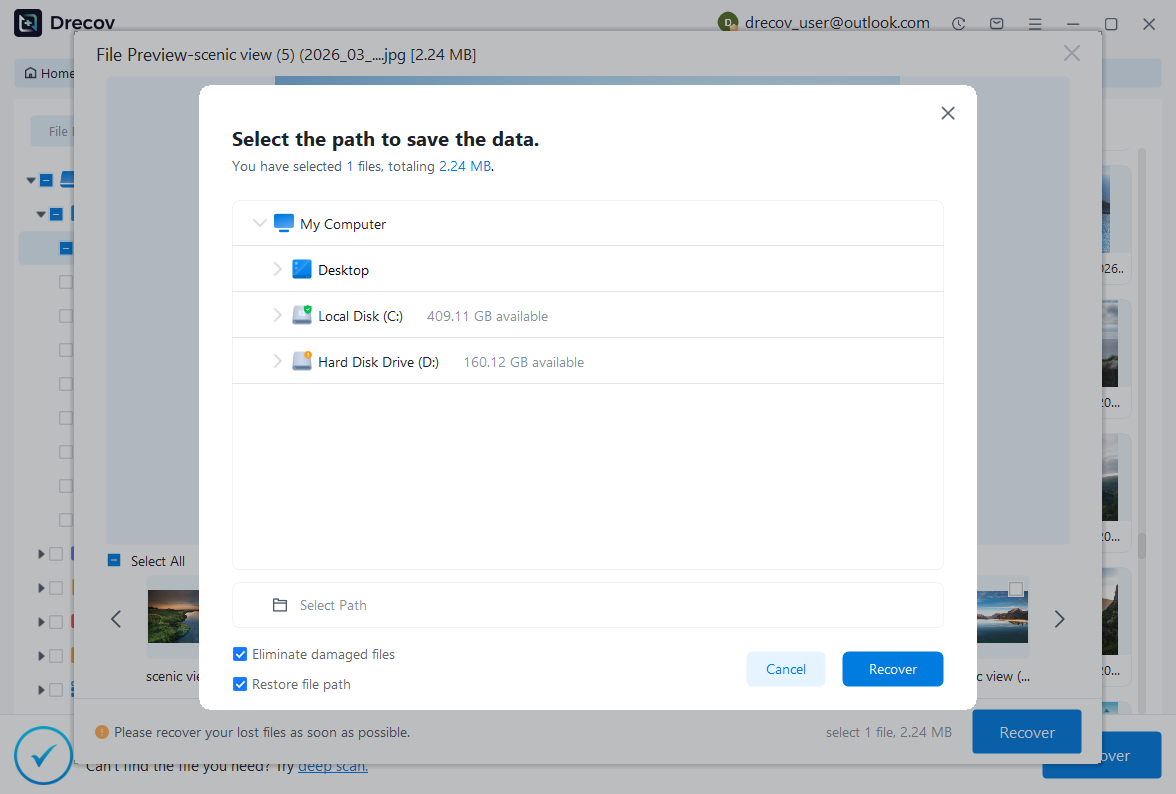
Step 3: Restore Elsewhere and Render a Sample
Recover selected files to a separate destination and retain untouched originals. Open a working OSP in an appropriate OpenShot version, reconnect verified media, and inspect timing, titles, effects, and audio. Export a representative section and review it independently. Record reconstructed elements and missing assets before accepting the project for continued editing.
Keep an Independent Editable Recovery
Preserve the accepted OSP, required source media, relevant asset directory, and a reference export with a short recovery record. Test a copied project from its planned location. This provides a practical route back to the edit instead of relying only on a rendered video that cannot restore its original timeline decisions.
Related Recovery Resources
Explore the relevant recovery options: Hard drive recovery, External hard drive recovery.
For another recovery case and its practical checks, read the related recovery guide.
Check the vendor guidance for the installed version: official recovery documentation 1, official recovery documentation 2, official recovery documentation 3, official recovery documentation 4.





